
Suositut kategoriat
Etsitkö tiettyä lankaa?


|
|||||||||||||||||||||||||
Fields of Blue |
|||||||||||||||||||||||||
 |
 |
||||||||||||||||||||||||
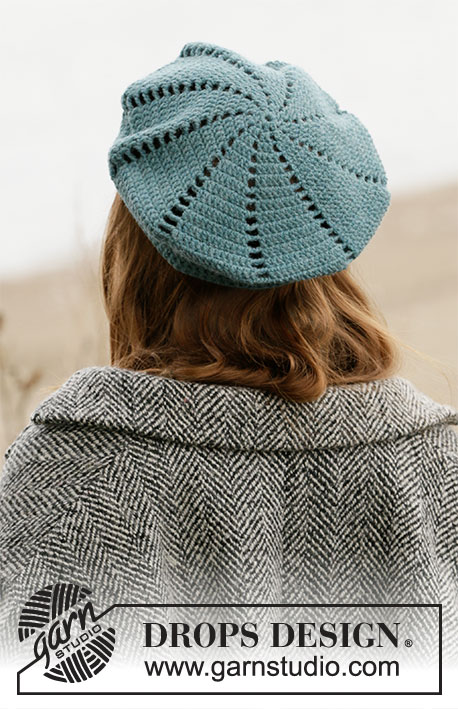
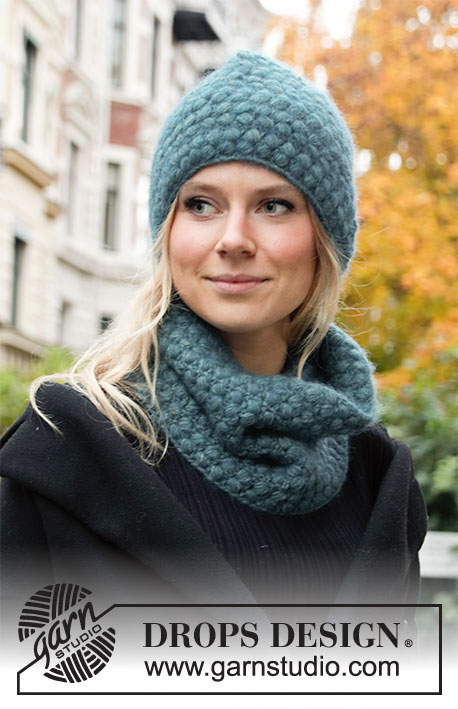
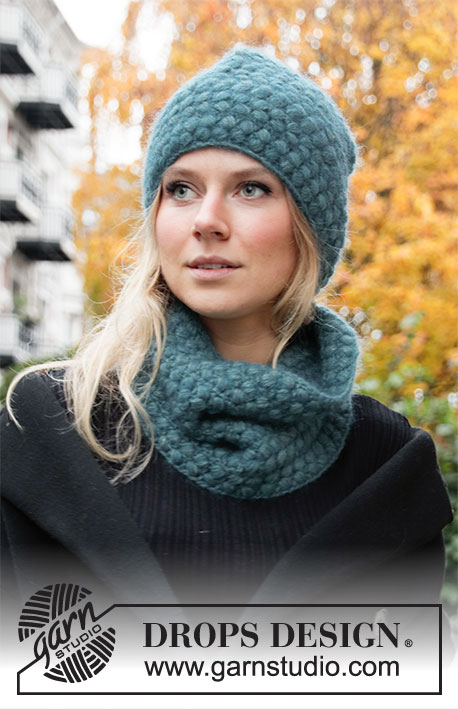
Virkatut myssy ja kauluri DROPS Sky- ja DROPS Kid-Silk -langoista. Työssä on puhvisilmukoita.
DROPS 204-16 |
|||||||||||||||||||||||||
|
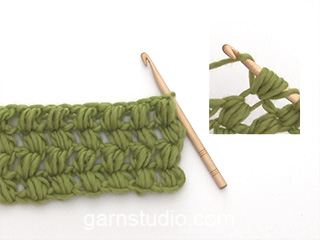
OHJE: ------------------------------------------------------- MALLIVIRKKAUS (sekä myssy että kauluri): Katso piirrokset A.1-A.4. KETJUSILMUKKA: Mikäli virkkaat virkkuukoukun kärjellä, ketjusilmukasta tulee usein liian kireä. 1 ketjusilmukan tulee olla yhtä pitkä kuin 1 kiinteä silmukka/pylväs on leveä. VIRKKAUSINFO: Kaikki kerrokset virkataan tasona ja jokainen kerros alkaa ja loppuu seuraavasti (piirrokset A.1 ja A.4): Jokaisen kiinteä silmukka -kerroksen aluksi virkataan 1 ketjusilmukka (tämä ketjusilmukka = 1 kiinteä silmukka) ja kerroksen lopuksi virkataan 1 piilosilmukka edellisen kerroksen 1.ketjusilmukkaan (mikäli edellinen kerros oli kiinteä silmukka -kerros)/1 piilosilmukka edellisen kerroksen 3.ketjusilmukkaan (mikäli edellinen kerros oli puhvisilmukkakerros), käännä työ. Jokaisen puhvisilmukkakerroksen aluksi virkataan 3 ketjusilmukkaa (nämä 3 ketjusilmukkaa = 1 pylväs) ja kerroksen lopuksi virkataan 1 piilosilmukka edellisen kerroksen 3.ketjusilmukkaan (mikäli edellinen kerros oli puhvisilmukkakerros)/1 piilosilmukka edellisen kerroksen 1.ketjusilmukkaan (mikäli edellinen kerros oli kiinteä silmukka -kerros), käännä työ. 1 PUHVISILMUKKA: Virkkaa samaan silmukkaan seuraavasti (on tärkeää, että virkataan silmukkaan, eikä silmukan ympäri): *tee 1 langankierto koukulle, vie koukku silmukkaan, tee 1 langankierto koukulle ja vedä lanka silmukan läpi, vedä molemmat langankierrot pitkiksi (on tärkeää, että vedät langankierrot niin pitkiksi kuin pystyt (n. 2 cm), koska muuten puhvisilmukasta tulee liian pieni ja tiheä)*, toista *-* yhteensä 5 kertaa, ota lanka koukulle ja vedä lanka kaikkien koukulla olevien silmukoiden läpi. KAVENNUSVINKKI (kaventaminen tasavälein): Laske kuinka usein kerroksella kavennetaan seuraavasti: Laske kerroksen silmukkaluku (esim. 63 silmukkaa) ja jaa silmukat kavennusten määrän kanssa (esim. 28) = 2,3. Tässä esimerkissä kavennetaan virkkaamalla n. joka ja joka 2.kiinteä silmukka yhteen näin: Vie koukku seuraavaan silmukkaan, tee 1 langankierto koukulle ja vedä langankierto silmukan läpi, vie koukku seuraavaan silmukkaan, tee 1 langankierto koukulle ja vedä langankierto silmukan läpi, tee vielä 1 langankierto koukulle ja vedä langankierto kaikkien koukulla olevien 3 silmukan läpi (= työstä kapeni 1 silmukka). ------------------------------------------------------- ALOITA TYÖ TÄSTÄ: ------------------------------------------------------- MYSSY: LYHYT YLEISKATSAUS TYÖSTÄ: Työ virkataan tasona keskeltä takaa alkaen, alhaalta ylös, ja ommellaan lopuksi yhteen keskeltä takaa. MYSSY: Käytä molempia lankoja yhtaikaa (= 2-kertainen lanka) ja virkkaa 75-77-82 ketjusilmukkaa koukulla nro 5,5. Ensimmäinen kerros virkataan seuraavasti: Virkkaa 1 kiinteä silmukka 3.ketjusilmukkaan koukusta laskien, virkkaa 1 kiinteä silmukka jokaiseen 0-2-1 seuraavaan ketjusilmukkaan, *jätä 1 ketjusilmukka väliin, virkkaa 1 kiinteä silmukka jokaiseen 5 seuraavaan ketjusilmukkaan*, toista *-* koko kerroksen pituudelta = 62-64-68 kiinteää silmukkaa kerroksella. Seuraava kerros virkataan näin: Virkkaa ensimmäisen silmukan kohdalla mallivirkkausta piirroksen A.1 mukaisesti, virkkaa mallivirkkausta piirroksen A.2 mukaisesti, kunnes jäljellä on 3 silmukkaa, virkkaa 2 silmukan kohdalla mallivirkkausta piirroksen A.3 mukaisesti ja virkkaa lopuksi viimeisen silmukan kohdalla mallivirkkausta piirroksen A.4 mukaisesti. Jatka tasona mallivirkkausta tähän tapaan. TARKISTA VIRKKUUTIHEYS! Kun työn korkeus on n. 20-21-22 cm, kavenna tasavälein piirroksen 3. tai 6.kerroksella (merkitty piirrokseen nuolella) 28-30-30 silmukkaa (lue KAVENNUSVINKKI) = 34-34-38 silmukkaa. Virkkaa vielä 2 puhvisilmukkakerrosta. Tee seuraavalla kerroksella (kiinteä silmukka -kerros) kavennukset virkkaamalla kaikki kiinteät silmukat pareittain yhteen = 17-17-19 kiinteää silmukkaa jäljellä. Virkkaa 2 kerrosta kiinteitä silmukoita ja virkkaa molemmilla kerroksilla kaikki kiinteät silmukat pareittain yhteen = 5 kiinteää silmukkaa jäljellä kaikissa koissa. Katkaise lanka, jätä työhön riittävän pitkä lanka sauman ompelemiseen. Harsi lanka myssyn päälaen 5 silmukan läpi, kiristä lanka ja päättele langanpäät hyvin. Myssyn korkeus päälaelta alaspäin mitattuna on n. 26-27-28 cm. VIIMEISTELY: Ompele myssy yhteen keskeltä takaa (ompele reunat vastakkain uloimmista silmukanreunoista, jottei saumasta tulisi paksu). ------------------------------------------------------- KAULURI: LYHYT YLEISKATSAUS TYÖSTÄ: Työ virkataan tasona keskeltä takaa alkaen, alhaalta ylös, ja ommellaan lopuksi yhteen keskeltä takaa. KAULURI: Käytä molempia lankoja yhtaikaa (= 2-kertainen lanka) ja virkkaa 94-101-108 ketjusilmukkaa koukulla nro 5,5. Ensimmäinen kerros virkataan seuraavasti: Virkkaa 1 kiinteä silmukka 3.ketjusilmukkaan koukusta laskien, virkkaa 1 kiinteä silmukka jokaiseen 1-2-3 seuraavaan ketjusilmukkaan, *jätä 1 ketjusilmukka väliin, virkkaa 1 kiinteä silmukka jokaiseen 5 seuraavaan ketjusilmukkaan*, toista *-* koko kerroksen pituudelta = 78-84-90 kiinteää silmukkaa kerroksella. Seuraava kerros virkataan näin: Virkkaa ensimmäisen silmukan kohdalla mallivirkkausta piirroksen A.1A mukaisesti, virkkaa mallivirkkausta piirroksen A.2 mukaisesti, kunnes jäljellä on 3 silmukkaa, virkkaa 2 silmukan kohdalla mallivirkkausta piirroksen A.3 mukaisesti ja virkkaa lopuksi viimeisen silmukan kohdalla mallivirkkausta piirroksen A.4 mukaisesti. TARKISTA VIRKKUUTIHEYS! Jatka tasona mallivirkkausta tähän tapaan, kunnes työn pituus on n. 24-27-30 cm (tai kunnes työ on halutun pituinen) ja olet viimeksi virkannut piirroksen 3. tai 6.kerroksen. Katkaise lanka, jätä työhön riittävän pitkä lanka sauman ompelemiseen. VIIMEISTELY: Ompele kauluri yhteen keskeltä takaa (ompele reunat vastakkain uloimmista silmukanreunoista, jottei saumasta tulisi paksu). |
|||||||||||||||||||||||||
Ruutupiirroksen selitykset |
|||||||||||||||||||||||||
|
|||||||||||||||||||||||||

|
|||||||||||||||||||||||||
|
Oletko tehnyt tämän mallin, tai jonkun muun malleistamme? Jaa kuvia sosiaalisissa medioissa ja merkitse ne #dropsdesign, jotta voimme nähdä ne! Tarvitsetko apua tämän ohjeen kanssa?Löydät ohjevideota, kommentteja/kysymyksiä ja muuta osoitteessa www.garnstudio.com © 1982-2024 DROPS Design A/S. Pidätämme kaikki oikeudet. Tämä tiedosto ja kaikki sen alatiedostot on suojattu tekijänoikeuslailla. Lue lisää siitä, mitä voit tehdä ohjeillamme, verkkosivujemme jokaisen ohjeen alaosasta. |
|||||||||||||||||||||||||


DROPS Design on toiminut neule- ja virkkausalalla yli 40 vuotta ja meillä on yksi kaikkein laajin valikoima ilmaisia ohjeita verkossa - käännettynä 17 kielelle. Tänään meiltä löytyy 304 lehteä ja 11422 ohjetta - joista 10675 ohjetta on käännetty suomeksi.
Työskentelemme ahkerasti, jotta voisimme antaa teille kaikkein parhaimpia neule- ja virkkausohjeita, inspiraatiota ja neuvoja sekä korkealaatuisia lankoja todella edulliseen hintaan! Haluaisitko käyttää ohjeitamme muuhun kuin henkilökohtaiseen käyttöön? Voit lukea säännöistä ohjeiden Tekijänoikeus -tekstissä, joka löytyy kaikkien ohjeidemme alapuolelta. Hauskoja hetkiä käsitöiden parissa!
Kommentit / Kysymykset (33)
Hola, he comenzado a hacer el cuello. Si lo pongo en plano sobre la mesa me queda circular, no un rectángulo, como pensaba que tendría que quedar. Pienso que pasa esto porque en la primera vuelta dice que hay que saltarse una cadena. ¿Esto es correcto? O yo no lo he entendido bien? Gracias
19.05.2021 - 15:40DROPS Design answered:
Hola Olga, la forma obtenida no es por la cadeneta saltada, sino que por la tensión del tejido. Efectivamente, se tiene que saltar una cadeneta; siempre se montan más cadenetas que las necesarias para evitar que la labor se tense.
30.05.2021 - 20:53Thanks. However the instructions for the box (□) say 'skip 1 puff-stitch + 1 chain stitch, work 1 treble crochet in the next treble crochet' - this uses 3 stitches. The instructions for the cross (X) say 'skip 1 stitch, work 1 treble crochet in next stitch' - this uses 2 stitches. It worked in the second row of the pattern fine because the box (□)was used all the way along the row (not the cross X). Please could you get someone to explain this. Thanks.
14.04.2021 - 13:10The very top row of the pattern (before the last row of double crochet) doesn't seem to work for me. I am working it right to left, A1 over 1st stitch, A2 until the last 3 stitches, A3 over last 2 stitches and A1 over last stitch. Because A2 is a cross (X) and not a box (□) (like row No 2), there ends up being more puff stitches because the chain stitch isn't being missed (there is a puff stitch being made every 2 stitches instead of 3). Should this symbol not be a box to prevent this?
13.04.2021 - 21:08DROPS Design answered:
Dear Jean, the X is worked over 2 stitches (1 treble in the 2. one, and one puff into the first one, cossing the tr), and the square is also wprked over two stitches (puff stitch into the 2. stotch, and treble into the first one) so you should not end up (both symbols have crossed stitches, only teh direction is different), so you should not end up with extra stitches. Happy Crafting!
13.04.2021 - 21:58Hej ! I flere af Drops opskrifter møder jeg 3 tal med bindestreg imellem f. eks. i Drops 204-16: "hækl 1 fastmaske i hver af de 0-2-1 næste luftmasker, . . . " Hvad betyder 0-2-1 næste luftmaske ? Eller i strikkeopskriften Drops Clementin Hat "Strik 0-1-0 maske ret, strik derefter . . ." Hvad betyder det ? Med venlig hilsen Annette
25.02.2021 - 06:50DROPS Design answered:
Hej Annette, det er tallene i de 3 forskellige størrelser. Strikker du den mindste, følger du det første tal igennem hele opskriften osv. God fornøjelse!
25.02.2021 - 14:20Efter att ha virkat de två första varven (först fastmaskor... sedan första varvet på diagrammet) står: "Fortsätt mönstret fram och tillbaka så". Hur menas? Är det det nedersta varvet som ska upprepas till 20 cm och för att sedan gå uppåt i diagrammet? Eller ska jag följa hela diagrammet uppåt direkt? Med vänlig hälsning, Annica
31.01.2021 - 20:02DROPS Design answered:
Hei Annica. Den nederst raden i diagrammet hekler du kun 1 gang, slik det står beskrevet i oppskriften. I diagramteksten med sort stjerne står det: denne raden skal ikke hekles, den er allerede heklet og viser kun hvordan neste rad skal hekles i maskene . Så du skal kun repetere de 6 radene i diagrammet (starter med 3 luftmasker) i høyden. God Fornøyelse!
08.02.2021 - 10:18Bonjour, Pour faire mon échantillon, vous dites : "13 double-brides/mailles serrées de large avec 1 fil de chaque qualité = 10 cm." Je ne comprends pas bien : je fais des double-brides ou des mailles serrées ? Et dans la hauteur, comment je peux voir ce qu'il y a dans 10 cm ? Merci de me répondre car je reste bloquée sur mon échantillon !
17.11.2020 - 11:14DROPS Design answered:
Bonjour Mme Lasalle, vos mailles doivent être toutes de la même largeur, autrement dit 13 double-brides = 13 mailles serrées = 10 cm de large. La hauteur est indiquée pour A.2 = 3 rangs de A.2 = environ 3,25 cm. Bon crochet!
17.11.2020 - 13:56Thanks so much for your patience. That explains well how the row of 78 dbl crochet stitches are worked into. However, after you have done the first row of puff stitches, and then count the stitches, there are 116 stitches. This is because each X box contains 3 stitches (a treble, a chain and a puff) and this is being worked into 2 dc stitches. So at the end of the row you have 38 extra stitches (because there are 38 puff stitches). Can you possibly work out why I am going wrong here. Thanks
30.07.2020 - 09:40DROPS Design answered:
Dear Roro, work simply following the diagram and video previously linked, making sure you have 38 puff stitches on every row - if your tension is right, you should have then the right measurements. Happy crocheting!
30.07.2020 - 12:34Thanks for your response. However, there is an increase from the row of double crochets to the 1st row of puff stitches if you follow the pattern (see question below). In the pattern it looks like each 3rd double crochet is possibly missed, which would actually even out the number of stitches if that was the case - is this where I'm possibly going wrong? Thanks for your patience.
29.07.2020 - 18:01DROPS Design answered:
Dear Roro, on neck warmer you cast on 94-101-108 sts and work first row skipping chains evenly so that there are 78-84-90 sts at the end of this first row. Then work: A.1 over 1st st, repeat A.2 until 3 sts remain = repeat A.2 a total of 37-40-43 times in width (= over the next 74-80-86 sts), and finish with A.3 (= 2 sts) and A.4 over the last stitch = 1+74-80-86+2+1=78-84-90 sts and 38-41-44 puff stitches. Hope this help. Happy crocheting!
30.07.2020 - 08:54Thanks for all your help. The fundamental reason I don't understand this pattern is this: On the 1st row (after dbl crochet row ) the puff stitches which produce 3 stitches (1 treble + 1 chain + 1 puff) are worked into 2 dbl crochet stitches (1 missed - into which a puff stitch goes after the treble + 1 for the treble). This results in an increase of stitches. That would maybe make sense in the 1st row of the item, but not further up. Should the 'X' box say 'miss 2 stitches' instead? Thanks
29.07.2020 - 16:02DROPS Design answered:
Dear Roro, there shouldn't be any increase, you should work "straight", each treble will be worked in the treble from the previous row so that the number of sts will remain constant. This video shows how to crochet these 2 rows with same symbols. Happy crocheting!
29.07.2020 - 17:11Sorry there are so many questions. I'm kind of struggling a bit with this pattern. The 'CROCHET INFORMATION' section states that each row will finish with a slip stitch. Does this mean that the last stitch in the row in the diagram is not actually the last stitch because a slip stitch comes after it. So in effect there is 2 stitches worked in A4 (Right side) or A1 (Wrong side). For example the 1st row ends in A4 with '1 treble crochet in stitch' - is there a slip stitch after this? Thanks.
18.07.2020 - 00:59DROPS Design answered:
Dear Roro, you can follow diagram, ie work back and forth as explained under each piece, without joining at the end of every row, then sew the seam on mid back (hat and neck warmer). The first stitch of each row is drawn in the chart, ie at the beg of puff sts start with 3 chains and end with 1 treble and at the beg of dc row, start with 1 chain and end with 1 dc in 3rd ch from previous row. (A.1 might have to be edited, but our design team is now on summer vacation - thanks in advance for your patience and comprehension). Happy crocheting!
20.07.2020 - 09:11