DROPS Sky
DROPS Sky
74% Alpaca, 18% Polyamide, 8% Wool
from 10.00 CAD /50g
Get the yarn to make this pattern from 70.00CAD.

The yarn cost is calculated from the pattern’s smallest size and the yarn’s cheapest product type. Looking for an even better price? You might find it on the DROPS Deals!

DROPS SS24

Lagoon

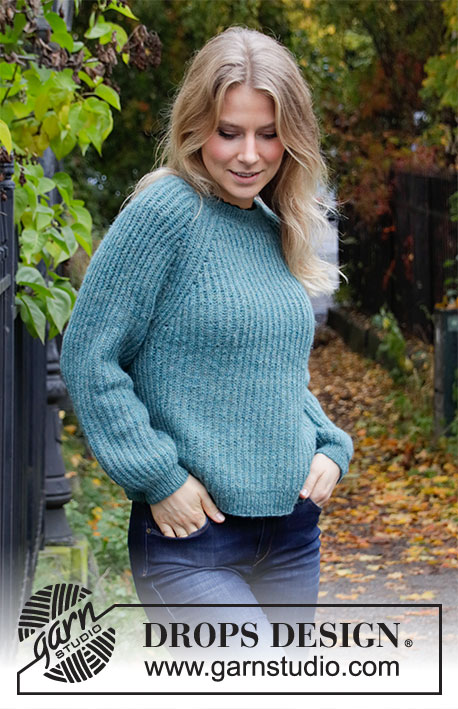
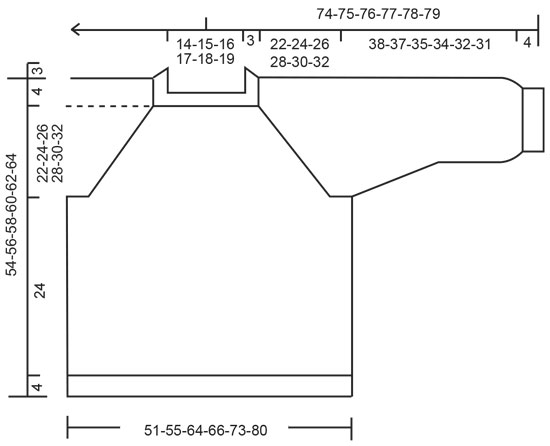
Knitted sweater with raglan in DROPS Sky. Piece is knitted top down with English rib. Size: S - XXXL

DROPS 207-40
DROPS design: Pattern sk-044
Yarn group B
----------------------------------------------------------

SIZE:
S - M - L - XL - XXL – XXXL

Finished measurements:
Chest measurements: 102-110-128-132-148-160 cm = 40"-43⅜"-50⅜"-52"-58⅜"-62"
Full length: 54-56-58-60-62-64 cm = 21¼"-22"-22¾"-23⅝"-24⅜"-25¼"

All measurements in chart are in cm.

MATERIALS:
DROPS SKY from Garnstudio (belongs to yarn group B)
350-350-400-450-450-500 g color 06, sea green

KNITTING GAUGE:
16 stitches in width and 40 rows vertically with English rib = 10 x 10 cm = 4" x 4".

NEEDLES:
DROPS DOUBLE POINTED NEEDLES SIZE 4.5 mm = US 7
DROPS CIRCULAR NEEDLE SIZE 4.5 mm = US 7: Length 40 and 80 cm = 16" and 32".
DROPS DOUBLE POINTED NEEDLES SIZE 3 mm = US 2,5
DROPS CIRCULAR NEEDLE SIZE 3 mm = US 2,5: Length 40 cm = 16" and 80 cm = 32" for rib.
Needle size is only a suggestion! If you have too many stitches on 10 cm = 4" switch to larger needles. If you have too few stitches on 10 cm = 4" switch to smaller needles.

-------------------------------------------------------

Alternative Yarn – See how to change yarns here
Yarn Groups A to F – Use the same pattern and change the yarn here
Yarn usage using an alternative yarn – Use our yarn converter here

-------------------------------------------------------

DROPS Sky
DROPS Sky
74% Alpaca, 18% Polyamide, 8% Wool
from 10.00 CAD /50g
Get the yarn to make this pattern from 70.00CAD.

The yarn cost is calculated from the pattern’s smallest size and the yarn’s cheapest product type. Looking for an even better price? You might find it on the DROPS Deals!

Pattern instructions

NOTE: This pattern is written in American English. All measurements in charts are in cm. For conversion from inches to cm - click here. There are different terms for crocheting in American and British English. If this pattern includes crochet, click for "crochet terms" here. For this pattern in British English, please click here.
----------------------------------------------------------

EXPLANATION FOR THE PATTERN:

----------------------------------------------------------

ENGLISH RIB:
ROUND 1: * Knit 1, 1 yarn over, slip 1 stitch as if to purl *, work from *-*.
ROUND 2: * 1 yarn over, slip 1 stitch purlwise, purl together yarn over and slipped stitch *, work from *-*.
ROUND 3: * Knit together yarn over and slipped stitch, 1 yarn over, slip 1 stitch as if to purl *, repeat from *-*.
Repeat rounds 2 to 3.

ENGLISH RIB STITCH:
When counting the stitches, the yarn overs are not counted as stitches.

RAGLAN:
All increases are done on 2 round in English rib pattern!
NOTE! If the knitting gauge is not correct vertically the raglan increase will be too short/long vertically. Raglan increase is written in both number of round and cm/inches. If the knitting gauge is incorrect vertically, work raglan increase in cm/inches.
Increase as follows:
Work until 4 stitches remain before stitch with marker. Increase 2 stitches in next stitch (one purl stitch + yarn over) as follows: Knit yarn over and stitch together but wait to slip stitch and yarn over off the needle, make 1 yarn over on right needle, knit stitch and yarn over together 1 more time = 3 stitches (= 2 stitches increased). Work the next 7 stitches in English rib as before. Increase 2 stitches in next stitch (one purl stitch + yarn over) as follows: Knit yarn over and stitch together but wait to slip stitch and yarn over off the needle, make 1 yarn over on right needle, knit stitch and yarn over together 1 more time = 3 stitches (= 2 stitches increased). Repeat at each of the remaining markers (= 16 stitches increased in total on round).
On next round work the increased stitches in English rib pattern - there are no English rib yarn overs in increase, so on next round in English rib pattern work stitch to be worked together yarn over, without yarn over.

DECREASE TIP-1 (evenly):
To calculate how to decrease evenly, use the total number of stitches on row (e.g. 96 stitches) and divide stitches by number of decreases to be done (e.g. 16) = 6.
In this example decrease by knitting every 5th and 6th stitch together.

DECREASE TIP-2 (applies to sleeves):
All decreases are done on 2 round in English rib pattern.
Decrease as follows: Work like this until 2 stitches remain before stitch with marker, slip the next 3 stitches (+ yarn overs that belongs to stitches) loosely over on to right needle as if to knit together, knit the next 2 stitches (+ yarn over that belongs to stitch) together, pass the 3 slipped stitches over stitches knitted together (= 4 stitches decreased). NOTE! On next round do not work any English rib stitch together with middle stitch under sleeve, then on next round in English rib pattern, work stitch together with yarn over, without yarn over.

INCREASE TIP (evenly):
To calculate how to increase evenly, use the total number of stitches on row (e.g. 164 stitches) and divide stitches by number of increases to be done (e.g. 70) = 2.3.
In this example increase by making 1 yarn over after approx. every other stitch. On next round work yarn overs twisted to avoid holes.

----------------------------------------------------------

START THE PIECE HERE:

----------------------------------------------------------

SWEATER - SHORT OVERVIEW OF THE PIECE:
Worked in the round on circular needle, top down. Work sleeves in the round on a short circular needle/double pointed needles.

NECK EDGE:
Cast on 96-102-106-110-114-118 stitches on a short circular needle size 3 mm = US 2,5 with Sky. Knit 1 round, then work rib = knit 1/purl 1 for 3 cm = 1⅛". Knit 1 round while decreasing 16-18-18-22-22-26 stitches evenly - read DECREASE TIP-1 (evenly) = 80-84-88-88-92-92 stitches. Purl 1 round. Insert a marker here (= beginning of round approx. mid back). NOW MEASURE PIECE FROM HERE!

YOKE:
Switch to circular needle size 4.5 mm = US 7. Then work ENGLISH RIB - read explanation above. When 1 round has been worked with English rib, insert 4 markers in piece without working (insert all markers in a purl stitch) - read ENGLISH RIB STITCH: Skip the first 13-13-15-15-15-15 stitches, insert a marker in next stitch (= in transition between half back piece and right sleeve), skip the next 13 stitches, insert a marker in next stitch (= in transition between right sleeve and front piece), skip the next 25-27-29-29-31-31 stitches, insert a marker in next stitch (= in transition between front piece and left sleeve), skip the next 13 stitches, insert a marker in next stitch (= in transition between left sleeve and half back piece), there are now 12-14-14-14-16-16 stitches between last marker and beginning of round. REMEMBER THE KNITTING GAUGE! There is now a marker in every transition between body and sleeves. Move the markers upwards when working. Continue in the round with English rib, AT THE SAME TIME on next round (= 2nd round in English rib) begin increase for RAGLAN - read explanation above. Increase like this every 6th round (approx. every 1½ cm = ½"), 1-2-4-5-6-8 times in total and every 8th round (approx. every 2 cm = ¾") 10 times in all sizes = 256-276-312-328-348-380 stitches.
When all increases are done, continue with English rib until piece measures 22-24-26-28-30-32 cm = 8¾"-9½"-10¼"-11"-11¾"-12½" from marker, finish after 2nd round in English rib. Work next round as follows: Work the first 37-39-47-49-53-59 stitches (= approx. half back piece), slip the next 55-59-63-67-67-71 stitches on a stitch holder for sleeve and cast on 9 new stitches on needle (= in the side under sleeve), work the next 73-79-93-97-107-119 stitches (= front piece), insert the next 55-59-63-67-67-71 stitches on a stitch holder for sleeve and cast on 9 new stitches on needle (= in the side under sleeve), work the last 36-40-46-48-54-60 stitches on round (= approx. half back piece). Finish body and sleeves separately. NOW MEASURE PIECE FROM HERE!

BODY:
There are now 164-176-204-212-232-256 stitches on round. Continue in the round with English rib until piece measures 24 cm = 9½" - adjust to finish after 2nd round in English rib. Switch to circular needle size 3 mm = US 2,5. Work next round as follows: * Knit yarn over and slipped stitch together, purl 1 *, work from *-* the entire round, AT THE SAME TIME increase 70-76-90-92-104-112 stitches - read INCREASE TIP = 234-252-294-304-336-368 stitches. Work rib (knit 1/purl 1) in the round for 4 cm = 1½". Bind off stitches with knit over knit and purl over purl. Sweater measures approx. 54-56-58-60-62-64 cm = 21¼"-22"-22¾"-23⅝"-24⅜"-25¼" from shoulder and down.

SLEEVE:
Slip the 55-59-63-67-67-71 stitches from stitch holder in one side of piece back on a short circular needle/double pointed needles size 4.5 mm = US 7 and pick in addition up 1 stitch in each of the 9 new stitches cast on in the side under sleeve = 64-68-72-76-76-80 stitches. Continue in the round with English rib. When sleeve measures 4 cm = 1½" – adjust so that next round is 2nd round in English rib, insert a marker in the middle stitch under sleeve (= one knit stitch). On next round, decrease 4 stitches under sleeve - read DECREASE TIP-2. Decrease like this every 8-8-5-4-4-3 cm = 3⅛"-3⅛"-2"-1½"-1½"-1⅛" 4-4-5-6-6-6 times in total = 48-52-52-52-52-56 stitches. When sleeve measures 38-37-35-34-32-31 cm = 15"-14½"-13¾"-12½"-12¼" – adjust so that next round is 3rd round in English rib pattern, switch to double pointed needles size 3 mm = US 2,5. Work next round as follows: * Knit yarn over and slipped stitch together, purl 1 *, work from *-* the entire round = 48-52-52-52-52-56 stitches. Now work rib (= knit 1/purl 1) for 4 cm = 1½". Bind off stitches with knit over knit and purl over purl. Sleeve measures 42-41-39-38-36-35 cm = 16½"-16⅛"-15¼"-15"-14¼"-13¾" from division. Work the other sleeve the same way.

Diagram

diagram measurements
Do you have a question? See a list of frequently asked questions (FAQ)

Knitting tension is what determines the final measurements of your work, and is usually measured per 10 x 10 cm. It is provided like so: number of stitches in width x number of rows in height - eg: 19 stitches x 26 rows = 10 x 10 cm.

The knitting tension is very individual; some people knit/crochet loosely while others work tightly. You adjust the knitting tension with the needle size, which is why the suggested needle size only serve as a guide! You need to adjust this (up or down) to ensure that YOUR knitting tension matches the knitting tension provided in the pattern. If you work with a different knitting tension than provided you will have a different yarn consumption, and your work will have different measurements than what the pattern suggests.

The knitting tension also determines which yarns can replace each other. As long as you achieve the same knitting tension you can replace one yarn with another.

See DROPS lesson: How to measure your tension/gauge

See DROPS video: How to make a gauge tension swatch

The required amount of yarn is provided in grams, eg: 450 g. To calculate how many balls you’ll need you first need to know how many grams are in 1 ball (25g, 50g or 100g). This information is available if you click on the individual yarn quality on our pages. Divide the amount required with the amount of each ball. For example, if each ball is 50g (the most common amount), the calculation will be as follows: 450 / 50 = 9 balls.

The important thing when changing from one yarn to another is that the knitting/crochet tension remains the same. This is so that the measurements of the finished piece will be the same as on the sketch provided. It is easier to achieve the same knitting tension using yarns from the same yarn group. It is also possible to work with multiple strands of a thinner yarn to achieve the knitting tension of a thicker one. Please try our yarn converter. We recommend you to always work a test swatch.

Please NOTE: when changing yarn the garment might have a different look and feel to the garment in the photo, due to individual properties and qualities of each yarn.

See DROPS lesson: Can I use a different yarn than the one mentioned in the pattern?

All our yarns are categorised into yarn groups (from A to F) according to thickness and knitting tension – group A contains the thinnest yarns and group F the thickest. This makes it easier for you to find alternative yarns to our patterns, should you wish to switch yarn. All yarns within the same group have a similar knitting tension and can easily replace each other. However, different yarn qualities have different structures and properties which will give the finished work a unique look and feel.

Click here for an overview of the yarns in each yarn group

At the top of all our patterns you’ll find a link to our yarn converter, which is a helpful tool should you wish to use a different yarn than suggested. By filling in the yarn quality you wish to replace, the amount (in your size) and number of strands, the converter will present good alternative yarns with the same knitting tension. Additionally it will tell you how much you’ll require in the new qualities and whether you’ll need to work with multiple strands. Most skeins are 50g (some are 25g or 100g).

If the pattern is worked with multiple colours, every colour will have to be converted separately. Similarly, if the pattern is worked with several strands of different yarns (for example 1 strand Alpaca and 1 strand Kid-Silk) you will have to find alternatives for each, individually.

Click here to see our yarn converter

Since different yarns have different qualities and textures we have chosen to keep the original yarn in our patterns. However, you can easily find options among our available qualities by using our yarn converter, or simply pick a yarn from the same yarn group.

It is possible that some retailers still have discontinued yarns in stock, or that someone has a few skeins at home that they would like to find patterns for.

The yarn converter will provide both alternative yarn as well as required amount in the new quality.

If you think it's hard to decide what size to make, it can be a good idea to measure a garment you own already and like the size of. Then you can pick the size by comparing those measures with the ones available in the pattern's size chart.

You'll find the size chart at the bottom of the pattern.

See DROPS lesson: How to read size chart

The needle size provided in the pattern serves only as a guide, the important thing is to follow the knitting tension. And since knitting tension is very individual, you will have to adjust the needle size to ensure that YOUR tension is the same as in the pattern – maybe you’ll have to adjust 1, or even 2 needle sizes, up or down to achieve the correct tension. For this, we recommend that you work test swatches.

Should you work with a different knitting tension than the one provided, the measurements of the finished garment might deviate from the measurement sketch.

See DROPS lesson: How to measure your tension/gauge

See DROPS video: How to make a gauge tension swatch

Working a garment top-down provides more flexibility and room for personal adjustment. For example it is easier to try the garment on while working, as well as making adjustments to length of yoke and shoulder caps.

The instructions are carefully explaining every step, in the correct order. Diagrams are adjusted to the knitting direction and are worked as usual.

The diagram depicts all rows/rounds, and every stitch seen from the right side. It is read from bottom to top, from right to left. 1 square = 1 stitch.

When working back and forth, every other row is worked from the right side and every other row is worked from the wrong side. When working from the wrong side, the diagram will have to be worked reversed: from left to right, knit stitches are purled, purl stitches are knit etc.

When working in the round every round is worked from the right side and the diagram are worked from right to left on all rounds.

See DROPS lesson: How to read knitting diagrams

The diagram depicts all rows/rounds, and every stitch seen from the right side. It is worked from bottom to top, from right to left.

When working back and forth every other row is worked from the right side: from right to left and every other row is worked from the wrong side: from left to right.

When working in the round, every row in the diagram are worked from the right side, from right to left.

When working a circular diagram you start in the middle and work your way outwards, counter clockwise, row by row.

The rows usually start with a given number of chain stitches (equivalent to the height of the following stitch), this will either be depicted in the diagram or explained in the pattern.

See DROPS lesson: How to read crochet diagrams

Instructions for working several diagrams after each other on the same row/round, will often be written like so: “work A.1, A.2, A.3 a total of 0-0-2-3-4 times". This means you work A.1 once, then A.2 is worked once, and A.3 is repeated (in width) the number of times provided for your size – in this case like so: S = 0 times, M = 0 times, L=2 times, XL= 3 times and XXL = 4 times.

The diagrams are worked as usual: begin with the first row in A.1, then work the first row in A.2 etc.

See DROPS lesson: How to read knitting diagrams

See DROPS lesson: How to read crochet diagrams

The total width of the garment (from wrist-to-wrist) will be larger in the larger sizes, despite the actual sleeves being shorter. The larger sizes have longer sleeve caps and wider shoulders, so there will be a good fit in all sizes.

The measurement sketch/schematic drawing provides information regarding the full length of the garment. If it’s a jumper or a jacket the length is measured from the highest point on the shoulder (usually closest to the neckline), and straight down to the bottom of the garment. It is NOT measured from the tip of shoulder. Similarly, the length of yoke is measured from the highest point on the shoulder and down to where yoke is split into body and sleeves.

See DROPS lesson: How to read a schematic drawing

Diagrams are often repeated on the round or in height. 1 repeat is the diagram the way it appears in the pattern. If it says to work 5 repeats of A.1 in the round, then you work A.1 a total of 5 times after/next to each other in the round. If it says to work 2 repeats of A.1 vertically/in height you work the entire diagram once, then begin again at the start and work the entire diagram one more time.

Chain stitches are slightly narrower than other stitches and to avoid working the cast-on edge too tight, we simply chain more stitches to begin with. The stitch count will be adjusted on the following row to fit the pattern and measurement sketch.

The rib edge is more elastic and will contract slightly compared to, for example, stocking stitch. By increasing before the rib edge, you avoid a visible difference in width between the rib edge and the rest of the body.

It’s very easy to cast off too tightly, and by making yarn overs while casting off (and simultaneously casting these off) you avoid a too tight cast off edge.

See DROPS video: How to bind off with yarn overs (yo)

To achieve an even increase (or decrease) you can increase on, for example: every 3rd and 4th row alternately, like so: work 2 rows and increase on the 3rd row, work 3 rows and increase on the 4th. Repeat this until the increase is complete.

See DROPS lesson: Increase or decrease 1 st on every 3rd and 4th row alternately

Should you prefer to work in the round instead of back and forth, you may of course adjust the pattern. You’ll need to add steeks mid-front (usually 5 stitches), and follow the instructions. When you would normally turn and work from the wrong side, simply work across the steek and continue in the round. At the end you’ll cut the piece open, pick up stitches to work bands, and cover the cut edges.

See DROPS video: How to knit steeks and cut open

Should you prefer to work back and forth instead of in the round, you may of course adjust the pattern so you work the pieces separately and then assemble them at the end. Divide the stitches for the body in 2, add 1 edge stitch in each side (for sewing) and work the front and back pieces separately.

See DROPS lesson: Can I adapt a pattern for circular needles into straight needles?

Pattern repeats can vary slightly in the different sizes, in order to get the correct proportions. If you’re not working the exact same size as the garment in the photo, yours might deviate slightly. This has been carefully developed and adjusted so that the complete impression of the garment is the same in all sizes.

Make sure to follow instructions and diagrams for your size!

If you have found a pattern you like which is available in women’s size it’s not very difficult to convert it to men’s size. The biggest difference will be the length of sleeves and body. Start working on the women size that you think would fit across the chest. The additional length will be worked right before you cast off for the armhole/sleeve cap. If the pattern is worked top-down you can add the length right after the armhole or before the first decrease on sleeve.

Regarding additional yarn amount, this will depend on how much length you add, but it is better with a skein too many than too few.

All yarns will have excess fibres (from production) that might come off as lint or shedding. Brushed yarns (ie hairier yarns) have more of these loose, excess fibres, causing more shedding.

Shedding also depends on what is worn under or over the garment, and whether this pulls at the yarn fibres. It’s therefore not possible to guarantee that there will be no shedding

Below are some tips on how to get the best result when working with hairier yarns:

1. When the garment is finished (before you wash it) shake it vigorously so the looser hairs come off. NOTE: do NOT use a lint roller, brush or any method that pulls at the yarn.

2. Place the garment in a plastic bag and put it in your freezer - the temperature will cause the fibres to become less attached to each other, and excess fibres will come off easier.

3. Leave in the freezer for a few hours before taking it out and shaking it again.

4. Wash the garment according to the instructions on the yarn label.

Pilling is a natural process that happens to even the most exclusive of fibers. It's a natural sign of wear and tear that is hard to avoid, and that is most visible in high friction areas of your garment like a sweater's arms and cuffs.

You can make your garment look as new by removing the pilling, using a fabric comb or a pill/lint remover.

Still can't find the answer you need? Then scroll down and leave your question so one of our experts can try to help you. This will be done normally within 5 to 10 working days.
In the meantime, you can read the questions and answers that others have left to this pattern or join the DROPS Workshop on Facebook to get help from fellow knitters/crocheters!

You might also like...

Post a comment to pattern DROPS 207-40

We would love to hear what you have to say about this pattern!

If you want to leave a question, please make sure you select the correct category in the form below, to speed up the answering process. Required fields are marked *.

Comments / Questions (32)

country flag Bärbel Nagel wrote:

Die Anleitung ist nicht zu verstehen . Nach der Halsblende habe ich 92 Maschen und nicht 88.\\r\\nDie Makierer sind völlig falsch gesetzt. ergibt keinen Sinn. Ich habe mich im Handarbeitsladen beraten lassen . Die Damen konnten mir auch nicht helfen , denn sie fanden die Anleitung auch völlig missverständlich. Vielleicht können Sie ja eine verständliche Anleitung mit den richtigen Zahlen in Deutsch veröffentlichen.

10.03.2023 - 12:57

DROPS Design answered:

Liebe Frau Nagel, in 3. + 4. Grösse haben Sie 106-110 Maschen , man nimt 18-22 Maschen ab = es sind nur noch 88 M in beiden Grössen, dann wird die Arbeit so geteilt: 15 M (1/2 Rückenteil), 1 M mit Markierer, 13 M (Ärmel), 1 M mit Markierer, 29 M (Vorderteil), 1 M mit Markierer, 13 M (Ärmel), 1 M mit Markierer, 14 M (1/2 Rückenteil) = 15+1+13+1+29+1+13+1+14= 88 Maschen. Viel Spaß beim stricken!

10.03.2023 - 13:48

country flag Esther wrote:

Mij is het stuk tekst bij RAGLAN niet duidelijk als het gaat over het meerderen. 4 steken voor de markeerdraad en 7 steken breien lijkt mij niet overeenkomend met het filmpje wat erbij staat qua uitleg? Ik kom er niet uit hoe dit bedoeld wordt. Graag wacht ik jullie antwoord af om verder te kunnen!

17.12.2022 - 21:42

DROPS Design answered:

Dag Esther,

Je begint 4 steken voor de steek met de markeerdraad. Wanneer je meerdert in die steek heb je daarna nog 3 steken voor de steek met de markeerdraad, dan de markeerdraadsteek zelf en 3 steken na de markeerdraadsteek. Dit zijn in totaal 7 steken.

18.12.2022 - 15:07

country flag Pharahilde wrote:

Ik gebruik dit patroon in twee kleuren (brioche). Perfect te doen, en tot nu toe, prachtig resultaat. Ok, al een paar foutjes moeten herstellen, (links waar rechts moet en vv) maar met een haaknaald erbij, toch eenvoudig. Meestal valt het pas op na ca. 4 toeren, dus lekker laten vallen die steek, herstellen en weer ophalen. Hopelijk lukt het om jullie een foto van het eindresultaat te sturen.

23.09.2022 - 20:11

country flag Raffaella wrote:

Grazie per la vostra premura ma il problema non è ogni quanti ferri fare gli aumenti ma come procedere per gli aumenti lungo il ferro. I primi aumenti riesco a collocarli poi lavoro 5 ferri al 6 ferro che prevede i nuovi aumenti faccio confusione. Potreste aiutarmi ?? Vi ringrazio sempre tanto per la cortesia e gentilezza che mettete nel vs lavoro.

14.02.2022 - 21:15

DROPS Design answered:

Buonasera Raffaella, per lavorare gli aumenti deve seguire sempre le indicazioni riportate nel paragrafo raglan all'inizio delle spiegazioni. Buon lavoro!

16.02.2022 - 23:28

country flag Raffaella wrote:

Dopo il primo giro di aumenti non mi è chiaro come procedere per i successivi. Sul punto costa inglese procedo senza difficoltà. Grazie per la disponibilità e buon lavoro

12.02.2022 - 22:04

DROPS Design answered:

Buonasera Raffaella, se sta facendo riferimento agli aumenti per il raglan deve aumentare prima ogni 6 giri per le volte indicate per le diverse taglie e poi ogni 8 giri per le volte indicate. Buon lavoro!

14.02.2022 - 19:37

country flag Raffaella wrote:

Non mi è chiaro il procedimento per gli aumenti della manica raglan a coste inglesi ho provato diverse volte ma senza successo. Potete aiutarmi per favore vi sarei molto grata

03.02.2022 - 22:09

DROPS Design answered:

Buonasera Raffaella, quale passaggio non le è chiaro? Buon lavoro!

05.02.2022 - 20:53

country flag Confused wrote:

Hi. I too have a Q on the raglan increase (size M). Once I increase 16 sts on round 2 of English rib pattern, would I increase again on round 8, 14, 22, 30, etc?? begin with 84 sts RND 1 - work the pattern RND 2 - INC 16 sts RND 3 to 7 - work the pattern RND 8 - INC 16 sts RND 14 to 21 - work the pattern RND 22 - INC 16 sts RND 23 to 29 - work the pattern RND 30 - INC 16 sts . . . RND 94 - INC 16 sts (last increase) Thanks in advance.

17.01.2021 - 10:15

DROPS Design answered:

Hi, sorry, this confuse me, you should increase like this: 1st round with increase as explained, then work 5 rounds without increase and increase on next round (= round 2 English rib). Now work *7 rounds, increase on next round*, repeat from *-* a total of 10 times. Hope this will help. Happy knitting!

18.01.2021 - 09:43

country flag Ditte wrote:

Hej. Jeg har strikket halskanten på Drops Lagoon. Jeg forstår ikke helt hvordan udtagningerne på bærestykket skal laves? Der står, at de skal laves på 2. omgang..... -men kan det passe, når der på 2. omgang er vrangmasker

20.12.2020 - 20:14

DROPS Design answered:

Hej Ditte, du skal tage ud på den pind hvor masken skal strikkes vrang sammen med omslaget. Se stykket om "tag ud således". God fornøjelse!

21.12.2020 - 15:39

country flag Maria Virginia wrote:

È possibile realizzare questo modello non con i ferri circolari? Grazie

25.11.2020 - 09:14

DROPS Design answered:

Buongiorno Maria Virginia, questo modello è stato progettato per essere lavorato in tondo: se desidera lavorarlo in piano deve prestare attenzione alla lavorazione delle coste inglesi. Buon lavoro!

25.11.2020 - 09:49

country flag Carla M Zamperetti wrote:

Dopo la spiegazione della costa inglese , nella versione italiana si dice di contate i gettati come m , mentre nella versione in inglese dice di NON considerare i gettati come maglie

23.11.2020 - 17:27

DROPS Design answered:

Buonasera Carla, grazie per la segnalazione: abbiamo corretto la versione italiana. Buon lavoro!

28.11.2020 - 21:32