
Popular categories
Looking for a yarn?


|
|||||||||||||||||||||||||||||||
River Rock |
|||||||||||||||||||||||||||||||
|
|
|||||||||||||||||||||||||||||||
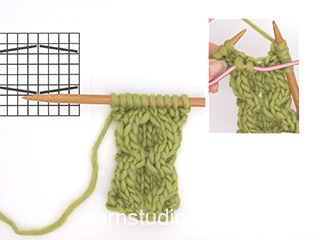
Knitted sweater with cables in DROPS Nepal. Size: S - XXXL
DROPS 205-17 |
|||||||||||||||||||||||||||||||
|
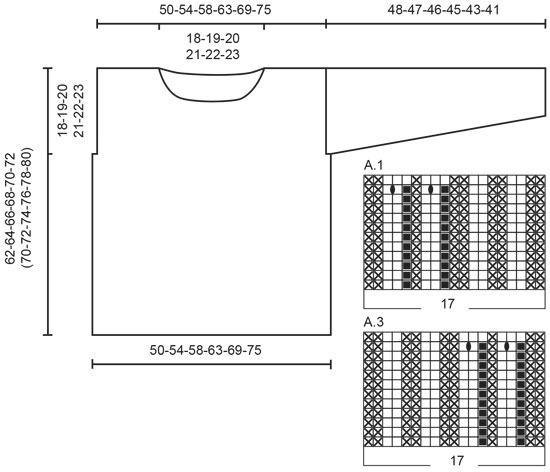
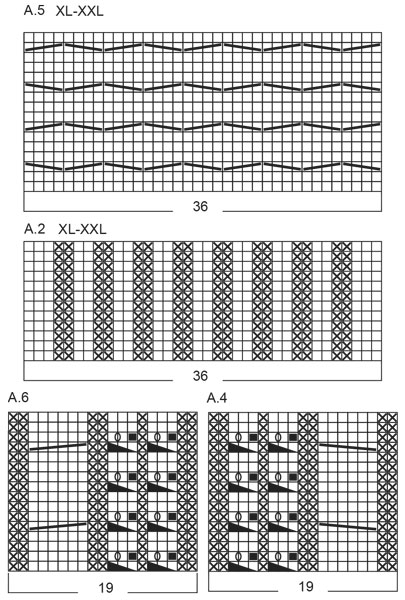
---------------------------------------------------------- EXPLANATION FOR THE PATTERN: ---------------------------------------------------------- GARTER STITCH (back and forth): Knit all rows. 1 ridge vertically = knit 2 rows. INCREASE/DECREASE TIP (evenly): To calculate how to increase/decrease evenly, use the total number of stitches on row (e.g. 50 stitches) and divide stitches by number of increases/decreases to be done (e.g. 6) = 8.3. In this example increase by making 1 yarn over after approx. every 8th stitch. On next round work yarn over twisted to avoid hole. To decrease in this example knit approx. every 7th and 8th stitch together. PATTERN: See diagrams A.1 to A.8. See diagram for your size in A.2 and A.5. INCREASE TIP (applies to sleeves): Work until 1 stitch remains before marker thread, 1 yarn over, knit 2 (marker thread is in the middle of these stitches), 1 yarn over. On next round knit yarn overs twisted to avoid holes. ---------------------------------------------------------- START THE PIECE HERE: ---------------------------------------------------------- SWEATER - SHORT OVERVIEW OF THE PIECE: Front piece and back piece are worked back and forth on circular needle, bottom-up. Work back piece 8 cm = 3 1/8” longer than front piece, and there is a vent in the side at the bottom. Work sleeves in the round on double pointed needles/a short circular needle. BACK PIECE: Cast on 104-112-120-128-144-152 stitches on circular needle size 4.5 mm = US 7 with Nepal. Purl 1 row from wrong side, then work as follows from right side: Work 3 stitches in GARTER STITCH - see explanation above, * knit 2, purl 2 *, repeat from *-* over the next 20-24-24-28-32-36 stitches, knit 2, A.1 (= 17 stitches), A.2 (see diagram for your size = 20-20-28-28-36-36 stitches), A.3 (= 17 stitches), * knit 2, purl 2 *, repeat from *-* over the next 20-24-24-28-32-36 stitches, knit 2, 3 stitches in garter stitch. Continue this pattern until A.1, A.2 and A.3 have been worked (= 108-116-124-132-148-156 stitches). Switch to circular needle size 5.5 mm = US 9. REMEMBER THE KNITTING GAUGE! Work next row as follows from right side: Work 3 stitches in garter stitch, knit over the next 22-26-26-30-34-38 stitches, AT THE SAME TIME decrease 4-5-5-5-7-6 stitches evenly over these stitches – read INCREASE/DECREASE TIP, work A.4 over stitches in A.1, A.5 over stitches in A.2, and A.6 over stitches in A.3, knit over the next 22-26-26-30-34-38 stitches, AT THE SAME TIME decrease 4-5-5-5-7-6 stitches over these stitches, work 3 stitches in garter stitch = 100-106-114-122-134-144 stitches. Continue with garter stitch in each side, stockinette stitch and A.4, A.5 and A.6. When piece measures 18 cm = 7”, cast on 1 edge stitch in each side, now continue with only 1 edge stitch in garter stitch in each side, stockinette stitch and A.4, A.5 and A.6 as before = 102-108-116-124-136-146 stitches. When piece measures 52-53-54-55-56-57 cm = 20 1/2”-21”-21 1/4”-21 5/8”-22”-22 1/2”, bind off 1 edge stitch in each side = 100-106-114-122-134-144 stitches. Continue pattern as before. When piece measures 68-70-72-74-76-78 cm = 26 3/4”-27 1/2”-28 3/8”-29 1/8”-30”-30 3/4”, slip the middle 46-48-52-54-58-58 stitches on a stitch holder for neck and finish each shoulder separately. NOTE: Continue the stitches that do not fit the pattern in knit and purl as in A.4, A.5 and A.6 (without cables). On next row decrease 1 stitch towards the neck = 26-28-30-33-37-42 stitches remain on shoulder. When piece measures 70-72-74-76-78-80 cm = 27 1/2”-28 3/8”-29 1/8”-30”-30 3/4”-31 1/2”, bind off all stitches. Work the other shoulder the same way. FRONT PIECE: Cast on 104-112-120-128-144-152 stitches on circular needle size 4.5 mm = US 7 with Nepal. Purl 1 row from wrong side, then work as follows from right side: Work 3 stitches in garter stitch, * knit 2, purl 2 *, repeat from *-* over the next 20-24-24-28-32-36 stitches, knit 2, A.1 (= 17 stitches), A.2 (see diagram for your size = 20-20-28-28-36-36 stitches), A.3 (= 17 stitches), * knit 2, purl 2 *, repeat from *-* over the next 20-24-24-28-32-36 stitches, knit 2, 3 stitches in garter stitch. Continue this pattern until A.1, A.2 and A.3 have been worked (= 108-116-124-132-148-156 stitches). Switch to circular needle size 5.5 mm = US 9. Work next row as follows from right side: Work 3 stitches in garter stitch, knit over the next 22-26-26-30-34-38 stitches, AT THE SAME TIME decrease 4-5-5-5-7-6 stitches evenly over these stitches, work A.4 over stitches in A.1, A.5 over stitches in A.2, and A.6 over stitches in A.3, knit over the next 22-26-26-30-34-38 stitches, AT THE SAME TIME decrease 4-5-5-5-7-6 stitches over these stitches, work 3 stitches in garter stitch = 100-106-114-122-134-144 stitches. Continue with garter stitch in each side, stockinette stitch and A.4, A.5 and A.6. When piece measures 10 cm = 4”, cast on 1 edge stitch in each side, now continue with only 1 edge stitch in garter stitch in each side, stockinette stitch and A.4, A.5 and A.6 as before = 102-108-116-124-136-146 stitches. When piece measures 44-45-46-47-48-49 cm = 17 1/4”-17 3/4”-18”-18 1/2”-19”-19 1/4”, bind off 1 edge stitch in each side = 100-106-114-122-134-144 stitches. Continue pattern as before. When piece measures 56-58-60-62-64-66 cm = 22"-22 3/4"-23 5/8"-24 3/8"-25 1/4"-26", slip the middle 40-42-46-48-52-52 stitches on a stitch holder for neck and finish each shoulder separately. NOTE: Continue the stitches that do not fit the pattern in knit and purl as in A.4, A.5 and A.6 (without cables). Then bind off towards neck: 2 stitches 1 time and 1 stitch 2 times = 26-28-30-33-37-42 stitches remain for shoulder. When piece measures 62-64-66-68-70-72 cm = 24 3/8"-25 1/4"-26"-26 3/4"-27 1/2"-28 3/8”, bind off all stitches. Work the other shoulder the same way. SLEEVE: Work sleeve in the round on double pointed needles/a short circular needle, top down. Cast on 44-44-44-52-52-52 stitches on circular needle size 4.5 mm = US 7 with Nepal. Knit 1 round, work next round as follows: Knit 1, work rib purl 2, knit 2 until 3 stitches remain, purl 2 and finish with knit 1. Switch to double pointed needles/short circular needle size 5.5 mm = US 9 when piece measures 6 cm = 2 3/8” and work next round as follows: Knit over the first 17-17-17-21-21-21 stitches, AT THE SAME TIME decrease 3-2-2-5-4-3 stitches evenly over these stitches, work A.7, knit the last 17-17-17-21-21-21 stitches, AT THE SAME TIME decrease 3-2-2-5-4-3 stitches evenly over these = 38-40-40-42-44-46 stitches on round. Insert 1 marker thread at beginning of round. When piece measures 7 cm = 2 3/4”, begin increase mid under sleeve – read INCREASE TIP, increase 1 stitch on each side of marker thread the beginning of round, increase every 4-4-3-3-2½-2½ cm = 1 1/2”-1 1/2”-1 1/8”-1 1/8”-7/8”-7/8” 10-10-12-13-13-14 times in total = 58-60-64-68-70-74 stitches. When piece measures 47-46-45-44-42-40 cm = 18 1/2”-18”-17 3/4”-17 1/4”-16 1/2”-15 3/4”, decrease 2 stitch over cable in A.7 = 56-58-62-66-68-72 stitches. When piece measures 48-47-46-45-43-41 cm = 19”-18 1/2”-18”-17 3/4”-17”-16 1/8”, bind off all stitches. Work the other sleeve the same way, but work A.8 instead of A.7. ASSEMBLY: Sew the shoulder seams. Sew side seams inside 1 edge stitch, the bottom 10/18 cm = 4”/7” = vent. Back piece is longer than front piece. Sew in sleeves. NECK: Pick up approx. 100-120 stitches around the neck (including stitches on stitch holder mid front and mid back) on a short circular needle size 4.5 mm = US 7. Knit 1 round and purl 1 round. Then work rib knit 2/purl 2. When piece measures 10 cm = 4”, increase all 2 knit stitches to 3 knit stitches = 125-150 stitches. Continue until rib measures 16 cm = 6 1/4” in all sizes, bind off with knit over knit and purl over purl. |
|||||||||||||||||||||||||||||||
Diagram explanations |
|||||||||||||||||||||||||||||||
|
|||||||||||||||||||||||||||||||
|
|||||||||||||||||||||||||||||||

|
|||||||||||||||||||||||||||||||
|
|||||||||||||||||||||||||||||||
|
Have you made this or any other of our designs? Tag your pictures in social media with #dropsdesign so we can see them! Do you need help with this pattern?You'll find tutorial videos, a Comments/Questions area and more by visiting the pattern on garnstudio.com. © 1982-2024 DROPS Design A/S. We reserve all rights. This document, including all its sub-sections, has copyrights. Read more about what you can do with our patterns at the bottom of each pattern on our site. |
|||||||||||||||||||||||||||||||


With over 40 years in knitting and crochet design, DROPS Design offers one of the most extensive collections of free patterns on the internet - translated to 17 languages. As of today we count 304 catalogs and 11422 patterns - 11417 of which are translated into English (US/in).
We work hard to bring you the best knitting and crochet have to offer, inspiration and advice as well as great quality yarns at incredible prices! Would you like to use our patterns for other than personal use? You can read what you are allowed to do in the Copyright text at the bottom of all our patterns. Happy crafting!
Comments / Questions (25)
Buongiorno. Per la manica dice che si lavora dall'alto in basso, ma seguendo la spiegazione si capisce che è dal basso in alto, si inizia con 44 maglie...
08.01.2020 - 16:54DROPS Design answered:
Buongiorno Dea. Abbiamo corretto le spiegazioni. La manica si lavora dal basso verso l'alto. La ringraziamo per la segnalazione. Buon lavoro!
09.01.2020 - 09:04I find it difficult to determine how you work out your size guide. Exactly what is XXXL? I love your patterns but am reluctant to try them because of this.
06.01.2020 - 21:58DROPS Design answered:
Dear Mrs Keane, measure a similar garment you have and like the shape and compare these measurements with them on the chart, this way you will find the best matching size. Read more about measuring chart here. Happy knitting!
07.01.2020 - 08:33Un'altra domanda. Quando parla del collo, dice di riprendere " 100 - 120 maglie" per la taglia S quante ne devo riprendere?
05.01.2020 - 18:28DROPS Design answered:
Buongiorno Dea. Per la taglia S può riprendere 100 maglie. L’indicazione è comunque indicativa. Variazione di poche unità non compromettono il risultato finale. È però importante che siano in numero pari e divisibile per 4. Buon lavoro!
06.01.2020 - 13:10Mi trovo allo scollo e mi dice di mettere in attesa le maglie...devo lavorare le prime maglie sul ferro, poi mettere in attesa le maglie per il collo e poi lavorare le ultime maglie sul ferro ? Grazie.
03.01.2020 - 15:21DROPS Design answered:
Buongiorno Dea. Sì, può procedere come ha scritto. Buon lavoro!
06.01.2020 - 12:32Drops river rock205-17 a1 a3 have a black square- this is not a stitch, go directly to next symbol; I dont understand, a slipped stitch? or what. a1 a3 are 19 stitches not 17 a7 a8 are 10 stitches not 19 please clarify thank you
31.12.2019 - 21:03DROPS Design answered:
Dear Rachel, the black square is not a stitch, this means both diagrams are rib P2/K2. But then on next to last row, you are working a yarn over on 2 places = increase 2 stitches (there are now 19 sts) and then increasing a K2 to K3 on last row in A.1/A.3. Happy knitting!
02.01.2020 - 14:16Buonasera, ho trovato un errore nella legenda dei diagrammi. Gli ultimi sei quadratini con la diagonale verso destra dice "trasferire 2 maglie sul ferro ausiliario sul dietro del lavoro, 3 maglie diritto, 3 maglie diritto dal ferro ausiliario" , non sono 2 le maglie da trasferire, ma 3 altrimenti non si possono fare le 3 m dal ferro ausiliario. Grazie.
18.12.2019 - 20:15DROPS Design answered:
Buongiorno Dea. Abbiamo corretto il testo nel diagramma. La ringraziamo per la segnalazione. Buon lavoro!
19.12.2019 - 09:21Buonasera, i diagrammi A7 e A8 dice che sono 19 maglie, ma contando i quadratini ne risultano 10, giusto?
18.12.2019 - 17:58DROPS Design answered:
Buonasera Dea, chiederemo delucidazioni al settore design. Grazie per la segnalazione. Buon lavoro!
18.12.2019 - 18:37VORRE COME LEGGERE GLI SCHEMI SOLO AL DIRITTO E LAVORARE AL ROVESCIO LE MAGLIE COME PRESENTANO OPPURE DIRITTO E ROVESCIO GRAZIE
01.12.2019 - 14:56DROPS Design answered:
Buonasera Paola, i diagrammi riportano sia i ferri di andata che di ritorno. Buon lavoro!
18.12.2019 - 18:39Wil deze trui graag gaan breien.
17.10.2019 - 15:04Belle collection de pulls à tresse cette année, j'attends avec impatience le patron de celui-ci!
18.09.2019 - 10:19