DROPS Fabel
DROPS Fabel
75% Wool, 25% Polyamide
from 2.50 € /50g
Get the yarn to make this pattern from 7.50€.

The yarn cost is calculated from the pattern’s smallest size and the yarn’s cheapest product type. Looking for an even better price? You might find it on the DROPS Deals!

DROPS SS24

Holiday Hearts

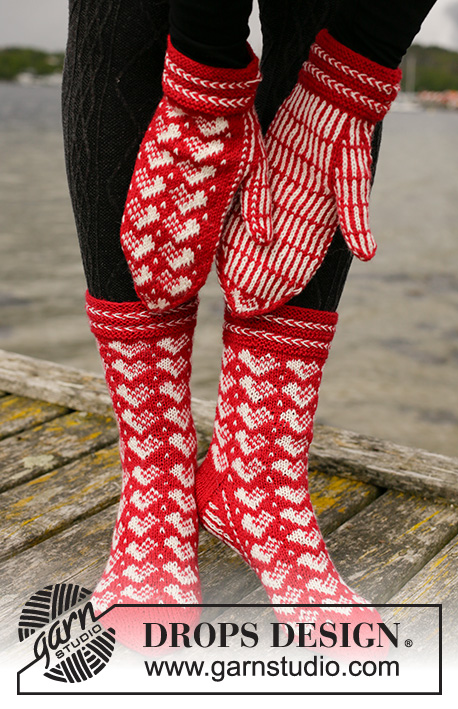
Knitted socks with hearts in DROPS Fabel. The piece is worked top down with Latvian cables and Nordic pattern. Sizes 35 - 43. Theme: Christmas.

DROPS Extra 0-1464
DROPS Design: Pattern no fa-445
Yarn group A
-------------------------------------------------------

SIZES:
35/37 - 38/40 - 41/43
Foot length: Approx. 22-24-27 cm. Leg height: Approx. 13-16-16 cm.

MATERIALS:
DROPS FABEL from Garnstudio (belongs to yarn group A)
100-100-100 g colour 106, red
50-50-50 g colour 100, off white

KNITTING TENSION:
26 stitches in width and 34 rows in height with stocking stitch and Nordic pattern = 10 x 10 cm.

NEEDLES:
DROPS DOUBLE POINTED NEEDLES SIZE 2.5 MM.
Needle size is only a guide. If you get too many stitches on 10 cm, change to a larger needle size. If you get too few stitches on 10 cm, change to a smaller needle size.

-------------------------------------------------------

Alternative Yarn – See how to change yarns here
Yarn Groups A to F – Use the same pattern and change the yarn here
Yarn usage using an alternative yarn – Use our yarn converter here

-------------------------------------------------------

DROPS Fabel
DROPS Fabel
75% Wool, 25% Polyamide
from 2.50 € /50g
Get the yarn to make this pattern from 7.50€.

The yarn cost is calculated from the pattern’s smallest size and the yarn’s cheapest product type. Looking for an even better price? You might find it on the DROPS Deals!

Pattern instructions

-------------------------------------------------------

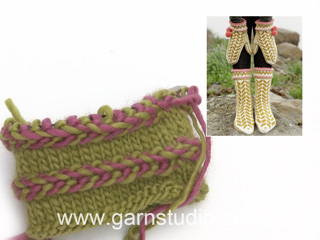
EXPLANATIONS FOR THE PATTERN:

-------------------------------------------------------

PATTERN:
See diagrams A.1 to A.4.

LATVIAN CABLE:
The cable consists of 3 rounds – all the rounds are included in A.1 and marked A.x. The 3 rounds are worked as follows:
ROUND 1: * Knit 1 using red, knit 1 using off-white *, work from *-* to end of round.
ROUND 2: Bring both strands to the front of the piece (towards you). Take the red strand to the back, purl 1 and bring the strand to the front. Take the off-white strand under the red strand and then to the back of the piece, purl 1 and bring the strand to the front. Continue like this, purling alternately with red and off-white, but always take the strand UNDER the strand from the last stitch worked.
ROUND 3: Work as round 2, but now always take the strand OVER the strand from the last stitch worked.

DECREASE TIP (evenly spaced):
To work out how to decrease evenly, count the total number of stitches on the needles (e.g. 64 stitches) and divide by number of decreases to be made (e.g. 4) = 16. 
In this example decrease by knitting each 15th and 16th stitch together.

KNITTING TIP-1:
To avoid the knitting tension becoming tighter when working pattern it is important that the strands at the back are not tight. Use a half-size larger needle when working pattern if this is a problem.

KNITTING TIP-2 (for heel):
To strengthen the heel you can work with 2 strands when working the heel and heel decrease as follows: Use the strand from both the inside and outside of the ball and work 1 stitch alternately with first the one then the other strand; this gives you a slightly thicker heel without using a double strand.

HEEL DECREASE:
ROW 1 (= right side): Knit until there are 8-8-9 stitches left, slip the next stitch as if to knit, knit 1 and pass the slipped stitch over the knitted stitch, turn the piece.
ROW 2 (= wrong side): Purl until there are 8-8-9 stitches left, slip the next stitch as if to purl, purl 1 and pass the slipped stitch over the purled stitch, turn the piece.
ROW 3 (= right side): Knit until there are 7-7-8 stitches left, slip the next stitch as if to knit, knit 1 and pass the slipped stitch over the knitted stitch, turn the piece. 
ROW 4 (= wrong side): Purl until there are 7-7-8 stitches left, slip the next stitch as if to purl, purl 1 and pass the slipped stitch over the purled stitch, turn the piece. 
Continue to decrease in this way by working 1 less stitch before slipping a stitch and until there are 15-15-17 stitches left on the row.

-------------------------------------------------------

START THE PIECE HERE:

-------------------------------------------------------

SOCK – SHORT OVERVIEW OF THE PIECE:
The piece is worked in the round with double pointed needles, top down.

SOCK:
Read KNITTING TIP-1!
Cast on 64-64-74 stitches with double pointed needles size 2.5 mm and red. Work A.1 in the round. When A.1 has been completed in height, knit 1 round with red where you decrease 4 stitches evenly spaced – read DECREASE TIP = 60-60-70 stitches.
The next round is worked as follows:
Sizes 35/37 and 38/40: Work A.2A (= 4 stitches), A.2B over the next 50 stitches (= 5 repeats of 10 stitches) and A.2C (= 6 stitches).
Size 41/43: Work A.2B over all 70 stitches (= 7 repeats of 10 stitches).
ALL SIZES:
Continue this pattern (make note, you always knit 1 round of red over all stitches after a row of hearts). REMEMBER THE KNITTING TENSION!
Repeat A.2 a total of 4-5-5 times in height but finish when you still have 1 round of red over all stitches left. The piece now measures approx. 13-16-16 cm from the cast-on edge.
Now work the heel as described below:
Keep the first 14-14-17 stitches on the needle for the heel, place the next 31-31-37 stitches on 1 thread without working them (= mid-top of foot) and keep the last 15-15-16 stitches on the needle for heel = 29-29-33 stitches on the needle for heel.
Read KNITTING TIP-2 and work stocking stitch using red, back and forth over the heel stitches for 5-5½-6 cm. Insert 1 marker in the middle of the last row; this will be used to measure the foot length later.
Work the HEEL DECREASE with red – read description above. After the heel decrease work the next round with red as follows: Knit the 15-15-17 heel stitches, knit up 13-14-16 stitches along the side of the heel, knit the 31-31-37 stitches from the thread and knit up 13-14-16 stitches along the other side of the heel = 72-74-86 stitches on the round. Continue to the middle of the heel; the round now begins from here.
Insert 1 marker on each side of the middle 41 stitches on top of foot (i.e. on each side of A.4). There are 31-33-45 stitches under the foot. Insert 1 marker thread mid-under foot so there are 15-17-23 stitches after the marker thread (i.e. to the left of the marker thread) and 16-16-22 stitches before the marker thread (i.e. to the right of the marker thread).
Start the round at the marker thread (= mid-under foot) and work the first round as follows:
Work A.3A over the first 14-16-22 stitches (= 7-8-11 repeats of 2 stitches), A.3B (= 1 stitch), A.4 (= 41 stitches) and A.3A over the next 16-16-22 stitches (= 8-8-11 repeats of 2 stitches). Continue this pattern.
When you have worked 2 full rounds, decrease on each side of the middle 39 stitches on top of foot as follows (decreases always worked using red):
Decrease as follows at the first marker: Work until there is 1 stitch left before the marker, knit this stitch together with the first stitch after the marker (= last stitch in A.3 knitted together with first stitch in A.4).
Decrease as follows at the second marker: Work until there is 1 stitch left before the marker, knit this stitch twisted together with the first stitch after the marker (= last stitch in A.4 knitted twisted together with first stitch in A.3).
Decrease like this every 2nd round a total of 8-8-12 times = 56-58-62 stitches left (A.4 is always worked over the 41 stitches on top of foot, but there will be fewer and fewer stitches in A.3 under the foot).
Continue working without further decreases until the piece measures 18-19-21 cm from the marker on the heel, finishing after a complete row of hearts. Then work stocking stitch with red to finished length.
When the piece measures 18-19-21 cm from the marker on the heel, there is approx. 4-5-6 cm left to finished length; you can try the sock on and work to desired length.
Insert 1 marker on each side of the sock so there are 28-29-31 stitches both on top of and under the foot. 
Work stocking stitch with red and decrease to toe on each side of both markers as follows: 3 stitches before the marker thread, knit 2 together, knit 2 (the marker thread sits between these 2 stitches) and knit 2 twisted together. Repeat this decrease at the other marker (= 4 stitches decreased on the round). Decrease every 2nd round a total of 3-5-7 times and then every round a total of 8-7-6 times = 12-10-10 stitches. On the next round knit all stitches together 2 and 2 = 6-5-5 stitches. Cut the strand and pull it through the remaining stitches, tighten and fasten well. The sock measures approx. 22-24-27 cm from the marker on the heel.

Work 1 more sock in the same way.

Diagram

symbols = purl with red
symbols = knit with red
symbols = knit with off-white
symbols = work LATVIAN CABLE – read description above, take the strand under the strand you last worked with
symbols = work LATVIAN CABLE – read description above, take the strand over the strand you last worked with
symbols = start here
diagram
diagram

Each of our patterns has specific tutorial videos to help you.

Do you have a question? See a list of frequently asked questions (FAQ)

Knitting tension is what determines the final measurements of your work, and is usually measured per 10 x 10 cm. It is provided like so: number of stitches in width x number of rows in height - eg: 19 stitches x 26 rows = 10 x 10 cm.

The knitting tension is very individual; some people knit/crochet loosely while others work tightly. You adjust the knitting tension with the needle size, which is why the suggested needle size is only meant as a guide! You need to adjust this (up or down) to ensure that YOUR knitting tension matches the knitting tension provided in the pattern. If you work with a different knitting tension than provided you will have a different yarn consumption, and your work will have different measurements than what the pattern suggests.

The knitting tension also determines which yarns can replace each other. As long as you achieve the same knitting tension you can replace one yarn with another.

See DROPS lesson: How to measure your tension/gauge

See DROPS video: How to make a gauge tension swatch

The required amount of yarn is provided in grams, eg: 450 g. To calculate how many balls you’ll need you first need to know how many grams are in 1 ball (25g, 50g or 100g). This information is available if you click on the individual yarn quality on our pages. Divide the amount required with the amount of each ball. For example, if each ball is 50g (the most common amount), the calculation will be as follows: 450 / 50 = 9 balls.

The important thing when changing from one yarn to another is that the knitting/crochet tension remains the same. This is so that the measurements of the finished piece will be the same as on the sketch provided. It is easier to achieve the same knitting tension using yarns from the same yarn group. It is also possible to work with multiple strands of a thinner yarn to achieve the knitting tension of a thicker one. Please try our yarn converter. We recommend you to always work a test swatch.

Please NOTE: when changing yarn the garment might have a different look and feel to the garment in the photo, due to individual properties and qualities of each yarn.

See DROPS lesson: Can I use a different yarn than the one mentioned in the pattern?

All our yarns are categorised into yarn groups (from A to F) according to thickness and knitting tension – group A contains the thinnest yarns and group F the thickest. This makes it easier for you to find alternative yarns to our patterns, should you wish to switch yarn. All yarns within the same group have a similar knitting tension and can easily replace each other. However, different yarn qualities have different structures and properties which will give the finished work a unique look and feel.

Click here for an overview of the yarns in each yarn group

At the top of all our patterns you’ll find a link to our yarn calculator, which is a helpful tool should you wish to use a different yarn than suggested. By filling in the yarn quality you wish to replace, the amount (in your size) and number of strands, the calculator will present good alternative yarns with the same knitting tension. Additionally it will tell you how much you’ll require in the new qualities and whether you’ll need to work with multiple strands. Most skeins are 50g (some are 25g or 100g).

If the pattern is worked with multiple colours, every colour will have to be calculated separately. Similarly, if the pattern is worked with several strands of different yarns (for example 1 strand Alpaca and 1 strand Kid-Silk) you will have to find alternatives for each, individually.

Click here to see our yarn calculator

Since different yarns have different qualities and textures we have chosen to keep the original yarn in our patterns. However, you can easily find options among our available qualities by using our yarn calculator, or simply pick a yarn from the same yarn group.

It is possible that some retailers still have discontinued yarns in stock, or that someone has a few skeins at home that they would like to find patterns for.

The yarn calculator will provide both alternative yarn as well as required amount in the new quality.

If you think it's hard to decide what size to make, it can be a good idea to measure a garment you own already and like the size of. Then you can pick the size by comparing those measures with the ones available in the pattern's size chart.

You'll find the size chart at the bottom of the pattern.

See DROPS lesson: How to read size chart

The needle size provided in the pattern serves only as a guide, the important thing is to follow the knitting tension. And since knitting tension is very individual, you will have to adjust the needle size to ensure that YOUR tension is the same as in the pattern – maybe you’ll have to adjust 1, or even 2 needle sizes, up or down to achieve the correct tension. For this, we recommend that you work test swatches.

Should you work with a different knitting tension than the one provided, the measurements of the finished garment might deviate from the measurement sketch.

See DROPS lesson: How to measure your tension/gauge

See DROPS video: How to make a tension/gauge swatch

Working a garment top-down provides more flexibility and room for personal adjustment. For example it is easier to try the garment on while working, as well as making adjustments to length of yoke and shoulder caps.

The instructions are carefully explaining every step, in the correct order. Diagrams are adjusted to the knitting direction and are worked as usual.

The diagram depicts all rows/rounds, and every stitch seen from the right side. It is read from bottom to top, from right to left. 1 square = 1 stitch.

When working back and forth, every other row is worked from the right side and every other row is worked from the wrong side. When working from the wrong side, the diagram will have to be worked reversed: from left to right, knit stitches are purled, purl stitches are knit etc.

When working in the round every round is worked from the right side and the diagram are worked from right to left on all rounds.

See DROPS lesson: How to read knitting diagrams

The diagram depicts all rows/rounds, and every stitch seen from the right side. It is worked from bottom to top, from right to left.

When working back and forth every other row is worked from the right side: from right to left and every other row is worked from the wrong side: from left to right.

When working in the round, every row in the diagram are worked from the right side, from right to left.

When working a circular diagram you start in the middle and work your way outwards, counter clockwise, row by row.

The rows usually start with a given number of chain stitches (equivalent to the height of the following stitch), this will either be depicted in the diagram or explained in the pattern.

See DROPS lesson: How to read crochet diagrams

Instructions for working several diagrams after each other on the same row/round, will often be written like so: “work A.1, A.2, A.3 a total of 0-0-2-3-4 times". This means you work A.1 once, then A.2 is worked once, and A.3 is repeated (in width) the number of times provided for your size – in this case like so: S = 0 times, M = 0 times, L=2 times, XL= 3 times and XXL = 4 times.

The diagrams are worked as usual: begin with the first row in A.1, then work the first row in A.2 etc.

See DROPS lesson: How to read knitting diagrams

See DROPS lesson: How to read crochet diagrams

The total width of the garment (from wrist-to-wrist) will be larger in the larger sizes, despite the actual sleeves being shorter. The larger sizes have longer sleeve caps and wider shoulders, so there will be a good fit in all sizes.

The measurement sketch/schematic drawing provides information regarding the full length of the garment. If it’s a jumper or a jacket the length is measured from the highest point on the shoulder closest to the neckline, and straight down to the bottom of the garment. It is NOT measured from the tip of shoulder. Similarly, the length of yoke is measured from the highest point on the shoulder and down to where yoke is split into body and sleeves.

On a jacket measures are never taken along bands, unless specifically stated. Always measure inside band stitches when measuring the length.

See DROPS lesson: How to read a schematic drawing

Diagrams are often repeated on the round or in height. 1 repeat is the diagram the way it appears in the pattern. If it says to work 5 repeats of A.1 in the round, then you work A.1 a total of 5 times after/next to each other in the round. If it says to work 2 repeats of A.1 vertically/in height you work the entire diagram once, then begin again at the start and work the entire diagram one more time.

Chain stitches are slightly narrower than other stitches and to avoid working the cast-on edge too tight, we simply chain more stitches to begin with. The stitch count will be adjusted on the following row to fit the pattern and measurement sketch.

The rib edge is more elastic and will contract slightly compared to, for example, stocking stitch. By increasing before the rib edge, you avoid a visible difference in width between the rib edge and the rest of the body.

It’s very easy to cast off too tightly, and by making yarn overs while casting off (and simultaneously casting these off) you avoid a too tight cast off edge.

See DROPS video: How to bind off with yarn overs (yo)

To achieve an even increase (or decrease) you can increase on, for example: every 3rd and 4th row alternately, like so: work 2 rows and increase on the 3rd row, work 3 rows and increase on the 4th. Repeat this until the increase is complete.

See DROPS lesson: Increase or decrease 1 st on every 3rd and 4th row alternately

Should you prefer to work in the round instead of back and forth, you may of course adjust the pattern. You’ll need to add steeks mid-front (usually 5 stitches), and follow the instructions. When you would normally turn and work from the wrong side, simply work across the steek and continue in the round. At the end you’ll cut the piece open, pick up stitches to work bands, and cover the cut edges.

See DROPS video: How to knit steeks and cut open

Should you prefer to work back and forth instead of in the round, you may of course adjust the pattern so you work the pieces separately and then assemble them at the end. Divide the stitches for the body in 2, add 1 edge stitch in each side (for sewing) and work the front and back pieces separately.

See DROPS lesson: Can I adapt a pattern for circular needles into straight needles?

Pattern repeats can vary slightly in the different sizes, in order to get the correct proportions. If you’re not working the exact same size as the garment in the photo, yours might deviate slightly. This has been carefully developed and adjusted so that the complete impression of the garment is the same in all sizes.

Make sure to follow instructions and diagrams for your size!

If you have found a pattern you like which is available in women’s size it’s not very difficult to convert it to men’s size. The biggest difference will be the length of sleeves and body. Start working on the women size that you think would fit across the chest. The additional length will be worked right before you cast off for the armhole/sleeve cap. If the pattern is worked top-down you can add the length right after the armhole or before the first decrease on sleeve.

Regarding additional yarn amount, this will depend on how much length you add, but it is better with a skein too many than too few.

All yarns will have excess fibres (from production) that might come off as lint or shedding. Brushed yarns (ie hairier yarns) have more of these loose, excess fibres, causing more shedding.

Shedding also depends on what is worn under or over the garment, and whether this pulls at the yarn fibres. It’s therefore not possible to guarantee that there will be no shedding

Below are some tips on how to get the best result when working with hairier yarns:

1. When the garment is finished (before you wash it) shake it vigorously so the looser hairs come off. NOTE: do NOT use a lint roller, brush or any method that pulls at the yarn.

2. Place the garment in a plastic bag and put it in your freezer - the temperature will cause the fibres to become less attached to each other, and excess fibres will come off easier.

3. Leave in the freezer for a few hours before taking it out and shaking it again.

4. Wash the garment according to the instructions on the yarn label.

Pilling is a natural process that happens to even the most exclusive of fibers. It's a natural sign of wear and tear that is hard to avoid, and that is most visible in high friction areas of your garment like a sweater's arms and cuffs.

You can make your garment look as new by removing the pilling, using a fabric comb or a pill/lint remover.

Still can't find the answer you need? Then scroll down and leave your question so one of our experts can try to help you. This will be done normally within 5 to 10 working days.
In the meantime, you can read the questions and answers that others have left to this pattern or join the DROPS Workshop on Facebook to get help from fellow knitters/crocheters!

You might also like...

Post a comment to pattern DROPS Extra 0-1464

We would love to hear what you have to say about this pattern!

If you want to leave a question, please make sure you select the correct category in the form below, to speed up the answering process. Required fields are marked *.

Comments / Questions (6)

country flag Clare wrote:

Thank you for this lovely pattern! I've adapted it to knit a Christmas stocking for myself using DK wool - I added a band with my initials between the two cables and adjusted the proportions of the heel and foot. It turned out beautifully! I'm now casting on another stocking for my son with snowflake motifs instead of hearts.

03.09.2021 - 12:06

country flag Maria wrote:

Buongiorno. Non riesco a capire il suggerimento per il tallone rinforzato. Cosa significa lavorare una maglia in modo alternato con un capo dall'interno e dall'esterno del gimitolo? Cosa devo fare esattamente? Grazie mille.

23.11.2020 - 15:35

DROPS Design answered:

Buonasera Maria, deve lavorare il tallone con entrambi i capi del gomitolo, quindi sia quello interno che quello esterno. Deve lavorare una maglia con un capo e una maglia con l'altro capo. Buon lavoro!

23.11.2020 - 21:53

country flag Anni Larsen wrote:

🌹Er det på nogen måde muligt at i laver et katalog udelukkende med strømper med mønster og sokker og futter 🌹

20.05.2020 - 11:05

DROPS Design answered:

Hei Anni. Vi har sluttet med kataloger med oppskrifter, kun brosjyrer med bilder. Vi legger ut alle våre oppskrifter gratis på vår nettside og her kan du enkelt søke på f.eks strømper. mvh DROPS design

25.05.2020 - 14:25

country flag Catherine wrote:

Bonjour, il me semble qu'il manque les diagrammes A1 et A3 car ils sont cités dans les explications mais n'apparaissent pas dans la partie diagrammes. Merci pour votre réponse.

07.12.2019 - 10:53

DROPS Design answered:

Bonjour Catherine, effectivement, merci pour votre retour, nous allons faire le nécessaire le plus rapidement possible. Bon tricot!

09.12.2019 - 08:18

country flag Lina wrote:

Bonjour, je ne vois pas le sigle de la tresse lettone A.x sur les diagrammes ? Merci pour la réponse ..

07.12.2019 - 07:56

country flag Rena wrote:

Hallo, es fehlen die Anleitung A1 und A3 sowie die Angabe, wie breit A1 ausgeführt werden sollte - oder habe ich es einfach überlesen?

07.12.2019 - 06:41

DROPS Design answered:

Liebe Rena, Sie sind ja rechts, die felhende Diagramme hochladen wir so schnell wie möglich, Danke für den Hinweis, Viel Spaß beim stricken!

09.12.2019 - 08:06