DROPS Nepal
DROPS Nepal
65% Wool, 35% Alpaca
from 4.60 CAD /50g
Get the yarn to make this pattern from 13.80CAD.

The yarn cost is calculated from the pattern’s smallest size and the yarn’s cheapest product type. Looking for an even better price? You might find it on the DROPS Deals!

DROPS SS24

Tippy Toe

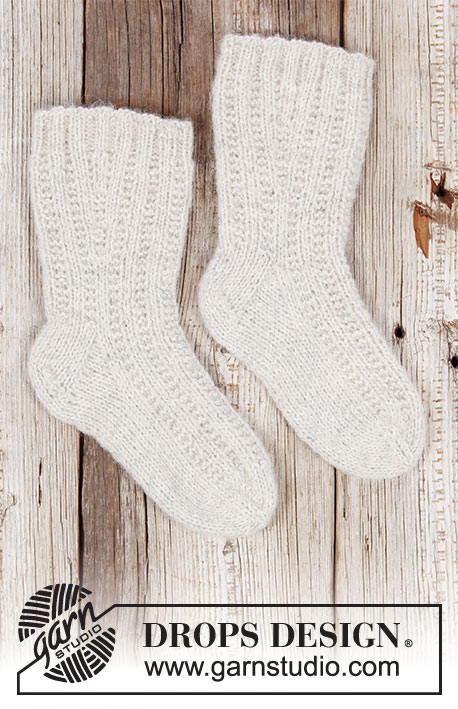
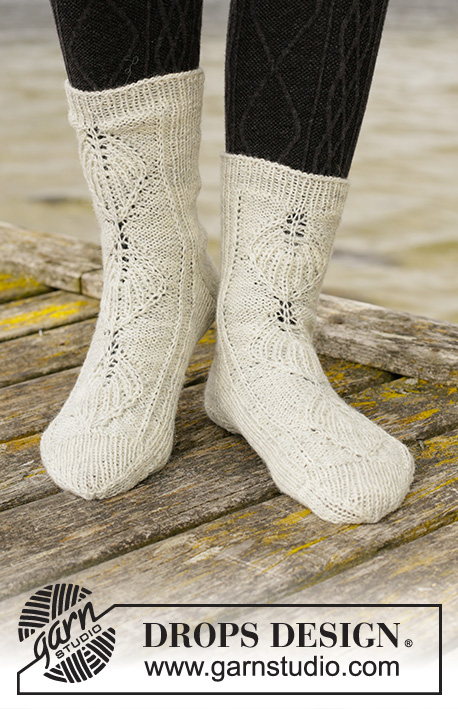
Knitted socks in DROPS Nepal. The piece is worked top down with rib, stockinette stitch and old-fashioned heel. Sizes 35-43 = 5-10 1/2.

DROPS 203-36
DROPS Design: Pattern no ne-303
Yarn group C or A + A
-------------------------------------------------------

SIZES:
US: 5/6 1/2 – 71/2/9 – 9 1/2/10 1/2
EU: 35/37 – 38/40 – 41/43
Foot length: 22-24-27 cm = 8¾"-9½"-10⅝"
Height of leg: 15-15-15 cm = 6"-6"-6".

MATERIALS:
DROPS NEPAL from Garnstudio (belongs to yarn group C)
100-150-150 g color 0618, camel
50-50-50 g color 8909, coral

KNITTING GAUGE:
21 stitches in width and 28 rows in height with stockinette stitch = 10 x 10 cm = 4" x 4".

NEEDLES:
DROPS DOUBLE POINTED NEEDLES SIZE 4 MM = US 6.
DROPS DOUBLE POINTED NEEDLES SIZE 3.5 MM = US 4 for rib at top.
Needle size is only a guide. If you get too many stitches on 10 cm = 4", change to a larger needle size. If you get too few stitches on 10 cm = 4", change to a smaller needle size.

-------------------------------------------------------

Alternative Yarn – See how to change yarns here
Yarn Groups A to F – Use the same pattern and change the yarn here
Yarn usage using an alternative yarn – Use our yarn converter here

-------------------------------------------------------

DROPS Nepal
DROPS Nepal
65% Wool, 35% Alpaca
from 4.60 CAD /50g
Get the yarn to make this pattern from 13.80CAD.

The yarn cost is calculated from the pattern’s smallest size and the yarn’s cheapest product type. Looking for an even better price? You might find it on the DROPS Deals!

Pattern instructions

NOTE: This pattern is written in American English. All measurements in charts are in cm. For conversion from inches to cm - click here. There are different terms for crocheting in American and British English. If this pattern includes crochet, click for "crochet terms" here. For this pattern in British English, please click here.
-------------------------------------------------------

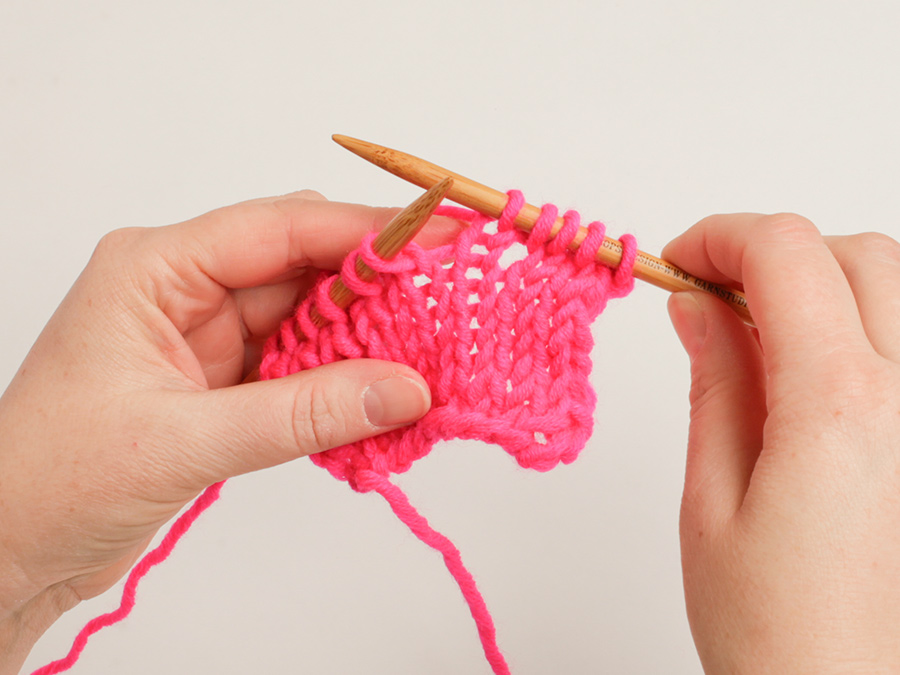
EXPLANATIONS FOR THE PIECE:

-------------------------------------------------------

INCREASE TIP:
Increase 1 stitch by lifting the strand between 2 stitches, place it on left needle and knit it twisted.

RIDGE/GARTER STITCH (worked back and forth):
1 ridge in height = Knit 2 rows.

-------------------------------------------------------

START THE PIECE HERE:

-------------------------------------------------------

SOCK – SHORT OVERVIEW OF THE PIECE:
The piece is worked in the round with double pointed needles, top down. The heel is worked back and forth, before being worked together mid bottom. Then the foot is worked in the round with double pointed needles.

LEG:
Cast on 40-42-46 stitches with camel and double pointed needles size 3.5 mm = US 4. Knit 1 round, then work rib in the round (knit, 1, purl 1) for 3 cm = 1⅛". Change to double pointed needles size 4 mm = US 6. Work stockinette stitch and increase 0-2-2 stitches evenly on first round = 40-44-48 stitches. Continue with stockinette stitch until the piece measures 15 cm = 6". REMEMBER THE KNITTING GAUGE!
Work stockinette stitch over the first 20-22-24 stitches on the round (= top of foot) and place these stitches on 1 thread. Knit and increase 4-4-4 stitches evenly over the remaining stitches – READ INCREASE TIP! = 24-26-28 stitches (= heel-stitches). Change to coral, turn the piece and purl 1 row from the wrong side.

HEEL:
Then work back and forth over the heel-stitches as follows: 1 stitch in GARTER STITCH – see description above, * knit 1, purl 1 *, work from *-* until there is 1 stitch left and 1 stitch in garter stitch. Knit over knit and purl over purl with 1 stitch in garter stitch on each side until the heel measures 5-5½-6 cm = 2"-2⅛"-2⅜". Insert a marker in the middle of the row (used to measure from later). On the next row from the right side work stockinette stitch and decrease 4-4-4 stitches evenly spaced = 20-22-24 stitches.
Purl 1 row from the wrong side and knit 1 row from the right side.
Now work back and forth from the wrong side to work the heel-stitches together.

WORKING TOGETHER THE HEEL-STITCHES:
All rows are worked from the wrong side. Turn and purl the first 10-11-12 stitches from the wrong side. Make sure the strand is at the back of the piece (= lies towards the right side) and work as follows:

LEFT NEEDLE: Knit 2 stitches twisted together, place the together-knitted stitch back on the left needle and tighten the strand. Do not turn the piece.

RIGHT NEEDLE: Insert the left needle into the next 2 stitches on the right needle (insert from left to right and make sure the needle is at the back of the right needle), pick up the strand and take it around the left needle, then pull the strand through the 2 stitches (from right to left) and slip the 2 stitches off the right needle. Place the knitted-together stitch back on the right needle and tighten strand. Do not turn the piece.

Repeat LEFT and RIGHT NEEDLE like this until there are 2 stitches left. Now the heel-stitches have been worked together. Place the 2 stitches on the right needle and turn the piece to the right side.

FOOT:
Use camel and knit up 9-10-11 stitches along the first side of the heel (inside the 1 stitch in garter stitch), place the stitches from the thread back on the needles and work stockinette stitch over these stitches as before, knit up 9-10-11 stitches along the other side of the heel (inside the 1 stitch in garter stitch) = 40-44-48 stitches. Continue with stockinette stitch in the round until the piece measures 19-20-23 cm = 7½"-8"-9" from the marker on the heel (there is 3-4-4 cm = 1⅛"-1½"-1½" left to finished length). Insert 1 marker thread on each side of the foot (so you have 20-22-24 stitches both on top and under the foot). Change to coral, work stockinette stitch and decrease to toe on each side of both marker threads as follows:
Work to 3 stitches before the marker thread, knit 2 twisted together, knit 2 (marker thread sits between these 2 stitches) and knit 2 together. Work in the same way at the next marker thread.
Decrease like this every round until you have 8 stitches left then knit together all stitches 2 and 2 on the next round = 4 stitches. Cut the strand and pull it through the remaining stitches a couple of times, pull tight and fasten well.

Work 1 more sock in the same way.

This pattern has been corrected.

Updated online: 04.02.2020
LEG: Cast on 40-42-46 stitches with camel and double pointed needles size 3.5 mm = US 4. Knit 1 round, then work rib in the round ( knit, 1, purl 1) for 3 cm = 1 1/8". Change to double pointed needles size 4 mm = US 6. Work stockinette stitch and increase 0-2-2 stitches evenly on first round = 40-44-48 stitches
Updated online: 21.02.2020
FOOT: Use camel and knit up 9-10-11 stitches along the first side of the heel (inside the 1 stitch in garter stitch), place the stitches from the thread back on the needles and work stockinette stitch over these stitches as before, knit up 9-10-11 stitches along the other side of the heel (inside the 1 stitch in garter stitch) = 40-44-48 stitches.
Do you have a question? See a list of frequently asked questions (FAQ)

Knitting tension is what determines the final measurements of your work, and is usually measured per 10 x 10 cm. It is provided like so: number of stitches in width x number of rows in height - eg: 19 stitches x 26 rows = 10 x 10 cm.

The knitting tension is very individual; some people knit/crochet loosely while others work tightly. You adjust the knitting tension with the needle size, which is why the suggested needle size only serve as a guide! You need to adjust this (up or down) to ensure that YOUR knitting tension matches the knitting tension provided in the pattern. If you work with a different knitting tension than provided you will have a different yarn consumption, and your work will have different measurements than what the pattern suggests.

The knitting tension also determines which yarns can replace each other. As long as you achieve the same knitting tension you can replace one yarn with another.

See DROPS lesson: How to measure your tension/gauge

See DROPS video: How to make a gauge tension swatch

The required amount of yarn is provided in grams, eg: 450 g. To calculate how many balls you’ll need you first need to know how many grams are in 1 ball (25g, 50g or 100g). This information is available if you click on the individual yarn quality on our pages. Divide the amount required with the amount of each ball. For example, if each ball is 50g (the most common amount), the calculation will be as follows: 450 / 50 = 9 balls.

The important thing when changing from one yarn to another is that the knitting/crochet tension remains the same. This is so that the measurements of the finished piece will be the same as on the sketch provided. It is easier to achieve the same knitting tension using yarns from the same yarn group. It is also possible to work with multiple strands of a thinner yarn to achieve the knitting tension of a thicker one. Please try our yarn converter. We recommend you to always work a test swatch.

Please NOTE: when changing yarn the garment might have a different look and feel to the garment in the photo, due to individual properties and qualities of each yarn.

See DROPS lesson: Can I use a different yarn than the one mentioned in the pattern?

All our yarns are categorised into yarn groups (from A to F) according to thickness and knitting tension – group A contains the thinnest yarns and group F the thickest. This makes it easier for you to find alternative yarns to our patterns, should you wish to switch yarn. All yarns within the same group have a similar knitting tension and can easily replace each other. However, different yarn qualities have different structures and properties which will give the finished work a unique look and feel.

Click here for an overview of the yarns in each yarn group

At the top of all our patterns you’ll find a link to our yarn converter, which is a helpful tool should you wish to use a different yarn than suggested. By filling in the yarn quality you wish to replace, the amount (in your size) and number of strands, the converter will present good alternative yarns with the same knitting tension. Additionally it will tell you how much you’ll require in the new qualities and whether you’ll need to work with multiple strands. Most skeins are 50g (some are 25g or 100g).

If the pattern is worked with multiple colours, every colour will have to be converted separately. Similarly, if the pattern is worked with several strands of different yarns (for example 1 strand Alpaca and 1 strand Kid-Silk) you will have to find alternatives for each, individually.

Click here to see our yarn converter

Since different yarns have different qualities and textures we have chosen to keep the original yarn in our patterns. However, you can easily find options among our available qualities by using our yarn converter, or simply pick a yarn from the same yarn group.

It is possible that some retailers still have discontinued yarns in stock, or that someone has a few skeins at home that they would like to find patterns for.

The yarn converter will provide both alternative yarn as well as required amount in the new quality.

If you think it's hard to decide what size to make, it can be a good idea to measure a garment you own already and like the size of. Then you can pick the size by comparing those measures with the ones available in the pattern's size chart.

You'll find the size chart at the bottom of the pattern.

See DROPS lesson: How to read size chart

The needle size provided in the pattern serves only as a guide, the important thing is to follow the knitting tension. And since knitting tension is very individual, you will have to adjust the needle size to ensure that YOUR tension is the same as in the pattern – maybe you’ll have to adjust 1, or even 2 needle sizes, up or down to achieve the correct tension. For this, we recommend that you work test swatches.

Should you work with a different knitting tension than the one provided, the measurements of the finished garment might deviate from the measurement sketch.

See DROPS lesson: How to measure your tension/gauge

See DROPS video: How to make a gauge tension swatch

Working a garment top-down provides more flexibility and room for personal adjustment. For example it is easier to try the garment on while working, as well as making adjustments to length of yoke and shoulder caps.

The instructions are carefully explaining every step, in the correct order. Diagrams are adjusted to the knitting direction and are worked as usual.

The diagram depicts all rows/rounds, and every stitch seen from the right side. It is read from bottom to top, from right to left. 1 square = 1 stitch.

When working back and forth, every other row is worked from the right side and every other row is worked from the wrong side. When working from the wrong side, the diagram will have to be worked reversed: from left to right, knit stitches are purled, purl stitches are knit etc.

When working in the round every round is worked from the right side and the diagram are worked from right to left on all rounds.

See DROPS lesson: How to read knitting diagrams

The diagram depicts all rows/rounds, and every stitch seen from the right side. It is worked from bottom to top, from right to left.

When working back and forth every other row is worked from the right side: from right to left and every other row is worked from the wrong side: from left to right.

When working in the round, every row in the diagram are worked from the right side, from right to left.

When working a circular diagram you start in the middle and work your way outwards, counter clockwise, row by row.

The rows usually start with a given number of chain stitches (equivalent to the height of the following stitch), this will either be depicted in the diagram or explained in the pattern.

See DROPS lesson: How to read crochet diagrams

Instructions for working several diagrams after each other on the same row/round, will often be written like so: “work A.1, A.2, A.3 a total of 0-0-2-3-4 times". This means you work A.1 once, then A.2 is worked once, and A.3 is repeated (in width) the number of times provided for your size – in this case like so: S = 0 times, M = 0 times, L=2 times, XL= 3 times and XXL = 4 times.

The diagrams are worked as usual: begin with the first row in A.1, then work the first row in A.2 etc.

See DROPS lesson: How to read knitting diagrams

See DROPS lesson: How to read crochet diagrams

The total width of the garment (from wrist-to-wrist) will be larger in the larger sizes, despite the actual sleeves being shorter. The larger sizes have longer sleeve caps and wider shoulders, so there will be a good fit in all sizes.

The measurement sketch/schematic drawing provides information regarding the full length of the garment. If it’s a jumper or a jacket the length is measured from the highest point on the shoulder (usually closest to the neckline), and straight down to the bottom of the garment. It is NOT measured from the tip of shoulder. Similarly, the length of yoke is measured from the highest point on the shoulder and down to where yoke is split into body and sleeves.

See DROPS lesson: How to read a schematic drawing

Diagrams are often repeated on the round or in height. 1 repeat is the diagram the way it appears in the pattern. If it says to work 5 repeats of A.1 in the round, then you work A.1 a total of 5 times after/next to each other in the round. If it says to work 2 repeats of A.1 vertically/in height you work the entire diagram once, then begin again at the start and work the entire diagram one more time.

Chain stitches are slightly narrower than other stitches and to avoid working the cast-on edge too tight, we simply chain more stitches to begin with. The stitch count will be adjusted on the following row to fit the pattern and measurement sketch.

The rib edge is more elastic and will contract slightly compared to, for example, stocking stitch. By increasing before the rib edge, you avoid a visible difference in width between the rib edge and the rest of the body.

It’s very easy to cast off too tightly, and by making yarn overs while casting off (and simultaneously casting these off) you avoid a too tight cast off edge.

See DROPS video: How to bind off with yarn overs (yo)

To achieve an even increase (or decrease) you can increase on, for example: every 3rd and 4th row alternately, like so: work 2 rows and increase on the 3rd row, work 3 rows and increase on the 4th. Repeat this until the increase is complete.

See DROPS lesson: Increase or decrease 1 st on every 3rd and 4th row alternately

Should you prefer to work in the round instead of back and forth, you may of course adjust the pattern. You’ll need to add steeks mid-front (usually 5 stitches), and follow the instructions. When you would normally turn and work from the wrong side, simply work across the steek and continue in the round. At the end you’ll cut the piece open, pick up stitches to work bands, and cover the cut edges.

See DROPS video: How to knit steeks and cut open

Should you prefer to work back and forth instead of in the round, you may of course adjust the pattern so you work the pieces separately and then assemble them at the end. Divide the stitches for the body in 2, add 1 edge stitch in each side (for sewing) and work the front and back pieces separately.

See DROPS lesson: Can I adapt a pattern for circular needles into straight needles?

Pattern repeats can vary slightly in the different sizes, in order to get the correct proportions. If you’re not working the exact same size as the garment in the photo, yours might deviate slightly. This has been carefully developed and adjusted so that the complete impression of the garment is the same in all sizes.

Make sure to follow instructions and diagrams for your size!

If you have found a pattern you like which is available in women’s size it’s not very difficult to convert it to men’s size. The biggest difference will be the length of sleeves and body. Start working on the women size that you think would fit across the chest. The additional length will be worked right before you cast off for the armhole/sleeve cap. If the pattern is worked top-down you can add the length right after the armhole or before the first decrease on sleeve.

Regarding additional yarn amount, this will depend on how much length you add, but it is better with a skein too many than too few.

All yarns will have excess fibres (from production) that might come off as lint or shedding. Brushed yarns (ie hairier yarns) have more of these loose, excess fibres, causing more shedding.

Shedding also depends on what is worn under or over the garment, and whether this pulls at the yarn fibres. It’s therefore not possible to guarantee that there will be no shedding

Below are some tips on how to get the best result when working with hairier yarns:

1. When the garment is finished (before you wash it) shake it vigorously so the looser hairs come off. NOTE: do NOT use a lint roller, brush or any method that pulls at the yarn.

2. Place the garment in a plastic bag and put it in your freezer - the temperature will cause the fibres to become less attached to each other, and excess fibres will come off easier.

3. Leave in the freezer for a few hours before taking it out and shaking it again.

4. Wash the garment according to the instructions on the yarn label.

Pilling is a natural process that happens to even the most exclusive of fibers. It's a natural sign of wear and tear that is hard to avoid, and that is most visible in high friction areas of your garment like a sweater's arms and cuffs.

You can make your garment look as new by removing the pilling, using a fabric comb or a pill/lint remover.

Still can't find the answer you need? Then scroll down and leave your question so one of our experts can try to help you. This will be done normally within 5 to 10 working days.
In the meantime, you can read the questions and answers that others have left to this pattern or join the DROPS Workshop on Facebook to get help from fellow knitters/crocheters!

You might also like...

Post a comment to pattern DROPS 203-36

We would love to hear what you have to say about this pattern!

If you want to leave a question, please make sure you select the correct category in the form below, to speed up the answering process. Required fields are marked *.

Comments / Questions (11)

country flag Mona wrote:

Læg mærke til hæl-konstruktionen - efter min mening ikke særlig pæn. Så nu trevler jeg lidt op og laver en traditionel hæl.

21.02.2024 - 21:48

country flag Maylen wrote:

Hvor i omgangen skal man bytte til korall før tåfelling? Midt under foten eller ved første merketråd?

19.12.2023 - 12:51

DROPS Design answered:

Hej Maylen, det er en god ide at starte omgangen under foden, så ser du ikke det lille hak der kan blive når man skifter tråd :)

19.12.2023 - 14:32

country flag Solya wrote:

Hello, Úgy látom a magyar fordításban sajnos nem minden pontos. Amit eddig észrevettem, hogy a kezdőszemek száma más: az angol verzióban 40-42-46 szemmel kell kezdeni, míg a magyarban ez 39-42-45 (és így a bordás minta 1S, 1F-ja sem jön ki). Illetve később a sarok leírásában az áll: "szaporítsunk 4-4-4 szemet = 20-22-24 szemünk lesz" - de előtte eddig 26 szemünk volt, úgyhogy pont, hogy fogyasztani kell, nem? Köszönöm. :)

17.04.2023 - 08:29

country flag Sissel wrote:

Hei - sokker med brushed alpaca silk - bruker oppskrift med nepalgarn - skal gå ifølge tabellen - skal jeg bruke dobbelt garn av alpaca/sil garnet - det gjelder denne oppskriften på sokker med nepalgarn

03.04.2022 - 12:56

DROPS Design answered:

Hei Sissel, Begge garn er i samme garngruppe så da kan Nepal erstatte Brushed Alpaca Silk, Da følger du oppskriften som gitt, men det er lurt å strikke en prøvelapp før du begynner, for å sjekke strikkefastheten din. God fornøyelse!

04.04.2022 - 07:03

country flag Ferial wrote:

"Force" a raison quoi faire avec les 2 m?,...les laisser sur l aiguille toute seules et continuer comme ca en jersey?...1 aiguille a 2m...1 a 11 m (relevé)...1 a les m en attentes et 1 a 11 mailles relevé ?en continuant en jersey sur 4 aiguilles,?...sinon sur quelles aiguilles mettre les 2 m ?....et combien de mailles par aiguille sinon..?...merci..et la video s arrete exactement la ou on as besoin d explications.

23.01.2022 - 00:36

DROPS Design answered:

Bonjour Mme Ferial, remettez ces 2 dernières mailles sur l'aiguille droite et tournez, relevez 11 m (3ème taille), tricotez les 24 m du dessus du pied et relevez 11 m = 2+11+24+11=48 mailles. Tricotez maintenant en rond, en jersey. Bon tricot!

24.01.2022 - 10:32

country flag Lena Falk wrote:

Hej. Jag har en fråga om hälen: är det resårstickning samt 1 m rätstickning i var sida? Lite otydlig beskrivning.

06.09.2021 - 17:16

DROPS Design answered:

Hej Lena. Ja det stämmer. Mvh DROPS Design

07.09.2021 - 09:43

country flag Force wrote:

I think I don't understand. There are 2 stitches from heel, I pick up 22 stitches in total and I have 22 stitches on thread = 46 stitches not 44.

19.02.2020 - 15:12

DROPS Design answered:

Dear Mrs Force, pattern will be here edited, you will have to pick up only 10 sts in 2nd size (=9-10-11 sts) on each side of heel so that the total number of stitches will be 44 stitches together with the stitches from thread + the 2 remaining sts from heel. Happy knitting!

21.02.2020 - 15:18

country flag Force wrote:

Hi again, I would like to follow up on my question you answered with video, the problem is the video ends exactly in situation in which i am at this moment and i don't know how to continue. What do I do with the two stitches left after the heel is done (right at tvé end of the video)? Thank you

19.02.2020 - 10:25

DROPS Design answered:

Dear Force, the 2 remaining stitches are slipped on the right needle, turn piece so that you will continue from RS, then follow pattern under FOOT: pick up 11 sts along first side of heel, knit stitches from thread and pick up 11 sts along last side of heel and continue now in the round over the 44 stitches. Happy knitting!

19.02.2020 - 11:53

country flag Force wrote:

Hi I do not quite understand what to do with the two remaining stitches after WORKING TOGETHER THE HEEL-STITCHES. I am doing the 38/40 size. You say:"Place the 2 stitches on the right needle and turn the piece to the right side. " Then I am supposed to pick up 11 stitches, then knit the threaded stitches and then pick up another 11 = 44 but what do I do with the two remaining from the heel? Thank you

18.02.2020 - 17:36

DROPS Design answered:

Dear Mrs Force, this video shows how to work such a heel - to time code 08.41 you see how to work the first part of heel, than you work half of the stitches (11 sts in your size) and work now the decreases from WS as shown from 10:10. Happy knitting!

19.02.2020 - 08:50

country flag Maria Holm wrote:

Når det er oddetall i vrangborden, hvordan fungerer det? Blir det to like etter hverandre på et punkt? 1 r og 1 v går vel i togangen, men 39 masker er ikke i togangen.

16.01.2020 - 23:21

DROPS Design answered:

Hej Maria, jo det stemmer, vi retter og slår 1 maske mere op - tak for info :)

04.02.2020 - 08:39