
Popular categories
Looking for a yarn?


|
|||||||||||||
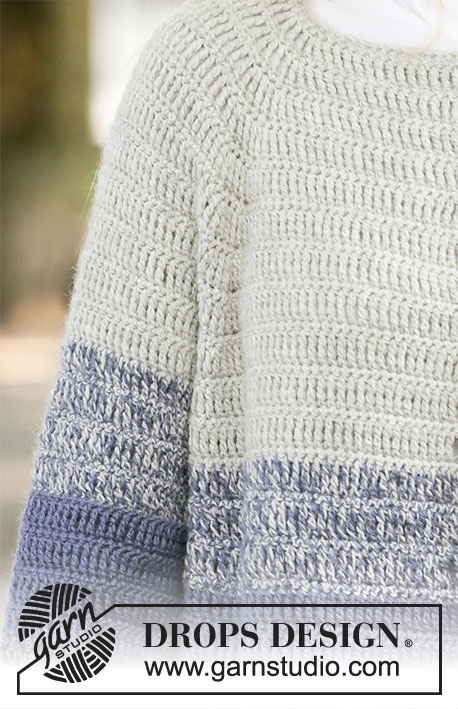
Purple Dawn Jacket |
|||||||||||||
 |
 |
||||||||||||
Crocheted jacket with raglan in 2 strands DROPS Alpaca. The piece is worked top down with stripes. Sizes S - XXXL.
DROPS 206-14 |
|||||||||||||
|
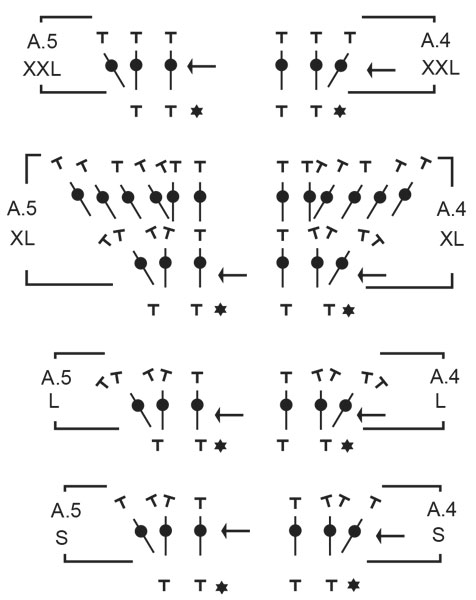
------------------------------------------------------- EXPLANATIONS FOR THE PATTERN: ------------------------------------------------------- CHAIN STITCH: If you work outermost on the hook the chain stitch will often be too tight; 1 chain stitch should be as long as 1 double crochet/double treble crochet is wide. STRIPES: All stripes are worked with 2 strands! STRIPE 1: 25-27-27-29-29-31 cm with 2 strands light pearl grey. STRIPE 2: 8-8-8½-8½-9-9 cm with 1 strand light pearl grey + 1 strand grey purple. STRIPE 3: 8-8-8½-8½-9-9 cm with 2 strands grey purple. STRIPE 4: 8-8-8½-8½-9-9 cm with 1 strand grey purple + 1 strand black. STRIPE 5: Then work with 2 strands black to finished length (= 8-8-8½-8½-9-9 cm). CROCHET INFORMATION 1: At the beginning of each row of double crochets work 1 chain stitch (does not replace the first double crochet). At the beginning of each row of double treble crochets work 4 chain stitches (these do not replace the first double treble crochet). INCREASE TIP (evenly spaced): To work out how to increase evenly, count the total number of stitches (e.g. 76 stitches), minus 5 band stitches on each side, and divide the remaining stitches by the number of increases to be made (e.g. 4) = 16.5. In this example, increase by working 2 double crochets in alternately each 16th and 17th stitch. PATTERN: See diagrams A.1 to A.5. Choose diagram for your size. A.4 and A.5 do not apply to size M. NOTE: All rows of double treble crochets are worked from the right side and all rows of double crochets from the wrong side. STRIPES SLEEVE: All stripes are worked with 2 strands! Continue STRIPE 1 until the stripe is 25-27-27-29-29-31 cm in height. STRIPE 2: 10 cm with 1 strand light pearl grey + 1 strand grey purple. STRIPE 3: 10 cm with 2 strands grey purple. STRIPE 4: 10 cm with 1 strand grey purple + 1 strand black. STRIPE 5: Then work with 2 strands black to finished length (= 15-13-14-12-12-11 cm). CROCHET INFORMATION 2: On each row of double crochets, work 1 chain stitch at the beginning of the row (does not replace the first double crochet; is worked in addition to the first stitch), finish the row with 1 slip stitch in the first double crochet on the row before turning and continuing. On each row of double treble crochets, work 4 chain stitches at the beginning of the row (these do not replace the first double treble crochet; are worked in addition to the first stitch), finish the row with 1 slip stitch in the fourth double crochet on the row before turning and continuing. DECREASE TIP-1 (for sleeves): Decrease 1 stitch by working 2 double treble crochets together as follows: Work 1 double treble crochet but wait with the last yarn over and pull through, work 1 more double treble crochet, but when working the last pull through, pull the strand through all loops on hook (= 1 stitch decreased). DECREASE TIP-2 (for sleeves): Decrease 1 stitch by working 2 double crochets together as follows: * Insert the hook in the next stitch, pick up strand *, work from *-* 1 more time, make 1 yarn over and pull it through all 3 loops on the hook (= 1 double crochet decreased). ------------------------------------------------------- START THE PIECE HERE: ------------------------------------------------------- JACKET – SHORT OVERVIEW OF THE PIECE: The piece is worked back and forth, top down. The sleeves are worked back and forth (i.e. alternately from the right and wrong side) and crocheted together at the end of each row, top down. NOTE: All rows with double treble crochets are worked from the right side and all rows with double crochets from the wrong side when you are working pattern. NECK: Work 76-80-84-92-92-96 chain stitches – read CHAIN STITCH with hook size 4.5 mm and 2 strands light pearl grey. Work STRIPES – read description above and work as follows: Turn with 1 chain stitch – read CROCHET INFORMATION 1 and work 1 double crochet in each of the 76-80-84-92-92-96 chain stitches = 76-80-84-92-92-96 double crochets. Work 1 more row of double crochets and increase 4 stitches evenly spaced on this row – read INCREASE TIP = 80-84-88-96-96-100 double crochets. YOKE: Now work as follows: A.1 over the first 15-16-17-19-19-20 stitches, A.2 over the next 2 stitches, insert a marker thread here (= in the transition between left front piece and sleeve), A.3 over the next 2 stitches, A.1 over the next 7 stitches, A.2 over the next 2 stitches, insert a marker thread here (= in the transition between left sleeve and back piece), A.3 over the next 2 stitches, A.1 over the next 20-22-24-28-28-30 stitches, A.2 over the next 2 stitches, insert a marker thread here (= in the transition between back piece and right sleeve), A.3 over the next 2 stitches, A.1 over the next 7 stitches, A.2 over the next 2 stitches, insert a marker thread here (= in the transition between right sleeve and front piece), A.3 over the next 2 stitches and A.1 over the remaining 15-16-17-19-19-20 stitches. REMEMBER THE CROCHET TENSION! SIZES S-M: Continue back and forth like this. Increase 1 stitch on each of the first 3 rows in A.2 and A.3 (i.e. a total of 8 stitches on each row), but on the last row increase 2 stitches (i.e. a total of 16 stitches on the last row). SIZES L-XL-XXL-XXXL: Continue back and forth like this. Increase 1 stitch on each row of double treble crochets (i.e. a total of 8 stitches on each row of double treble crochets) in A.2 and A.3 and increase 2 stitches on each row of double crochets (i.e. a total of 16 stitches on each row of double crochets). ALL SIZES: When A.1 to A.3 have been completed in height 1 time there are 120-124-136-144-144-148 stitches. Continue with A.1 and repeat rows 1 to 4 in A.2 and A.3 on each side of the marker threads until A.1 to A.3 have been worked a total of 4-5-4-4-5-5 times in height (each time A.2/A.3 is worked 1 time in height, the increased stitches are worked into A.1) = 240-284-280-288-336-340 stitches. Now work A.4 instead of A.2 and A.5 instead of A.3 (does not apply to size M as the increases have finished) on each side of the marker threads; the remaining stitches are worked in A.1 as before. When A.4 and A.5 have been worked 1 time in height there are 256-284-304-328-344-372 stitches. Continue with A.1 (without increasing) until the piece measures 25-27-28-30-32-34 cm from the beginning of the neck and down the bands – adjust so the next row is a row of double crochets. Work the next row from the wrong side as follows (the transitions between body and sleeves are not necessarily at the marker threads): Work A.1 over the first 45-48-50-54-58-63 stitches (= right front piece), work 8-8-10-10-12-12 loose chain stitches (= in side under sleeve), skip the next 43-51-57-61-61-65 stitches (= sleeve), work A.1 over the next 80-86-90-98-106-116 stitches (= back piece), work 8-8-10-10-12-12 loose chain stitches (= in side under sleeve), skip the next 43-51-57-61-61-65 stitches (= sleeve) and work A.1 over the remaining 45-48-50-54-58-63 stitches (= left front piece). Body and sleeves are finished separately. THE PIECE IS NOW MEASURED FROM HERE! BODY: There are 186-198-210-226-246-266 stitches on the body. Continue back and forth with pattern A.1 and stripes as before. When all the stripes have been completed in height – adjust so you finish after a row of double crochets, the piece measures approx. 32-32-33-33-33-33 cm. The whole jacket measures approx. 59-61-63-65-67-69 cm from the shoulder down. Cut and fasten the strands. SLEEVE: Start with 1 slip stitch in the 4th chain stitch worked under the sleeve and continue back and forth with A.1, working 1 stitch in each stitch around the sleeve – read STRIPES SLEEVES and CROCHET INFORMATION 2 = 51-59-67-71-73-77 stitches. Insert a marker thread at the beginning of the row (= mid under sleeve). When the sleeve measures 2 cm, decrease 1 stitch on each side of the marker thread (does not apply to size S) – read DECREASE TIP-1. Decrease like this every 2 cm a total of 0-2-5-5-4-5 times = 51-55-57-61-65-67 stitches. When the sleeve measures 43-41-41-39-37-36 cm – adjust so the next row is a row of double crochets, work 1 row of double crochets where you decrease 2-3-5-7-8-7 double crochets evenly spaced – read DECREASE TIP-2 = 49-52-52-54-57-60 double crochets. The next row is worked as follows: Work 1 double crochet in each of the first 1-0-0-2-1-0 stitches, * 1 double crochet in each of the next 2 stitches, work 2 double crochets together (= 1 double crochet decreased) *, work from *-* to end of row = 37-39-39-41-43-45 double crochets. Work 2 rows of double crochets with 1 double crochet in each stitch. Cut and fasten the strands. Work the other sleeve in the same way. ASSEMBLY: Sew the buttons onto the left band (when the garment is worn). Sew onto the 3rd stitch from the edge. The first button is sewn approx. 1½-2 cm from the top of the neck, then the other 5-5-5-5-6-6 buttons with approx. 7½-8-8½-8½-7½-8 cm between each one. The jacket is buttoned through the double treble crochets on the right band. |
|||||||||||||
Diagram explanations |
|||||||||||||
|
|||||||||||||

|
|||||||||||||
|
|||||||||||||

|
|||||||||||||
|
Have you made this or any other of our designs? Tag your pictures in social media with #dropsdesign so we can see them! Do you need help with this pattern?You'll find tutorial videos, a Comments/Questions area and more by visiting the pattern on garnstudio.com. © 1982-2024 DROPS Design A/S. We reserve all rights. This document, including all its sub-sections, has copyrights. Read more about what you can do with our patterns at the bottom of each pattern on our site. |
|||||||||||||


With over 40 years in knitting and crochet design, DROPS Design offers one of the most extensive collections of free patterns on the internet - translated to 17 languages. As of today we count 304 catalogues and 11422 patterns - 11422 of which are translated into English (UK/cm).
We work hard to bring you the best knitting and crochet have to offer, inspiration and advice as well as great quality yarns at incredible prices! Would you like to use our patterns for other than personal use? You can read what you are allowed to do in the Copyright text at the bottom of all our patterns. Happy crafting!
Comments / Questions (15)
Na explicação TODOS OS TAMANHOS, : diz " Continuar A.1 e repetir as carreiras 1 a 4 de A.2 e A.3 de cada lado do fio marcadores" Pergunto: A.2 ficado de um lado do marcador e A.3 do outro lado do marcador?
20.04.2022 - 16:14DROPS Design answered:
Bom dia, Sim, A.2 fica de um lado e A.3 do outro lado do marcador. Bom Croché!
22.04.2022 - 08:41Buongiorno non capisco il passaggio da 136 maglie a 280 maglie taglia M. A me viene 328 maglie se faccio 4 volte i diagrammi A2 ed A3. Mi verrebbe corretto ovvero 280 maglie se ripetessi 3 volte i due diagrammi. Non riesco davvero a capire dove sbaglio. Grazie mille!!
24.11.2020 - 08:58DROPS Design answered:
Buongiorno Argentina, deve contare anche la prima ripetizione dei diagrammi. Buon lavoro!
24.11.2020 - 16:23Weer een voorbeeld van magere meisjes in Plus-size kleding. Zo jamme! Waarom gebruikt u geen mollige dames? Zij zijn ook mooi.
02.07.2020 - 14:29Hallo, ik wil dit patroon meteen enkele draad haken, welk wol kan ik daarvoor gebruiken en hoeveel voor een xl?
25.05.2020 - 00:10DROPS Design answered:
Dag Maartje,
Hiervoor heb je wol nodig uit garencategorie C. Je kan ook 2 garens uit categorie A samenbreien zoals in het patroon gedaan wordt. Hier vind je een overzicht van de garengroepen. Om de hoeveelheid wol te berekenen is de totale looplengte die gebruikt wordt in dit voor jouw maat een goed uitgangspunt.
01.06.2020 - 10:51Dove sono le istruzioni per realizzarlo?
21.02.2020 - 17:10DROPS Design answered:
Buongiorno Elisa. A questo link trova le spiegazioni in italiano. Buon lavoro!
24.02.2020 - 14:44I Hækleinformationen står der " afslut rækken med 1 kædemaske i første fastmaske på rækken før det vendes og hækles videre." Jeg forstår ikke hvor den kædemaske skal hækles og hvorfor hvis det er en åben trøje med knapper. Der er også 2 gange hækleinformationer i opskriften.
20.11.2019 - 20:27DROPS Design answered:
Hei Jane! På rader med fastmasker skal kjedemasken hekles i den siste masken på raden. Husk at alle rader skal hekles frem og tilbake! Denne oppskriften har blitt oppdatert, vi har nå merket HÆKLEINFORMATION med 1 og 2. HEKLEINFORMATION 1 brukes på halskanten, mens HÆKLEINFORMATION 2 brukes på ermene. Lykke til!
21.11.2019 - 10:55Ich habe Konfektionsgrösse 42/44. Welche Grösse muss ich nehmen?
25.10.2019 - 14:40DROPS Design answered:
Liebe Frau Hauswirth, hier lesen Sie wie man die Größe wählt. Viel Spaß beim häkeln!
25.10.2019 - 16:33En el patrón en español no vienen los diagramas ni el dibujo del patrón
21.10.2019 - 11:41Imposible abrir las instrucciones!!!
26.08.2019 - 11:52No se me abren las instrucciones
09.08.2019 - 11:17