DROPS Air
DROPS Air
65% alpaka, 28% polyamid, 7% vlna
od 138.00 Kč /50g
Přízi na tento model můžete mít už za 138.00Kč.

Cenu za klubka počítáme podle spotřeby při výrobě modelu v nejmenší velikosti a nejlevnější variantě příze. Rádi byste ještě lepší cenu? Třeba ji najdete mezi DROPS Deals!

DROPS 196-14
DROPS design: model č. ai-148
Skupina přízí C nebo A + A
----------------------------------------------------------

NA CELOU SOUPRAVU:

VELIKOST:
S/M – M/L – L/XL

MATERIÁL:
DROPS AIR firmy Garnstudio (spadá do skupiny přízí C)
50-50-100-100-100-100 g, barva č. 20, růže
50-50-50-50-50-50 g, barva č. 02, světlá béžová

ČEPICE:

VELIKOST:
S/M – M/L – L/XL
Obvod hlavy: asi 54/56 - 56/58 - 58/60 cm

MATERIÁL:
DROPS AIR firmy Garnstudio (spadá do skupiny přízí C)
50-50-50 g, barva č. 20, růže
50-50-50 g, barva č. 02, světlá béžová

ZKUŠEBNÍ VZOREK:
18 ok na šířku a 23 řad na výšku lícovým žerzejem = 10 x 10 cm.

JEHLICE:
DROPS PONOŽKOVÉ JEHLICE č. 4,5.
DROPS KRUHOVÁ JEHLICE č. 4,5, dlouhá 40 cm.
DROPS KRUHOVÁ JEHLICE č. 4, dlouhá 40 cm – na lem.
Uvedená síla jehlic je pouze orientační. Máte-li ve svém zkušebním vzorku více ok na 10 cm, použijte jehlice silnější. Pokud máte naopak méně ok na 10 cm, použijte jehlice slabší.

RUKAVICE:

VELIKOST:
S/M – M/L – L/XL
Rozměry: Délka: asi 26-27-28 cm. Obvod: asi 19-19-22 cm

MATERIÁL:
DROPS AIR firmy Garnstudio (spadá do skupiny přízí C)
50-50-50 g, barva č. 20, růže
50-50-50 g, barva č. 02, světlá béžová

ZKUŠEBNÍ VZOREK:
19 ok na šířku a 25 řad na výšku lícovým žerzejem = 10 x 10 cm.

JEHLICE:
DROPS PONOŽKOVÉ JEHLICE č. 4.
DROPS PONOŽKOVÉ JEHLICE č. 3,5.
Uvedená síla jehlic je pouze orientační. Máte-li ve svém zkušebním vzorku více ok na 10 cm, použijte jehlice silnější. Pokud máte naopak méně ok na 10 cm, použijte jehlice slabší.

-------------------------------------------------------

Náhradní příze – Podívejte se, jak změnit přízi
Skupina přízí A až F – Neměňte návod, změňte přízi
Spotřeba příze při použití náhradní příze – Využijte náš převodník

-------------------------------------------------------

DROPS Air
DROPS Air
65% alpaka, 28% polyamid, 7% vlna
od 138.00 Kč /50g
Přízi na tento model můžete mít už za 138.00Kč.

Cenu za klubka počítáme podle spotřeby při výrobě modelu v nejmenší velikosti a nejlevnější variantě příze. Rádi byste ještě lepší cenu? Třeba ji najdete mezi DROPS Deals!

DROPS Super Sale

SAVE 30% on 6 cotton favourites!
Platí do 12.04.2024

Návod

----------------------------------------------------------

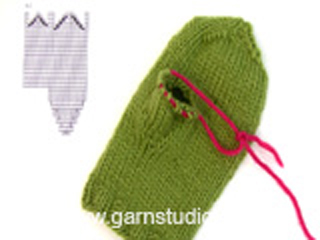
VYSVĚTLIVKY:

----------------------------------------------------------

TIP – UJÍMÁNÍ 1:
Abychom vypočítali, v jakých rozestupech musíme ujímat, vydělíme celkový počet ok v řadě (např. 96 ok) počtem ok, která potřebujeme ujmout (tj. 12), takže 96 : 12 = 8. V tomto případě tedy splétáme hladce dohromady každé 7. a 8. oko.

TIP:
Abychom předešli deformování pleteniny v místech s vyplétaným vzorem, dbáme na to, aby vlákna příze tažená za prací nebyla příliš utažená. Pokud má vzor přece jen tendenci příliš se stahovat, použijeme na vyplétání vzoru silnější jehlice.

VZOR:
Čepice: viz schéma A.1. Celý vzor pleteme lícovým žerzejem.
Rukavice: viz schémata A.2 a A.3. Celý vzor pleteme lícovým žerzejem.

TIP – UJÍMÁNÍ 2 (čepice):
Ujmeme 1 oko za každou značkou; ujímáme přetažením, tj. 1 oko sejmeme hladce, 1 upleteme hladce a sejmuté přes ně přetáhneme (= ujmuli jsme 1 oko).

TIP - PŘIDÁVÁNÍ (rukavice- klínek pro palec):
Celý klínek pleteme světle béžovou přízí. Pleteme až k označenému oku, 1x nahodíme, 1 oko upleteme hladce (= označené oko), 1x nahodíme (= přidali jsme 2 oka). V následující kruhové řadě pleteme nahození za zadní nit, aby se v pletenině netvořily dírky.
Při následujícím přidávání postupujeme takto: pleteme až po 1 oko před označeným okem, 1x nahodíme, 3 oka upleteme hladce, 1x nahodíme (= přidali jsme 2 oka). Takto pokračujeme v přidávání – přidáváme v každé 2. kruhové řadě, tj. vždy přidáme na vnějších okrajích vznikajícího klínu.

TIP – UJÍMÁNÍ 3 (špička rukavic):
Začínáme 3 oka před značkou: 2 oka spleteme hladce, 2 upleteme hladce (značka leží mezi nimi), 1 oko sejmeme hladce, 1 upleteme hladce a sejmuté přes ně přetáhneme (= ujmuli jsme 2 oka).

----------------------------------------------------------

POPIS PRÁCE:

-------------------------------------------------------

ČEPICE - JAK BUDEME POSTUPOVAT:
Pleteme v kruhových řadách na kruhové jehlici, zdola nahoru. Podle potřeby převedeme pleteninu s ubývajícím počtem ok na ponožkové jehlice.

ČEPICE:
Na kruhovou jehlici č.4 nahodíme přízí v barvě růže 96-104-112 ok a pleteme v kruhových řadách pružným vzorem 2/2 (tj. střídáme 2 oka hladce, 2 obrace). Ve výši 4 cm převedeme pleteninu na kruhovou jehlici č.4,5. Pleteme 1 kruhovou řadu hladce a SOUČASNĚ ujmeme rovnoměrně 12-14-16 ok – viz TIP – UJÍMÁNÍ 1 = 84-90-96 ok.
Viz TIP. Nyní pleteme v kruhových řadách VZOR A.1 – viz výše (= 14-15-16 sekvencí vzoru po 6 okách).
Po dokončení celé sekvence vzoru A.1 (na výšku) pokračujeme přízí v barvě růže a pleteme lícovým žerzejem až do ukončení práce. Ve výši 19-20,5-22 cm vložíme do pleteniny 6 značek, takto: první značkou označíme začátek kruhové řady, dalších 5 značek pak vkládáme vždy po 14-15-16 okách. V následující kruhové řadě ujmeme 1 oko za každou značkou - viz TIP – UJÍMÁNÍ 2 (= ujmeme 6 ok). Takto ujímáme v každé 2. kruhové řadě, celkem 3-4-4x, pak ujmeme ještě v každé kruhové řadě, celkem 3-3-4x = zbývá 48-48-48 ok. V každé z následujících 2 kruhových řad spleteme každá 2 oka hladce = zbývá 12-12-12 ok. Přízi odstřihneme, protáhneme zbylými oky, stáhneme a zapošijeme.
Čepice měří asi 24-26-28 cm.

----------------------------------------------------------

RUKAVICE - JAK BUDEME POSTUPOVAT:
Pleteme v kruhových řadách na ponožkových jehlicích.

PRAVÁ RUKAVICE:
Na ponožkové jehlice č.3,5 nahodíme přízí v barvě růže 40-40-44 ok a upleteme 1 kruhovou řadu hladce. Pak pleteme v kruhových řadách pružným vzorem 2/2 (tj. střídáme 2 oka hladce, 2 obrace). Ve výši 4 cm převedeme pleteninu na ponožkové jehlice č.4. Pleteme 1 kruhovou řadu hladce a SOUČASNĚ ujmeme rovnoměrně 4-4-2 oka – viz TIP – UJÍMÁNÍ 1 = 36-36-42 ok. Viz TIP. Pak pleteme v kruhových řadách vzor A.2 – viz výše (= 6-6-7 sekvencí vzoru po 6 okách).
Po dokončení celé sekvence vzoru A.2 (na výšku) pokračujeme světle béžovou přízí lícovým žerzejem. Ve výši 9 cm si označíme 1. oko v kruhové řadě. Nyní tvarujeme klínek palce – přidáváme 1 oko na každé straně označeného oka - viz TIP - PŘIDÁVÁNÍ (= přidáme 2 oka). Takto přidáváme v každé 2. kruhové řadě, celkem 5-6-7x = 46-48-56 ok. Dál pleteme už bez přidávání, až do výše 14-15-16 cm. V následující kruhové řadě odložíme 11-13-15 ok palce na pomocnou jehlici a pleteme v kruhových řadách světle béžovou přízí jako dosud, za odloženými oky palce nahodíme 1 oko nové = 36-36-42 ok.
Nyní pleteme v kruhových řadách vzor A.3 (= 6-6-7 sekvencí po 6 okách). Po dokončení celé sekvence vzoru A.3 (na výšku) pleteme světle béžovou přízí lícovým žerzejem až do ukončení práce. Když je rukavice vysoká 22-23-24 cm (do ukončení práce nám zbývá doplést asi 4 cm výšky – rukavici si teď můžete vyzkoušet a míry upravit), označíme si začátek kruhové řady a druhou značku vložíme za 18.-18.-21. oko. V následující kruhové řadě ujmeme na obou stranách obou značek 1 oko – viz TIP – UJÍMÁNÍ 3 (= ujmeme 4 oka). Takto ujímáme v každé 2. kruhové řadě , celkem 3-3-3x, pak ujmeme ještě v každé kruhové řadě, celkem 2-2-2x = zbývá 16-16-22 ok. V každé z následujících 2 kruhových řad spleteme každá 2 oka hladce = zbývají 4-4-6 oka. Přízi odstřihneme, protáhneme zbylými oky, stáhneme a zapošijeme.
Rukavice měří asi 26-27-28 cm.

PALEC:
Odložených 11-13-15 ok palce vrátíme z pomocné jehlice zpět na ponožkové jehlice č.4 a navíc nabereme 4-4-4 oka z okraje za nimi = 15-17-19 ok. Pleteme v kruhových řadách lícovým žerzejem. Když je palec vysoký 5-5,5-6 cm (do ukončení práce nám zbývá doplést asi 0,5 cm výšky – rukavici si teď můžete vyzkoušet a míry upravit), spleteme v každé z následujících 2 kruhových řad každá 2 oka hladce = zbývá 4-5-5 ok. Přízi odstřihneme, protáhneme zbylými oky, stáhneme a zapošijeme.

LEVÁ RUKAVICE:
Nahodíme a pleteme stejně jako pravou rukavici, ale pro palec si označíme poslední oko v kruhové řadě. Zbytek rukavice upleteme stejně jako pravou.

Schéma

symbols = světle béžová
symbols = růže
diagram

Každý náš návod je doprovázen speciálními video-ukázkami, které vás navedou.

Chcete se na něco zeptat? Projděte si seznam nejčastějších otázek (FAQ).

Knitting tension is what determines the final measurements of your work, and is usually measured per 10 x 10 cm. It is provided like so: number of stitches in width x number of rows in height - eg: 19 stitches x 26 rows = 10 x 10 cm.

The knitting tension is very individual; some people knit/crochet loosely while others work tightly. You adjust the knitting tension with the needle size, which is why the suggested needle size is only meant as a guide! You need to adjust this (up or down) to ensure that YOUR knitting tension matches the knitting tension provided in the pattern. If you work with a different knitting tension than provided you will have a different yarn consumption, and your work will have different measurements than what the pattern suggests.

The knitting tension also determines which yarns can replace each other. As long as you achieve the same knitting tension you can replace one yarn with another.

See DROPS lesson: How to measure your tension/gauge

See DROPS video: How to make a gauge tension swatch

The required amount of yarn is provided in grams, eg: 450 g. To calculate how many balls you’ll need you first need to know how many grams are in 1 ball (25g, 50g or 100g). This information is available if you click on the individual yarn quality on our pages. Divide the amount required with the amount of each ball. For example, if each ball is 50g (the most common amount), the calculation will be as follows: 450 / 50 = 9 balls.

The important thing when changing from one yarn to another is that the knitting/crochet tension remains the same. This is so that the measurements of the finished piece will be the same as on the sketch provided. It is easier to achieve the same knitting tension using yarns from the same yarn group. It is also possible to work with multiple strands of a thinner yarn to achieve the knitting tension of a thicker one. Please try our yarn converter. We recommend you to always work a test swatch.

Please NOTE: when changing yarn the garment might have a different look and feel to the garment in the photo, due to individual properties and qualities of each yarn.

See DROPS lesson: Can I use a different yarn than the one mentioned in the pattern?

All our yarns are categorised into yarn groups (from A to F) according to thickness and knitting tension – group A contains the thinnest yarns and group F the thickest. This makes it easier for you to find alternative yarns to our patterns, should you wish to switch yarn. All yarns within the same group have a similar knitting tension and can easily replace each other. However, different yarn qualities have different structures and properties which will give the finished work a unique look and feel.

Click here for an overview of the yarns in each yarn group

At the top of all our patterns you’ll find a link to our yarn calculator, which is a helpful tool should you wish to use a different yarn than suggested. By filling in the yarn quality you wish to replace, the amount (in your size) and number of strands, the calculator will present good alternative yarns with the same knitting tension. Additionally it will tell you how much you’ll require in the new qualities and whether you’ll need to work with multiple strands. Most skeins are 50g (some are 25g or 100g).

If the pattern is worked with multiple colours, every colour will have to be calculated separately. Similarly, if the pattern is worked with several strands of different yarns (for example 1 strand Alpaca and 1 strand Kid-Silk) you will have to find alternatives for each, individually.

Click here to see our yarn calculator

Since different yarns have different qualities and textures we have chosen to keep the original yarn in our patterns. However, you can easily find options among our available qualities by using our yarn calculator, or simply pick a yarn from the same yarn group.

It is possible that some retailers still have discontinued yarns in stock, or that someone has a few skeins at home that they would like to find patterns for.

The yarn calculator will provide both alternative yarn as well as required amount in the new quality.

If you think it's hard to decide what size to make, it can be a good idea to measure a garment you own already and like the size of. Then you can pick the size by comparing those measures with the ones available in the pattern's size chart.

You'll find the size chart at the bottom of the pattern.

See DROPS lesson: How to read size chart

The needle size provided in the pattern serves only as a guide, the important thing is to follow the knitting tension. And since knitting tension is very individual, you will have to adjust the needle size to ensure that YOUR tension is the same as in the pattern – maybe you’ll have to adjust 1, or even 2 needle sizes, up or down to achieve the correct tension. For this, we recommend that you work test swatches.

Should you work with a different knitting tension than the one provided, the measurements of the finished garment might deviate from the measurement sketch.

See DROPS lesson: How to measure your tension/gauge

See DROPS video: How to make a tension/gauge swatch

Working a garment top-down provides more flexibility and room for personal adjustment. For example it is easier to try the garment on while working, as well as making adjustments to length of yoke and shoulder caps.

The instructions are carefully explaining every step, in the correct order. Diagrams are adjusted to the knitting direction and are worked as usual.

The diagram depicts all rows/rounds, and every stitch seen from the right side. It is read from bottom to top, from right to left. 1 square = 1 stitch.

When working back and forth, every other row is worked from the right side and every other row is worked from the wrong side. When working from the wrong side, the diagram will have to be worked reversed: from left to right, knit stitches are purled, purl stitches are knit etc.

When working in the round every round is worked from the right side and the diagram are worked from right to left on all rounds.

See DROPS lesson: How to read knitting diagrams

The diagram depicts all rows/rounds, and every stitch seen from the right side. It is worked from bottom to top, from right to left.

When working back and forth every other row is worked from the right side: from right to left and every other row is worked from the wrong side: from left to right.

When working in the round, every row in the diagram are worked from the right side, from right to left.

When working a circular diagram you start in the middle and work your way outwards, counter clockwise, row by row.

The rows usually start with a given number of chain stitches (equivalent to the height of the following stitch), this will either be depicted in the diagram or explained in the pattern.

See DROPS lesson: How to read crochet diagrams

Instructions for working several diagrams after each other on the same row/round, will often be written like so: “work A.1, A.2, A.3 a total of 0-0-2-3-4 times". This means you work A.1 once, then A.2 is worked once, and A.3 is repeated (in width) the number of times provided for your size – in this case like so: S = 0 times, M = 0 times, L=2 times, XL= 3 times and XXL = 4 times.

The diagrams are worked as usual: begin with the first row in A.1, then work the first row in A.2 etc.

See DROPS lesson: How to read knitting diagrams

See DROPS lesson: How to read crochet diagrams

The total width of the garment (from wrist-to-wrist) will be larger in the larger sizes, despite the actual sleeves being shorter. The larger sizes have longer sleeve caps and wider shoulders, so there will be a good fit in all sizes.

The measurement sketch/schematic drawing provides information regarding the full length of the garment. If it’s a jumper or a jacket the length is measured from the highest point on the shoulder closest to the neckline, and straight down to the bottom of the garment. It is NOT measured from the tip of shoulder. Similarly, the length of yoke is measured from the highest point on the shoulder and down to where yoke is split into body and sleeves.

On a jacket measures are never taken along bands, unless specifically stated. Always measure inside band stitches when measuring the length.

See DROPS lesson: How to read a schematic drawing

Diagrams are often repeated on the round or in height. 1 repeat is the diagram the way it appears in the pattern. If it says to work 5 repeats of A.1 in the round, then you work A.1 a total of 5 times after/next to each other in the round. If it says to work 2 repeats of A.1 vertically/in height you work the entire diagram once, then begin again at the start and work the entire diagram one more time.

Chain stitches are slightly narrower than other stitches and to avoid working the cast-on edge too tight, we simply chain more stitches to begin with. The stitch count will be adjusted on the following row to fit the pattern and measurement sketch.

The rib edge is more elastic and will contract slightly compared to, for example, stocking stitch. By increasing before the rib edge, you avoid a visible difference in width between the rib edge and the rest of the body.

It’s very easy to cast off too tightly, and by making yarn overs while casting off (and simultaneously casting these off) you avoid a too tight cast off edge.

See DROPS video: How to bind off with yarn overs (yo)

To achieve an even increase (or decrease) you can increase on, for example: every 3rd and 4th row alternately, like so: work 2 rows and increase on the 3rd row, work 3 rows and increase on the 4th. Repeat this until the increase is complete.

See DROPS lesson: Increase or decrease 1 st on every 3rd and 4th row alternately

Should you prefer to work in the round instead of back and forth, you may of course adjust the pattern. You’ll need to add steeks mid-front (usually 5 stitches), and follow the instructions. When you would normally turn and work from the wrong side, simply work across the steek and continue in the round. At the end you’ll cut the piece open, pick up stitches to work bands, and cover the cut edges.

See DROPS video: How to knit steeks and cut open

Should you prefer to work back and forth instead of in the round, you may of course adjust the pattern so you work the pieces separately and then assemble them at the end. Divide the stitches for the body in 2, add 1 edge stitch in each side (for sewing) and work the front and back pieces separately.

See DROPS lesson: Can I adapt a pattern for circular needles into straight needles?

Pattern repeats can vary slightly in the different sizes, in order to get the correct proportions. If you’re not working the exact same size as the garment in the photo, yours might deviate slightly. This has been carefully developed and adjusted so that the complete impression of the garment is the same in all sizes.

Make sure to follow instructions and diagrams for your size!

If you have found a pattern you like which is available in women’s size it’s not very difficult to convert it to men’s size. The biggest difference will be the length of sleeves and body. Start working on the women size that you think would fit across the chest. The additional length will be worked right before you cast off for the armhole/sleeve cap. If the pattern is worked top-down you can add the length right after the armhole or before the first decrease on sleeve.

Regarding additional yarn amount, this will depend on how much length you add, but it is better with a skein too many than too few.

All yarns will have excess fibres (from production) that might come off as lint or shedding. Brushed yarns (ie hairier yarns) have more of these loose, excess fibres, causing more shedding.

Shedding also depends on what is worn under or over the garment, and whether this pulls at the yarn fibres. It’s therefore not possible to guarantee that there will be no shedding

Below are some tips on how to get the best result when working with hairier yarns:

1. When the garment is finished (before you wash it) shake it vigorously so the looser hairs come off. NOTE: do NOT use a lint roller, brush or any method that pulls at the yarn.

2. Place the garment in a plastic bag and put it in your freezer - the temperature will cause the fibres to become less attached to each other, and excess fibres will come off easier.

3. Leave in the freezer for a few hours before taking it out and shaking it again.

4. Wash the garment according to the instructions on the yarn label.

Pilling is a natural process that happens to even the most exclusive of fibers. It's a natural sign of wear and tear that is hard to avoid, and that is most visible in high friction areas of your garment like a sweater's arms and cuffs.

You can make your garment look as new by removing the pilling, using a fabric comb or a pill/lint remover.

Pořád se nemůžete dobrat odpovědi, kterou hledáte? Pak posuňte stránku dolů a napište nám svůj dotaz, naši specialisté se vám pokusí poradit. Obvykle to zvládneme během 5 až 10 pracovních dnů..
Mezitím si můžete pročíst otázky a odpovědi, které k tomuto modelu položili ostatní, nebo navštívit skupinu DROPS Workshop na Facebooku, kde vám může poradit některá spřízněná duše!

Přidejte komentář k návodu DROPS 196-14

Rádi bychom věděli, co si o tomto modelu myslíte!

Pokud se chcete na něco zeptat, dbejte prosím na to, abyste ve formuláři níže vybrali správnou kategorii - díky tomu se dříve dozvíte, co potřebujete vědět. Povinná pole jsou označena *.

Komentáře / Otázky (5)

country flag Johana wrote:

Dobrý den, na jaké velikosti jehlic se plete zkušební vzorek? (konkrétně u této čepice i obecně - nikde to není napsané a tak pletu zkušební vzorky na těch hlavních jehlicích (ne velikost pro lemy) a jednou mi to vychází, že moc utahuji, podruhé, že pletu moc volně... Děkuji

28.01.2023 - 19:36

DROPS Design answered:

Milá Johano, postupujete naprosto správně! Zkušební vzorek pleteme vždy na těch "hlavních" jehlicích (pokud není výslovně uvedeno jinak). To, že se hustota vašeho vzorku zcela neshoduje s tím v návodu, je zcela normální - každý plete jinak, i jednotliví návrháři, i vy. Proto je dobré vždy vzorek udělat a míry si srovnat. Mohl by se vám také hodit náš článek Jak změřit hustotu úpletu . Hodně zdaru! Hana

30.01.2023 - 06:36

country flag Lydia Lee Cain wrote:

Hi , I would like to knit this set. Confused about how many balls of Drops Air to purchase. As stated: 100-100-100 g colour 14, heather 50-50-50 g colour 02, wheat Is that six balls of Heather and three balls of wheat? Thank you in advance for any help. Please take care.

05.07.2021 - 21:14

DROPS Design answered:

Dear Lydia, the set (hat and mittens) is knitted from DROPS Air yarn that comes in 50 gramms ball, so you will need 100 gramms (2 balls) of the heather color, and 50 grams (1 ball) od the wheat color. Happy Knitting!

05.07.2021 - 21:46

country flag Lera wrote:

Hello! I am knitting this hat and after decreasing 16 stitches (XL size) it is very small for me. What can I do now to make a proper hat?

12.07.2020 - 13:02

DROPS Design answered:

Dear Lera, did you check your tension? You should have 18 sts = 10 cm in width - read more about tension here. Happy knitting!

13.07.2020 - 09:08

country flag Hetty Stok wrote:

When I do the gusset increase I have one line up which is the stitch with the marker. It doesn’t look like your tutorial. I can’t interpret the instructions to come out the same as the tutorial because it seems to me that I’m doing exactly what it says. However it looks different. Do you have any clearer diagrams or photos of it. Totally confused!

30.03.2020 - 14:24

DROPS Design answered:

Dear Mrs Stok, when working gousset for thumb you have to increase on each side of the stitch with the marker. This means there will be always more stitches between each increase, first time you will have: Inc 1, K1 (=marker), Inc 1. Then you will have: Inc 1, K3 (marker is in the middle st), Inc 1. Then: inc 1, K5 (marker is in the middle st), inc 1 and so on until you have increased all sts (5-6-7 sts on each side of the stitch with marker). Happy knitting!

30.03.2020 - 15:11

country flag Patricia A wrote:

Bonjour Merci pour vos merveilleux modèles et vos très belles laines. Je tricote le pull et le bonnet ci dessus en brushed alpaca silk et j observe je pense une erreur sur les 2 derniers rangs de la grille du bonnet A1. En effet si je respecte la grille , je termine avec la couleur opposée. Vous pouvez vérifier s il vous plaît ? Merci beaucoup.

22.11.2019 - 10:09

DROPS Design answered:

Bonjour Patricia, je ne suis pas sûre de bien comprendre, à l'avant-dernier rang de A.1, vous tricotez: *2 m bruyère, 3 m blé, 1 m bruyère* et répétez de *-* (vous aurez ainsi 3 m bruyère, 3 m blé tout le tour. Puis, vous tricotez: *3 m bruyère, 1 m blé, 2 m bruyère*, vous aurez ainsi 5 m bruyère, 1 m blé tout le tour. Bon tricot!

22.11.2019 - 10:59