
Popular categories
Looking for a yarn?


|
||||||||||||||||
Stroll in the Park |
||||||||||||||||
 |
 |
|||||||||||||||
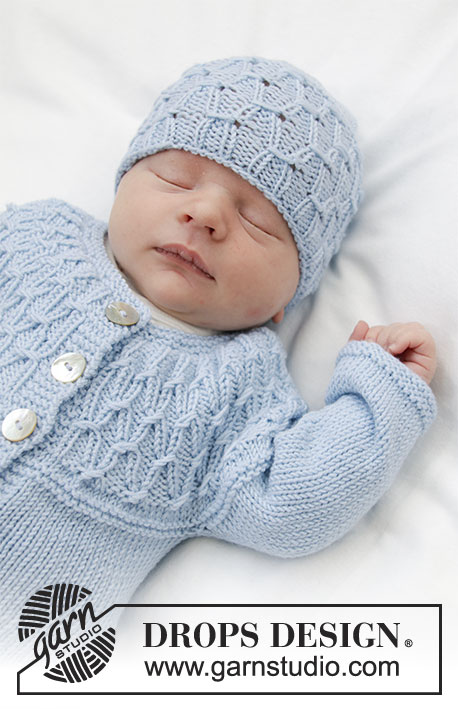
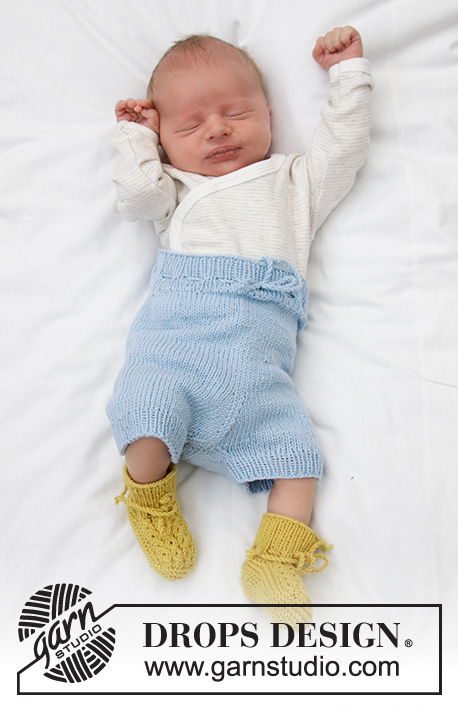
Jacket for baby with round yoke and textured pattern, knitted top down. Shorts for baby with ties and rib. Piece is knitted in DROPS BabyMerino or Drops Alpaca. Size: Premature to 2 years
DROPS Baby 33-26 |
||||||||||||||||
|
---------------------------------------------------------- EXPLANATION FOR THE PATTERN: ---------------------------------------------------------- INFORMATION FOR PATTERN: GARTER STITCH (back and forth): 1 ridge = knit 2 rows. RIDGE/GARTER STITCH (worked in the round): 1 ridge = 2 rounds. Knit 1 round and purl 1 round. PATTERN: See diagram A.1. Diagrams show all rows in pattern seen from the right side. INCREASE TIP (evenly on jacket): To calculate how to increase evenly, use the total number of stitches on row (e.g. 68 stitches), minus bands (e.g. 10 stitches) and divide the remaining stitches by number of increases to be done (e.g. 11) = 5.2. In this example increase after alternately approx. every 5th stitch by making 1 yarn over. On next row work yarn overs twisted to avoid holes Do not increase over bands. RAGLAN (applies to size 12/18 months - 2 years): Increase for raglan on each side of the 4 marker threads in every transition between body and sleeves (= 8 stitches increased on every increase row). All increases are done from the right side! Work until 1 stitch remains before marker thread, make 1 yarn over, knit 2 (marker thread is in the middle of these 2 stitches), make 1 yarn over (= 2 stitches increased). On next row (wrong side) purl yarn overs twisted to avoid holes. DECREASE TIP (applies to mid under sleeve on jacket and on inside of legs on shorts): Begin 3 stitches before marker and knit 2 together, knit 2 (marker is between these 2 stitches), slip 1 stitch knitwise, knit 1, pass slipped stitch over stitch worked (= 2 stitches decreased). BUTTONHOLES: Decrease for buttonholes on right band (when garment is worn). 1 buttonhole = work from right side until 3 stitches remain on needle, make 1 yarn over, knit 2 together and finish by knitting 1. On next row (wrong side) knit the yarn over to make a hole. Decrease for first buttonhole on first row from right side after neck edge. Then decrease the next 4 buttonholes approx. 5 cm = 2" apart. INCREASE TIP (applies mid front and mid back on shorts): Work until 1 stitch remains before marker thread, make 1 yarn over, knit 2 (marker thread is in the middle of these 2 stitches), make 1 yarn over (= 2 stitches increased). On next round knit yarn overs twisted to avoid holes. ---------------------------------------------------------- BEGIN PIECE FOR JACKET HERE: ---------------------------------------------------------- JACKET - SHORT OVERVIEW OF THE PIECE: Work yoke and body back and forth on circular needle from mid front, work top down. Work sleeves in the round on double pointed needles, top down. NECK EDGE: Cast on (68) 72-78-82-84 (86) stitches (including 5 band stitches in each side towards mid front) on circular needle size 2.5 mm = US 1,5 with Baby Merino or Alpaca. Work 2 ridges in GARTER STITCH - see explanation above. Knit 1 row from right side while increasing (11) 16-16-18-19 (20) stitches evenly - read INCREASE TIP and decrease for BUTTONHOLES on right band - see explanation above = (79) 88-94-100-103 (106) stitches. Purl 1 row from wrong side (knit bands). Switch to circular needle size 3 mm = US 2,5 and work yoke as explained below. YOKE: Work first row as follows from right side: 5 band stitches in garter stitch, A.1A (= 2 stitches), work A.1B until 9 stitches remain on row (= (21) 24-26-28-29 (30) repetitions of 3 stitches), work A.1C (= 4 stitch) and finish with 5 band stitches in garter stitch. Continue pattern like this and increase as shown in diagrams. REMEMBER THE KNITTING GAUGE! When A.1 has been worked vertically, there are (148) 166-178-190-196 (202) stitches on row and piece measures approx. 7 cm = 2¾" from cast-on edge. Work 2 rows in stockinette stitch with 5 band stitches in garter stitch in each side and increase AT THE SAME TIME (10) 16-20-24-14 (12) stitches evenly on first row = (158) 182-198-214-210 (214 stitches. Work 2 ridges in GARTER STITCH - see explanation above. Then work as explained in the different sizes. PREMATURE, 0/1 MONTHS, 1/3 MONTHS + 6/9 MONTHS: Continue with stockinette stitch and 5 band stitches in garter stitch in each side towards mid front until piece measures (9) 9-10-11 cm = (3½") 3½"-4"-4⅜" from cast-on edge mid front. Work next row as follows in stockinette stitch with 5 band stitches in garter stitch in each side: Work(25) 28-31-33 stitches (= front piece), slip the next (34) 40-42-46 stitches on 1 stitch holder for sleeve, cast on (4) 4-6-6 new stitches on row (= in the side under sleeve), work (40) 46-52-56 stitches as before (= back piece), slip the next (34) 40-42-46 stitches on 1 stitch holder for sleeve, cast on (4) 4-6-6 new stitches on row (= in the side under sleeve) and work the (25) 28-31-33 stitches (= front piece). Then work body as explained below. NOW MEASURE THE PIECE FROM HERE! 12/18 MONTHS, 2 YEARS: Insert 4 marker threads in piece (without working stitches) as follows: Insert first marker thread after the first 33 (34) stitches (= front piece), insert 2nd marker thread after the next 44 (44) stitches (= sleeve), insert 3rd marker thread after the next 56 (58) stitches (= back piece), and insert 4th marker thread after the next 44-44 stitches (= sleeve). 33 (34) stitches remain on row after last marker thread (= front piece). Continue in stockinette stitch back and forth with 5 band stitches in garter stitch in each side towards mid front. When 2 rows have been worked, increase for RAGLAN on next row from right side - see explanation above. Increase like this every 4th row (i.e. every other row from right side) 2 (3) times in total. After last increase for raglan there are 226 (238) stitches on needle. Work until piece measures 12 (13) cm = 4¾" (5⅛") from cast-on edge. Work next row as follows in stockinette stitch with 5 band stitches in garter stitch in each side: Work 35 (37) stitches (= front piece), slip the next 48 (50) stitches on 1 stitch holder for sleeve, cast on 8 (8) new stitches on row (= in the side under sleeve), work 60 (64) stitches as before (= back piece), slip the next 48 (50) stitches on 1 stitch holder for sleeve, cast on 8 (8) new stitches on row (= in the side under sleeve) and work the remaining 35 (37) stitches (= front piece). Then work body as explained below. NOW MEASURE THE PIECE FROM HERE! BODY: = (98) 110-126-134-146 (154) stitches. Continue back and forth in stockinette stitch with 5 band stitches in garter stitch in each side towards mid front. When piece measures (7) 11-14-15-17 (19) cm = (2¾") 4⅜"-5½"-6"-6¾" (7½") from division switch to circular needle size 2.5 mm = US 1,5. Work 3 ridges back and forth over all stitches. Switch back to circular needle size 3 mm = US 2,5. Loosely bind off by knitting from right side. Jacket measures approx. (20) 24-28-30-33 (36) cm = (8") 9½"-11"-11¾"-13" (14¼") from shoulder and down. SLEEVE: Slip the (34) 40-42-46-48 (50) stitches from stitch holder in one side of piece on double pointed needles size 3 mm = US 2,5 and pick in addition up 1 stitch in each of the (4) 4-6-6-8 (8) new stitches cast on under sleeve = (38) 44-48-52-56 (58) stitches. Insert 1 marker thread in the middle of the (4) 4-6-6-8 (8) stitches under sleeve and move the marker thread upwards when working. Work in stockinette stitch in the round. When piece measures 2 cm = ¾" from division, decrease 2 stitches mid under sleeve - read DECREASE TIP. Decrease like this every (3) 2-2-1½-1½ (1½) cm = (1⅛") ¾"-¾"-½"-½" (1/2") (2) 4-6-7-9 (9) times in total = (34) 36-36-38-38 (40) stitches. Work until piece measures (7) 11-14-15-18 (19) cm = (2¾") 4⅜"-5½"-6"-7" (7½") from division. Switch to double pointed needles size 2.5 mm = US 1,5. Work 3 ridges in GARTER STITCH in the round - see explanation above. Switch back to double pointed needles size 3 mm = US 2,5 and loosely bind off by knitting. Sleeve measures approx. (8) 12-15-16-19 (20) cm = (3⅛") 4¾"-6"-6¼"-7½" (8") from division. Work the other sleeve the same way. ASSEMBLY: Sew the buttons on to the left band. ---------------------------------------------------------- BEGIN PIECE FOR SHORTS HERE: ---------------------------------------------------------- SHORTS - SHORT OVERVIEW OF THE PIECE: Worked in the round on circular needles/double pointed needles, top down. Cast on (96) 106-116-132-144 (152) stitches on circular needle size 2.5 mm = US 1,5 with Baby Merino or Alpaca. Knit 1 round. Then work rib in the round = knit 1/ purl 1. When rib measures 2½ cm = 1", work a round with eyelet holes for tie as follows: * Knit 1, purl 1, make 1 yarn over, purl 2 together *, work from *-* the entire round (= (24) 26-29-33-36 (38) holes on round). Then continue rib = knit 1/purl 1 until piece measures 4 cm = 1½" from cast-on edge. Switch to circular needle size 3 mm = US 2,5, knit 1 round while decreasing (10) 10-10-12-14 (18) stitches evenly - read DECREASE TIP-1 = (86) 96-106-120-130 (134) stitches. Now work an elevation at the back of shorts as explained below. ELEVATION AT THE BACK: To get a better fit work the shorts higher at the back than at the front. This is done by working short rows back and forth as follows: Insert 1 marker at beginning of round = mid back. Work from right side and knit 8 past marker, turn, tighten yarn and purl 16 stitches back. Turn, tighten yarn and knit 24, turn, tighten yarn and purl 32. Turn, tighten yarn and knit 40, turn, tighten yarn and purl 48. Turn piece, tighten yarn and knit until mid back. SHORTS: Continue in the round in stockinette stitch over all stitches. REMEMBER THE KNITTING GAUGE! When shorts measures (14) 16-17-20-21 (22) cm = (5½") 6¼"-6¾"-8"-8¼" (8¾") from cast-on edge, insert 1 marker thread mid front and 1 marker thread mid back. On next round increase 1 stitch on each side of both marker threads – read INCREASE TIP (= 4 stitches increased). Increase like this every other round 6 times in total = (110) 120-130-144-154 (158) stitches. Work until piece measures (18) 20-21-24-25 (26) cm = (7") 8"-8¼"-9½"-9¾" (10¼") from cast-on edge mid front. Now divide for legs at both marker threads. Slip half the stitches on a stitch holder or extra needle and work leg over the remaining stitches as explained below. NOW MEASURE THE PIECE FROM HERE! LEG: = (55) 60-65-72-77 (79) stitches. Distribute the stitches on double pointed needles size 3 mm = US 2,5 and work in stockinette stitch in the round. AT THE SAME TIME after 1 round, decrease 2 stitches on inside of leg - read DECREASE TIP. Decrease like this every other round (2) 2-2-2-3 (3) times in total = (51) 56-61-68-71 (73) stitches. Switch to double pointed needles size 2.5 mm = US 1,5. Knit 1 round while increasing (5) 6-7-8-9 (9) stitches evenly = (56) 62-68-76-80 (82) stitches. Work rib in the round = knit 1/purl 1 for 2 cm = ¾". Loosely bind off stitches with knit over knit and purl over purl. Work the other leg the same way. TWINED STRING FOR TIE: Cut 2 lengths of 3 metres = 120" each. Twine the strands tog until they resist, fold the string double so that it twines again. Make a knot at each end. Thread tie up and down in row with eyelet holes on shorts, make a bow mid front. |
||||||||||||||||
Diagram explanations |
||||||||||||||||
|
||||||||||||||||

|
||||||||||||||||

|
||||||||||||||||

|
||||||||||||||||
|
Have you made this or any other of our designs? Tag your pictures in social media with #dropsdesign so we can see them! Do you need help with this pattern?You'll find tutorial videos, a Comments/Questions area and more by visiting the pattern on garnstudio.com. © 1982-2024 DROPS Design A/S. We reserve all rights. This document, including all its sub-sections, has copyrights. Read more about what you can do with our patterns at the bottom of each pattern on our site. |
||||||||||||||||


With over 40 years in knitting and crochet design, DROPS Design offers one of the most extensive collections of free patterns on the internet - translated to 17 languages. As of today we count 304 catalogs and 11422 patterns - 11417 of which are translated into English (US/in).
We work hard to bring you the best knitting and crochet have to offer, inspiration and advice as well as great quality yarns at incredible prices! Would you like to use our patterns for other than personal use? You can read what you are allowed to do in the Copyright text at the bottom of all our patterns. Happy crafting!
Comments / Questions (45)
Is there a free pdf pattern for the stroll in the park
02.01.2021 - 07:51DROPS Design answered:
Dear Kaye. All of the patterns in this website are free. To get the pdf, you should click on print and then, in your computer’s printing screen, select save as pdf. Happy knitting!
02.01.2021 - 13:01Se puede hacer el modelo baby33-26 con dos agujas el lugar de las circulares? Gracias. Saludos.
01.12.2020 - 17:08DROPS Design answered:
Hola Cristina! Como adaptar un patrón para agujas circulares y tejerlo con agujas rectas encontreras en el video AQUI. Buen trabajo!
02.12.2020 - 10:06Hei. Er det mulig å få oppskrift på denne babyjakken i dame str. ?
24.10.2020 - 19:01DROPS Design answered:
Hei Britt. Ta en titt på jakken i DROPS 179-1, samme teknikk. God Fornøyelse!
25.10.2020 - 20:56W instrukcji do szortów jest napisane, żeby mierzyć długość spodni od rzędu nabierania oczek - ale długość spodni jest inna z przodu a inna z tyłu - ze względu na podwyższenie tyłu. Gdzie mierzyć w takim razie?
20.10.2020 - 22:17DROPS Design answered:
Witaj Mario, należny zawsze mierzyć wzdłuż przodu. Pozdrawiamy!
21.10.2020 - 10:11Leider klappen bei mir die Krausrippen der Jacke unten nach oben. Was kann ich tun damit dies nicht passiert. Beim Ärmel ist dies nicht der Fall.
26.09.2020 - 00:12DROPS Design answered:
Liebe Martina, Sie können die Jacke mit Stecknadeln auf einer geeigneten Unterlage spannen, anfeuchten (z.B. mit einer Sprühflasche für Blumen) und trocknen lassen, danach entfernen Sie die Stecknadeln, dann sollte sich der Rand nicht mehr rollen.
28.09.2020 - 08:45I beskrivningen saknas förklaring på RÄTSTICKNING (runt). Jag förstår hur det ska göras, men i alla fall...
21.09.2020 - 12:08DROPS Design answered:
Hej Kerstin. Tack för info! Detta har nu lagts till. Mvh DROPS Design
22.09.2020 - 08:54Hej! Kanten längst ner på koftan rullar sig för mig. Har följt mönstret och stickat en kant med rätstickning längst ner men ändå rullar den upp sig. Vad har jag gjort för fel och hur kan jag lösa det?
14.09.2020 - 07:26DROPS Design answered:
Hei Stina. Prøv å damp kanten lett. vmh DROPS design
14.09.2020 - 14:02Hallo, welche Knöpfe soll ich für dieses Modell nehmen? Laut Anleitung: DROPS PERLMUTTKNOPF, Konkav (weiß) Nr. 515. Im Online-Shop sehe ich KONKAV in weiß nur mit den Bestellnummern 521, 522 und 540. Alle leider ohne Durchmesser-Angabe. Bestell-Nr. 515 ist ein Kokos-Knopf mit 20 mm Durchmesser. 20-er Knöpfe passen wohl kaum durch Knopflöcher aus nur einem Umschlag. Also kleinere Knöpfe oder größere Löcher? Dank + Gruß, Annette
24.08.2020 - 20:10Pükstel on kästud 8 kasvatust teha, aga sel juhul ei klapi hiljem silmade arv. Inglise keelses juhendis on kuus kasvatust.
30.06.2020 - 19:11Det här är ett supertydligt mönster som är jättelätt att följa och resultatet blir så fint! Rekommenderas, även för någon som inte är så van vid att sticka.
14.05.2020 - 10:29