DROPS Sky
DROPS Sky
74% Alpaca, 18% Polyamide, 8% Wool
from 5.40 € /50g
Get the yarn to make this pattern from 27.00€.

The yarn cost is calculated from the pattern’s smallest size and the yarn’s cheapest product type. Looking for an even better price? You might find it on the DROPS Deals!

DROPS SS24

Winter Storm

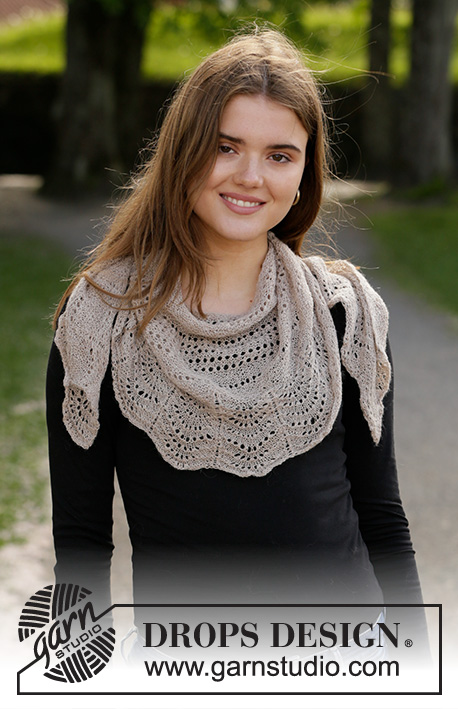
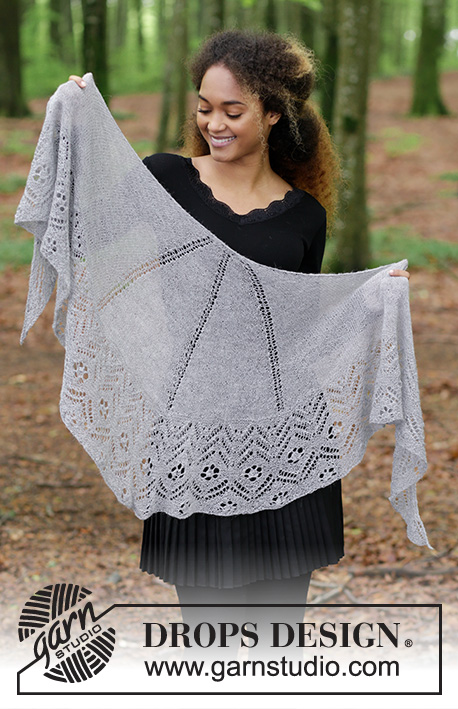
Knitted shawl with cables and garter stitch in DROPS Sky. The piece is worked top down.

DROPS 203-18
DROPS Design: Pattern no sk-059
Yarn group B
-------------------------------------------------------

SIZE:
Height: Measured along middle = approx. 72 cm.
Width: Measured along top = approx. 144 cm.

MATERIALS:
DROPS SKY from Garnstudio (belongs to yarn group B)
250 g colour 07, light sea green

KNITTING TENSION:
20 stitches in width and 26 rows in height with stocking stitch = 10 x 10 cm.

NEEDLES:
DROPS CIRCULAR NEEDLE SIZE 4.5 MM: Length 80 cm for stocking stitch.
DROPS CABLE NEEDLE – for cables.
Needle size is only a guide. If you get too many stitches on 10 cm, change to a larger needle size. If you get too few stitches on 10 cm, change to a smaller needle size.

-------------------------------------------------------

Alternative Yarn – See how to change yarns here
Yarn Groups A to F – Use the same pattern and change the yarn here
Yarn usage using an alternative yarn – Use our yarn converter here

-------------------------------------------------------

DROPS Sky
DROPS Sky
74% Alpaca, 18% Polyamide, 8% Wool
from 5.40 € /50g
Get the yarn to make this pattern from 27.00€.

The yarn cost is calculated from the pattern’s smallest size and the yarn’s cheapest product type. Looking for an even better price? You might find it on the DROPS Deals!

Pattern instructions

NOTE: This pattern is written in British English. All measurements in charts are in cm. For conversion from cm to inches - click here. There are different terms for crocheting in British and American English. If this pattern includes crochet, click for "crochet terms" here. For this pattern in American English, please click here.
-------------------------------------------------------

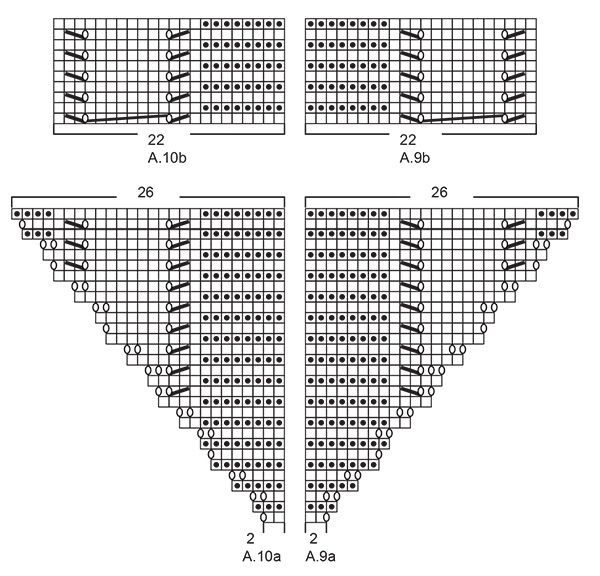
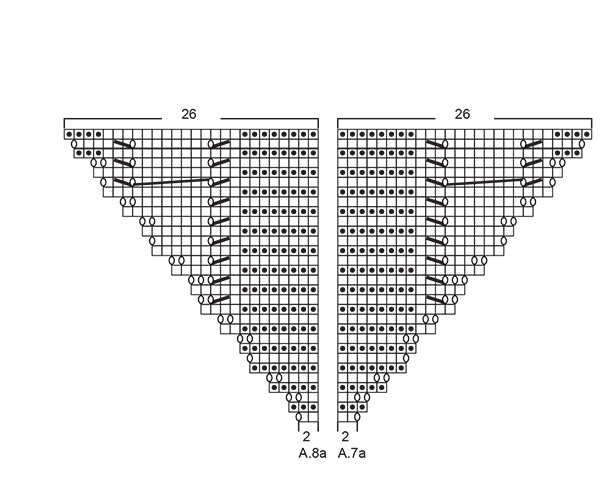
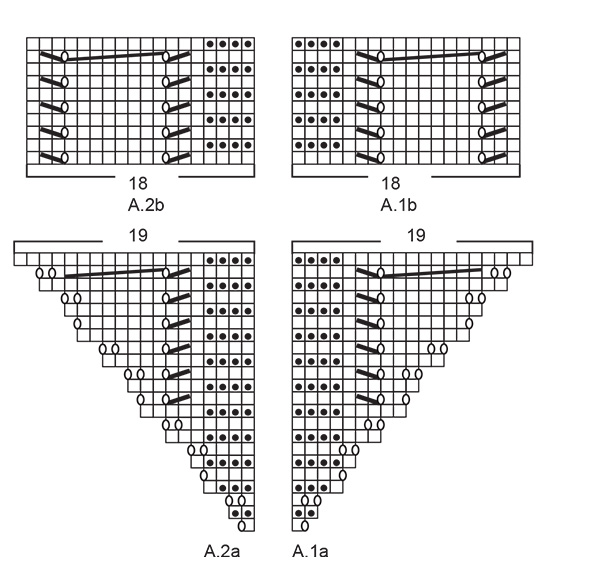
EXPLANATIONS FOR THE PATTERN:

-------------------------------------------------------

RIDGE/GARTER STITCH (worked back and forth):
Knit all rows.
1 ridge in height = Knit 2 rows.

PATTERN: 
See diagrams A.1 to A.12. Pattern A.a is worked first, then the A.b-patterns are repeated over the A.a-patterns upwards to finished length. The diagrams show all the rows in the patterns seen from the right side.

CASTING-OFF TIP:
To avoid the cast-off edge being tight make 1 yarn over after each 4th stitch; this yarn over is worked and cast off as a normal stitch.

-------------------------------------------------------

START THE PIECE HERE:

-------------------------------------------------------

SHAWL – SHORT OVERVIEW OF THE PIECE:
The shawl is worked back and forth with circular needle, top down.

SHAWL:
Cast on 7 stitches with circular needle size 4.5 mm and Sky. Knit 1 row from the wrong side.

Work as follows from the right side: Work 1 edge stitch in GARTER STITCH – read description above, * A.1a (= 1 stitch), A.2a (= 1 stitch) *, 1 mid-stitch in stocking stitch, work from *-* 1 more time and finish with 1 edge stitch in garter stitch.
Continue this pattern. The yarn overs are worked twisted to avoid holes.
The increases are drawn in the diagrams; 4 stitches are increased on the first increase-row, 8 stitches on the 2nd. Then 4 stitches are increased on the 3rd increase-row and 8 stitches on the 4th and 5th. The 3rd to 5th increase-rows are repeated in height to finished length (apart from the last increase in A.7/A.8 and A.11a/A.12a). REMEMBER THE KNITTING TENSION!
When A.1a and A.2a have been completed 1 time in height there are 79 stitches on the needle.

The next row is worked as follows from the right side:
Work 1 edge stitch in garter stitch, * A.3a (= 1 stitch), A.1b (= 18 stitches), A.2b (= 18 stitches), A.4a (= 1 stitch) *, 1 mid-stitch in stocking stitch, work from *-* 1 more time and finish with 1 edge stitch in garter stitch.
A.1b and A.2b are repeated in height to finished length.
When A.3a and A.4a have been completed 1 time in height there are 179 stitches on the needle.

The next row is worked as follows from the right side:
Work 1 edge stitch in garter stitch, * A.5a (= 4 stitches), A.3b (= 22 stitches), A.1b and A.2b as before (= a total of 36 stitches), A.4b (= 22 stitches), A.6a (= 4 stitches) *, 1 mid-stitch in stocking stitch, work from *-* 1 more time and finish with 1 edge stitch in garter stitch.
A.3b and A.4b are repeated in height to finished length.
When A.5a and A.6a have been completed 1 time in height there are 259 stitches on the needle.

The next row is worked as follows from the right side:
Work 1 edge stitch in garter stitch, * A.7a (= 2 stitches), A.5b (= 22 stitches), A.1b to A.4b as before (= a total of 80 stitches), A.6b (= 22 stitches), A.8a (= 2 stitches) *, 1 mid-stitch in stocking stitch, work from *-* 1 more time and finish with 1 edge stitch in garter stitch.
A.5b and A.6b are repeated in height to finished length.
When A.7a and A.8a have been completed 1 time in height there are 355 stitches on the needle.

The next row is worked as follows from the right side:
Work 1 edge stitch in garter stitch, * A.5a (= 4 stitches), A.5b (= 22 stitches), A.1b to A.6b as before (= a total of 124 stitches), A.6b (= 22 stitches), A.6a (= 4 stitches) *, 1 mid-stitch in stocking stitch, work from *-* 1 more time and finish with 1 edge stitch in garter stitch.
A.5b and A.6b are repeated in height to finished length.
When A.5a and A.6a have been completed 1 time in height there are 435 stitches on the needle.

The next row is worked as follows from the right side:
Work 1 edge stitch in garter stitch, * A.9a (= 2 stitches), A.9b (= 22 stitches), A.1b to A.6b as before (= a total of 168 stitches), A.10b (= 22 stitches), A.10a (= 2 stitches) *, 1 mid-stitch in stocking stitch, work from *-* 1 more time and finish with 1 edge stitch in garter stitch.
A.9b and A.10b are repeated in height to finished length.
When A.9a and A.10a have been completed 1 time in height there are 531 stitches on the needle.

The piece measures approx. 50 cm measured in the knitting direction (measured between A.1 and A.2) and approx. 71 cm measured along the mid-stitch.

If you have not reached these measurements continue working to correct length:
The next row is worked as follows from the right side:
Work 1 edge stitch in garter stitch, * A.11a (= 4 stitches), A.9b (= 22 stitches), A.1b to A.10b as before (= a total of 256 stitches), A.10b (= 22 stitches), A.12a (= 4 stitches) *, 1 mid-stitch in stocking stitch, work from *-* 1 more time and finish with 1 edge stitch in garter stitch.

Work until the piece measures approx. 71 cm, measured along the mid-stitch – adjust so you finish on a row from the wrong side.
Work 2 ridges. Cast off with knit over knit, purl over purl and garter stitch over garter stitch; make sure the cast-off edge is not tight - read CASTING OFF TIP.

Diagram

symbols = knit from right side, purl from wrong side
symbols = purl from right side, knit from wrong side
symbols = between 2 stitches make 1 yarn over (= hole)
symbols = knit 2 together
symbols = slip 1 stitch as if to knit, knit 1 and pass the slipped stitch over the knitted stitch
symbols = cable. This is worked differently before and after the mid-stitch. BEFORE the mid-stitch work the cable as follows: Place 4 stitches on cable needle behind the piece, knit 4, knit 4 stitches from the cable needle. AFTER the mid-stitch work the cable as follows: Place 4 stitches on cable needle in front of piece, knit 4, knit 4 from cable needle
diagram
diagram
diagram
diagram
diagram
diagram

Each of our patterns has specific tutorial videos to help you.

Do you have a question? See a list of frequently asked questions (FAQ)

Knitting tension is what determines the final measurements of your work, and is usually measured per 10 x 10 cm. It is provided like so: number of stitches in width x number of rows in height - eg: 19 stitches x 26 rows = 10 x 10 cm.

The knitting tension is very individual; some people knit/crochet loosely while others work tightly. You adjust the knitting tension with the needle size, which is why the suggested needle size is only meant as a guide! You need to adjust this (up or down) to ensure that YOUR knitting tension matches the knitting tension provided in the pattern. If you work with a different knitting tension than provided you will have a different yarn consumption, and your work will have different measurements than what the pattern suggests.

The knitting tension also determines which yarns can replace each other. As long as you achieve the same knitting tension you can replace one yarn with another.

See DROPS lesson: How to measure your tension/gauge

See DROPS video: How to make a gauge tension swatch

The required amount of yarn is provided in grams, eg: 450 g. To calculate how many balls you’ll need you first need to know how many grams are in 1 ball (25g, 50g or 100g). This information is available if you click on the individual yarn quality on our pages. Divide the amount required with the amount of each ball. For example, if each ball is 50g (the most common amount), the calculation will be as follows: 450 / 50 = 9 balls.

The important thing when changing from one yarn to another is that the knitting/crochet tension remains the same. This is so that the measurements of the finished piece will be the same as on the sketch provided. It is easier to achieve the same knitting tension using yarns from the same yarn group. It is also possible to work with multiple strands of a thinner yarn to achieve the knitting tension of a thicker one. Please try our yarn converter. We recommend you to always work a test swatch.

Please NOTE: when changing yarn the garment might have a different look and feel to the garment in the photo, due to individual properties and qualities of each yarn.

See DROPS lesson: Can I use a different yarn than the one mentioned in the pattern?

All our yarns are categorised into yarn groups (from A to F) according to thickness and knitting tension – group A contains the thinnest yarns and group F the thickest. This makes it easier for you to find alternative yarns to our patterns, should you wish to switch yarn. All yarns within the same group have a similar knitting tension and can easily replace each other. However, different yarn qualities have different structures and properties which will give the finished work a unique look and feel.

Click here for an overview of the yarns in each yarn group

At the top of all our patterns you’ll find a link to our yarn calculator, which is a helpful tool should you wish to use a different yarn than suggested. By filling in the yarn quality you wish to replace, the amount (in your size) and number of strands, the calculator will present good alternative yarns with the same knitting tension. Additionally it will tell you how much you’ll require in the new qualities and whether you’ll need to work with multiple strands. Most skeins are 50g (some are 25g or 100g).

If the pattern is worked with multiple colours, every colour will have to be calculated separately. Similarly, if the pattern is worked with several strands of different yarns (for example 1 strand Alpaca and 1 strand Kid-Silk) you will have to find alternatives for each, individually.

Click here to see our yarn calculator

Since different yarns have different qualities and textures we have chosen to keep the original yarn in our patterns. However, you can easily find options among our available qualities by using our yarn calculator, or simply pick a yarn from the same yarn group.

It is possible that some retailers still have discontinued yarns in stock, or that someone has a few skeins at home that they would like to find patterns for.

The yarn calculator will provide both alternative yarn as well as required amount in the new quality.

If you think it's hard to decide what size to make, it can be a good idea to measure a garment you own already and like the size of. Then you can pick the size by comparing those measures with the ones available in the pattern's size chart.

You'll find the size chart at the bottom of the pattern.

See DROPS lesson: How to read size chart

The needle size provided in the pattern serves only as a guide, the important thing is to follow the knitting tension. And since knitting tension is very individual, you will have to adjust the needle size to ensure that YOUR tension is the same as in the pattern – maybe you’ll have to adjust 1, or even 2 needle sizes, up or down to achieve the correct tension. For this, we recommend that you work test swatches.

Should you work with a different knitting tension than the one provided, the measurements of the finished garment might deviate from the measurement sketch.

See DROPS lesson: How to measure your tension/gauge

See DROPS video: How to make a tension/gauge swatch

Working a garment top-down provides more flexibility and room for personal adjustment. For example it is easier to try the garment on while working, as well as making adjustments to length of yoke and shoulder caps.

The instructions are carefully explaining every step, in the correct order. Diagrams are adjusted to the knitting direction and are worked as usual.

The diagram depicts all rows/rounds, and every stitch seen from the right side. It is read from bottom to top, from right to left. 1 square = 1 stitch.

When working back and forth, every other row is worked from the right side and every other row is worked from the wrong side. When working from the wrong side, the diagram will have to be worked reversed: from left to right, knit stitches are purled, purl stitches are knit etc.

When working in the round every round is worked from the right side and the diagram are worked from right to left on all rounds.

See DROPS lesson: How to read knitting diagrams

The diagram depicts all rows/rounds, and every stitch seen from the right side. It is worked from bottom to top, from right to left.

When working back and forth every other row is worked from the right side: from right to left and every other row is worked from the wrong side: from left to right.

When working in the round, every row in the diagram are worked from the right side, from right to left.

When working a circular diagram you start in the middle and work your way outwards, counter clockwise, row by row.

The rows usually start with a given number of chain stitches (equivalent to the height of the following stitch), this will either be depicted in the diagram or explained in the pattern.

See DROPS lesson: How to read crochet diagrams

Instructions for working several diagrams after each other on the same row/round, will often be written like so: “work A.1, A.2, A.3 a total of 0-0-2-3-4 times". This means you work A.1 once, then A.2 is worked once, and A.3 is repeated (in width) the number of times provided for your size – in this case like so: S = 0 times, M = 0 times, L=2 times, XL= 3 times and XXL = 4 times.

The diagrams are worked as usual: begin with the first row in A.1, then work the first row in A.2 etc.

See DROPS lesson: How to read knitting diagrams

See DROPS lesson: How to read crochet diagrams

The total width of the garment (from wrist-to-wrist) will be larger in the larger sizes, despite the actual sleeves being shorter. The larger sizes have longer sleeve caps and wider shoulders, so there will be a good fit in all sizes.

The measurement sketch/schematic drawing provides information regarding the full length of the garment. If it’s a jumper or a jacket the length is measured from the highest point on the shoulder closest to the neckline, and straight down to the bottom of the garment. It is NOT measured from the tip of shoulder. Similarly, the length of yoke is measured from the highest point on the shoulder and down to where yoke is split into body and sleeves.

On a jacket measures are never taken along bands, unless specifically stated. Always measure inside band stitches when measuring the length.

See DROPS lesson: How to read a schematic drawing

Diagrams are often repeated on the round or in height. 1 repeat is the diagram the way it appears in the pattern. If it says to work 5 repeats of A.1 in the round, then you work A.1 a total of 5 times after/next to each other in the round. If it says to work 2 repeats of A.1 vertically/in height you work the entire diagram once, then begin again at the start and work the entire diagram one more time.

Chain stitches are slightly narrower than other stitches and to avoid working the cast-on edge too tight, we simply chain more stitches to begin with. The stitch count will be adjusted on the following row to fit the pattern and measurement sketch.

The rib edge is more elastic and will contract slightly compared to, for example, stocking stitch. By increasing before the rib edge, you avoid a visible difference in width between the rib edge and the rest of the body.

It’s very easy to cast off too tightly, and by making yarn overs while casting off (and simultaneously casting these off) you avoid a too tight cast off edge.

See DROPS video: How to bind off with yarn overs (yo)

To achieve an even increase (or decrease) you can increase on, for example: every 3rd and 4th row alternately, like so: work 2 rows and increase on the 3rd row, work 3 rows and increase on the 4th. Repeat this until the increase is complete.

See DROPS lesson: Increase or decrease 1 st on every 3rd and 4th row alternately

Should you prefer to work in the round instead of back and forth, you may of course adjust the pattern. You’ll need to add steeks mid-front (usually 5 stitches), and follow the instructions. When you would normally turn and work from the wrong side, simply work across the steek and continue in the round. At the end you’ll cut the piece open, pick up stitches to work bands, and cover the cut edges.

See DROPS video: How to knit steeks and cut open

Should you prefer to work back and forth instead of in the round, you may of course adjust the pattern so you work the pieces separately and then assemble them at the end. Divide the stitches for the body in 2, add 1 edge stitch in each side (for sewing) and work the front and back pieces separately.

See DROPS lesson: Can I adapt a pattern for circular needles into straight needles?

Pattern repeats can vary slightly in the different sizes, in order to get the correct proportions. If you’re not working the exact same size as the garment in the photo, yours might deviate slightly. This has been carefully developed and adjusted so that the complete impression of the garment is the same in all sizes.

Make sure to follow instructions and diagrams for your size!

If you have found a pattern you like which is available in women’s size it’s not very difficult to convert it to men’s size. The biggest difference will be the length of sleeves and body. Start working on the women size that you think would fit across the chest. The additional length will be worked right before you cast off for the armhole/sleeve cap. If the pattern is worked top-down you can add the length right after the armhole or before the first decrease on sleeve.

Regarding additional yarn amount, this will depend on how much length you add, but it is better with a skein too many than too few.

All yarns will have excess fibres (from production) that might come off as lint or shedding. Brushed yarns (ie hairier yarns) have more of these loose, excess fibres, causing more shedding.

Shedding also depends on what is worn under or over the garment, and whether this pulls at the yarn fibres. It’s therefore not possible to guarantee that there will be no shedding

Below are some tips on how to get the best result when working with hairier yarns:

1. When the garment is finished (before you wash it) shake it vigorously so the looser hairs come off. NOTE: do NOT use a lint roller, brush or any method that pulls at the yarn.

2. Place the garment in a plastic bag and put it in your freezer - the temperature will cause the fibres to become less attached to each other, and excess fibres will come off easier.

3. Leave in the freezer for a few hours before taking it out and shaking it again.

4. Wash the garment according to the instructions on the yarn label.

Pilling is a natural process that happens to even the most exclusive of fibers. It's a natural sign of wear and tear that is hard to avoid, and that is most visible in high friction areas of your garment like a sweater's arms and cuffs.

You can make your garment look as new by removing the pilling, using a fabric comb or a pill/lint remover.

Still can't find the answer you need? Then scroll down and leave your question so one of our experts can try to help you. This will be done normally within 5 to 10 working days.
In the meantime, you can read the questions and answers that others have left to this pattern or join the DROPS Workshop on Facebook to get help from fellow knitters/crocheters!

You might also like...

Post a comment to pattern DROPS 203-18

We would love to hear what you have to say about this pattern!

If you want to leave a question, please make sure you select the correct category in the form below, to speed up the answering process. Required fields are marked *.

Comments / Questions (29)

country flag Odile Lacomblez wrote:

Bonjour\r\nSerait- il possible d\'avoir une vidéo pour débuter ce modèle car je ne comprends pas le diagramme\r\nJ\'ai visionné les vidéos de YouTube et je n\' ai pas trouvé ce modèle\r\nPourriez vous s\'il vous plaît créer cette vidéo car c\'est la galère\r\nMerci de votre réponse ODILE

15.09.2023 - 23:29

DROPS Design answered:

Bonjour Odile, dans cette leçon, nous expliquons comment on lit un diagramme; Au 1er rang, tricotez: 1 jeté, 1 m end (A.1a), et 1 m end, 1 jeté (A.2a), au 2ème rang (sur l'envers) tricotez 2 m endroit pour A.1a et A.2a (point mousse), tricotez les jetés torse pour éviter un trou. Continuez ainsi, en suivant attentivement les symboles et la légende correspondantes; lorsque vous augmentez les mailles vous constituez le motif progressivement de chaque côté de la maille centrale. Bon tricot!

18.09.2023 - 08:03

country flag Carina Richard wrote:

Hej Fick snabbt ett svar, men jag förstår ändå inte . Jag har stickat 7maskor rätstickning kan inte få antalet maskor att stämma och hur kan 2 omslag bli 4 ökade maskor ? Carina

24.11.2022 - 13:11

DROPS Design answered:

Hei Carina. Husk du øker med 2 masker på hver side av midtmasken. A.1 og A.2 strikkes 1 gang på hver side av midtmasken. Du har 7 masker og på 1. pinne øker du 4 ganger = 11 masker. Strikk slik: 1 kantmaske + A.1a (kast + 1 rett) + A.2a (1 rett + 1 kast) + 1 midtmaske i glattstrikk + A.1a (kast + 1 rett) + A.2a (1 rett + 1 kast) + 1 kantmaske = 11 masker på pinnen. mvh DROPS Design

28.11.2022 - 13:12

country flag Carina Richard wrote:

Hej ! Känner mej lite frustrerad ska sticka 203-18 men kan inte ens komma igång ! Är faktiskt ingen nybörjare. Alltså redan på A1a o A2a förstår jag inte hur jag ska komma vidare med mina 7 maskor. Snälla försök att förklara för mej. Carina

23.11.2022 - 14:28

DROPS Design answered:

Hej Carina. Du stickar såhär från rätsidan: 1 kantmaska rätstickning, 1 omslag, 1 rätmaska, 1 mittmaska slätstickning, 1 rätmaska, 1 omslag, 1 kantmaska rätstickning. Du har då stickat första varvet i diagrammet och har ökat 4 maskor. Sedan stickar du andra varvet i diagrammet från avigsidan. Mvh DROPS Design

24.11.2022 - 12:00

country flag Melanie wrote:

Bonjour, je souhaiterai commencer ce modèle je voudrais savoir si les diagrammes A-1b, A-2b, A3b,A-4b,A-5b,A-6b,A-9,A-10b il faut les tricoter j’en fois en hauteur ou deux fois en hauteur? Merci d’avance

22.11.2022 - 11:22

DROPS Design answered:

Bonjour Mélanie, les diagrammes -a sont tricotés une seule fois en hauteur (ils comportent les augmentations), quand ces diagrammes -a sont terminés, vous tricotez et répétez les diagrammes -b au-dessus des mailles concernées (ex. après avoir tricoté A.1a, vous tricotez A.1b sur les 19 mailles et répétez les 19 mailles x 10 rangs de A.1b jusqu'à la fin). Bon tricot!

22.11.2022 - 15:55

country flag Adrie wrote:

Hallo, wat een prachtige omslagdoek! Ik heb een vraag over het patroon, kan ik de omslagdoek ook langer maken? En hoe doe ik dat dan, kan ik het patroon gewoon aanhouden?\r\nGroetjes A3

25.09.2022 - 08:11

DROPS Design answered:

Dag Adrie,

Ja, dat kan. Als je het patroon gewoon voortzet wordt de omslagdoek breder en hooger.

27.09.2022 - 18:10

country flag Launay wrote:

Bonjour, je suis le diagramme cependant mon ouvrage ne correspond pas à la photo du châle. Pouvez-vous me confirmer que le point noir dans le diagramme correspond à 1 maille envers sur l'endroit , endroit sur l'envers. Je tricote une maille envers au lieu d'une maille endroit normalement et une maille endroit au lieu de maille envers?

05.12.2021 - 14:06

DROPS Design answered:

Bonjour Mme Launay, ce point noir correspond en fait à une maille point mousse: au rang précédent vous tricotez ces mailles comme une case blanche = à l'endroit sur l'endroit, et au rang suivant sur l'envers, vous les tricotez à l'endroit sur l'envers. Bon tricot!

06.12.2021 - 08:19

country flag Ghislaine Ethier wrote:

Merci beaucoup pour les explications! La je vais pouvoir poursuivre mon châle Merci beaucoup!et bonne journée à vous !

08.04.2021 - 13:21

country flag Ghislaine Ethier wrote:

Bonjour je pense que vous ne comprenez pas ma question je vais vous l’expliquer donc je commence avec A5a (4 mailles) A5b (22 mailles) A1b (18 mailles) A2b(18 mailles) Ensuite c’est quoi le suivant ??.?.? C’est À quoi ???.. Et à la fin vous l’avez écrit je termine par A6b et A6 a

07.04.2021 - 12:35

DROPS Design answered:

Bonjour Mme Ethier, les diagrammes se répètent en hauteur, tricotez vos 355 m ainsi: 1 m lis, A.5a, A.5b, A.5b, A.3b, A.1b, A.2b, A.4b, A.6b, A;6b, et A.6a, 1 m jersey, A.5a, A.5b, A.5b, A.3b, A.1b, A.2b, A.4b, A.6b, A;6b, et A.6a, 1 m lis = 1+4+22+(22+22+18+18+22+22=124) +22+4+1+4+22+(22+22+18+18+22+22=124) +22+4+1=355m. Bon tricot!

08.04.2021 - 09:28

country flag Ghislaine Ethier wrote:

J’aimerais que tu me donne le chiffre de chaque schéma pour ce qui donne 124 mailles svp car tu dit À1b a A 6 b comme avant mais ça ne marche pas car je commence a A 1b A2 b ensuite c’est quoi ??? Je n’y arrive vraiment pas!!! J’attends votre réponse avec impatience!!!

06.04.2021 - 13:28

DROPS Design answered:

Bonjour Mme Ethier, ces 124 m se tricotent tout simplement comme avant, vous répétez les mêmes diagrammes que depuis le début et tout du long de chaque côté de la maille centrale et en ajoutez d'autres quand indiqué. Bon tricot!

06.04.2021 - 15:05

country flag Ethier Ghislaine wrote:

J’ai besoin d’aide pour le paragraphe de 435 mailles 1 m lisière A5a=4 mailles A5b=22 mailles Pourriez-vous me dire en détails les autres schémas SVP Car je n’arrive à faire le comme avant comme vous dite je suis bloqué Car je ne sais pas quel schéma le suivant de a5b Vous dites A1b a A 6b M’écrire les schémas suivants en détail merci Ghislaine Ethier

03.04.2021 - 00:25

DROPS Design answered:

Bonjour Mme Ethier, cette section se tricote sur 355 m: 1 m lisière, *A.5a (= 4 m), A.5b (= 22 m), A.1b à A.6b comme avant (= 124 m), A.6b (= 22 m), A.6a (= 4 m)*, 1 m centrale en jersey, répéter de *-* encore 1 fois et terminer par 1 m lisière = 1+4+22+124+22+4+1+4+22+124+22+4+1= 355; quand A.5a et A;6 a sont terminés, vous avez 435 m (= 1+24+22+124+22+24+1+24+22+124+22+24+1). Bon tricot!

06.04.2021 - 13:04