
Popular categories
Looking for a yarn?


|
||||||||||||||||||||||
December Dunes |
||||||||||||||||||||||
 |
 |
|||||||||||||||||||||
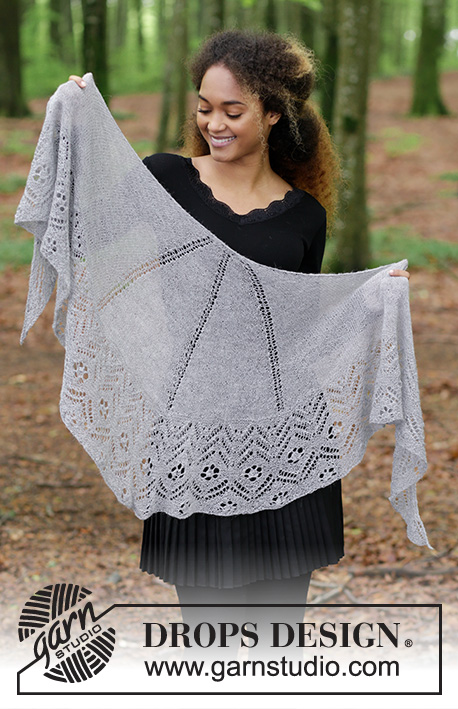
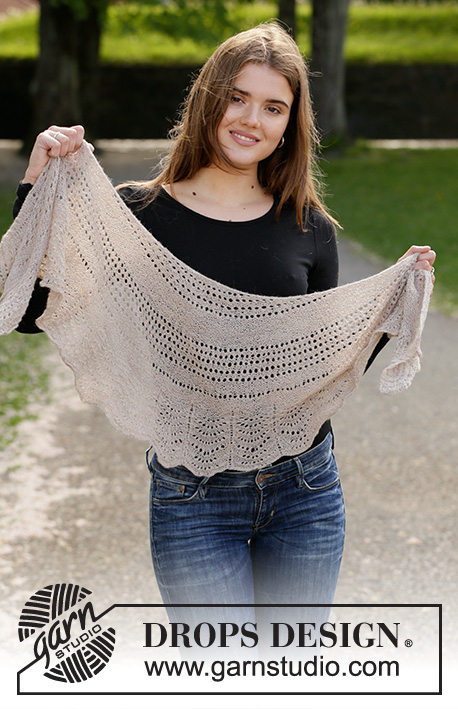
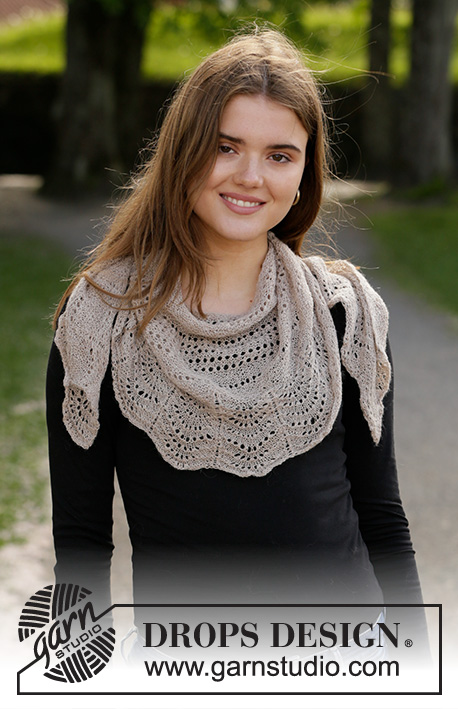
Knitted shawl in DROPS Alpaca or DROPS Lace. Piece is knitted top down with garter stitch, eyelet rows and wave pattern.
DROPS 203-17 |
||||||||||||||||||||||
|
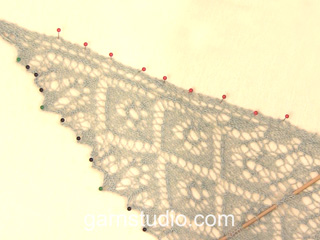
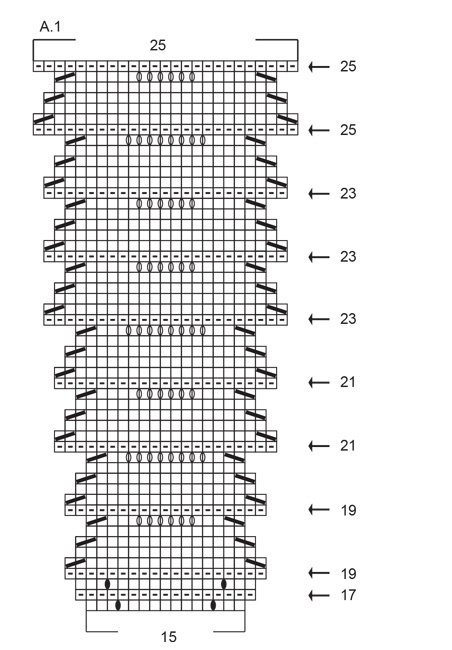
---------------------------------------------------------- EXPLANATION FOR THE PATTERN: ---------------------------------------------------------- GARTER STITCH (back and forth): Knit all rows. 2 rows = 1 ridge. EYELET ROW: When working eyelet row, increase at the beginning of the row as before. Work as follows: ROW 1: Make 1 yarn over, knit 1, 1 yarn over, knit 1. * knit 2 together, 1 yarn over *, work from *-* until 3 stitches remain, and knit 3. ROW 2: Make 1 yarn over, knit 1, 1 yarn over, knit the rest of stitches. INCREASE TIP-1 (evenly): To calculate how to increase evenly, use the total number of stitches on row (e.g. 33 stitches) and divide stitches by number of increases to be done (e.g. 12) = 2.7. In this example increase by making 1 yarn over after alternately every 2nd and 3rd stitch. On next row knit yarn overs twisted to avoid holes. INCREASE TIP-2: If the knitting tension is incorrect the shawl can have the wrong number of stitches if you need to work more or less rows than stated to get the correct measurements in cm. This error can be corrected on next increase ridge. If you work to tightly, so that e.g. 6 cm is not 15 ridges as in pattern, but e.g. 16 ridges, there will be 4 or 2 stitches to many on needle (depending on it being before or after INCREASE RIDGE 3). If you work to loose, there will be too few stitches on needle when worked to given measurements in cm. This can be adjusted on next increase ridge, so that number of stitches is the same as number of stitches given when increase ridge is done. PATTERN: See diagram A.1. Diagrams show all rows in pattern seen from the right side. SHAPING: Place the piece in lukewarm water until it is soaking wet. Carefully squeeze out the water - do not twist. Then roll the piece in a towel and squeeze to remove more water. The piece will now only be moist. Place the piece on a carpet or mattress - carefully stretch it out to measurements found under SIZE at the top of pattern and leave to dry. Repeat the process when the piece has been washed. ---------------------------------------------------------- START THE PIECE HERE: ---------------------------------------------------------- SHAWL - SHORT OVERVIEW OF THE PIECE: Worked back and forth on circular needle to make room for all the stitches. Most of the shawl is worked in GARTER STITCH - read explanation above, work the edge at the bottom in wave pattern. SHAWL: Cast on 13 stitches on circular needle size 3.5 mm with Lace. Knit 1 row from wrong side. Continue as follows: ROW 1 (= right side): Make 1 yarn over, knit 1, 1 yarn over, knit the rest of stitches (= 2 stitches increased). ROW 2 (= wrong side): Make 1 yarn over, knit 1, 1 yarn over, knit the rest of stitches (= 2 stitches increased). Work in garter stitch and continue to increase 2 stitches at the beginning of every row until 4 ridges have been worked in total from beginning (= 4 stitches increased per ridge) = 29 stitches. Work 1 EYELET ROW - read explanation above (= 4 stitches increased) = 33 stitches. REMEMBER THE KNITTING TENSION! INCREASE RIDGE 1: Knit 1 row from right side while increasing 12 stitches evenly - read INCREASE TIP-1 in explanation over. Knit next row, knit yarn overs twisted = 45 stitches. Work in garter stitch and continue to increase 2 stitches at the beginning of every row as before until 3 ridges have been worked in total (including increase ridge) from previous eyelet row (= 4 stitches increased per ridge) = 53 stitches. *Work 1 EYELET ROW. Work in garter stitch and continue to increase 2 stitches at the beginning of every row as before until 3 ridges have been worked after eyelet row *, work from *-* 2 times in total (= 4 stitches increased per ridge/eyelet row) = 85 stitches. Work 1 EYELET ROW (= 4 stitches increased) = 89 stitches. INCREASE RIDGE 2: Knit 1 row from right side while increasing 21 stitches evenly. Knit next row, knit yarn overs twisted = 110 stitches. Work in garter stitch and continue to increase 2 stitches at the beginning of every row as before until piece measures 6 cm from previous eyelet row, equals approx. 15 ridges (including previous increase ridge) (= 4 stitches increased per ridge) = 166 stitches. If the number of stitches deviates, adjust on next increase ridge - READ INCREASE TIP-2 in explanation above. INCREASE RIDGE 3: Knit 1 row from right side while increasing 57 stitches evenly. There should now be 223 stitches on needle. Knit next row, knit yarn overs twisted. NOTE: Now the increase in the side will change from 2 stitches to 1 stitch (on eyelet rows also increase only 1 stitch in the side on each row) - increase and work as follows: ROW 1 (= right side): Knit 1, 1 yarn over and knit the rest of the stitches (= 1 stitch increased). ROW 2 (= wrong side): Knit 1, 1 yarn over and knit the rest of the stitches (= 1 stitch increased). Work in garter stitch and increase in the sides this way until 3 ridges in total have been worked from previous increase ridge (= 2 stitches increased per ridge) = 229 stitches. *Work 1 EYELET ROW - read explanation above. Work in garter stitch and continue to increase 1 stitch at the beginning of every row as before until 2 ridges have been worked in total after eyelet row *, work from *-* 4 times in total (2 stitches increased per ridge/eyelet row) = 253 stitches. Work 1 EYELET ROW (= 2 stitches increased) = 255 stitches. Work in garter stitch and continue to increase 1 stitch at the beginning of every row as before until piece measures 3 cm from previous eyelet row, equals approx. 7 ridges (= 2 stitches increased per ridge) = 269 stitches. If the number of stitches deviates along the way, adjust on next increase ridge - read INCREASE TIP-2. Work 1 EYELET ROW (= 2 stitches increased) = 271 stitches. INCREASE RIDGE 4: Knit 1 row from right side while increasing 64 stitches evenly. There should now be 335 stitches on needle. Knit next row, knit yarn overs twisted. Work in garter stitch and continue to increase 1 stitch at the beginning of every row as before until piece measures 3 cm from previous eyelet row, equals approx. 7 ridges (2 stitches increased per ridge) = 349 stitches. Piece measures approx. 25 cm measured on the middle from cast-on edge and down. Now it is important to have the correct number of stitches because of the diagrams. If you need to, you can work 1 more ridge and adjust the number of stitches if the number is incorrect. Work according to diagram A.1 as follows: Work 2 edge stitches in garter stitch, work A.1 (= 15 stitches) until 2 stitches remain on needle (repeat A.1 23 times) and work 2 edge stitches in garter stitch. Work diagram 1 time vertically. CAST-OFF: To avoid a tight cast-off, make yarn overs when casting off by knitting from right side as follows: Make 1 yarn over over the stitches that were yarn overs in pattern, cast off yarn overs as stitches. Make sure to avoid tightening the yarn along the way. If the edge still is tight use a larger needle size for cast-off. Cut and fasten the yarn. When shawl is done, wash and shape if you want - read SHAPING in explanation above. |
||||||||||||||||||||||
Diagram explanations |
||||||||||||||||||||||
|
||||||||||||||||||||||
|
||||||||||||||||||||||
|
Have you made this or any other of our designs? Tag your pictures in social media with #dropsdesign so we can see them! Do you need help with this pattern?You'll find tutorial videos, a Comments/Questions area and more by visiting the pattern on garnstudio.com. © 1982-2024 DROPS Design A/S. We reserve all rights. This document, including all its sub-sections, has copyrights. Read more about what you can do with our patterns at the bottom of each pattern on our site. |
||||||||||||||||||||||


With over 40 years in knitting and crochet design, DROPS Design offers one of the most extensive collections of free patterns on the internet - translated to 17 languages. As of today we count 304 catalogues and 11422 patterns - 11422 of which are translated into English (UK/cm).
We work hard to bring you the best knitting and crochet have to offer, inspiration and advice as well as great quality yarns at incredible prices! Would you like to use our patterns for other than personal use? You can read what you are allowed to do in the Copyright text at the bottom of all our patterns. Happy crafting!
Comments / Questions (32)
Confused how to follow the diagram a.1 vertically???? how does it make a scalloped edge- thanks - leslie
27.09.2020 - 02:32DROPS Design answered:
Dear Mrs Rifkin, the scalloped edge will be made of the pattern worked as shown in diagram. This lesson<:a> explains how to read knitting diagrams. Happy knitting!
28.09.2020 - 09:59I am having trouble following this pattern. After the initial setup rows, I have 29 sts. For the eyelet row, it says to 'knit and inc over the first 3 stitches' ie. YO, K, YO, K etc..(technically not 3 stitches, it is only 1 until the stitches are made). If I follow the eyelet pattern, with a YO, K, YO followed by the "..*knit 2 tog, 1 yarn over*...until 3 stitches remain", I don't end up with 3 stitches, I end up with 2. Am I misunderstanding or is there an error? Thanks.
03.03.2020 - 10:05Hei! Skal det ikke økes i starten av hver omgang, mens man strikker bølgemønsteret? Da blir det i såfall ikke den samme "skråen" i sidene som resten av sjalet...
21.12.2019 - 18:54DROPS Design answered:
Hej Torill, nej det går ikke, du må følge økningen i bølgemønsteret som det vises i diagrammet. God fornøjelse!
15.01.2020 - 14:07J’aime beaucoup vos patron mais celui la j’ai bien des problèmes à comprendre le patron La section entre 53 mailles *tricoter 1 rang ajouré je ne comprend pas comment arriver à 85 mailles Et après ont dit 1 rang ajouré ( on augmente 4 mailles ) =89 mailles J’ai besoin des explications
06.12.2019 - 04:13DROPS Design answered:
Bonjour Ly, vous augmnetez 4 mailles par chaque côte mousse (2 rangs endroit) et 4 mailles par chaque RANG AJOURE (2 rangs pour etre precis). Au debut il y a 53 m. Vous tricotez 1 rang ajoure (4 mailles augmentees, 2 au debut du 1er rang, 2 au debur du 2me rang), 3 cotes mousse (12 mailles augmentees), 1 rang ajoure (4 mailles augmentees), 3 cotes mousse (12 mailles augmentees)> 53+32=85 mailles. Ensuite 1 rang ajouré ( on augmente 4 mailles ) =89 mailles.
30.12.2019 - 10:26Bonjour, vous mentionnez 1rang ajouré =on augmente 4 mailles Dit moi ont augmenté au debout et à la fin du rang j’ai besoin explication
06.12.2019 - 03:43DROPS Design answered:
Bonjour Ly, vous augmentez 2 mailles au debut du 1er rang, 2 au debut du 2me rang: RANG 1 (= sur l'endroit): Faire 1 jeté, 1 maille endroit, 1 jeté, tricoter à l'endroit les mailles restantes (= on augmente 2 mailles). RANG 2 (= sur l'envers): Faire 1 jeté, 1 maille endroit, 1 jeté, tricoter à l'endroit les mailles restantes (= on augmente 2 mailles). Bon tricot!
30.12.2019 - 10:33Comment faire le point de vagues SVP avez-vous une vidéo qui démontre comment faire. le modele est 203-17.
22.11.2019 - 14:14DROPS Design answered:
Bonjour Mme Naud, vous trouverez ici comment lire un diagramme, le 1er rang se tricote sur l'endroit (lisez de droite à gauche sur l'endroit et de gauche à droite sur l'envers). N'hésitez pas à ajouter des marqueurs entre chaque diagramme pour bien vérifier votre nombre de mailles à chaque fois. Bon tricot!
22.11.2019 - 14:41Guten Tag, habe das Tuch aus Drops Alpaca gestrickt, obwohl ich etwa 8 cm ( ein Rapport ) breiter gestrickt habe, habe nicht ganz 200 gr Wolle bei Nadel Nr 3 gebraucht.Stricke normal,-weder fest noch zu locker.
21.11.2019 - 15:58DROPS Design answered:
Liebe Eva, stimmt Ihre Maschenprobe? Sie sollen 23 M x 45 Reihe krausrechts = 10 x 10 cm haben. hier lesen Sie mehr. Viel Spaß beim stricken!
22.11.2019 - 09:13Danke für die schnelle Antwort. Auf dem Bild ist zwischen dem jeweiligen Rapport von A1 eine Lochreihe, die sich nach oben fortsetzt. Wenn ich bei Reihe 5 19 Maschen habe und bei Reihe 6 nur 17 Maschen, dann verschiebt sich doch das ganze Muster. Muss ich zwischen den einzelnen Rapporten A1 rechte Maschen stricken und wie muss ich die senkrechte Lochreihe beginnen. Ich bin eine sehr geübte Strickerin, aber hier passt etwas nicht oder kapiere ich nichts mehr?
25.10.2019 - 16:33DROPS Design answered:
Liebe Frau Lahm, die kleine Löcher, die man zwischen den Diagrammen im Foto sieht, kommen sicher aus der Abnahmen am Anfang/Ende von den Diagrammen. Bei der 1. Reihe nehmen Sie 2 M zu = 17 M. Bei der 3. Reihe nehmen Sie 2 M zu = 19 M. Das heißt die Maschenanzahl im Diagram ändert je nach der Reihe (deshalb wird es daneben beschrieben), aber die Diagramme werden immer 23 Mal in der Breite wiederholt (= die Maschenanzahl wird dann je nach der Reihe unterschiedlich sein). Viel Spaß beim stricken!
25.10.2019 - 16:39Was muss ich zwischen den einzelnen Diagrammen stricken? Auf der Abbildung ist da eine Lochreihe nach oben zu sehen. Und wenn die Maschenzahl nach oben weniger wird, verschiebt sich doch da das Muster.Ich habe nun schon x mal aufgetrennt, weil es einfach nicht stimmt.
25.10.2019 - 11:26DROPS Design answered:
Liebe Frau Lahm, A.1 stricken Sie hintereinander, dh: 2 M kraus rechts, dann 23 x die 15 Maschen in A.1 stricken und mit 2 M kraus rechts enden = 2 + 23x15 - 2 = 349 M. Oder vielleicht mißverstehen ich Ihre Frage?
25.10.2019 - 13:42Stimmen die Mengenangaben, 100g Alpaca = 100g Lace? Müssten es nicht eher 250g Alpaca sein?
25.10.2019 - 10:26DROPS Design answered:
Liebe Anke, ja genau, es sollte 250 g DROPS Alpaca sein, Garnmenge wurde korrigiert, danke für den Hinweis. Viel Spaß beim stricken!
04.11.2019 - 11:18