DROPS Alpaca
DROPS Alpaca
100% Alpaca
from 3.65 € /50g
Get the yarn to make this pattern from 18.25€.

The yarn cost is calculated from the pattern’s smallest size and the yarn’s cheapest product type. Looking for an even better price? You might find it on the DROPS Deals!

DROPS SS24

December Dunes

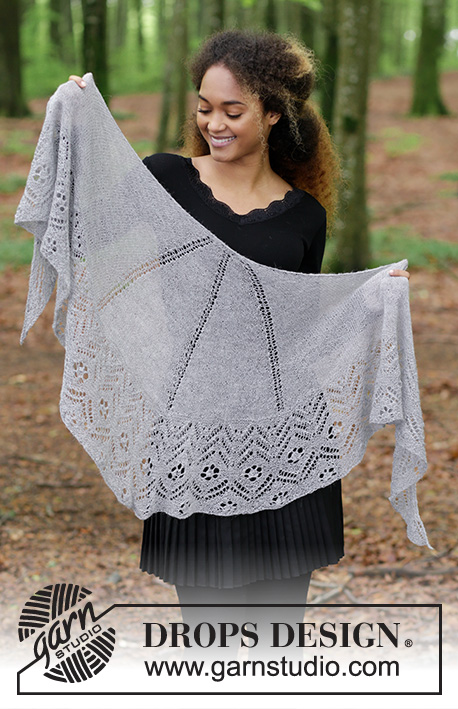
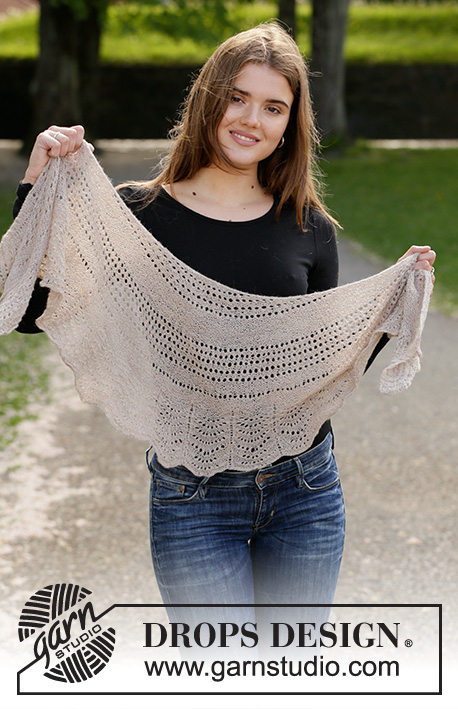
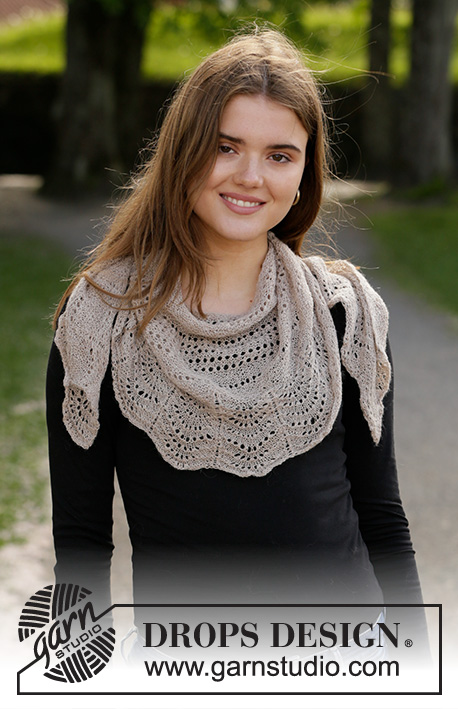
Knitted shawl in DROPS Alpaca or DROPS Lace. Piece is knitted top down with garter stitch, eyelet rows and wave pattern.

DROPS 203-17
DROPS design: Pattern la-041
Yarn group A
----------------------------------------------------------

SIZE:
Height: Measured along the middle = approx. 39 cm
Width: Measured along the top side from side to side = approx. 162 cm.

MATERIALS:
DROPS ALPACA from Garnstudio (belongs to yarn group A)
250 g colour 2020, light nougat

or use:
DROPS LACE from Garnstudio (belongs to yarn group A)
100 g colour 2020, light camel

KNITTING TENSION:
23 stitches in width and 45 rows vertically in garter stitch = 10 x 10 cm.

NEEDLES:
DROPS CIRCULAR NEEDLE SIZE 3.5 mm: Length 80 cm.
Needle size is only a suggestion! If you have too many stitches on 10 cm switch to larger needles. If you have too few stitches on 10 cm switch to smaller needles.

-------------------------------------------------------

Alternative Yarn – See how to change yarns here
Yarn Groups A to F – Use the same pattern and change the yarn here
Yarn usage using an alternative yarn – Use our yarn converter here

-------------------------------------------------------

DROPS Alpaca
DROPS Alpaca
100% Alpaca
from 3.65 € /50g
Get the yarn to make this pattern from 18.25€.

The yarn cost is calculated from the pattern’s smallest size and the yarn’s cheapest product type. Looking for an even better price? You might find it on the DROPS Deals!

Pattern instructions

NOTE: This pattern is written in British English. All measurements in charts are in cm. For conversion from cm to inches - click here. There are different terms for crocheting in British and American English. If this pattern includes crochet, click for "crochet terms" here. For this pattern in American English, please click here.
----------------------------------------------------------

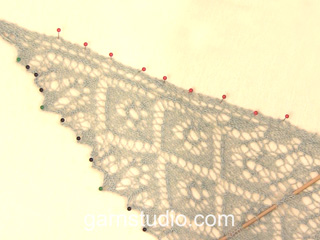
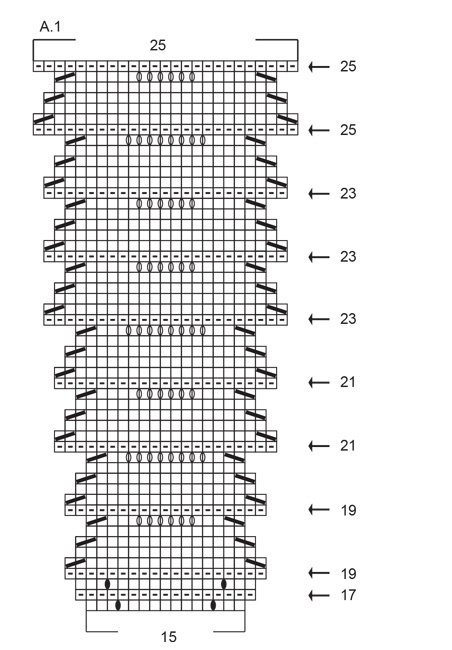
EXPLANATION FOR THE PATTERN:

----------------------------------------------------------

GARTER STITCH (back and forth):
Knit all rows. 2 rows = 1 ridge.

EYELET ROW:
When working eyelet row, increase at the beginning of the row as before.
Work as follows:
ROW 1: Make 1 yarn over, knit 1, 1 yarn over, knit 1. * knit 2 together, 1 yarn over *, work from *-* until 3 stitches remain, and knit 3.
ROW 2: Make 1 yarn over, knit 1, 1 yarn over, knit the rest of stitches.

INCREASE TIP-1 (evenly):
To calculate how to increase evenly, use the total number of stitches on row (e.g. 33 stitches) and divide stitches by number of increases to be done (e.g. 12) = 2.7. 
In this example increase by making 1 yarn over after alternately every 2nd and 3rd stitch. On next row knit yarn overs twisted to avoid holes.

INCREASE TIP-2:
If the knitting tension is incorrect the shawl can have the wrong number of stitches if you need to work more or less rows than stated to get the correct measurements in cm. This error can be corrected on next increase ridge. If you work to tightly, so that e.g. 6 cm is not 15 ridges as in pattern, but e.g. 16 ridges, there will be 4 or 2 stitches to many on needle (depending on it being before or after INCREASE RIDGE 3). If you work to loose, there will be too few stitches on needle when worked to given measurements in cm. This can be adjusted on next increase ridge, so that number of stitches is the same as number of stitches given when increase ridge is done.

PATTERN: 
See diagram A.1. Diagrams show all rows in pattern seen from the right side.

SHAPING:
Place the piece in lukewarm water until it is soaking wet. Carefully squeeze out the water - do not twist. Then roll the piece in a towel and squeeze to remove more water. The piece will now only be moist. Place the piece on a carpet or mattress - carefully stretch it out to measurements found under SIZE at the top of pattern and leave to dry. Repeat the process when the piece has been washed. 

----------------------------------------------------------

START THE PIECE HERE:

----------------------------------------------------------

SHAWL - SHORT OVERVIEW OF THE PIECE:
Worked back and forth on circular needle to make room for all the stitches. Most of the shawl is worked in GARTER STITCH - read explanation above, work the edge at the bottom in wave pattern.

SHAWL:
Cast on 13 stitches on circular needle size 3.5 mm with Lace. Knit 1 row from wrong side.
Continue as follows:
ROW 1 (= right side): Make 1 yarn over, knit 1, 1 yarn over, knit the rest of stitches (= 2 stitches increased).
ROW 2 (= wrong side): Make 1 yarn over, knit 1, 1 yarn over, knit the rest of stitches (= 2 stitches increased).

Work in garter stitch and continue to increase 2 stitches at the beginning of every row until 4 ridges have been worked in total from beginning (= 4 stitches increased per ridge) = 29 stitches.

Work 1 EYELET ROW - read explanation above (= 4 stitches increased) = 33 stitches.
REMEMBER THE KNITTING TENSION!

INCREASE RIDGE 1:
Knit 1 row from right side while increasing 12 stitches evenly - read INCREASE TIP-1 in explanation over. Knit next row, knit yarn overs twisted = 45 stitches.

Work in garter stitch and continue to increase 2 stitches at the beginning of every row as before until 3 ridges have been worked in total (including increase ridge) from previous eyelet row (= 4 stitches increased per ridge) = 53 stitches.

*Work 1 EYELET ROW. Work in garter stitch and continue to increase 2 stitches at the beginning of every row as before until 3 ridges have been worked after eyelet row *, work from *-* 2 times in total (= 4 stitches increased per ridge/eyelet row) = 85 stitches.

Work 1 EYELET ROW (= 4 stitches increased) = 89 stitches.

INCREASE RIDGE 2:
Knit 1 row from right side while increasing 21 stitches evenly. Knit next row, knit yarn overs twisted = 110 stitches.

Work in garter stitch and continue to increase 2 stitches at the beginning of every row as before until piece measures 6 cm from previous eyelet row, equals approx. 15 ridges (including previous increase ridge) (= 4 stitches increased per ridge) = 166 stitches. If the number of stitches deviates, adjust on next increase ridge - READ INCREASE TIP-2 in explanation above.

INCREASE RIDGE 3:
Knit 1 row from right side while increasing 57 stitches evenly. There should now be 223 stitches on needle. Knit next row, knit yarn overs twisted.

NOTE: Now the increase in the side will change from 2 stitches to 1 stitch (on eyelet rows also increase only 1 stitch in the side on each row) - increase and work as follows:

ROW 1 (= right side): Knit 1, 1 yarn over and knit the rest of the stitches (= 1 stitch increased).
ROW 2 (= wrong side): Knit 1, 1 yarn over and knit the rest of the stitches (= 1 stitch increased).

Work in garter stitch and increase in the sides this way until 3 ridges in total have been worked from previous increase ridge (= 2 stitches increased per ridge) = 229 stitches.

*Work 1 EYELET ROW - read explanation above. Work in garter stitch and continue to increase 1 stitch at the beginning of every row as before until 2 ridges have been worked in total after eyelet row *, work from *-* 4 times in total (2 stitches increased per ridge/eyelet row) = 253 stitches.

Work 1 EYELET ROW (= 2 stitches increased) = 255 stitches.

Work in garter stitch and continue to increase 1 stitch at the beginning of every row as before until piece measures 3 cm from previous eyelet row, equals approx. 7 ridges (= 2 stitches increased per ridge) = 269 stitches. If the number of stitches deviates along the way, adjust on next increase ridge - read INCREASE TIP-2.

Work 1 EYELET ROW (= 2 stitches increased) = 271 stitches.

INCREASE RIDGE 4:
Knit 1 row from right side while increasing 64 stitches evenly. There should now be 335 stitches on needle. Knit next row, knit yarn overs twisted.

Work in garter stitch and continue to increase 1 stitch at the beginning of every row as before until piece measures 3 cm from previous eyelet row, equals approx. 7 ridges (2 stitches increased per ridge) = 349 stitches. Piece measures approx. 25 cm measured on the middle from cast-on edge and down. Now it is important to have the correct number of stitches because of the diagrams. If you need to, you can work 1 more ridge and adjust the number of stitches if the number is incorrect.

Work according to diagram A.1 as follows: Work 2 edge stitches in garter stitch, work A.1 (= 15 stitches) until 2 stitches remain on needle (repeat A.1 23 times) and work 2 edge stitches in garter stitch. Work diagram 1 time vertically.

CAST-OFF:
To avoid a tight cast-off, make yarn overs when casting off by knitting from right side as follows: Make 1 yarn over over the stitches that were yarn overs in pattern, cast off yarn overs as stitches. Make sure to avoid tightening the yarn along the way. If the edge still is tight use a larger needle size for cast-off. Cut and fasten the yarn. When shawl is done, wash and shape if you want - read SHAPING in explanation above.

This pattern has been corrected.

Updated online: 22.04.2021
Explanation of how to work EYELET ROW is updated.
Updated online: 12.11.2021
Changes made between INCREASE ROW 3 and INCREASE ROW 4.

Diagram

symbols = knit from the right side, purl from the wrong side
symbols = knit from wrong side
symbols = slip 1 stitch, knit 1 and pass slipped stitch over stitch worked
symbols = knit 2 together
symbols = between 2 stitches make 1 yarn over, knit yarn over twisted on next row. It should not make a hole.
symbols = arrow shows how many stitches there are in every repetition on this row in diagram
symbols = between 2 stitches make 1 yarn over, knit yarn over on next row. It should make hole.
diagram

Each of our patterns has specific tutorial videos to help you.

Do you have a question? See a list of frequently asked questions (FAQ)

Knitting tension is what determines the final measurements of your work, and is usually measured per 10 x 10 cm. It is provided like so: number of stitches in width x number of rows in height - eg: 19 stitches x 26 rows = 10 x 10 cm.

The knitting tension is very individual; some people knit/crochet loosely while others work tightly. You adjust the knitting tension with the needle size, which is why the suggested needle size is only meant as a guide! You need to adjust this (up or down) to ensure that YOUR knitting tension matches the knitting tension provided in the pattern. If you work with a different knitting tension than provided you will have a different yarn consumption, and your work will have different measurements than what the pattern suggests.

The knitting tension also determines which yarns can replace each other. As long as you achieve the same knitting tension you can replace one yarn with another.

See DROPS lesson: How to measure your tension/gauge

See DROPS video: How to make a gauge tension swatch

The required amount of yarn is provided in grams, eg: 450 g. To calculate how many balls you’ll need you first need to know how many grams are in 1 ball (25g, 50g or 100g). This information is available if you click on the individual yarn quality on our pages. Divide the amount required with the amount of each ball. For example, if each ball is 50g (the most common amount), the calculation will be as follows: 450 / 50 = 9 balls.

The important thing when changing from one yarn to another is that the knitting/crochet tension remains the same. This is so that the measurements of the finished piece will be the same as on the sketch provided. It is easier to achieve the same knitting tension using yarns from the same yarn group. It is also possible to work with multiple strands of a thinner yarn to achieve the knitting tension of a thicker one. Please try our yarn converter. We recommend you to always work a test swatch.

Please NOTE: when changing yarn the garment might have a different look and feel to the garment in the photo, due to individual properties and qualities of each yarn.

See DROPS lesson: Can I use a different yarn than the one mentioned in the pattern?

All our yarns are categorised into yarn groups (from A to F) according to thickness and knitting tension – group A contains the thinnest yarns and group F the thickest. This makes it easier for you to find alternative yarns to our patterns, should you wish to switch yarn. All yarns within the same group have a similar knitting tension and can easily replace each other. However, different yarn qualities have different structures and properties which will give the finished work a unique look and feel.

Click here for an overview of the yarns in each yarn group

At the top of all our patterns you’ll find a link to our yarn calculator, which is a helpful tool should you wish to use a different yarn than suggested. By filling in the yarn quality you wish to replace, the amount (in your size) and number of strands, the calculator will present good alternative yarns with the same knitting tension. Additionally it will tell you how much you’ll require in the new qualities and whether you’ll need to work with multiple strands. Most skeins are 50g (some are 25g or 100g).

If the pattern is worked with multiple colours, every colour will have to be calculated separately. Similarly, if the pattern is worked with several strands of different yarns (for example 1 strand Alpaca and 1 strand Kid-Silk) you will have to find alternatives for each, individually.

Click here to see our yarn calculator

Since different yarns have different qualities and textures we have chosen to keep the original yarn in our patterns. However, you can easily find options among our available qualities by using our yarn calculator, or simply pick a yarn from the same yarn group.

It is possible that some retailers still have discontinued yarns in stock, or that someone has a few skeins at home that they would like to find patterns for.

The yarn calculator will provide both alternative yarn as well as required amount in the new quality.

If you think it's hard to decide what size to make, it can be a good idea to measure a garment you own already and like the size of. Then you can pick the size by comparing those measures with the ones available in the pattern's size chart.

You'll find the size chart at the bottom of the pattern.

See DROPS lesson: How to read size chart

The needle size provided in the pattern serves only as a guide, the important thing is to follow the knitting tension. And since knitting tension is very individual, you will have to adjust the needle size to ensure that YOUR tension is the same as in the pattern – maybe you’ll have to adjust 1, or even 2 needle sizes, up or down to achieve the correct tension. For this, we recommend that you work test swatches.

Should you work with a different knitting tension than the one provided, the measurements of the finished garment might deviate from the measurement sketch.

See DROPS lesson: How to measure your tension/gauge

See DROPS video: How to make a tension/gauge swatch

Working a garment top-down provides more flexibility and room for personal adjustment. For example it is easier to try the garment on while working, as well as making adjustments to length of yoke and shoulder caps.

The instructions are carefully explaining every step, in the correct order. Diagrams are adjusted to the knitting direction and are worked as usual.

The diagram depicts all rows/rounds, and every stitch seen from the right side. It is read from bottom to top, from right to left. 1 square = 1 stitch.

When working back and forth, every other row is worked from the right side and every other row is worked from the wrong side. When working from the wrong side, the diagram will have to be worked reversed: from left to right, knit stitches are purled, purl stitches are knit etc.

When working in the round every round is worked from the right side and the diagram are worked from right to left on all rounds.

See DROPS lesson: How to read knitting diagrams

The diagram depicts all rows/rounds, and every stitch seen from the right side. It is worked from bottom to top, from right to left.

When working back and forth every other row is worked from the right side: from right to left and every other row is worked from the wrong side: from left to right.

When working in the round, every row in the diagram are worked from the right side, from right to left.

When working a circular diagram you start in the middle and work your way outwards, counter clockwise, row by row.

The rows usually start with a given number of chain stitches (equivalent to the height of the following stitch), this will either be depicted in the diagram or explained in the pattern.

See DROPS lesson: How to read crochet diagrams

Instructions for working several diagrams after each other on the same row/round, will often be written like so: “work A.1, A.2, A.3 a total of 0-0-2-3-4 times". This means you work A.1 once, then A.2 is worked once, and A.3 is repeated (in width) the number of times provided for your size – in this case like so: S = 0 times, M = 0 times, L=2 times, XL= 3 times and XXL = 4 times.

The diagrams are worked as usual: begin with the first row in A.1, then work the first row in A.2 etc.

See DROPS lesson: How to read knitting diagrams

See DROPS lesson: How to read crochet diagrams

The total width of the garment (from wrist-to-wrist) will be larger in the larger sizes, despite the actual sleeves being shorter. The larger sizes have longer sleeve caps and wider shoulders, so there will be a good fit in all sizes.

The measurement sketch/schematic drawing provides information regarding the full length of the garment. If it’s a jumper or a jacket the length is measured from the highest point on the shoulder closest to the neckline, and straight down to the bottom of the garment. It is NOT measured from the tip of shoulder. Similarly, the length of yoke is measured from the highest point on the shoulder and down to where yoke is split into body and sleeves.

On a jacket measures are never taken along bands, unless specifically stated. Always measure inside band stitches when measuring the length.

See DROPS lesson: How to read a schematic drawing

Diagrams are often repeated on the round or in height. 1 repeat is the diagram the way it appears in the pattern. If it says to work 5 repeats of A.1 in the round, then you work A.1 a total of 5 times after/next to each other in the round. If it says to work 2 repeats of A.1 vertically/in height you work the entire diagram once, then begin again at the start and work the entire diagram one more time.

Chain stitches are slightly narrower than other stitches and to avoid working the cast-on edge too tight, we simply chain more stitches to begin with. The stitch count will be adjusted on the following row to fit the pattern and measurement sketch.

The rib edge is more elastic and will contract slightly compared to, for example, stocking stitch. By increasing before the rib edge, you avoid a visible difference in width between the rib edge and the rest of the body.

It’s very easy to cast off too tightly, and by making yarn overs while casting off (and simultaneously casting these off) you avoid a too tight cast off edge.

See DROPS video: How to bind off with yarn overs (yo)

To achieve an even increase (or decrease) you can increase on, for example: every 3rd and 4th row alternately, like so: work 2 rows and increase on the 3rd row, work 3 rows and increase on the 4th. Repeat this until the increase is complete.

See DROPS lesson: Increase or decrease 1 st on every 3rd and 4th row alternately

Should you prefer to work in the round instead of back and forth, you may of course adjust the pattern. You’ll need to add steeks mid-front (usually 5 stitches), and follow the instructions. When you would normally turn and work from the wrong side, simply work across the steek and continue in the round. At the end you’ll cut the piece open, pick up stitches to work bands, and cover the cut edges.

See DROPS video: How to knit steeks and cut open

Should you prefer to work back and forth instead of in the round, you may of course adjust the pattern so you work the pieces separately and then assemble them at the end. Divide the stitches for the body in 2, add 1 edge stitch in each side (for sewing) and work the front and back pieces separately.

See DROPS lesson: Can I adapt a pattern for circular needles into straight needles?

Pattern repeats can vary slightly in the different sizes, in order to get the correct proportions. If you’re not working the exact same size as the garment in the photo, yours might deviate slightly. This has been carefully developed and adjusted so that the complete impression of the garment is the same in all sizes.

Make sure to follow instructions and diagrams for your size!

If you have found a pattern you like which is available in women’s size it’s not very difficult to convert it to men’s size. The biggest difference will be the length of sleeves and body. Start working on the women size that you think would fit across the chest. The additional length will be worked right before you cast off for the armhole/sleeve cap. If the pattern is worked top-down you can add the length right after the armhole or before the first decrease on sleeve.

Regarding additional yarn amount, this will depend on how much length you add, but it is better with a skein too many than too few.

All yarns will have excess fibres (from production) that might come off as lint or shedding. Brushed yarns (ie hairier yarns) have more of these loose, excess fibres, causing more shedding.

Shedding also depends on what is worn under or over the garment, and whether this pulls at the yarn fibres. It’s therefore not possible to guarantee that there will be no shedding

Below are some tips on how to get the best result when working with hairier yarns:

1. When the garment is finished (before you wash it) shake it vigorously so the looser hairs come off. NOTE: do NOT use a lint roller, brush or any method that pulls at the yarn.

2. Place the garment in a plastic bag and put it in your freezer - the temperature will cause the fibres to become less attached to each other, and excess fibres will come off easier.

3. Leave in the freezer for a few hours before taking it out and shaking it again.

4. Wash the garment according to the instructions on the yarn label.

Pilling is a natural process that happens to even the most exclusive of fibers. It's a natural sign of wear and tear that is hard to avoid, and that is most visible in high friction areas of your garment like a sweater's arms and cuffs.

You can make your garment look as new by removing the pilling, using a fabric comb or a pill/lint remover.

Still can't find the answer you need? Then scroll down and leave your question so one of our experts can try to help you. This will be done normally within 5 to 10 working days.
In the meantime, you can read the questions and answers that others have left to this pattern or join the DROPS Workshop on Facebook to get help from fellow knitters/crocheters!

You might also like...

Post a comment to pattern DROPS 203-17

We would love to hear what you have to say about this pattern!

If you want to leave a question, please make sure you select the correct category in the form below, to speed up the answering process. Required fields are marked *.

Comments / Questions (32)

country flag Danielle Langlois wrote:

Combien de mêtres de fil faut-il pour faire ce châle

14.04.2024 - 22:37

DROPS Design answered:

Bonjour Mme Langlois, 1 pelote Alpaca fait environ 167 m (cf nuancier et il faut 5 pelotes (250 g / 50 g la pelote); 1 écheveau de 100 g Lace (avant d'être sous forme de pelote, Lace était sous forme d'écheveau) faisait environ 800 m (cf fils épuisés. Bon tricot!

15.04.2024 - 08:27

country flag Eva wrote:

Guten Tag, beinhalten die Musterzeichnungen die Rückreihen oder nicht? danke LG Eva

15.05.2023 - 12:18

DROPS Design answered:

Liebe Eva, alle Reihen sind im Diagram gezeichnet, die Hin-Reihen (lesen Sie rechts nach links) sowie die Rückreihen (lesen Sie links nach rechts). Viel Spaß beim stricken!

15.05.2023 - 13:23

country flag Sabbi wrote:

Sind bei Diagramm A1 nur die Hinreihen oder auch die Rückreihen angegeben? Mich irritiert, dass beim Zeichen Karo mit Minuszeichen drinnen = 1 Masche rechts in Rück-Reihen steht. Wie strickt man da in der Hinreihe?

11.04.2022 - 16:16

DROPS Design answered:

Es sind sowohl Hin- als auch Rück-Reihen angegeben. Das "Minuszeichen-Symbol" gibt es nur in Rück-Reihen, darum ist eine Beschreibung, wie es in Hin-Reihen gestrickt wird, überflüssig. Viel Spaß beim Stricken!

13.04.2022 - 20:49

country flag Gordana wrote:

Vielen Dank für die Anleitung Bin schon beim 2. Fast fertig 3 ist schon in Planung LG

22.11.2021 - 23:40

country flag Maria Grazia Alcanello wrote:

Buon giorno e grazie per la presentazione di tanti modelli veramente deliziosi. Ho realizzato questo scialle, ma per l'insolita forma, credo di aver sbagliato a non continuare gli aumenti all'inizio di ogni giro, a cominciare dal punto pavone. E' così ? Grazie e cordiali saluti.

25.10.2021 - 16:06

DROPS Design answered:

Buonasera Maria Grazia, per la parte a punto pavone deve lavorare come indicato, con 2 maglie di vivagno a ogni lato. Buon lavoro!

26.10.2021 - 19:52

country flag Sabine wrote:

Bonjour J’en suis au 4ème rang de jours dans le point de vagues et en regardant de plus près la photo du modèle je constate que la grille ne correspond pas ! Le nombre de jours n’est pas identique !? D’autres part : il n’y a plus d’augmentations sur les côtés quand on tricote la grille finale ? Ce châle n’est donc pas vraiment triangulaire ? Merci

22.06.2021 - 23:29

DROPS Design answered:

Bonjour Sabine, le châle n'est pas un triangle mais plutôt un demi ovale très allongé; lorsque vous tricotez le point de vagues, vous n'augmentez plus que dans le point de vagues (il se tricote d'abord sur 15 m et quand il est terminé, vous aurez 25 m dans chaque A.1). Bon tricot!

23.06.2021 - 07:54

country flag Silke wrote:

Wann gibt es die Drops LACE mit der Lauflänge 400mm/50g wieder im Programm, damit ich es nachstricken kann.?

04.05.2021 - 06:32

DROPS Design answered:

Liebe Silke, sowas haben wir nicht vor, aber wenn Sie die selbe Zusammensetzung möchten, dann können Sie gerne DROPS Baby Alpaca Silk stricken. Viel Spaß beim stricken!

04.05.2021 - 07:53

country flag Sabine wrote:

Was bedeuten die Symbole in R9,15... bei dem Muster A1?

10.01.2021 - 14:22

DROPS Design answered:

Liebe Sabine, bei der 9. Reihe haben Sie Abnahmen und Umschläge, dh die 9. Reihe stricken Sie so: 1 Masche abheben, 1 Masche rechts und die abgehobene Masche über die gestrickte ziehen, 3 Maschen rechts, (1Umschlag, 1 Masche recht), von (bis) insgesamt 5 Mal stricken, 1 Umschlag, 3 Maschen rechts, 2 Maschen rechts zusammne = 1+3+ 2x5 + 1 +3+1=19 Maschen. Viel Spaß beim stricken!

11.01.2021 - 09:35

country flag Natalia wrote:

Hallo, ich würde gerne wissen, ob die Maschenprobe sich auf die Maschenanzahl beim Stricken bezieht oder auf die Maschenanzahl nach dem Spannen?

21.12.2020 - 19:26

DROPS Design answered:

Liebe Natalia, die Maschenprobe wird gemessen, wenn die Maschen auf der Nadel sind/beim stricken!. Viel Spaß beim stricken!

22.12.2020 - 09:55

country flag Hauchecorne Nathalie wrote:

Bonjour , j aimerais savoir si ce chale je peux le faire au point de jersey au lieu du point mousse ? Et si le nombre de pelote changera ? Merci de votre réponse. Bonne journée

23.11.2020 - 10:21

DROPS Design answered:

Bonjour Mme Hauchecorne, ce modèle a été créé et calculé sur la base d'un point mousse, comme la hauteur point mousse/jersey est différente, il est recommandé de bien suivre les explications comme indiqué, si vous préférez tricoter un châle en jersey, essayez d'en trouver un qui vous plait parmi tous nos modèles de châles - filtrez si besoin. Bon tricot!

23.11.2020 - 10:41