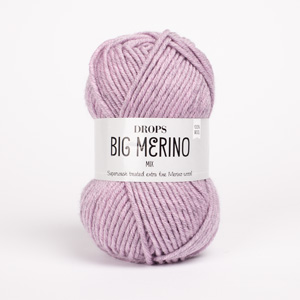
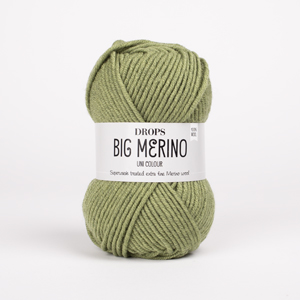
DROPS Big Merino
DROPS Big Merino
100% Wool
from 4.55 $ /50g
Get the yarn to make this pattern from 50.05$.

The yarn cost is calculated from the pattern’s smallest size and the yarn’s cheapest product type. Looking for an even better price? You might find it on the DROPS Deals!

DROPS SS24

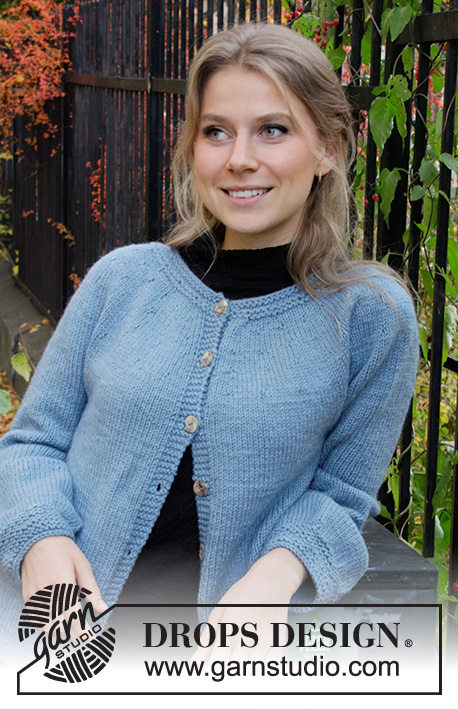
Blue November Jacket

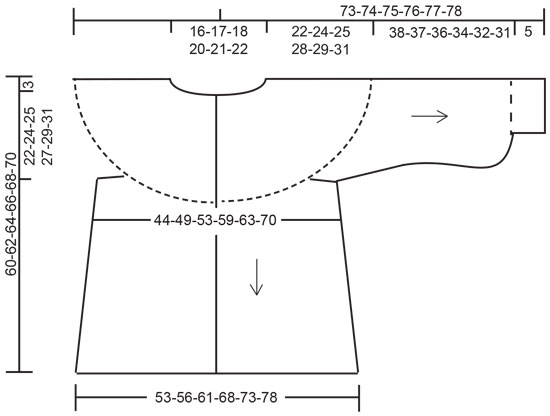
Knitted jacket in DROPS Big Merino with round yoke and balloon sleeves. Sizes S-XXXL.

DROPS 205-32
DROPS Design: Pattern no mb-058
Yarn group A + A or C
-------------------------------------------------------

SIZES:
S – M – L – XL – XXL – XXXL

Finished measurements:
Chest measurements: 106-112-122-136-146-156 cm = 41¾"-44"-48"-53½"-57⅜"-61¼"
Full length: 60-62-64-66-68-70 cm = 23⅝"-24⅜"-25¼"-26"-26¾"-27½"

All measurements in chart are in cm.

MATERIALS:
DROPS BIG MERINO from Garnstudio (belongs to yarn group C)
550-600-700-750-850-900 g color 06, forget-me-not

KNITTING GAUGE:
16 stitches in width and 20 rows in height with stockinette stitch = 10 x 10 cm = 4" x 4".

NEEDLES:
DROPS DOUBLE POINTED NEEDLES AND CIRCULAR NEEDLE SIZE 5.5 MM = US 9: Length 80 cm = 32" for stockinette stitch.
DROPS DOUBLE POINTED NEEDLES AND CIRCULAR NEEDLE SIZE 4.5 MM = US 7: Length 80 cm = 32" for garter stitch edges.
Needle size is only a guide. If you get too many stitches on 10 cm = 4", change to a larger needle size. If you get too few stitches on 10 cm = 4", change to a smaller needle size.

DROPS MOTHER OF PEARL BUTTONS, Arched (white) NO 522: 7-7-8-8-9-9 items.

-------------------------------------------------------

Alternative Yarn – See how to change yarns here
Yarn Groups A to F – Use the same pattern and change the yarn here
Yarn usage using an alternative yarn – Use our yarn converter here

-------------------------------------------------------

DROPS Big Merino
DROPS Big Merino
100% Wool
from 4.55 $ /50g
Get the yarn to make this pattern from 50.05$.

The yarn cost is calculated from the pattern’s smallest size and the yarn’s cheapest product type. Looking for an even better price? You might find it on the DROPS Deals!

Pattern instructions

NOTE: This pattern is written in American English. All measurements in charts are in cm. For conversion from inches to cm - click here. There are different terms for crocheting in American and British English. If this pattern includes crochet, click for "crochet terms" here. For this pattern in British English, please click here.
-------------------------------------------------------

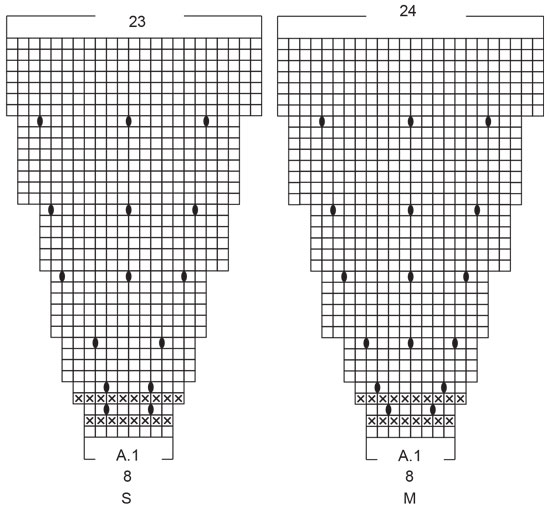
EXPLANATIONS FOR THE PATTERN:

-------------------------------------------------------

RIDGE/GARTER STITCH (worked in the round):
1 ridge in height = 2 rounds; Knit 1 round and purl 1 round.

RIDGE/GARTER STITCH (worked back and forth):
Knit all rows.
1 ridge in height = Knit 2 rows.


PATTERN:
See diagram A.1.Choose diagram for your size. The diagram shows all rows in the pattern seen from the right side.

BUTTONHOLES:
Work buttonholes on the right band (when the garment is worn). Work from the right side when there are 3 stitches left on the row as follows: Make 1 yarn over, knit 2 together and knit 1. On the next row (wrong side), knit the yarn over to leave a hole.
The first buttonhole is worked when the rib on the neck measures approx. 1½-2 cm = ½"-¾". Then work the other 6-6-7-7-8-8 buttonholes with approx. 8-8-7½-7½-7-7 cm = 3⅛"-3⅛"-2⅞"-2⅞"-2¾"-2¾" between each one.

INCREASE TIP-1 (for neck):
To work out how to increase evenly, count the total number of stitches on the needle (e.g. 84 stitches) minus bands (e.g. 10 stitches) and divide the remaining stitches by the number of increases to be made (e.g. 6) = 12.3.
In this example, increase by making 1 yarn over after approx. each 12th stitch. Do not increase on bands. On the next row work the yarn overs twisted to avoid holes.

INCREASE TIP-2 (for sides of body):
All increases are worked from the right side!
Work until there are 2 stitches left before the marker thread, make 1 yarn over, knit 4 (marker thread sits between these 4 stitches) make 1 yarn over (= 2 stitches increased at each marker thread; 4 stitches increased on round).
On the next row work the yarn overs twisted to avoid holes. Then work the new stitches in stockinette stitch.

DECREASE TIP-1 (for mid under sleeve):
Work until there are 3 stitches left before the marker, knit 2 together, knit 2 (marker thread sits between these 2 stitches), slip 1 stitch as if to knit, knit 1 and pass the slipped stitch over the knitted stitch (= 2 stitches decreased).

DECREASE TIP-2 (evenly spaced at bottom of sleeve):
To work out how to decrease evenly, count the total number of stitches on needle (e.g. 64 stitches) and divide by number of decreases to be made (e.g. 26) = 2.4.
In this example decrease by knitting alternately each 1st and 2nd and each 2nd and 3rd stitch together.

KNITTING TIP (for sleeve length):
The length of the sleeve can be adjusted as described in the text, but be aware that the sleeve length should be slightly longer than usual so the sleeve is a bit baggy at the bottom.
-------------------------------------------------------

START THE PIECE HERE:

-------------------------------------------------------

JACKET – SHORT OVERVIEW OF THE PIECE:
The piece is worked top down. The yoke is worked back and forth with circular needle to where it is divided for body and sleeves. Body and sleeves are finished separately; the body is continued back and forth, the sleeves are worked in the round with double pointed needles.

YOKE:
Cast on 80-84-86-92-94-100 stitches (including 5 band stitches on each side) with circular needle size 4.5 mm = US 7 and Big Merino. Work GARTER STITCH back and forth – read description above, for 1½ cm = ½". Knit 1 row from the right side and increase 2-6-4-6-4-6 stitches evenly spaced – read INCREASE TIP-1 = 82-90-90-98-98-106 stitches.
Knit 1 row from the wrong side. Change to circular needle size 5.5 mm = US 9.
Continue from the right side as follows: Work 5 band stitches in garter stitch, A.1 (= 8 stitches) a total of 9-10-10-11-11-12 times in width and finish with 5 band stitches in garter stitch.
REMEMBER THE KNITTING GAUGE!
When A.1 has been worked 1 time in height there are 217-250-260-296-296-322 stitches on the row. Knit 1 row from the right side where you increase 6-2-8-0-8-13 stitches evenly spaced = 223-252-268-296-304-335 stitches. Work stockinette stitch with band stitches in garter stitch as before until the piece measures 22-24-25-27-29-31 cm = 8¾"-9½"-9¾"-10⅝"-11⅜"-12¼" from the cast-on edge.
Now divide the piece for body and sleeves as follows:
Work 5 band stitches in garter stitch, 32-35-37-43-45-51 stitches in stockinette stitch (= front piece), place the next 44-51-55-58-58-62 stitches on a thread for sleeve and cast on 8-8-10-10-12-12 stitches under the sleeve, work 62-70-74-84-88-99 stitches in stockinette stitch (= back piece), place the next 44-51-55-58-58-62 stitches on a thread for sleeve and cast on 8-8-10-10-12-12 stitches under the sleeve, work 31-35-37-43-45-51 stitches in stockinette stitch and finish with 5 band stitches in garter stitch (= front piece) = 151-166-178-200-212-235 stitches.

BODY:
Place 1 marker in the middle of the 8-8-10-10-12-12 stitches under each sleeve (= 2 markers = 70-78-84-94-100-111 stitches on the back piece).
Work stockinette stitch with 5 band stitches in garter stitch on each side. When the piece measures 3 cm = 1⅛" from where the body and sleeves were divided increase 1 stitch on either side of both markers – read INCREASE TIP-2 (= a total of 4 stitches increased). Increase like this every 4-4½-4-4-3½-4½ cm = 1½"-1¾"-1½"-1½"-1¼"-1¾" a total of 7-6-7-7-8-6 times = 179-190-206-228-244-259 stitches.
When the piece measures 33-33-34-34-34-34 cm = 13"-13"-13⅜"-13⅜"-13⅜"-13⅜" from where body and sleeves were divided, change to circular needle size 4.5 mm = US 7 and work garter stitch over all stitches. Bind off with knit when the piece measures 35-35-36-36-36-36 cm = 13¾"-13¾"-14¼"-14¼"-14¼"-14¼" from the division.

SLEEVE:
Place the 44-51-55-58-58-62 stitches from the thread on the one side of the piece on double pointed needles size 5.5 mm = US 9 and knit up 1 stitch in each of the 8-8-10-10-12-12 stitches under the sleeve = 52-59-65-68-70-74 stitches. Insert 1 marker in the middle of the 8-8-10-10-12-12 stitches. Work stockinette stitch in the round.
When the sleeve measures 3 cm = 1⅛" from the division decrease 1 stitch on each side of the marker – read DECREASE TIP-1! Decrease like this every 10-3-3-3-5-5 cm = 4"-1⅛"-1⅛"-1⅛"-2"-2" a total of 2-4-4-4-3-3 times = 48-51-57-60-64-68 stitches.
When the sleeve measures 22-21-20-19-17-16 cm = 8¾"-8¼"-8"-7½"-6¾"-6¼" from the division increase 8 stitches as follows on the next round:
* Knit 6-6-7-7-8-8 stitches, 1 yarn over *, work from *-* a total of 8 times and finish with knit 0-3-1-4-0-4 stitches = 56-59-65-68-72-76 stitches.
The yarn overs are worked twisted on the next round to avoid holes!
When the sleeve measures 24-23-22-21-19-18 cm = 9½"-9"-8¾"-8¼"-7½"-7" from the division increase as follows:
* Knit 7-7-8-8-9-9, 1 yarn over *, work from *-* a total of 8 times and finish with knit 0-3-1-4-0-4 stitches = 64-67-73-76-80-84 stitches.
Continue working until the piece measures 38-37-36-34-32-31 cm = 16"-14½"-14¼"-13⅜"-12½"-12¼" from the division (there is approx. 5 cm = 2" left to finished length – read KNITTING TIP). NOTE: Shorter measurements in larger sizes due to wider neck and longer yoke. On the next round decrease 26-29-33-34-36-40 stitches evenly space – read DECREASE TIP-2! There are 38-38-40-42-44-44 stitches left on the sleeve. Change to double pointed needles size 4.5 mm = US 7 and work GARTER STITCH in the round for 5 cm = 2" – read description above. The sleeve measures 43-42-41-39-37-36 cm = 17"-16½"-16⅛"-15¼"-14½"-14¼" from where the sleeve was divided from the body. Bind off with knit.
Work the other sleeve in the same way.

ASSEMBLY:
Sew buttons onto left band.

This pattern has been corrected.

Updated online: 25.03.2021
Decrease TIP-2 corrected.

Diagram

All measurements in charts are in cm.

symbols = knit from right side, purl from wrong side
symbols = knit from wrong side
symbols = between 2 stitches make 1 yarn over; yarn over is purled twisted on the next row to avoid holes
diagram
diagram
diagram

Each of our patterns has specific tutorial videos to help you.

Do you have a question? See a list of frequently asked questions (FAQ)

Knitting tension is what determines the final measurements of your work, and is usually measured per 10 x 10 cm. It is provided like so: number of stitches in width x number of rows in height - eg: 19 stitches x 26 rows = 10 x 10 cm.

The knitting tension is very individual; some people knit/crochet loosely while others work tightly. You adjust the knitting tension with the needle size, which is why the suggested needle size only serve as a guide! You need to adjust this (up or down) to ensure that YOUR knitting tension matches the knitting tension provided in the pattern. If you work with a different knitting tension than provided you will have a different yarn consumption, and your work will have different measurements than what the pattern suggests.

The knitting tension also determines which yarns can replace each other. As long as you achieve the same knitting tension you can replace one yarn with another.

See DROPS lesson: How to measure your tension/gauge

See DROPS video: How to make a gauge tension swatch

The required amount of yarn is provided in grams, eg: 450 g. To calculate how many balls you’ll need you first need to know how many grams are in 1 ball (25g, 50g or 100g). This information is available if you click on the individual yarn quality on our pages. Divide the amount required with the amount of each ball. For example, if each ball is 50g (the most common amount), the calculation will be as follows: 450 / 50 = 9 balls.

The important thing when changing from one yarn to another is that the knitting/crochet tension remains the same. This is so that the measurements of the finished piece will be the same as on the sketch provided. It is easier to achieve the same knitting tension using yarns from the same yarn group. It is also possible to work with multiple strands of a thinner yarn to achieve the knitting tension of a thicker one. Please try our yarn converter. We recommend you to always work a test swatch.

Please NOTE: when changing yarn the garment might have a different look and feel to the garment in the photo, due to individual properties and qualities of each yarn.

See DROPS lesson: Can I use a different yarn than the one mentioned in the pattern?

All our yarns are categorised into yarn groups (from A to F) according to thickness and knitting tension – group A contains the thinnest yarns and group F the thickest. This makes it easier for you to find alternative yarns to our patterns, should you wish to switch yarn. All yarns within the same group have a similar knitting tension and can easily replace each other. However, different yarn qualities have different structures and properties which will give the finished work a unique look and feel.

Click here for an overview of the yarns in each yarn group

At the top of all our patterns you’ll find a link to our yarn converter, which is a helpful tool should you wish to use a different yarn than suggested. By filling in the yarn quality you wish to replace, the amount (in your size) and number of strands, the converter will present good alternative yarns with the same knitting tension. Additionally it will tell you how much you’ll require in the new qualities and whether you’ll need to work with multiple strands. Most skeins are 50g (some are 25g or 100g).

If the pattern is worked with multiple colours, every colour will have to be converted separately. Similarly, if the pattern is worked with several strands of different yarns (for example 1 strand Alpaca and 1 strand Kid-Silk) you will have to find alternatives for each, individually.

Click here to see our yarn converter

Since different yarns have different qualities and textures we have chosen to keep the original yarn in our patterns. However, you can easily find options among our available qualities by using our yarn converter, or simply pick a yarn from the same yarn group.

It is possible that some retailers still have discontinued yarns in stock, or that someone has a few skeins at home that they would like to find patterns for.

The yarn converter will provide both alternative yarn as well as required amount in the new quality.

If you think it's hard to decide what size to make, it can be a good idea to measure a garment you own already and like the size of. Then you can pick the size by comparing those measures with the ones available in the pattern's size chart.

You'll find the size chart at the bottom of the pattern.

See DROPS lesson: How to read size chart

The needle size provided in the pattern serves only as a guide, the important thing is to follow the knitting tension. And since knitting tension is very individual, you will have to adjust the needle size to ensure that YOUR tension is the same as in the pattern – maybe you’ll have to adjust 1, or even 2 needle sizes, up or down to achieve the correct tension. For this, we recommend that you work test swatches.

Should you work with a different knitting tension than the one provided, the measurements of the finished garment might deviate from the measurement sketch.

See DROPS lesson: How to measure your tension/gauge

See DROPS video: How to make a gauge tension swatch

Working a garment top-down provides more flexibility and room for personal adjustment. For example it is easier to try the garment on while working, as well as making adjustments to length of yoke and shoulder caps.

The instructions are carefully explaining every step, in the correct order. Diagrams are adjusted to the knitting direction and are worked as usual.

The diagram depicts all rows/rounds, and every stitch seen from the right side. It is read from bottom to top, from right to left. 1 square = 1 stitch.

When working back and forth, every other row is worked from the right side and every other row is worked from the wrong side. When working from the wrong side, the diagram will have to be worked reversed: from left to right, knit stitches are purled, purl stitches are knit etc.

When working in the round every round is worked from the right side and the diagram are worked from right to left on all rounds.

See DROPS lesson: How to read knitting diagrams

The diagram depicts all rows/rounds, and every stitch seen from the right side. It is worked from bottom to top, from right to left.

When working back and forth every other row is worked from the right side: from right to left and every other row is worked from the wrong side: from left to right.

When working in the round, every row in the diagram are worked from the right side, from right to left.

When working a circular diagram you start in the middle and work your way outwards, counter clockwise, row by row.

The rows usually start with a given number of chain stitches (equivalent to the height of the following stitch), this will either be depicted in the diagram or explained in the pattern.

See DROPS lesson: How to read crochet diagrams

Instructions for working several diagrams after each other on the same row/round, will often be written like so: “work A.1, A.2, A.3 a total of 0-0-2-3-4 times". This means you work A.1 once, then A.2 is worked once, and A.3 is repeated (in width) the number of times provided for your size – in this case like so: S = 0 times, M = 0 times, L=2 times, XL= 3 times and XXL = 4 times.

The diagrams are worked as usual: begin with the first row in A.1, then work the first row in A.2 etc.

See DROPS lesson: How to read knitting diagrams

See DROPS lesson: How to read crochet diagrams

The total width of the garment (from wrist-to-wrist) will be larger in the larger sizes, despite the actual sleeves being shorter. The larger sizes have longer sleeve caps and wider shoulders, so there will be a good fit in all sizes.

The measurement sketch/schematic drawing provides information regarding the full length of the garment. If it’s a jumper or a jacket the length is measured from the highest point on the shoulder (usually closest to the neckline), and straight down to the bottom of the garment. It is NOT measured from the tip of shoulder. Similarly, the length of yoke is measured from the highest point on the shoulder and down to where yoke is split into body and sleeves.

See DROPS lesson: How to read a schematic drawing

Diagrams are often repeated on the round or in height. 1 repeat is the diagram the way it appears in the pattern. If it says to work 5 repeats of A.1 in the round, then you work A.1 a total of 5 times after/next to each other in the round. If it says to work 2 repeats of A.1 vertically/in height you work the entire diagram once, then begin again at the start and work the entire diagram one more time.

Chain stitches are slightly narrower than other stitches and to avoid working the cast-on edge too tight, we simply chain more stitches to begin with. The stitch count will be adjusted on the following row to fit the pattern and measurement sketch.

The rib edge is more elastic and will contract slightly compared to, for example, stocking stitch. By increasing before the rib edge, you avoid a visible difference in width between the rib edge and the rest of the body.

It’s very easy to cast off too tightly, and by making yarn overs while casting off (and simultaneously casting these off) you avoid a too tight cast off edge.

See DROPS video: How to bind off with yarn overs (yo)

To achieve an even increase (or decrease) you can increase on, for example: every 3rd and 4th row alternately, like so: work 2 rows and increase on the 3rd row, work 3 rows and increase on the 4th. Repeat this until the increase is complete.

See DROPS lesson: Increase or decrease 1 st on every 3rd and 4th row alternately

Should you prefer to work in the round instead of back and forth, you may of course adjust the pattern. You’ll need to add steeks mid-front (usually 5 stitches), and follow the instructions. When you would normally turn and work from the wrong side, simply work across the steek and continue in the round. At the end you’ll cut the piece open, pick up stitches to work bands, and cover the cut edges.

See DROPS video: How to knit steeks and cut open

Should you prefer to work back and forth instead of in the round, you may of course adjust the pattern so you work the pieces separately and then assemble them at the end. Divide the stitches for the body in 2, add 1 edge stitch in each side (for sewing) and work the front and back pieces separately.

See DROPS lesson: Can I adapt a pattern for circular needles into straight needles?

Pattern repeats can vary slightly in the different sizes, in order to get the correct proportions. If you’re not working the exact same size as the garment in the photo, yours might deviate slightly. This has been carefully developed and adjusted so that the complete impression of the garment is the same in all sizes.

Make sure to follow instructions and diagrams for your size!

If you have found a pattern you like which is available in women’s size it’s not very difficult to convert it to men’s size. The biggest difference will be the length of sleeves and body. Start working on the women size that you think would fit across the chest. The additional length will be worked right before you cast off for the armhole/sleeve cap. If the pattern is worked top-down you can add the length right after the armhole or before the first decrease on sleeve.

Regarding additional yarn amount, this will depend on how much length you add, but it is better with a skein too many than too few.

All yarns will have excess fibres (from production) that might come off as lint or shedding. Brushed yarns (ie hairier yarns) have more of these loose, excess fibres, causing more shedding.

Shedding also depends on what is worn under or over the garment, and whether this pulls at the yarn fibres. It’s therefore not possible to guarantee that there will be no shedding

Below are some tips on how to get the best result when working with hairier yarns:

1. When the garment is finished (before you wash it) shake it vigorously so the looser hairs come off. NOTE: do NOT use a lint roller, brush or any method that pulls at the yarn.

2. Place the garment in a plastic bag and put it in your freezer - the temperature will cause the fibres to become less attached to each other, and excess fibres will come off easier.

3. Leave in the freezer for a few hours before taking it out and shaking it again.

4. Wash the garment according to the instructions on the yarn label.

Pilling is a natural process that happens to even the most exclusive of fibers. It's a natural sign of wear and tear that is hard to avoid, and that is most visible in high friction areas of your garment like a sweater's arms and cuffs.

You can make your garment look as new by removing the pilling, using a fabric comb or a pill/lint remover.

Still can't find the answer you need? Then scroll down and leave your question so one of our experts can try to help you. This will be done normally within 5 to 10 working days.
In the meantime, you can read the questions and answers that others have left to this pattern or join the DROPS Workshop on Facebook to get help from fellow knitters/crocheters!

You might also like...

Post a comment to pattern DROPS 205-32

We would love to hear what you have to say about this pattern!

If you want to leave a question, please make sure you select the correct category in the form below, to speed up the answering process. Required fields are marked *.

Comments / Questions (6)

country flag Lisbeth Lund wrote:

Når jeg læser A1- er det korrekt, at jeg strikker (linje 5)* 2r-slå om- 3r-slå om-3r- slå om- 2r-*og gentag p. ud.\r\nEller er det 2r-*slå om- 3r-slå om - 3r- slå om- *gentag fra *-*og afslut med 2r.?

19.03.2024 - 12:55

DROPS Design answered:

Hei Lisbeth. Du gjentar hele diagrammet. I str. L-XL-XXL-XXXL strikker du slik: * 2r-slå om- 3r-slå om-3r- slå om- 2r*. mvh DROPS Design

02.04.2024 - 09:33

country flag Ruth wrote:

When I follow the directions I have 4 garter stitch ridges at the neckline. The picture seems to have only 2. What could I be doing incorrectly?

17.02.2023 - 22:41

DROPS Design answered:

Dear Ruth, the instructions are correct, there are 4 garter stitch ridges at the neckline. Happy knitting!

19.02.2023 - 19:41

country flag Kate Sumer wrote:

Om jag lägger upp 10 maskor under varje ärm borde antalet maskor bli 188 för fram o bakstycke

02.08.2021 - 23:05

country flag Conceição wrote:

Não entendi a explicação do primeiro aumento do encaixe. Pede para aumentar 6 pontos em intervalos regulares mas no gráfico A1 (M), mostra a cada 4.

10.02.2021 - 11:31

country flag Anne Larsen wrote:

I laver så mange skønne opskrifter. Forstår bare ikke hvorfor i fravælger størrelse xs når i ellers har op i størrelse XXXL

09.01.2020 - 19:00

country flag Zuzanna wrote:

Hello, looking at the picture I suppose that before starting A1 rows we should knit one row and purl the other side im order to have thr gap between gartner stitches. Am I right? Is there a mistake in the description?

07.09.2019 - 13:04

DROPS Design answered:

Dear Zuzanna, after the cast on you'll work garter stithc for 1½ cm, then knit 1 row from the right side with increases and finally knit 1 row from wrong side. Than you can start with A.1 as explained. Knit 1 row from the wrong side. Change to circular needle size 5.5 mm.

08.09.2019 - 10:51