
Popular categories
Looking for a yarn?


|
|||||||||||||||||||||||||||||||||||||||||||
DROPS 60-19 |
|||||||||||||||||||||||||||||||||||||||||||
|
|
|||||||||||||||||||||||||||||||||||||||||||
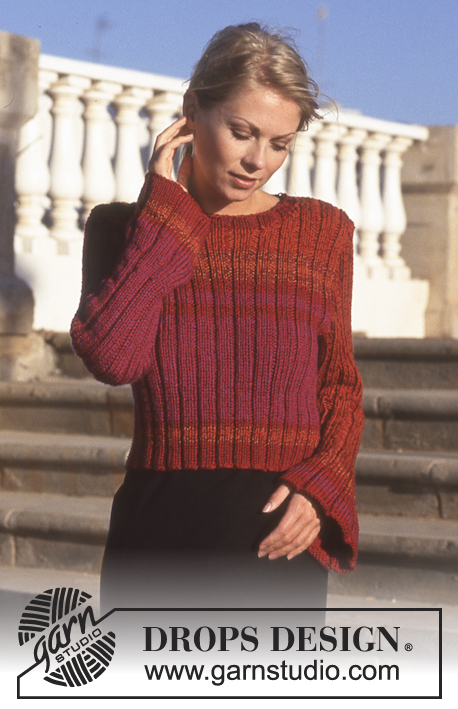
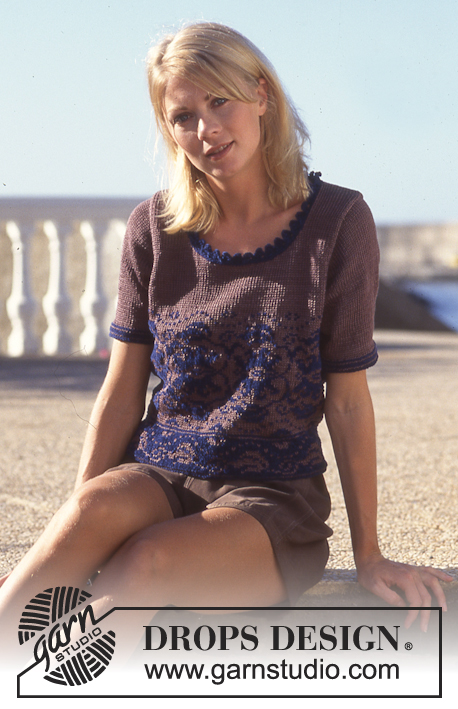
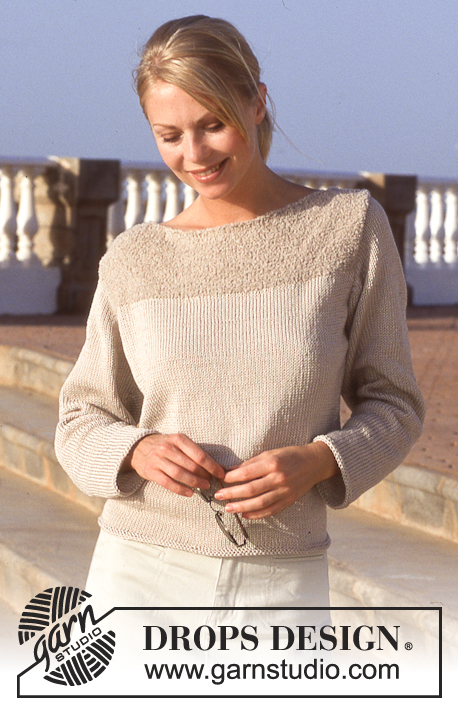
DROPS Rose sweater in 4 yarn types
DROPS 60-19 |
|||||||||||||||||||||||||||||||||||||||||||
|
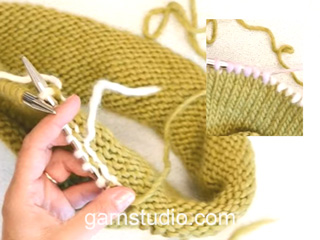
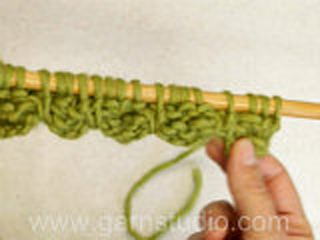
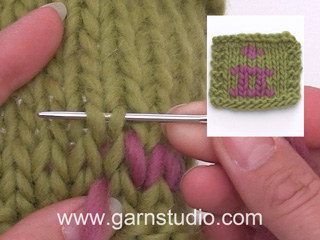
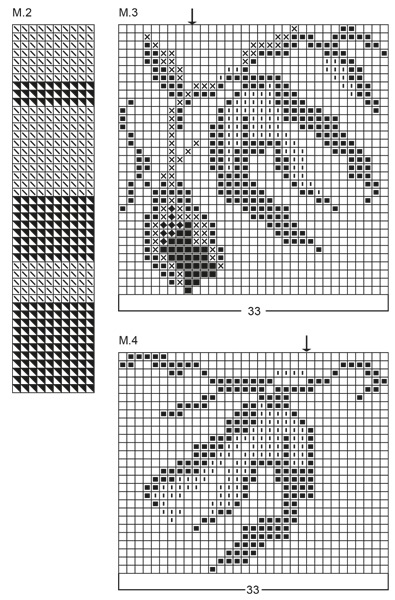
Gauge: 17 sts x 22 rows in stockinette st = 10 x 10 cm with either 1 strand of Paris, 1 strand Cotton Viscose + 1 strand Safran, or 2 strands Pelliza. Garter st, when knitting flat: Knit all sts, all rows. Garter st, when knitting in the round: *Rnd 1, knit. Rnd 2, purl.* Repeat from * - *. Knitting tip: Pattern 1 can be either knit in intarsia, or duplicate stitched. You may prefer to work small color areas in duplicate st. Pattern: See charts (1 chart = 1 repeat). The pattern is seen from the right side and is knit entirely in stockinette stitch. Arrows on the charts for Patterns 3 and 4 indicate the center of the sleeve (midt på ermet = center of sleeve). Front: Cast on 84 (90) sts with jeans blue Paris. Knit 2 rows garter st, change to dark beige Paris, knit 4 rows stockinette st. Knit the next row as follows: K 2 (5) sts, * K 5, roll/twist the edge as follows: put the right needle behind the work, bring it under and up in front of the work (twisting the edge), K 5, * repeat * - *, finish with K 2 (5) sts. Knit 1 row stockinette st, then Pattern 1, centering the pattern on the front. Knit the background color following Pattern 2. At the same time inc 1 st at each side 3 (4) times every 6.5 (5.5) cm = 90 (98) sts. When the work measures 29 (30) cm bind off for armholes at each side every other row: 3 sts 1 (2) times, 2 sts 1 time, 1 st 2 (3) = 76 (76) sts. When the work measures 45 (47) cm bind off the center 18 (18) sts for the neck. Bind off at each neck edge every other row: 3 sts 1 time, 2 sts 1 time, 1 st 1 time. Bind off when the work measures 52 (54) cm. Back: Cast on and knit as for the front, but knit only Pattern 2 (not Pattern 1). When the work measures 50 (52) cm bind off the center 26 (26) sts for the neck. Bind off 2 sts at each neck edge on the next row. Bind off when the work measures 52 (54) cm. Right sleeve: Cast on 42 (42) sts with jeans blue Paris. Knit 2 rows garter st, change to dark beige Paris, knit 4 rows stockinette st. Knit the next row as follows: K 2 (5) sts, * K 5, roll/twist the edge as follows: put the right needle behind the work, bring it under and up in front of the work (twisting the edge), K 5, * repeat * - *, finish with K 2 (5) sts. Knit 1 row of stockinette st. Then knit Pattern 2. When the work measures 7 cm inc 1 st at each side 19 (21) times: Size S/M: Every 4th row Size M/L: Alternately every 3rd and 4th row = 80 (84) sts. When the work measures 35 (37) cm knit Pattern 3 - see guide arrow to center the pattern on the sleeve. When the work measures 47 (47) cm bind off for sleeve caps at each side every other row: 4 sts 2 (1) times, 3 sts 1 (2) times, 2 sts 2 (5) times, 3 sts 1 time, 4 sts 2 (1) times, bind off. The work measures approx. 54 (56) cm. Left sleeve: Cast on and knit like the right sleeve, but when the work measures 36 (38) cm knit Pattern 4 instead of Pattern 3 - see guide arrow to center pattern on the sleeve. Assembly: Sew shoulder seams. Pick up approx. 80-85 sts around the neck on circular needles with dark beige Paris; join and knit 2 rows garter st, change to jeans blue Paris and knit 2 rows garter st, bind off. Sew in the sleeves. Sew the sleeve seam and the side seam in one. |
|||||||||||||||||||||||||||||||||||||||||||
Diagram explanations |
|||||||||||||||||||||||||||||||||||||||||||
|
|||||||||||||||||||||||||||||||||||||||||||

|
|||||||||||||||||||||||||||||||||||||||||||

|
|||||||||||||||||||||||||||||||||||||||||||
|
|||||||||||||||||||||||||||||||||||||||||||

|
|||||||||||||||||||||||||||||||||||||||||||
|
Have you made this or any other of our designs? Tag your pictures in social media with #dropsdesign so we can see them! Do you need help with this pattern?You'll find tutorial videos, a Comments/Questions area and more by visiting the pattern on garnstudio.com. © 1982-2024 DROPS Design A/S. We reserve all rights. This document, including all its sub-sections, has copyrights. Read more about what you can do with our patterns at the bottom of each pattern on our site. |
|||||||||||||||||||||||||||||||||||||||||||


With over 40 years in knitting and crochet design, DROPS Design offers one of the most extensive collections of free patterns on the internet - translated to 17 languages. As of today we count 304 catalogues and 11422 patterns - 11422 of which are translated into English (UK/cm).
We work hard to bring you the best knitting and crochet have to offer, inspiration and advice as well as great quality yarns at incredible prices! Would you like to use our patterns for other than personal use? You can read what you are allowed to do in the Copyright text at the bottom of all our patterns. Happy crafting!
Comments / Questions (1)
Bonjour J’aimerai savoir les couleurs associées à M2 et savoir quoi correspond drops Cotton viscose coloris 02 Et drops safran coloris 18
23.02.2023 - 11:02DROPS Design answered:
Bonjour Mme Contessi, retrouvez tous les fils épuisés ici et utilisez notre convertisseur pour trouver les alternatives possibles, quant aux couleurs, votre magasin saura vous conseiller plus simplement - même par mail ou téléphone. Bon tricot!
23.02.2023 - 14:46