
Popular categories
Looking for a yarn?


|
||||||||||||||||||||||||||||
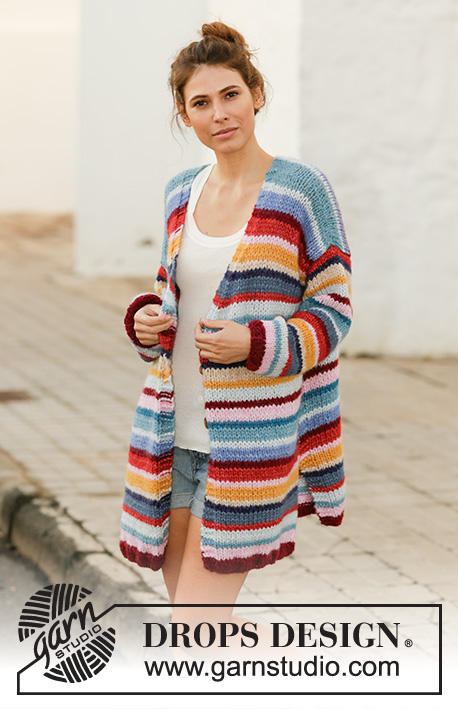
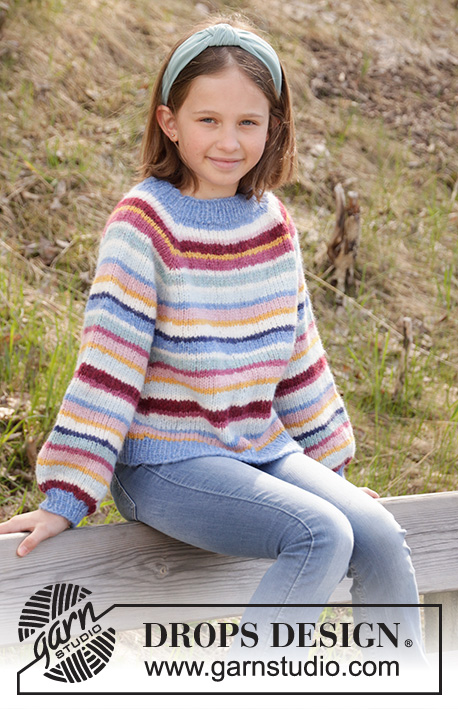
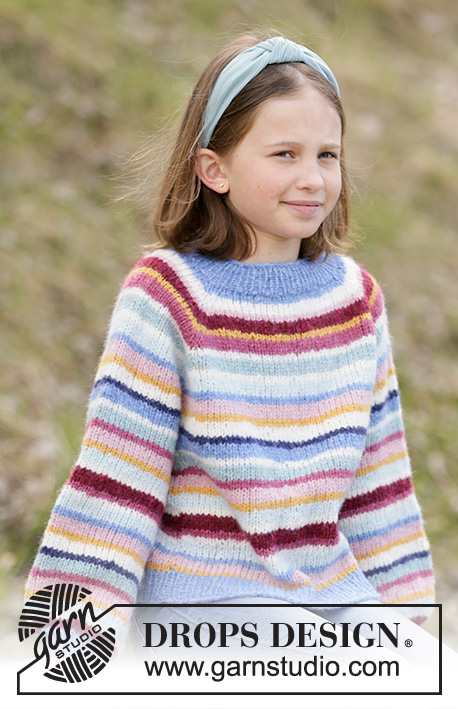
Happy Stripes |
||||||||||||||||||||||||||||
 |
 |
|||||||||||||||||||||||||||
Knitted sweater for children in DROPS Air, DROPS Nepal or DROPS Paris. The piece is worked top down with stripes and raglan. Sizes 2-12 years.
DROPS Children 34-22 |
||||||||||||||||||||||||||||
|
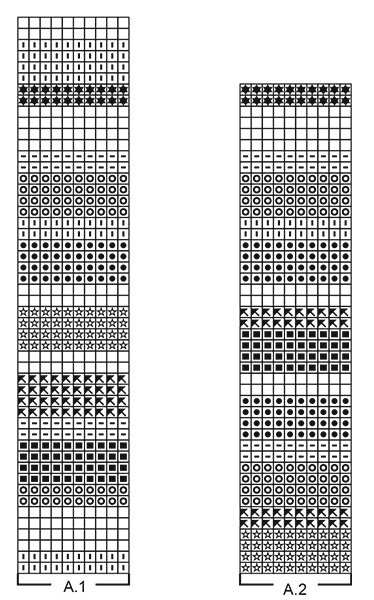
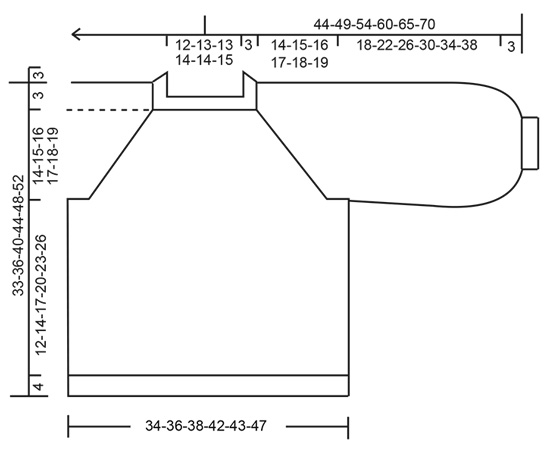
------------------------------------------------------- EXPLANATIONS FOR THE PATTERN: ------------------------------------------------------- INCREASE TIP-1 (evenly spaced): To work out how to increase evenly, count the total number of stitches on the needle (e.g. 54 stitches) and divide by the number of increases to be made (e.g. 6) = 9. In this example, increase by making 1 yarn over after each 9th stitch. On the next round work the yarn overs twisted to avoid holes. STRIPES: See diagrams A.1 and A.2. The stripes are worked in stockinette stitch. Work A.1 once, then continue with and repeat A.2 to finished length (applies to both sleeves and body). RAGLAN: Increase 1 stitch on each side of the 2 knitted stitches in each transition between body and sleeves (= 8 stitches increased on round). Increase 1 stitch by making 1 yarn over. On the next round knit the yarn twisted overs to avoid hole. INCREASE TIP-2 (for mid under sleeve): Increase 2 stitches mid under sleeve as follows: Start 1 stitch before the marker thread, make 1 yarn over, knit 2 (marker thread sits in between these 2 stitches) make 1 yarn over = 2 stitches increased. On the next round knit the yarn overs twisted to avoid holes. ------------------------------------------------------- START THE PIECE HERE: ------------------------------------------------------- SWEATER – SHORT OVERVIEW OF THE PIECE: The piece is worked in the round with circular needle, top down. After the yoke the body is continued in the round with circular needle. The sleeves are worked in the round with short circular needle/ double pointed needles. YOKE: Cast on 54-54-58-62-64-68 stitches with short circular needle size 4.5 mm = US 7 and blue. Knit 1 round, then work rib (= knit 1 / purl 1) for 3 cm = 1⅛". Knit 1 round where you increase 6-6-6-6-8-16 stitches evenly spaced – read INCREASE TIP-1 = 60-60-64-68-72-84 stitches. Change to circular needle size 5.5 mm = US 9. Insert 1 marker – THE PIECE IS NOW MEASURED FROM HERE! Now insert 4 more markers without working the stitches as follows: Insert 1 marker at the beginning of the round (= in the transition between sleeve and back piece), 1 marker after 21-21-23-25-25-31 stitches (= back piece), 1 marker after 9-9-9-9-11-11 more stitches (= sleeve), 1 marker after 21-21-23-25-25-31 more stitches (= front piece); there are 9-9-9-9-11-11 stitches left to the first marker (= sleeve). Continue with STRIPES – read description above. The next round is worked as follows: The round starts at the first marker in the transition between sleeve and back piece. Knit 1, make 1 yarn over, knit 19-19-21-23-23-29 stitches (= back piece), make 1 yarn over, knit 2 (the marker sits between these 2 stitches), 1 yarn over, knit 7-7-7-7-9-9 stitches (= sleeve), 1 yarn over, knit 2 (the marker sits between these 2 stitches), 1 yarn over, knit 19-19-21-23-23-29 stitches (= front piece), 1 yarn over, knit 2 (the marker sits between these 2 stitches), 1 yarn over, knit 7-7-7-7-9-9 stitches (= sleeve), 1 yarn over, knit 1. REMEMBER THE KNITTING GAUGE! The first increase to RAGLAN – read description above, is now finished (= 8 stitches increased on round). Continue with stockinette stitch, stripes and increase to raglan every 2nd round a total of 13-14-15-16-17-17 times (including the first increase described above). After the last increase to raglan there are 164-172-184-196-208-220 stitches on the needle. Continue with stockinette stitch and stripes, but without increasing, until the piece measures 14-15-16-17-18-19 cm = 5½"-6"-6¼"-6¾"-7"-7½" from the marker at the beginning of the yoke. The next round is worked in stripes and stockinette stitch as before but start the round 1 stitch earlier (before the 2 knitted stitches between sleeve and back piece). Knit 49-51-55-59-61-67 stitches (= back piece), place the next 33-35-37-39-43-43 stitches on a thread (= sleeve), cast on 4-4-4-6-6-6 new stitches on the needle (= in side under sleeve), knit 49-51-55-59-61-67 stitches (= front piece), place the next 33-35-37-39-43-43 stitches on a thread (= sleeve), cast on 4-4-4-6-6-6 new stitches on the needle (= in side under sleeve). Body and sleeves are finished separately. THE PIECE IS NOW MEASURED FROM HERE! BODY: There are 106-110-118-130-134-146 stitches on the needle. Continue in the round with stockinette stitch and stripes as before. When the piece measures 12-14-17-20-23-26 cm = 4¾"-5½"-6¾"-8"-9"-10¼" from the division change to circular needle size 4.5 mm = US 7 and blue. Work rib (= knit 1 / purl 1) for 4 cm = 1½". Loosely bind off with knit over knit and purl over purl – to avoid the bind-off edge being tight you can bind off with needle size 5.5 mm = US 9. Cut and fasten strand. SLEEVE: Place the stitches from the thread on the one side of the piece on short circular needle/ double pointed needles size 5.5 mm = US 9 (= 33-35-37-39-43-43 stitches) and knit up 1 stitch in each of the 4-4-4-6-6-6 stitches cast on under the sleeve = 37-39-41-45-49-49 stitches. Insert 1 marker in the middle of the 4-4-4-6-6-6 stitches and start the round here. Work stockinette stitch in the round and continue the stripes in the same way as on the body (important that you continue with the same round as on the body after the yoke). When the piece measures 2 cm = ¾" from the division increase 2 stitches mid under sleeve – read INCREASE TIP-2. Increase like this every 2-2½-3-4-5-6 cm = ¾"-1"-1⅛"-1½"-2"-2⅜" a total of 8-8-8-7-6-6 times = 53-55-57-59-61-61 stitches. Continue working until the sleeve measures 18-22-26-30-34-38 cm = 7"-8¾"-10¼"-11¾"-13⅜"-15" from the division. Change to blue and knit 1 round where you decrease 1-3-1-3-1-1 stitches = 52-52-56-56-60-60 stitches. Change to double pointed needles size 4.5 mm = US 7 and knit 1 round where all stitches are knitted together 2 and 2 = 26-26-28-28-30-30 stitches. Work rib (knit 1 / purl 1) for 3 cm = 1⅛". Loosely bind off with knit over knit and purl over purl – to avoid the bind-off edge being tight you can bind off with needle size 5.5 mm = US 9. Cut and fasten strand. Work the other sleeve in the same way. |
||||||||||||||||||||||||||||
Diagram explanations |
||||||||||||||||||||||||||||
|
||||||||||||||||||||||||||||
|
||||||||||||||||||||||||||||
|
||||||||||||||||||||||||||||
|
Have you made this or any other of our designs? Tag your pictures in social media with #dropsdesign so we can see them! Do you need help with this pattern?You'll find tutorial videos, a Comments/Questions area and more by visiting the pattern on garnstudio.com. © 1982-2024 DROPS Design A/S. We reserve all rights. This document, including all its sub-sections, has copyrights. Read more about what you can do with our patterns at the bottom of each pattern on our site. |
||||||||||||||||||||||||||||


With over 40 years in knitting and crochet design, DROPS Design offers one of the most extensive collections of free patterns on the internet - translated to 17 languages. As of today we count 304 catalogs and 11422 patterns - 11417 of which are translated into English (US/in).
We work hard to bring you the best knitting and crochet have to offer, inspiration and advice as well as great quality yarns at incredible prices! Would you like to use our patterns for other than personal use? You can read what you are allowed to do in the Copyright text at the bottom of all our patterns. Happy crafting!
Comments / Questions (15)
Har lige strikket denne i str. 98/104. Nem opskrift og flot resultat. Tak for en god opskrift.
11.12.2023 - 10:03Hei Jeg skal strikke ensfarget størrelse 11/12 år, hvor mange nøster beregner dere da?
07.09.2022 - 12:19DROPS Design answered:
Hej Thu, så skal du bruge ca 350 gram :)
07.09.2022 - 15:24Hej! Jeg har haft strikket Happy Stripes str. 10-12 for et års tid siden, og jeg mener bestemt, den var strikket i dobbelt garn. Husker jeg forkert? Blusen blev væk, så nu skal jeg strikke en ny, men opskriften er ikke i dobbelt garn. Jeg kan se, at voksenstørrelserne er i dobbelt garn.
25.04.2022 - 15:53DROPS Design answered:
Hej Vibeke, det kan være at du strikkede efter Dame i den mindste størrelse ... :)
26.04.2022 - 14:46Hei, minulta puuttuu muutama lisäys aivan alussa enkä saa nyt täsmäämään. Olen kohdassa, jossa hihat otetaan apulangoille. Kysymys: tuleeko rajakohta ( jossa ne keskimmäiset 2 silmukkaa, joiden viereen tehtiin aina lisäykset) etu- ja takakappaleille vai hihoihin? Ymmärtäisin, että etu- ja takakappaleelle. Silloin minun silmukat menisivät (suurin koko): takakappale 65, hiha 44;, etukappale 68, hiha 38).
20.11.2021 - 15:56Hallo, wieviel gramm wolle benötige ich für große 146/152??
22.09.2021 - 21:20DROPS Design answered:
Liebe Frau Bauer, da wir den Pullover mit Streifen gestrickt haben, können wir Ihnen leider nicht die Garnmenge in nur eine Farbe geben - lassen Sie sich mal bei einem ähnlichen Modell mit nur 1 Farbe und selbe Maschenprobe inspirieren oder gerne wird Ihnen Ihr DROPS Laden weiterhelfen - auch telefonisch oder per E-Mail. Viel Spaß beim stricken!
23.09.2021 - 08:41Wie hoch ist der Gesamtverbrauch bei Größe 146/152 - ich möchte einfarbig, ohne Streifen, stricken.
29.03.2021 - 13:33DROPS Design answered:
Liebe Frieda, da wir den Pullover mit Streifen gestrickt haben, können wir Ihnen leider nicht die Garnmenge in nur eine Farbe geben. Gerne wird Ihnen Ihr DROPS Laden weiterhelfen - auch telefonisch oder per E-Mail. Viel Spaß beim stricken!
06.04.2021 - 08:54Bonjour La quantité en une seule couleur est indiquée pour le modèle adulte. Dommage de ne pas l'avoir pour le modèle enfant. Merci quand même de votre réponse
14.12.2020 - 20:47Bonjour, comme Etoile, je souhaiterai connaitre le poids total du pull terminé pour pouvoir le faire en une seule couleur. cordialement
12.12.2020 - 22:55DROPS Design answered:
Bonjour Céline, comme expliqué à Étoile, nous ne sommes malheureusement pas en mesure de pouvoir adapter chaque modèle à chaque demande, vous pouvez vous inspirer d'un modèle uni dans une laine du groupe C. Bon tricot!
14.12.2020 - 08:37Strikker minste str. Skal begynne på bolen. 106m. Det er for og bakstykkemasker samt 8 m man skal legge opp ekstra (i siden under ermet). Disse 106 m skal altså strikkes videre på rundpinne? Men leser man på ermer, skal 33 m samt 4 ekstra (som allerede er inkl i bolen) strikkes opp. Hvordan gjør man dette i praksis? Jeg står fast.
01.10.2020 - 14:06DROPS Design answered:
Hei Liv. Du har 49 masker (bakstykket)+ 4 nye masker + 49 masker (forstykket) + 4 nye masker = 106 masker til bolen. Erm maskene er satt på en tråd, 33 masker x 2. Når bolen er ferdig strikket og du starter på ermene, strikker du de 33 maskene du har satt på 1 tråd og så strikker du opp 4 nye masker i de 4 nye maskene du la opp på bolen (under ermet). Ta gjerne et titt på videoen: Hvordan strikke en genser ovenfra og ned. Den viser ikke hvordan du strikker opp i de nye maskene på bolen, men hvordan du legger opp nye masker til erme, men kanskje lettere å skjønne teknikken ved å se en video. God Fornøyelse!
05.10.2020 - 10:36Ønsker strikke happy stripes genseren i Drops Nepal. Stemmer det at eg skal strikke med dobbelt garn? Det blir vel veeeeeldig tykt?
14.09.2020 - 13:45DROPS Design answered:
Hei Eva. Nei, denne genseren strikkes bare med 1 tråd. Men voksen versjonene (DROPS 202-1) strikkes med dobbelt tråd. mvh DROPS design
14.09.2020 - 14:07