DROPS Karisma
DROPS Karisma
100% Wool
from 2.50 € /50g
Get the yarn to make this pattern from 30.00€.

The yarn cost is calculated from the pattern’s smallest size and the yarn’s cheapest product type. Looking for an even better price? You might find it on the DROPS Deals!

DROPS SS24

Crisp Air Jacket

Knitted jacket with round yoke and Nordic pattern in DROPS Karisma. The piece is worked top down. Sizes S - XXXL.

DROPS 207-13
DROPS Design: Pattern no u-892
Yarn group B
-------------------------------------------------------

SIZES:
S - M - L - XL - XXL – XXXL

MATERIALS:
DROPS KARISMA from Garnstudio (belongs to yarn group B)
350-400-450-500-550-600 g colour 50, sea green
100-100-100-100-100-150 g colour 69, light grey green
100-100-100-100-150-150 g colour 01, off white
50-50-50-50-50-50 g colour 54, beige brown

KNITTING TENSION:
20 stitches in width and 26 rows in height with stocking stitch/Nordic pattern = 10 x 10 cm.

NEEDLES:
DROPS DOUBLE POINTED NEEDLES SIZE 4.5 MM.
DROPS CIRCULAR NEEDLE SIZE 4.5 MM: Length 40 cm and 80 cm for stocking stitch/Nordic pattern.
DROPS DOUBLE POINTED NEEDLES SIZE 3.5 MM.
DROPS CIRCULAR NEEDLE SIZE 3.5 MM: Length 80 cm for rib.
Needle size is only a guide. If you get too many stitches on 10 cm, change to a larger needle size. If you get too few stitches on 10 cm, change to a smaller needle size.

DROPS MOTHER OF PEARL BUTTONS, Arched (white) NO 522: 7-7-7-8-8-8 items.

-------------------------------------------------------

Alternative Yarn – See how to change yarns here
Yarn Groups A to F – Use the same pattern and change the yarn here
Yarn usage using an alternative yarn – Use our yarn converter here

-------------------------------------------------------

DROPS Karisma
DROPS Karisma
100% Wool
from 2.50 € /50g
Get the yarn to make this pattern from 30.00€.

The yarn cost is calculated from the pattern’s smallest size and the yarn’s cheapest product type. Looking for an even better price? You might find it on the DROPS Deals!

Pattern instructions

-------------------------------------------------------

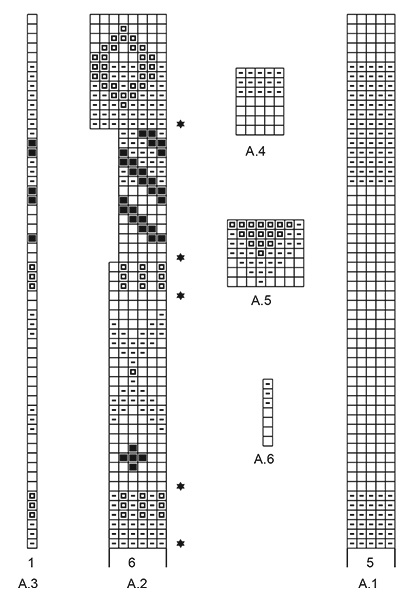
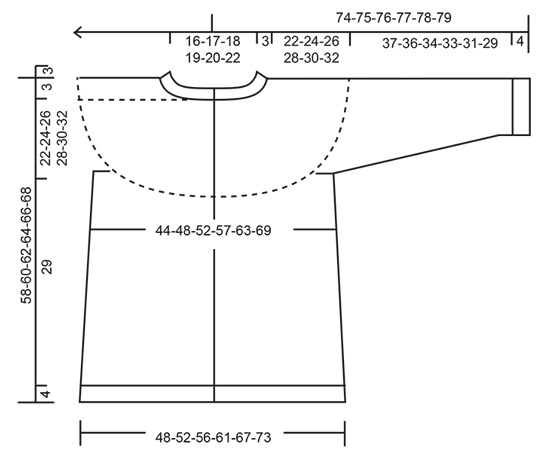
EXPLANATIONS FOR THE PATTERN:

-------------------------------------------------------

RIDGE/GARTER STITCH (worked back and forth):
Knit all rows.
1 ridge in height = Knit 2 rows.

ELEVATION (back of neck):
So the jacket is slightly higher at the back of the neck when working a round yoke, you can work an elevation as described here. Skip this section if you do not want an elevation; the neck will then be the same front and back.
Insert 1 marker in the middle of the row = mid back. Start from the right side and knit 14-15-16-16-17-18 stitches past the marker, turn, tighten strand and purl 28-30-32-32-34-36 stitches back. Turn, tighten strand and knit 42-45-48-48-51-54 stitches, turn, tighten strand and purl 56-60-64-64-68-72 stitches back. Turn, tighten strand and knit to end of row (band worked in garter stitch), turn, tighten strand and purl to end of row (band worked in garter stitch). Then work YOKE as described in the text.

PATTERN: 
See diagrams A.1 to A.6. The diagrams show all rows in the pattern seen from the right side.

BANDS:
The first and last 5 stitches on each row are worked in garter stitch; when working patterns A.2/A.3 the bands are worked in A.1. When working patterns A.5/A.6 the bands are worked in A.4.

INCREASE TIP-1 (evenly spaced):
To work out how to increase evenly, count the total number of stitches on the needle (e.g. 108 stitches) minus bands (e.g. 10 stitches) and divide the remaining stitches by the number of increases to be made (e.g. 29) = 3.4. 
In this example, increase by making 1 yarn over after alternately each 3rd and 4th stitch. Do not increase on bands. On the next row work the yarn overs twisted to avoid holes.

INCREASE TIP-2 (for sides of body):
All increases are worked from the right side!
Work until there are 2 stitches left before the marker thread, make 1 yarn over, knit 4 (marker thread sits between these 4 stitches) make 1 yarn over (= 2 stitches increased at each marker thread; 4 stitches increased on row).
On the next row purl the yarn overs twisted to avoid holes. Then work the new stitches in stocking stitch.

DECREASE TIP (for sleeves): 
Decrease 1 stitch on each side of the marker thread as follows: Work until there are 3 stitches left before the marker thread, knit 2 together, knit 2 (marker thread sits between these 2 stitches), slip 1 stitch as if to knit, knit 1 and pass the slipped stitch over the knitted stitch.

BUTTONHOLES:
Work buttonholes on the right band (when the garment is worn). Work from the right side when there are 3 stitches left on the row as follows: Make 1 yarn over, knit 2 together and knit 1. On the next row (wrong side), knit the yarn over to leave a hole.
The first buttonhole is worked when the rib on the neck measures 2 cm. Then work the other 6-6-6-7-7-7 buttonholes with approx. 8½-9-9-8-8½-9 cm between each one.

-------------------------------------------------------

START THE PIECE HERE:

-------------------------------------------------------

JACKET – SHORT OVERVIEW OF THE PIECE:
The piece is worked back and forth with circular needle, top down. The sleeves are worked in the round with short circular needle/ double pointed needles.

NECK:
Cast on 108-112-116-120-124-132 stitches with circular needle size 3.5 mm and sea green. Purl 1 row from the wrong side. Change to light grey green and work rib from the right side as follows: Work 5 band stitches in GARTER STITCH – read description above, (knit 2/ purl 2) until there are 7 stitches left on the row, knit 2 and finish with 5 band stitches in garter stitch. Continue this rib back and forth for 3 cm. Insert a marker here. THE PIECE IS MEASURED FROM HERE. Change to circular needle size 4.5 mm. Now you can work an ELEVATION in the back of the neck – read description above. If you do not want an elevation go straight to YOKE.

YOKE:
Work pattern back and forth as follows: Work 5 band stitches in garter stitch – read BANDS, work A.2 until there are 6 stitches left on the row, A.3 over the next stitch and 5 band stitches in garter stitch, AT THE SAME TIME on each row marked with a star increase as follows:
STAR-1: Increase 29-31-33-35-37-41 stitches evenly spaced – read INCREASE TIP-1 = 137-143-149-155-161-173 stitches (there is now room for 21-22-23-24-25-27 repeats of A.2 with 6 stitches). REMEMBER THE KNITTING TENSION!
STAR-2: Increase 42-42-48-48-48-48 stitches evenly spaced = 179-185-197-203-209-221 stitches (there is now room for 28-29-31-32-33-35 repeats of A.2 with 6 stitches).
STAR-3: Increase 48-54-54-60-60-60 stitches evenly spaced = 227-239-251-263-269-281 stitches (there is now room for 36-38-40-42-43-45 repeats of A.1 with 6 stitches).
STAR-4: Increase 29-42-45-48-52-60 stitches evenly spaced = 256-281-296-311-321-341 stitches (there is now room for 49-54-57-60-62-66 repeats of A.2 with 5 stitches).
STAR-5: Increase 27-34-43-44-50-54 stitches evenly spaced = 283-315-339-355-371-395 stitches (there is now room for 34-38-41-43-45-48 repeats of A.2 with 8 stitches).
When there is 1 row left in the diagram the piece measures approx. 22 cm from the marker. Continue as follows in the different sizes:
In size S skip the next section and continue from All sizes – below.

Sizes M, L, XL, XXL and XXXL:
Continue with pattern A.5 over A.2, A.6 over A.3 and the bands in garter stitch and colours as shown in A.4. When the diagrams have been completed in height the piece measures approx. 24 cm from the marker. Size M is now finished (unless it is shorter than 24 cm, in which case continue with stocking stitch and sea green to this measurement). In sizes L, XL, XXL and XXXL continue with stocking stitch, sea green and the band stitches in garter stitch on both sides towards mid front until the piece measures 26-28-30-32 cm from the marker, AT THE SAME TIME when the piece measures 27-28-29-30 cm (from the marker), increase 0-11-19-27 stitches evenly spaced = 339-366-390-422 stitches.

All sizes:
Work the last row on the yoke as follows: Work the first 45-49-52-57-62-68 stitches (= right front piece), place the next 56-64-70-74-76-80 stitches on 1 thread for sleeve, cast on 8-8-10-10-12-12 new stitches on the needle (= in side under sleeve), work the next 81-89-95-104-114-126 stitches (= back piece), place the next 56-64-70-74-76-80 stitches on 1 thread for sleeve, cast on 8-8-10-10-12-12 new stitches on the needle (= in side under sleeve), work the remaining 45-49-52-57-62-68 stitches on the row (= left front piece). Body and sleeves are finished separately. THE PIECE IS NOW MEASURED FROM HERE.

BODY:
There are 187-203-219-238-262-286 stitches on the body. Insert 1 marker thread in each side in the middle of the 8-8-10-10-12-12 new stitches cast on under both sleeves (= 4-4-5-5-6-6 new stitches on each side of the threads). In size S continue as described below; in sizes M, L, XL, XXL and XXXL skip the next section and continue from ALL SIZES below.

Size S:
Work pattern as follows: Work the 5 band stitches in garter stitch and pattern A.4, work A.5 over each repeat of A.2 until there are 6 stitches left on the row and finish with 5 band stitches in garter stitch and pattern A.4. Continue back and forth like this until the diagrams have been completed in height. Then continue from ALL SIZES below.

ALL SIZES:
Continue back and forth with sea green, stocking stitch and 5 band stitches in garter stitch on each side. When the piece measures 4 cm, increase 1 stitch on both sides of each marker thread in the sides – read INCREASE TIP-2. Increase like this every 7 cm a total of 4 times = 203-219-235-254-278-302 stitches. When the piece measures 29 cm, increase 37-41-45-50-54-58 stitches evenly spaced = 240-260-280-304-332-360 stitches. Change to circular needle size 3.5 mm and work rib from the right side as follows: 5 band stitches in garter stitch, (knit 2/ purl 2) until there are 7 stitches left on the row, knit 2 and finish with 5 band stitches in garter stitch. When the rib measures 4 cm cast off with knit over knit and purl over purl. Make sure the cast-off edge is not tight; increase a needle size when casting off, if this is a problem. The jacket measures approx. 58-60-62-64-66-68 cm from the shoulder down.

SLEEVE:
Place the 56-64-70-74-76-80 stitches from the thread on the one side of the piece on short circular needle/double pointed needles size 4.5 mm and knit up 1 stitch in each of the 8-8-10-10-12-12 stitches cast on under the sleeve = 64-72-80-84-88-92 stitches.
In size S work pattern as described below; the other sizes are continued from section ALL SIZES below.

Size S:
Start the round before the 8 new stitches under the sleeve and work A.2 over each repeat of A.1 (from the yoke). When A.2 has been completed in height continue from ALL SIZES below.


ALL SIZES:
Insert a marker thread in the middle of the new stitches under the sleeve (= 4-4-5-5-6-6 new stitches on each side of the thread). Work stocking stitch in the round with sea green. When the piece measures 4-4-4-3-3-3 cm, decrease 1 stitch on each side of the marker thread – read DECREASE TIP. Decrease like this every 3-2-1½-1½-1½-1 cm a total of 11-14-17-18-19-20 times = 42-44-46-48-50-52 stitches. When the sleeve measures 37-36-34-33-31-29 cm (shorter measurements in larger sizes due to longer yoke), increase 6-8-10-8-10-8 stitches evenly spaced = 48-52-56-56-60-60 stitches. Change to double pointed needles size 3.5 mm and work rib (= knit 2/ purl 2) for 4 cm. Cast off with knit over knit and purl over purl. Make sure the cast-off edge is not tight; increase a needle size when casting off, if this is a problem. The sleeve measures approx 41-40-38-37-35-33 cm. Work the other sleeve in the same way.

Diagram

symbols = sea green
symbols = light grey green
symbols = off white
symbols = beige brown
symbols = increase-row – read description in text
diagram
diagram

Each of our patterns has specific tutorial videos to help you.

Do you have a question? See a list of frequently asked questions (FAQ)

Knitting tension is what determines the final measurements of your work, and is usually measured per 10 x 10 cm. It is provided like so: number of stitches in width x number of rows in height - eg: 19 stitches x 26 rows = 10 x 10 cm.

The knitting tension is very individual; some people knit/crochet loosely while others work tightly. You adjust the knitting tension with the needle size, which is why the suggested needle size is only meant as a guide! You need to adjust this (up or down) to ensure that YOUR knitting tension matches the knitting tension provided in the pattern. If you work with a different knitting tension than provided you will have a different yarn consumption, and your work will have different measurements than what the pattern suggests.

The knitting tension also determines which yarns can replace each other. As long as you achieve the same knitting tension you can replace one yarn with another.

See DROPS lesson: How to measure your tension/gauge

See DROPS video: How to make a gauge tension swatch

The required amount of yarn is provided in grams, eg: 450 g. To calculate how many balls you’ll need you first need to know how many grams are in 1 ball (25g, 50g or 100g). This information is available if you click on the individual yarn quality on our pages. Divide the amount required with the amount of each ball. For example, if each ball is 50g (the most common amount), the calculation will be as follows: 450 / 50 = 9 balls.

The important thing when changing from one yarn to another is that the knitting/crochet tension remains the same. This is so that the measurements of the finished piece will be the same as on the sketch provided. It is easier to achieve the same knitting tension using yarns from the same yarn group. It is also possible to work with multiple strands of a thinner yarn to achieve the knitting tension of a thicker one. Please try our yarn converter. We recommend you to always work a test swatch.

Please NOTE: when changing yarn the garment might have a different look and feel to the garment in the photo, due to individual properties and qualities of each yarn.

See DROPS lesson: Can I use a different yarn than the one mentioned in the pattern?

All our yarns are categorised into yarn groups (from A to F) according to thickness and knitting tension – group A contains the thinnest yarns and group F the thickest. This makes it easier for you to find alternative yarns to our patterns, should you wish to switch yarn. All yarns within the same group have a similar knitting tension and can easily replace each other. However, different yarn qualities have different structures and properties which will give the finished work a unique look and feel.

Click here for an overview of the yarns in each yarn group

At the top of all our patterns you’ll find a link to our yarn calculator, which is a helpful tool should you wish to use a different yarn than suggested. By filling in the yarn quality you wish to replace, the amount (in your size) and number of strands, the calculator will present good alternative yarns with the same knitting tension. Additionally it will tell you how much you’ll require in the new qualities and whether you’ll need to work with multiple strands. Most skeins are 50g (some are 25g or 100g).

If the pattern is worked with multiple colours, every colour will have to be calculated separately. Similarly, if the pattern is worked with several strands of different yarns (for example 1 strand Alpaca and 1 strand Kid-Silk) you will have to find alternatives for each, individually.

Click here to see our yarn calculator

Since different yarns have different qualities and textures we have chosen to keep the original yarn in our patterns. However, you can easily find options among our available qualities by using our yarn calculator, or simply pick a yarn from the same yarn group.

It is possible that some retailers still have discontinued yarns in stock, or that someone has a few skeins at home that they would like to find patterns for.

The yarn calculator will provide both alternative yarn as well as required amount in the new quality.

If you think it's hard to decide what size to make, it can be a good idea to measure a garment you own already and like the size of. Then you can pick the size by comparing those measures with the ones available in the pattern's size chart.

You'll find the size chart at the bottom of the pattern.

See DROPS lesson: How to read size chart

The needle size provided in the pattern serves only as a guide, the important thing is to follow the knitting tension. And since knitting tension is very individual, you will have to adjust the needle size to ensure that YOUR tension is the same as in the pattern – maybe you’ll have to adjust 1, or even 2 needle sizes, up or down to achieve the correct tension. For this, we recommend that you work test swatches.

Should you work with a different knitting tension than the one provided, the measurements of the finished garment might deviate from the measurement sketch.

See DROPS lesson: How to measure your tension/gauge

See DROPS video: How to make a tension/gauge swatch

Working a garment top-down provides more flexibility and room for personal adjustment. For example it is easier to try the garment on while working, as well as making adjustments to length of yoke and shoulder caps.

The instructions are carefully explaining every step, in the correct order. Diagrams are adjusted to the knitting direction and are worked as usual.

The diagram depicts all rows/rounds, and every stitch seen from the right side. It is read from bottom to top, from right to left. 1 square = 1 stitch.

When working back and forth, every other row is worked from the right side and every other row is worked from the wrong side. When working from the wrong side, the diagram will have to be worked reversed: from left to right, knit stitches are purled, purl stitches are knit etc.

When working in the round every round is worked from the right side and the diagram are worked from right to left on all rounds.

See DROPS lesson: How to read knitting diagrams

The diagram depicts all rows/rounds, and every stitch seen from the right side. It is worked from bottom to top, from right to left.

When working back and forth every other row is worked from the right side: from right to left and every other row is worked from the wrong side: from left to right.

When working in the round, every row in the diagram are worked from the right side, from right to left.

When working a circular diagram you start in the middle and work your way outwards, counter clockwise, row by row.

The rows usually start with a given number of chain stitches (equivalent to the height of the following stitch), this will either be depicted in the diagram or explained in the pattern.

See DROPS lesson: How to read crochet diagrams

Instructions for working several diagrams after each other on the same row/round, will often be written like so: “work A.1, A.2, A.3 a total of 0-0-2-3-4 times". This means you work A.1 once, then A.2 is worked once, and A.3 is repeated (in width) the number of times provided for your size – in this case like so: S = 0 times, M = 0 times, L=2 times, XL= 3 times and XXL = 4 times.

The diagrams are worked as usual: begin with the first row in A.1, then work the first row in A.2 etc.

See DROPS lesson: How to read knitting diagrams

See DROPS lesson: How to read crochet diagrams

The total width of the garment (from wrist-to-wrist) will be larger in the larger sizes, despite the actual sleeves being shorter. The larger sizes have longer sleeve caps and wider shoulders, so there will be a good fit in all sizes.

The measurement sketch/schematic drawing provides information regarding the full length of the garment. If it’s a jumper or a jacket the length is measured from the highest point on the shoulder closest to the neckline, and straight down to the bottom of the garment. It is NOT measured from the tip of shoulder. Similarly, the length of yoke is measured from the highest point on the shoulder and down to where yoke is split into body and sleeves.

On a jacket measures are never taken along bands, unless specifically stated. Always measure inside band stitches when measuring the length.

See DROPS lesson: How to read a schematic drawing

Diagrams are often repeated on the round or in height. 1 repeat is the diagram the way it appears in the pattern. If it says to work 5 repeats of A.1 in the round, then you work A.1 a total of 5 times after/next to each other in the round. If it says to work 2 repeats of A.1 vertically/in height you work the entire diagram once, then begin again at the start and work the entire diagram one more time.

Chain stitches are slightly narrower than other stitches and to avoid working the cast-on edge too tight, we simply chain more stitches to begin with. The stitch count will be adjusted on the following row to fit the pattern and measurement sketch.

The rib edge is more elastic and will contract slightly compared to, for example, stocking stitch. By increasing before the rib edge, you avoid a visible difference in width between the rib edge and the rest of the body.

It’s very easy to cast off too tightly, and by making yarn overs while casting off (and simultaneously casting these off) you avoid a too tight cast off edge.

See DROPS video: How to bind off with yarn overs (yo)

To achieve an even increase (or decrease) you can increase on, for example: every 3rd and 4th row alternately, like so: work 2 rows and increase on the 3rd row, work 3 rows and increase on the 4th. Repeat this until the increase is complete.

See DROPS lesson: Increase or decrease 1 st on every 3rd and 4th row alternately

Should you prefer to work in the round instead of back and forth, you may of course adjust the pattern. You’ll need to add steeks mid-front (usually 5 stitches), and follow the instructions. When you would normally turn and work from the wrong side, simply work across the steek and continue in the round. At the end you’ll cut the piece open, pick up stitches to work bands, and cover the cut edges.

See DROPS video: How to knit steeks and cut open

Should you prefer to work back and forth instead of in the round, you may of course adjust the pattern so you work the pieces separately and then assemble them at the end. Divide the stitches for the body in 2, add 1 edge stitch in each side (for sewing) and work the front and back pieces separately.

See DROPS lesson: Can I adapt a pattern for circular needles into straight needles?

Pattern repeats can vary slightly in the different sizes, in order to get the correct proportions. If you’re not working the exact same size as the garment in the photo, yours might deviate slightly. This has been carefully developed and adjusted so that the complete impression of the garment is the same in all sizes.

Make sure to follow instructions and diagrams for your size!

If you have found a pattern you like which is available in women’s size it’s not very difficult to convert it to men’s size. The biggest difference will be the length of sleeves and body. Start working on the women size that you think would fit across the chest. The additional length will be worked right before you cast off for the armhole/sleeve cap. If the pattern is worked top-down you can add the length right after the armhole or before the first decrease on sleeve.

Regarding additional yarn amount, this will depend on how much length you add, but it is better with a skein too many than too few.

All yarns will have excess fibres (from production) that might come off as lint or shedding. Brushed yarns (ie hairier yarns) have more of these loose, excess fibres, causing more shedding.

Shedding also depends on what is worn under or over the garment, and whether this pulls at the yarn fibres. It’s therefore not possible to guarantee that there will be no shedding

Below are some tips on how to get the best result when working with hairier yarns:

1. When the garment is finished (before you wash it) shake it vigorously so the looser hairs come off. NOTE: do NOT use a lint roller, brush or any method that pulls at the yarn.

2. Place the garment in a plastic bag and put it in your freezer - the temperature will cause the fibres to become less attached to each other, and excess fibres will come off easier.

3. Leave in the freezer for a few hours before taking it out and shaking it again.

4. Wash the garment according to the instructions on the yarn label.

Pilling is a natural process that happens to even the most exclusive of fibers. It's a natural sign of wear and tear that is hard to avoid, and that is most visible in high friction areas of your garment like a sweater's arms and cuffs.

You can make your garment look as new by removing the pilling, using a fabric comb or a pill/lint remover.

Still can't find the answer you need? Then scroll down and leave your question so one of our experts can try to help you. This will be done normally within 5 to 10 working days.
In the meantime, you can read the questions and answers that others have left to this pattern or join the DROPS Workshop on Facebook to get help from fellow knitters/crocheters!

You might also like...

Crisp Air

Antje, Germany

207-13 Crisp Air Jacket

AntjeRi, Germany

Post a comment to pattern DROPS 207-13

We would love to hear what you have to say about this pattern!

If you want to leave a question, please make sure you select the correct category in the form below, to speed up the answering process. Required fields are marked *.

Comments / Questions (9)

country flag Vladi Angeliki wrote:

Je vous remercie de votre réponse rapide. Je me demandais s'il fallait faire une taille au dessus mais un deuxième échantillon m'a rassurée. Je continue mon ouvrage qui est de plus en plus joli.

23.06.2020 - 18:59

country flag Vladi Zelina wrote:

Bonjour! Je suis embrouillée avec les mesures du gilet. Si 20 mailles donnent 10 cm, les 304 mailles devraient donner 150 cm au lieu de 122 cm indiqué pour la taille XL.

23.06.2020 - 13:10

DROPS Design answered:

Bonjour Mme Zelina, les 304 mailles se tricotent en côtes avec les petites aiguilles = il faut plus de mailles qu'en jersey avec les grandes aiguilles - en XL vous terminez par 254 mailles soit 127 cm / 2 - les bordures des devants = env. 61 cm. Bon tricot!

23.06.2020 - 16:21

country flag Inkeri K-L wrote:

When will this jacket be published? It’s my favourite, the yarns are waiting😘😙

20.08.2019 - 19:17

country flag Johanna H wrote:

Lovely colours. I really want to make this!!!

07.07.2019 - 18:28

country flag Bullermor wrote:

Flot, skønne farver også.

19.06.2019 - 23:44

country flag Doris wrote:

1A, gefällt mir beides, Jacke und Pulli :-)

17.06.2019 - 10:28

country flag Ellis wrote:

My vote, elegant, colourband can be repeated on hips

09.06.2019 - 21:20

country flag Gabriele wrote:

Da stimmt Alles!Wird auf alle Fälle gestrickt!

06.06.2019 - 09:19

country flag Ángela wrote:

Favorece ese canesú

05.06.2019 - 20:21