DROPS Alpaca Bouclé
DROPS Alpaca Bouclé
80% Alpaca, 15% Wool, 5% Polyamide
from 5.00 $ /50g
Get the yarn to make this pattern from 35.00$.

The yarn cost is calculated from the pattern’s smallest size and the yarn’s cheapest product type. Looking for an even better price? You might find it on the DROPS Deals!

DROPS Super Sale

Seashell Search

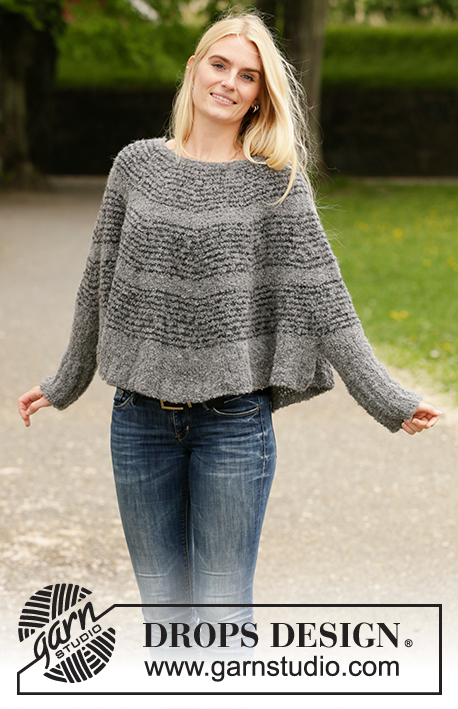
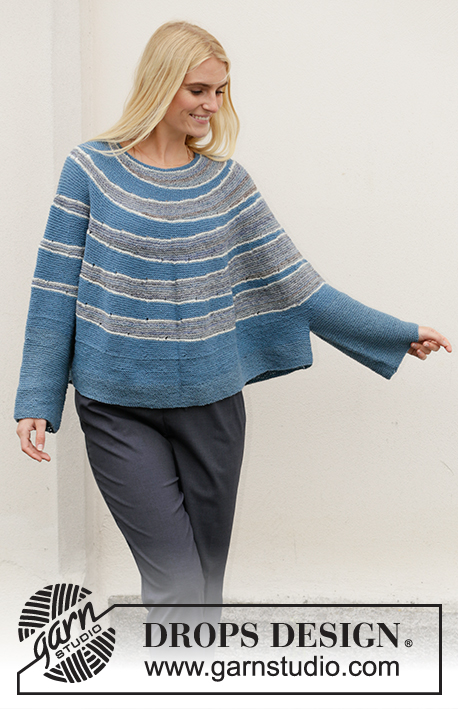
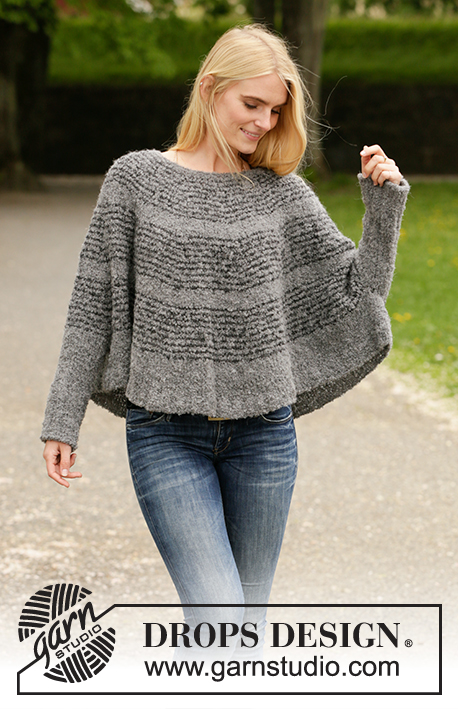
Knitted poncho-sweater in DROPS Alpaca Bouclé. The piece is worked top down with round yoke and stripes. Sizes S - XXXL.

DROPS 207-18
DROPS Design: Pattern no ab-101
Yarn group C or A + A
-------------------------------------------------------

SIZES:
S - M - L - XL - XXL – XXXL

Finished measurements:
Chest measurements: 178-186-192-204-214-226 cm = 70”-73”-75 1/2”-80 1/2”-84 1/8”-88 7/8”
Full length: 50-52-54-56-58-60 cm = 19 3/4"-20 1/2"-21 1/4"-22"-22 3/4"-23 5/8"

All measurements in chart are in cm.

MATERIALS:
DROPS ALPACA BOUCLÉ from Garnstudio (belongs to yarn group C)
250-250-300-300-350-400 g colour 0517, grey
100-100-100-100-100-100 g colour 0506, dark grey

KNITTING GAUGE:
17 stitches in width and 22 rows in height with stockinette stitch = 10 x 10 cm = 4” x 4”.

NEEDLES:
DROPS DOUBLE POINTED NEEDLES SIZE 5 MM = US 8.
DROPS CIRCULAR NEEDLE SIZE 5 MM = US 8: Length 40 cm = 16” and 80 cm = 32” for stockinette stitch.
DROPS DOUBLE POINTED NEEDLES SIZE 4 MM = US 6.
DROPS CIRCULAR NEEDLE SIZE 4 MM = US 6: Length 40 cm = 16” and 80 cm = 32” for rib.
Needle size is only a guide. If you get too many stitches on 10 cm = 4”, change to a larger needle size. If you get too few stitches on 10 cm = 4”, change to a smaller needle size.

-------------------------------------------------------

Alternative Yarn – See how to change yarns here
Yarn Groups A to F – Use the same pattern and change the yarn here
Yarn usage using an alternative yarn – Use our yarn converter here

-------------------------------------------------------

DROPS Alpaca Bouclé
DROPS Alpaca Bouclé
80% Alpaca, 15% Wool, 5% Polyamide
from 5.00 $ /50g
Get the yarn to make this pattern from 35.00$.

The yarn cost is calculated from the pattern’s smallest size and the yarn’s cheapest product type. Looking for an even better price? You might find it on the DROPS Deals!

DROPS Super Sale

SAVE 30% on 6 cotton favorites!
Valid until 04.12.2024

Pattern instructions

NOTE: This pattern is written in American English. All measurements in charts are in cm. For conversion from inches to cm - click here. There are different terms for crocheting in American and British English. If this pattern includes crochet, click for "crochet terms" here. For this pattern in British English, please click here.
-------------------------------------------------------

EXPLANATIONS FOR THE PATTERN:

-------------------------------------------------------

RIDGE/GARTER STITCH (worked in the round):
1 ridge in height = 2 rounds; Knit 1 round and purl 1 round.

INCREASE TIP-1 (evenly spaced):
To work out how to increase evenly, count the total number of stitches on the needle (e.g. 74 stitches) and divide by the number of increases to be made (e.g. 10) = 7.4.
In this example, increase by making 1 yarn over after approx. each 7th stitch. On the next round knit the yarn overs twisted to avoid holes.

STRIPES:
STRIPE 1: Work * 1 round with dark grey, 2 rounds with grey *, work from *-* for 9-10-10-10-11-11 cm = 3 1/2”-4”-4”-4”-4 3/8”-4 3/8” and then 1 round with dark grey
STRIPE 2: Work 3-3-3-3½-3½-3½ cm = 1 1/8”-1 1/8”-1 1/8”-1 1/4”-1 1/4”-1 1/4” with grey.
Repeat stripes 1 and 2 one more time, then work stripe 1 one more time.
Then work with grey to finished length.

INCREASE TIP-2 (for yoke):
Increase alternately before and after each marker thread.
Increase by making 1 yarn over. On the next round knit the yarn overs twisted to avoid holes. Then work the new stitches in stockinette stitch.

BINDING OFF TIP:
To avoid the bind-off edge being tight you can bind off with a ½ size larger needle.

-------------------------------------------------------

START THE PIECE HERE:

-------------------------------------------------------

SWEATER – SHORT OVERVIEW OF THE PIECE:
The neck and yoke are worked in the round with circular needle, top down. The yoke is divided for body and sleeves and the body continued in the round. The sleeves are worked in the round with short circular needle/double pointed needles, top down.

NECK:
Cast on 74-78-82-86-90-96 stitches with short circular needle size 4 mm = US 6 and grey. Work 2 RIDGES – read description above. Then knit 1 round where you increase 10-6-9-10-6-8 stitches evenly spaced – read INCREASE TIP-1 = 84-84-91-96-96-104 stitches. Then work yoke as described below.

YOKE:
Change to circular needle size 5 mm = US 8. Insert 12-12-13-12-12-13 marker threads in the piece (allow the threads to follow your work onwards; they will be used when increasing), i.e. work the next round as follows:
Insert 1 marker thread at the beginning of the round, work 7-7-7-8-8-8 stitches in stockinette stitch, * insert 1 marker thread, work 7-7-7-8-8-8 stitches in stockinette stitch *, repeat from *-* to end of round = 12-12-13-12-12-13 marker threads on the round. REMEMBER THE KNITTING GAUGE!
Continue with stockinette stitch and STRIPES – read description above, at the same time as you increase 1 stitch at each of the 12-12-13-12-12-13 marker threads – read INCREASE TIP-2. Increase like this every 2nd round a total of 7-7-2-8-8-4 times, then every 4th round a total of 16-17-20-18-19-22 times = 360-372-377-408-420-442 stitches. Continue with stockinette stitch and grey and on the next round adjust the number of stitches to 360-372-380-404-416-440 stitches. Continue working until the piece measures 38-40-41-43-45-47 cm = 15”-15 3/4”-16 1/8”-17”-17 3/4”-18 1/2” from after the neck.
The next round is worked as follows:
Work 146-152-156-166-172-182 stitches (= back piece), place the next 34-34-34-36-36-38 stitches on 1 thread for sleeve, cast on 6-6-8-8-10-10 new stitches on the needle (= in side under sleeve), work 146-152-156-166-172-182 stitches (= front piece), place the next 34-34-34-36-36-38 stitches on 1 thread for sleeve, cast on 6-6-8-8-10-10 new stitches on the needle (= in side under sleeve). Body and sleeves are finished separately. THE PIECE IS NOW MEASURED FROM HERE!

BODY:
= 304-316-328-348-364-384 stitches. Continue working in the round with stockinette stitch and grey. When the piece measures 5-5-6-6-6-6 cm = 2”-2”-2 3/8”-2 3/8”-2 3/8”-2 3/8” from the division knit 1 round where you increase 48-52-52-56-60-64 stitches = 352-368-380-404-424-448 stitches. Change to circular needle size 4 mm = US 6 and work rib (= knit 2/ purl 2) for 4 cm = 1 1/2”. Bind off with knit over knit and purl over purl – read BINDING OFF TIP.

SLEEVE:
Place 34-34-34-36-36-38 stitches from the thread on the one side of the piece on short circular needle size 5 mm = US 8 and knit up 1 stitch in each of the 6-6-8-8-10-10 stitches cast on under the sleeve = 40-40-42-44-46-48 stitches. Continue in the round with stockinette stitch and grey until the piece measures 13-11-11-9-8-6 cm = 5 1/8”-4 3/8”-4 3/8”-3 1/2”-3 1/8”-2 3/8” from the division (or to desired length; there is approx. 13 cm = 5 1/8” left to finished length – NOTE: Shorter measurements in larger sizes due to wider neck and longer yoke). Knit 1 round where you increase 4-4-6-8-6-8 stitches evenly spaced = 44-44-48-52-52-56 stitches. Change to double pointed needles size 4 mm = US 6 and work rib (= knit 2/ purl 2) for 13 cm = 5 1/8”. Bind off with knit over knit and purl over purl. Work the other sleeve in the same way.

Diagram

All measurements in charts are in cm.

diagram measurements

Each of our patterns has specific tutorial videos to help you.

Do you have a question? See a list of frequently asked questions (FAQ)

Knitting tension is what determines the final measurements of your work, and is usually measured per 10 x 10 cm. It is provided like so: number of stitches in width x number of rows in height - eg: 19 stitches x 26 rows = 10 x 10 cm.

The knitting tension is very individual; some people knit/crochet loosely while others work tightly. You adjust the knitting tension with the needle size, which is why the suggested needle size only serve as a guide! You need to adjust this (up or down) to ensure that YOUR knitting tension matches the knitting tension provided in the pattern. If you work with a different knitting tension than provided you will have a different yarn consumption, and your work will have different measurements than what the pattern suggests.

The knitting tension also determines which yarns can replace each other. As long as you achieve the same knitting tension you can replace one yarn with another.

See DROPS lesson: How to measure your tension/gauge

See DROPS video: How to make a gauge tension swatch

The required amount of yarn is provided in grams, eg: 450 g. To calculate how many balls you’ll need you first need to know how many grams are in 1 ball (25g, 50g or 100g). This information is available if you click on the individual yarn quality on our pages. Divide the amount required with the amount of each ball. For example, if each ball is 50g (the most common amount), the calculation will be as follows: 450 / 50 = 9 balls.

The important thing when changing from one yarn to another is that the knitting/crochet tension remains the same. This is so that the measurements of the finished piece will be the same as on the sketch provided. It is easier to achieve the same knitting tension using yarns from the same yarn group. It is also possible to work with multiple strands of a thinner yarn to achieve the knitting tension of a thicker one. Please try our yarn converter. We recommend you to always work a test swatch.

Please NOTE: when changing yarn the garment might have a different look and feel to the garment in the photo, due to individual properties and qualities of each yarn.

See DROPS lesson: Can I use a different yarn than the one mentioned in the pattern?

All our yarns are categorised into yarn groups (from A to F) according to thickness and knitting tension – group A contains the thinnest yarns and group F the thickest. This makes it easier for you to find alternative yarns to our patterns, should you wish to switch yarn. All yarns within the same group have a similar knitting tension and can easily replace each other. However, different yarn qualities have different structures and properties which will give the finished work a unique look and feel.

Click here for an overview of the yarns in each yarn group

At the top of all our patterns you’ll find a link to our yarn converter, which is a helpful tool should you wish to use a different yarn than suggested. By filling in the yarn quality you wish to replace, the amount (in your size) and number of strands, the converter will present good alternative yarns with the same knitting tension. Additionally it will tell you how much you’ll require in the new qualities and whether you’ll need to work with multiple strands. Most skeins are 50g (some are 25g or 100g).

If the pattern is worked with multiple colours, every colour will have to be converted separately. Similarly, if the pattern is worked with several strands of different yarns (for example 1 strand Alpaca and 1 strand Kid-Silk) you will have to find alternatives for each, individually.

Click here to see our yarn converter

Since different yarns have different qualities and textures we have chosen to keep the original yarn in our patterns. However, you can easily find options among our available qualities by using our yarn converter, or simply pick a yarn from the same yarn group.

It is possible that some retailers still have discontinued yarns in stock, or that someone has a few skeins at home that they would like to find patterns for.

The yarn converter will provide both alternative yarn as well as required amount in the new quality.

If you think it's hard to decide what size to make, it can be a good idea to measure a garment you own already and like the size of. Then you can pick the size by comparing those measures with the ones available in the pattern's size chart.

You'll find the size chart at the bottom of the pattern.

See DROPS lesson: How to read size chart

The needle size provided in the pattern serves only as a guide, the important thing is to follow the knitting tension. And since knitting tension is very individual, you will have to adjust the needle size to ensure that YOUR tension is the same as in the pattern – maybe you’ll have to adjust 1, or even 2 needle sizes, up or down to achieve the correct tension. For this, we recommend that you work test swatches.

Should you work with a different knitting tension than the one provided, the measurements of the finished garment might deviate from the measurement sketch.

See DROPS lesson: How to measure your tension/gauge

See DROPS video: How to make a gauge tension swatch

Working a garment top-down provides more flexibility and room for personal adjustment. For example it is easier to try the garment on while working, as well as making adjustments to length of yoke and shoulder caps.

The instructions are carefully explaining every step, in the correct order. Diagrams are adjusted to the knitting direction and are worked as usual.

The diagram depicts all rows/rounds, and every stitch seen from the right side. It is read from bottom to top, from right to left. 1 square = 1 stitch.

When working back and forth, every other row is worked from the right side and every other row is worked from the wrong side. When working from the wrong side, the diagram will have to be worked reversed: from left to right, knit stitches are purled, purl stitches are knit etc.

When working in the round every round is worked from the right side and the diagram are worked from right to left on all rounds.

See DROPS lesson: How to read knitting diagrams

The diagram depicts all rows/rounds, and every stitch seen from the right side. It is worked from bottom to top, from right to left.

When working back and forth every other row is worked from the right side: from right to left and every other row is worked from the wrong side: from left to right.

When working in the round, every row in the diagram are worked from the right side, from right to left.

When working a circular diagram you start in the middle and work your way outwards, counter clockwise, row by row.

The rows usually start with a given number of chain stitches (equivalent to the height of the following stitch), this will either be depicted in the diagram or explained in the pattern.

See DROPS lesson: How to read crochet diagrams

Instructions for working several diagrams after each other on the same row/round, will often be written like so: “work A.1, A.2, A.3 a total of 0-0-2-3-4 times". This means you work A.1 once, then A.2 is worked once, and A.3 is repeated (in width) the number of times provided for your size – in this case like so: S = 0 times, M = 0 times, L=2 times, XL= 3 times and XXL = 4 times.

The diagrams are worked as usual: begin with the first row in A.1, then work the first row in A.2 etc.

See DROPS lesson: How to read knitting diagrams

See DROPS lesson: How to read crochet diagrams

The total width of the garment (from wrist-to-wrist) will be larger in the larger sizes, despite the actual sleeves being shorter. The larger sizes have longer sleeve caps and wider shoulders, so there will be a good fit in all sizes.

The measurement sketch/schematic drawing provides information regarding the full length of the garment. If it’s a jumper or a jacket the length is measured from the highest point on the shoulder (usually closest to the neckline), and straight down to the bottom of the garment. It is NOT measured from the tip of shoulder. Similarly, the length of yoke is measured from the highest point on the shoulder and down to where yoke is split into body and sleeves.

See DROPS lesson: How to read a schematic drawing

Diagrams are often repeated on the round or in height. 1 repeat is the diagram the way it appears in the pattern. If it says to work 5 repeats of A.1 in the round, then you work A.1 a total of 5 times after/next to each other in the round. If it says to work 2 repeats of A.1 vertically/in height you work the entire diagram once, then begin again at the start and work the entire diagram one more time.

Chain stitches are slightly narrower than other stitches and to avoid working the cast-on edge too tight, we simply chain more stitches to begin with. The stitch count will be adjusted on the following row to fit the pattern and measurement sketch.

The rib edge is more elastic and will contract slightly compared to, for example, stocking stitch. By increasing before the rib edge, you avoid a visible difference in width between the rib edge and the rest of the body.

It’s very easy to cast off too tightly, and by making yarn overs while casting off (and simultaneously casting these off) you avoid a too tight cast off edge.

See DROPS video: How to bind off with yarn overs (yo)

To achieve an even increase (or decrease) you can increase on, for example: every 3rd and 4th row alternately, like so: work 2 rows and increase on the 3rd row, work 3 rows and increase on the 4th. Repeat this until the increase is complete.

See DROPS lesson: Increase or decrease 1 st on every 3rd and 4th row alternately

Should you prefer to work in the round instead of back and forth, you may of course adjust the pattern. You’ll need to add steeks mid-front (usually 5 stitches), and follow the instructions. When you would normally turn and work from the wrong side, simply work across the steek and continue in the round. At the end you’ll cut the piece open, pick up stitches to work bands, and cover the cut edges.

See DROPS video: How to knit steeks and cut open

Should you prefer to work back and forth instead of in the round, you may of course adjust the pattern so you work the pieces separately and then assemble them at the end. Divide the stitches for the body in 2, add 1 edge stitch in each side (for sewing) and work the front and back pieces separately.

See DROPS lesson: Can I adapt a pattern for circular needles into straight needles?

Pattern repeats can vary slightly in the different sizes, in order to get the correct proportions. If you’re not working the exact same size as the garment in the photo, yours might deviate slightly. This has been carefully developed and adjusted so that the complete impression of the garment is the same in all sizes.

Make sure to follow instructions and diagrams for your size!

If you have found a pattern you like which is available in women’s size it’s not very difficult to convert it to men’s size. The biggest difference will be the length of sleeves and body. Start working on the women size that you think would fit across the chest. The additional length will be worked right before you cast off for the armhole/sleeve cap. If the pattern is worked top-down you can add the length right after the armhole or before the first decrease on sleeve.

Regarding additional yarn amount, this will depend on how much length you add, but it is better with a skein too many than too few.

All yarns will have excess fibres (from production) that might come off as lint or shedding. Brushed yarns (ie hairier yarns) have more of these loose, excess fibres, causing more shedding.

Shedding also depends on what is worn under or over the garment, and whether this pulls at the yarn fibres. It’s therefore not possible to guarantee that there will be no shedding

Below are some tips on how to get the best result when working with hairier yarns:

1. When the garment is finished (before you wash it) shake it vigorously so the looser hairs come off. NOTE: do NOT use a lint roller, brush or any method that pulls at the yarn.

2. Place the garment in a plastic bag and put it in your freezer - the temperature will cause the fibres to become less attached to each other, and excess fibres will come off easier.

3. Leave in the freezer for a few hours before taking it out and shaking it again.

4. Wash the garment according to the instructions on the yarn label.

Pilling is a natural process that happens to even the most exclusive of fibers. It's a natural sign of wear and tear that is hard to avoid, and that is most visible in high friction areas of your garment like a sweater's arms and cuffs.

You can make your garment look as new by removing the pilling, using a fabric comb or a pill/lint remover.

Still can't find the answer you need? Then scroll down and leave your question so one of our experts can try to help you. This will be done normally within 5 to 10 working days.
In the meantime, you can read the questions and answers that others have left to this pattern or join the DROPS Workshop on Facebook to get help from fellow knitters/crocheters!

You might also like...

Pull-Poncho

Annette, Germany

Seashell Search

LakheziEva, Hungary

Seashell Search

Carmela Biscuit, Bulgaria

Post a comment to pattern DROPS 207-18

We would love to hear what you have to say about this pattern!

If you want to leave a question, please make sure you select the correct category in the form below, to speed up the answering process. Required fields are marked *.

Comments / Questions (58)

country flag Shirley Fischer wrote:

I like this design of the poncho. I am wondering if it can be made without the sleeves, by adjusting the pattern.

03.08.2023 - 20:24

DROPS Design answered:

Dear Shirley, yes, you can omit the sleeves by not separating the stitches for the sleeves at the end of the yoke and continuing with the whole piece as explained in the body. Happy knitting!

06.08.2023 - 21:31

country flag Jennifer wrote:

With this pattern, do you knit the gauge using the size 6 or size 8 knitting needles?

13.01.2023 - 22:58

DROPS Design answered:

Dear Jennifer, the gauge is measured using stocking stitch so you need to work it by using the needles which you will later use in stocking stitch (as indicated in the materials). In this case, you will use the 5mm/US 8 needles for the gauge. Happy knitting!

15.01.2023 - 11:11

country flag Lillie wrote:

Ich würde dieses Modell gern etwas länger stricken. Ist das möglich und können Sie mir einen Tipp geben wie ich das am besten mache?

10.01.2022 - 17:24

DROPS Design answered:

Liebe Lillie, wahrscheinlich aber leider können wir jeder Anleitung nach jedem individuellen Frage anpassen und einzelne Modelle auf individuellen Wunsch hin umrechnen. Wenn sie Hilfe damit brauchen, wenden Sie sich bitte an Ihrem DROPS Laden, dort hilft man Ihnen gerne weiter, auch telefonisch oder per E-Mail. Danke im voraus für Ihr Verständnis. Viel Spaß beim stricken!

11.01.2022 - 08:46

country flag Chaudet wrote:

Bonjour, Je n’ai pas vu le nombre de pelotes de chaque couleur à acheter pour la taille M et d’ailleurs pour toutes les autres tailles ? Merci

09.01.2022 - 12:04

DROPS Design answered:

Bonjour Mme Chaudet, vous trouverez les quantités nécessaires pour chaque taille et dans chaque couleur au début des explications, au poids, dans l'en-tête, autrement dit, en taille S, il faut 250 g DROPS Alpaca Bouclé coloris 0517/50 g la pelote = 5 pelotes + 100 g/50 = 2 pelotes en 0506, gris foncé. Bon tricot!

10.01.2022 - 08:42

country flag Pia Wettergren wrote:

Hvis jeg bruger bruŝed alpaca silk, er det stadig kun med en tråd?

27.09.2021 - 13:07

DROPS Design answered:

Hei Pia. Ja, de er det. Bare husk å få den oppgitte strikkefastheten og at du må være klar over at med et annet garn kan det bli en litt annen struktur/fasong enn hva du ser på bildet med Alpaca Boucle. mbh DROPS Design

28.09.2021 - 14:21

country flag Rita Knudsen wrote:

Det giver ingen mening , at man i str Xl skal tage ud på hver 4. omg totalt 18 gange og så “kun” have 408 masker på omg. En bedre forklaring ønskes. Efter at have taget ud 8 gange på begge sider af mærketråd er der 24 masker mellem mærketråde og så er der kun plads til yderligere 5 x2 masker til 408 masker. Jeg er nu ca midt i 2. række med striber.

06.09.2021 - 18:33

DROPS Design answered:

Hei Rita. Du skal ikke øke på hver side av merketråden, men vekselsvis før og etter hver en merketråd. Les ØKETIPS-2. Du har 96 masker og skal økes med 1 maske ved hver av de 12 merketråd 8 ganger, så etter 16 omganger er det økt 12 masker x 8 ganger = 96 økte masker + de 96 maskene du hadde fra starten = 192 masker. Så skal det økes på hver 4. omgang 18 ganger = 12 økte masker x 18 ganger = 216 økte masker. Da har du 96 masker du startet med + 96 økte masker + 216 økte masker = 408 masker. Mvh DROPS design

14.09.2021 - 07:00

country flag Anneliese wrote:

Vielen Dank für die Hilfe :-)

19.07.2021 - 09:07

country flag Anneliese wrote:

Hallo ich stricke diesen tollen Poncho meine Frage: die 47cm ab Ende Halsblende, wird die bei der Aufnahme gemessen oder mehr in der Mitte...da ja bei der Aufnahme die Länge "länger" ist als zwischen den Aufnahmen danke für die HIlfe

17.07.2021 - 16:11

DROPS Design answered:

Liebe Anneliese, messen Sie nach der Halskante in der Strickrichtung, bei der vorderen Mitte (nicht beim Schulter wenn die Arbeit gefaltet wird). Viel Spaß beim stricken!

19.07.2021 - 08:32

country flag Flormar wrote:

Instead of a yarn over to increase, may I do Mlk or Mlp instead?

02.03.2021 - 19:47

DROPS Design answered:

Hi Mrs Flormar, of course you can. Happy knitting!

02.03.2021 - 21:56

country flag Carmen wrote:

Gracias por tan Hermosas prendas y por compartirlas!!! Felicitaciones para todo el Staff!!

12.09.2020 - 19:08