
Popular categories
Looking for a yarn?


|
||||||||||||||||||||||||||||
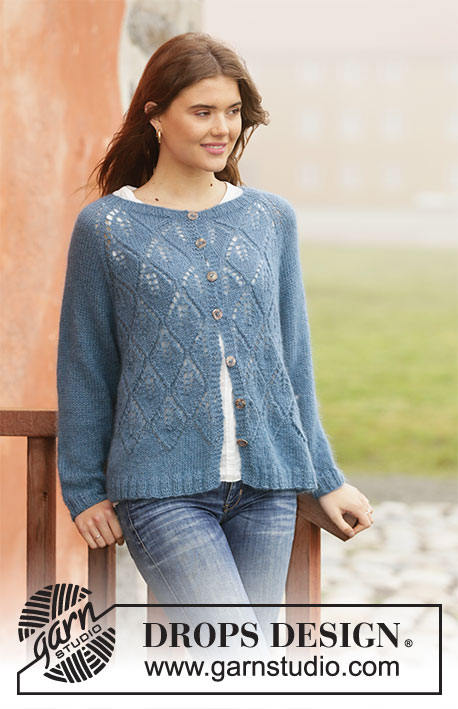
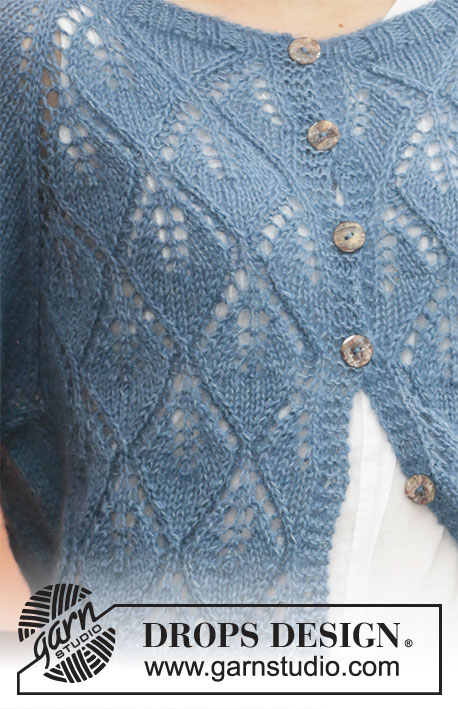
Blue Spruce Jacket |
||||||||||||||||||||||||||||
 |
 |
|||||||||||||||||||||||||||
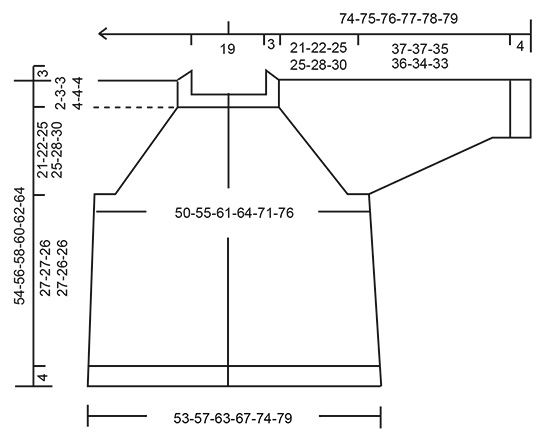
Knitted jacket with raglan in DROPS Nord and DROPS Kid-Silk. The piece is worked top down with lace pattern. Sizes S - XXXL.
DROPS 205-15 |
||||||||||||||||||||||||||||
|
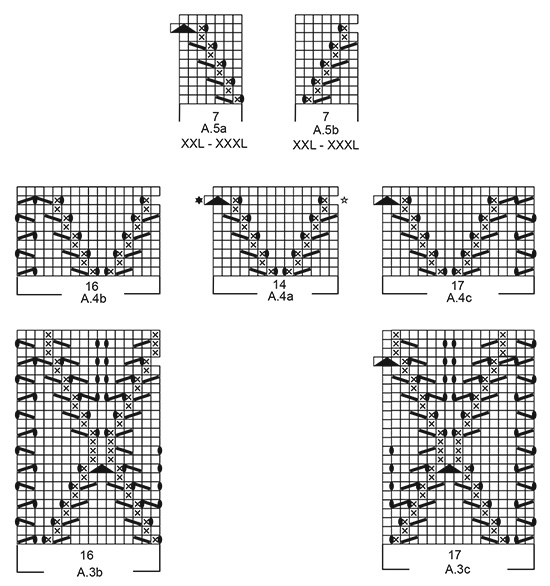
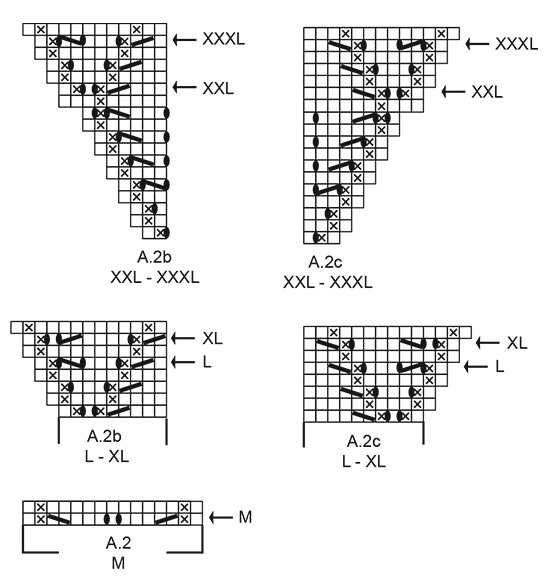
------------------------------------------------------- EXPLANATIONS FOR THE PATTERN: ------------------------------------------------------- RIDGE/GARTER STITCH (worked back and forth): Knit all rows. 1 ridge in height = Knit 2 rows. PATTERN: See diagrams A.1 to A.5. Choose diagrams for your size. INCREASE TIP-1 (evenly spaced): To work out how to increase evenly, count the total number of stitches on the needle (e.g. 82 stitches) minus the bands (e.g. 8 stitches) and divide the remaining stitches by the number of increases to be made (e.g. 9) = 8.2. In this example, increase by making 1 yarn over after approx. each 8th stitch. On the next round work the yarn overs twisted to avoid holes. INCREASE TIP-2 (for sides of body): All increases are worked from the right side! Work until there is 1 stitch left before the marker thread, make 1 yarn over, knit 2 (marker thread sits between these 2 stitches) make 1 yarn over. On the next row purl the yarn overs twisted to avoid holes. Then work the new stitches in stockinette stitch. RAGLAN: All increases are worked from the right side! Increase 1 stitch on each side of each sleeve, on the inside of the marker thread and knit 1 (4 stitches increased on the row). Increase 1 stitch by making 1 yarn over. On the next row purl the yarn over twisted to avoid holes. Then work the new stitches in stockinette stitch. DECREASE TIP (for sleeves): Decrease 1 stitch on each side of the marker thread as follows: Work until there are 3 stitches left before the marker thread, knit 2 together, knit 2 (marker thread sits between these 2 stitches), slip 1 stitch as if to knit, knit 1 and pass the slipped stitch over the knitted stitch. BUTTONHOLES: Work buttonholes on the right band (when the garment is worn). Work from the right side when there are 3 stitches left on the row as follows: Make 1 yarn over, knit 2 together and knit 1. On the next row knit the yarn over to leave a hole. The first buttonhole is worked when the rib on the neck measures approx. 2 cm = ¾". Then work the other 6 buttonholes with approx. 7-7-7½-7½-8-8 cm = 2¾"-2¾"-2⅞"-2⅞"-3⅛"-3⅛" between each one. ------------------------------------------------------- START THE PIECE HERE: ------------------------------------------------------- JACKET – SHORT OVERVIEW OF THE PIECE: The neck and yoke are worked back and forth with circular needle, top down. The yoke is divided for body and sleeves and the body continued back and forth with circular needle. The sleeves are worked in the round with double pointed needles/short circular needle, top down. NECK: Cast on 82-86-90-94-94-98 stitches (including 4 band stitches in garter stitch on each side towards mid front) with circular needle size 4 mm = US 6 and 1 strand Nord + 1 strand Kid-Silk (= 2 strands). Purl 1 row (wrong side). The next row is worked as follows from the right side: 4 band stitches in GARTER STITCH – read description above, *knit 2 / purl 2*. work from *-* until there are 6 stitches left on the row, knit 2 and finish with 4 band stitches in garter stitch. Continue back and forth like this for 3 cm = 1⅛". REMEMBER BUTTONHOLES on the right band – read description above. When the rib is finished, knit 1 row from the right side where you increase 9-9-5-5-5-5 stitches evenly spaced – read INCREASE TIP-1 = 91-95-95-99-99-103 stitches. Purl 1 row from the wrong side (the yarn overs are purled twisted and the band stitches are worked in garter stitch to finished length). Change to circular needle size 5 mm = US 8. Insert 1 marker after the band at the beginning of the row mid front; the yoke will be measured from this marker! YOKE: Now work pattern as follows: 4 band stitches in garter stitch, knit 1, A.1a over the next 14 stitches, A.1b over the next 2 stitches, insert a marker thread here (= in the transition between left front piece and left sleeve), knit 1, make 1 yarn over, knit 6-8-8-10-10-12, 1 yarn over, knit 1, insert a marker thread here (= in transition between left sleeve and back piece), A.1c over the next 3 stitches, A.1a over the next 28 stitches (= 2 repeats in width), A.1b over the next 2 stitches, insert a marker thread here (= in transition between back piece and right sleeve), knit 1, 1 yarn over, knit 6-8-8-10-10-12, 1 yarn over, knit 1, insert a marker thread here (= in transition between right sleeve and right front piece), A.1c over the next 3 stitches, A.1a over the next 14 stitches and finish with 4 band stitches in garter stitch. You now have 1 marker thread in each transition between body and sleeves (= 4 marker threads – allow them to follow your work onwards). In addition to the increases in the diagrams, you have increased 1 stitch on each side of the sleeves to RAGLAN – read description above. REMEMBER THE KNITTING GAUGE! Continue this pattern back and forth and increase to raglan on the sleeves every 2nd row 18-19-22-21-20-20 more times, then every 4th row 2-2-2-3-5-6 times (= a total of 21-22-25-25-26-27 times on each side of the sleeves). AT THE SAME TIME on row 21 in A.1a, work as described by the white star after the band stitches at the beginning of the row (seen from the right side) and as described by the black star before the band stitches at the end of the row – read description in the symbol explanations. When A.1a, A.1b and A.1c have been completed in height, continue the pattern in the same way; i.e. work A.1b and A.1c towards the raglan on the sides of the front and back pieces and leaf pattern (= A.1a) as before between the raglan on the back piece (= A.1b and A.1c) and between the raglan and bands on the front pieces until you have worked 36-46-48-48-48-48 rows of pattern in height and there are 42-47-49-49-49-49 stitches on each front piece (including the 4 band stitches) and 75-85-89-89-89-89 stitches on the back piece. There are 3-4-4-4-5-5 leaves along the raglan. Now continue in the different sizes as follows. Size M: Continue the leaf pattern in the same way, but towards the markers in each raglan (on the front and back pieces) work pattern A.2 (i.e. no more increases to raglan). There are now 47 stitches on each front piece (including the 4 band stitches) and 85 stitches on the back piece. When you have worked up to and including the row with the arrow in the diagrams (and all the increases on the sleeves are finished) there are 287 stitches on the needle. The piece measures approx. 22 cm = 8¾". If the piece is shorter than this continue with the leaf-pattern (without increasing to raglan) to the correct length. Sizes S, L, XL, XXL and XXXL: Continue the leaf pattern in the same way, but towards the markers in each raglan (on the front and back pieces) work pattern as shown in A.2b and A.2 c. When all the increases are finished there are 45-52-53-57-59 stitches on each front piece (including the 4 band stitches) and 81-95-97-105-109 stitches on the back piece. When you have worked up to and including the arrow for your size in the diagrams (and all the increases on the sleeves are finished) there are 271-319-327-347-363 stitches on the needle. The piece should measure approx. 21-25-25-28-30 cm = 8¼"-9¾"-9¾"-11"-11¾". If the piece is shorter than this continue with the leaf-pattern (without increasing to raglan) to the correct length. ALL SIZES: The yoke is now divided for body and sleeves. The next row (= row after the row with the arrow) from the wrong side is worked as follows: NOTE: In sizes XXL and XXXL you work 1-3 sleeve-stitches onto the back/front pieces. Work the first 45-47-52-53-58-62 stitches (= right front piece), place the next 50-54-60-62-62-62 stitches on a thread for sleeve and cast on 4-8-8-12-14-14 new stitches on the needle (= in side under sleeve), work the next 81-85-95-97-107-115 stitches (= back piece), place the next 50-54-60-62-62-62 stitches on a thread for sleeve and cast on 4-8-8-12-14-14 new stitches on the needle (= in side under sleeve), work the last 45-47-52-53-58-62 stitches (= left front piece). The body and sleeves are finished separately. THE PIECE IS NOW MEASURED FROM HERE! BODY: There are 179-195-215-227-251-267 stitches on the body. Insert a marker thread in the middle of the 4-8-8-12-14-14 stitches cast on under each sleeve (= 2-4-4-6-7-7 new stitches on each side of each marker thread). Work pattern from the right side as follows: NOTE: The pattern should match the pattern from the yoke; make sure you continue from the correct row in the diagrams. Work 4 band stitches in garter stitch, leaf pattern as before over the next 15-29-29-29-36-36 stitches, A.3b over the next 16 stitches, 12-2-7-10-9-13 stitches in stockinette stitch (marker thread sits here), 12-2-7-10-9-13 stitches in stockinette stitch, A.3c over the next 17 stitches, leaf pattern as before over the next 28-56-56-56-70-70 stitches (= 2-4-4-4-5-5 repeats of A.1a in width), A.3b over the next 16 stitches, 12-2-7-10-9-13 stitches in stockinette stitch (marker thread sits here), 12-2-7-10-9-13 stitches in stockinette stitch, A.3c over the next 17 stitches, leaf pattern as before over the next 14-28-28-28-35-35 stitches and 4 band stitches in garter stitch. AT THE SAME TIME when the piece measures 4 cm = 1½", increase 2 stitches in each side – read INCREASE TIP-2. Repeat this increase when the piece measures 12 cm = 4¾" = 187-203-223-235 -259-275 stitches. When the piece measures approx. 17-16-14-13-15-14 cm = 6¾"-6¼"-5½"-5⅛"-6"-5⅛" – adjust so you finish after a row like row 12 in A.1a, you have 5 cm = 2" left of pattern and 5-6-7-9-6-7 cm = 2"-2⅜"-2¾"-3½"-2⅜"-2¾" left of stockinette stitch before the rib at the bottom of the body. Now work pattern in the different sizes as follows. Sizes S, M, L and XL: Work 4 band stitches in garter stitch, knit 1, work A.4a over the next 14-28-28-28 stitches (= 1-2-2-2 repeats), A.4b over the next 16 stitches, stockinette stitch over the next 14-4-9-12 stitches, marker thread sits here, work stockinette stitch over the next 14-4-9-12 stitches, A.4c over the next 17 stitches, A.4a over the next 28-56-56-56 stitches (= 2-4-4-4 repeats), A.4b over the next 16 stitches, stockinette stitch over the next 14-4-9-12 stitches, marker thread sits here, work stockinette stitch over the next 14-4-9-12 stitches, A.4c over the next 17 stitches, A.4a over the next 14-28-28-28 stitches (= 1-2-2-2 repeats) and 4 band stitches in garter stitch. Continue this pattern back and forth until A.4a-A.4c have been completed in height. Continue from ALL SIZES – read description below. Sizes XXL and XXXL: Work 4 band stitches in garter stitch, knit 1, A.5a over the next 7 stitches, A.4a over the next 28-28 stitches (= 2-2 repeats), A.4b over the next 16 stitches, stockinette stitch over the next 11-15 stitches, marker thread sits here, stockinette stitch over the next 11-15 stitches, A.4c over the next 17 stitches, A.4a over the next 70-70 stitches (= 5 repeats), A.4b over the next 16 stitches, stockinette stitch over the next 11-15 stitches, marker thread sits here, stockinette stitch over the next 11-15 stitches, A.4c over the next 17 stitches, A.4a over the next 28-28 stitches (= 2-2 repeats), A.5b over the next 7 stitches and 4 band stitches in garter stitch. Continue back and forth like this until A.4a-A.4c, A.5a and A.5b have been completed in height. Continue from ALL SIZES below. ALL SIZES: Continue with stockinette stitch and band stitches in garter stitch until the body measures 27-27-26-27-26-26 cm = 10⅝"-10⅝"-10¼"-10⅝"-10¼"-10¼". Knit 1 row where you increase 27-31-35-35-39-43 stitches evenly spaced = 214-234-258-270-298-318 stitches. Change to circular needle size 4 mm = US 6 and work rib as follows: 4 band stitches in garter stitch, * knit 2, purl 2 * work from *-* until there are 6 stitches left on the row, knit 2 and 4 band stitches in garter stitch. When the rib measures 4 cm = 1½", bind off with knit over knit and purl over purl. The jacket measures approx. 54-56-58-60-62-64 cm = 21¼"-22"-22¾"-23⅝"-24⅜"-25¼"- from the shoulder down. SLEEVE: Place the 50-54-60-62-62-62 stitches from the thread on the one side of the piece on double pointed needles/short circular needle size 5 mm = US 8 and knit up 1 stitch in each of the 4-8-8-12-14-14 stitches cast on under the sleeve = 54-62-68-74-76-76 stitches. Insert a marker thread in the middle of the 4-8-8-12-14-14 new stitches under the sleeve (2-4-4-6-7-7 new stitches on each side of the thread). Work stockinette stitch in the round. When the sleeve measures 4 cm = 1½", decrease 2 stitches mid under sleeve – read DECREASE TIP. Decrease like this every 3½-2½-2-1½-1½-1½ cm = 1¼"-⅞"-¾"-½"-½"-½" a total of 9-13-15-17-17-16 times = 36-36-38-40-42-44 stitches. When the sleeve measure 37-37-35-36-34-33 cm = 14½"-14½"-13¾"-14¼"-13⅜"-13", knit 1 round where you increase 4-4-6-4-6-4 stitches evenly spaced = 40-40-44-44-48-48 stitches. Change to double pointed needles size 4 mm = US 6 and work rib (= 2 knit / purl 2) for 4 cm = 1½". Bind off with knit over knit and purl over purl. Work the other sleeve in the same way. ASSEMBLY: Sew buttons onto the left band. |
||||||||||||||||||||||||||||
Diagram explanations |
||||||||||||||||||||||||||||
|
||||||||||||||||||||||||||||
|
||||||||||||||||||||||||||||
|
||||||||||||||||||||||||||||

|
||||||||||||||||||||||||||||
|
||||||||||||||||||||||||||||
|
Have you made this or any other of our designs? Tag your pictures in social media with #dropsdesign so we can see them! Do you need help with this pattern?You'll find tutorial videos, a Comments/Questions area and more by visiting the pattern on garnstudio.com. © 1982-2024 DROPS Design A/S. We reserve all rights. This document, including all its sub-sections, has copyrights. Read more about what you can do with our patterns at the bottom of each pattern on our site. |
||||||||||||||||||||||||||||


With over 40 years in knitting and crochet design, DROPS Design offers one of the most extensive collections of free patterns on the internet - translated to 17 languages. As of today we count 304 catalogs and 11422 patterns - 11417 of which are translated into English (US/in).
We work hard to bring you the best knitting and crochet have to offer, inspiration and advice as well as great quality yarns at incredible prices! Would you like to use our patterns for other than personal use? You can read what you are allowed to do in the Copyright text at the bottom of all our patterns. Happy crafting!
Comments / Questions (36)
Thank you very much for your quick response. I am sorry to have clarification. I am still not very clear. I am working on size L. To start row 49 with the instruction of A.2b (shown 9 stitches in diagram)? But I only have 2 stitches left on each front piece after A.1ax3+4 band stitches. Same for A.2c. I only have only 3 stitches but in the diagram for A.2c, it is shown with 10 stitches. What to do? FYI, I worked with my drops Nord in Golden rod and it is fabulous. I love it. Thank you.
26.05.2020 - 16:34DROPS Design answered:
Dear Mrs Cho Cho Lwin, you will now work A.2c over the first sts from previous A.1c, then repeat the leaf pattern as before, ie finish the first leaf as before (= as in A.1a), then repeat A.1a as before until 9 sts remain and work A.2b. Happy knitting!
26.05.2020 - 16:47Hello , after completing 48 rows of pattern in height in YOKE, how to proceed A2b and A2c? row 49, A1a x3+2 stitches for A2b? how? , Reagan increases, A2c for 3 stitches? how? +A1ax4+2 stitches for A2b?how?+Reagan increases+ A2c for 3 stitches? how?+A1ax3? Please help me. Many thanks for all your hard work.
25.05.2020 - 17:24DROPS Design answered:
Dear Cho Cho Lwin, you will work A.2b and A.2c at the transitions to raglan (last st in A.2b and 1st st in A.2c are the 2 raglan sts = last st in A.1b/first st in A.1c) and the sts between A.2b and A.2c will be worked in A.1a as before - just adjust the lace pattern so that the leaf continue. Happy knitting!
26.05.2020 - 08:31Bom dia Continuo com dúvidas na 21ª carreira, se só diminuo junto das orlas (2 vezes) ou como nos esquemas ( mais diminuições), Nas costas quando repetir o A.1a. também faço as estrelas? Obrigada. Isabel
25.02.2020 - 13:16DROPS Design answered:
Boa tarde, Já conferimos o diagrama A.1a e só faz as diminuições (representadas pelos símbolos da estrela branca e da estrela peta) antes e deois das orlas da frente. Sendo assim, faz a primeira diminuição depois da orla da frente, não faz nenhuma diminuição cada vez que tricotar o diagrama A.1a ATÉ à última repetição: tricota A.1a e faz a diminuição antes da orla da frente . Bom tricô!
26.02.2020 - 15:13Gostaria de saber como consigo aceder às correções dete modelo. Tenho dúvidas na 21ª carreira, se só diminuo junto das orlas (2 vezes) ou como nos esquemas ( mais diminuições). Obrigada.
22.02.2020 - 20:19DROPS Design answered:
As correcções encontram-se acima dos diagramas_ Foram feitas correcções no dia 26.09.2019 Novas explicações e novos diagramas. Bom Tricô!.
24.02.2020 - 11:23Merci pour votre réponse rapide et pour tous vos merveilleux modèles .cordialement. Celine.
25.01.2020 - 15:50Bonjour , je suis entrain de réaliser ce modèle en taille L et j’en suis après le 48 eme rang. J’ai donc pris les explications de la taille L mais je ne comprend pas comment réaliser A2b et À 2 c après la dernière feuille ( j’en ai donc 3 pour le devant ) car jusqu’au marqueur du ranglan je n’ai que 2 mailles. J’ai vu qu’il y avait des modifications sur ce modèle mais je n’arrive pas à y accéder. Pouvez- vous m’aider ? Merci.
22.01.2020 - 10:47DROPS Design answered:
Bonjour Céline, quand A.1 est terminé, tricotez simplement A.2b et A.2c côté raglans (= fin du devant gauche, de chaque côté du dos et début du devant droit) - continuez bien les augmentations des manches - Continuez jusqu'au rang avec la flèche, quand toutes les augmentations sont faites et les diagrammes tricotés jusqu'au rang avec la flèche inclus, vous devez avoir 52 m pour chaque devant, 95 m pour le dos soit 319 m au total. Bon tricot!
22.01.2020 - 15:54Bonjour, J'ai commencé ce modèle comme indiqué dans les explications, même fil, même taille d'aiguille et je me retrouve avec un col rond alors que le modèle montre un col avec une encolure très large. Je précise que je ne tricote pas serré et que l'échantillon est identique à celui donné pour le modèle. Merci.
21.01.2020 - 07:49DROPS Design answered:
Bonjour Sandrine, si vous avez bien le bon échantillon et si vous conservez bien la bonne tension en tricotant le gilet, vous devriez avoir les mêmes mesures que celles indiquées dans le schéma. Bon tricot!
21.01.2020 - 10:07Die Bilder/Fotos zeigen, dass bei den Raglanzunahmen die Umschläge einfach links abgestrickt werden können und nicht verschränkt ..."In der nächsten Reihe den Umschlag links verschränkt stricken, um ein Loch zu vermeiden. .." Das ist auch viel einfacher, damit in den Rückreihen nicht zwischen den Muster-Umschlägen und den Raglan-Umschlägen unterschieden werden muss.
06.01.2020 - 14:07Moet je de steken voor de averechtse kant breien hoe ze zich voordoen? Of is dat al de 2de toer van het patroon?
05.01.2020 - 12:46DROPS Design answered:
Dag Marja,
Je breit het vest in tricotsteek, dus recht aan de goede kant en averecht aan de verkeerde kant. In de telpatronen brei je steeds de oneven naalden aan de goede kant en en de even naalden aan de verkeerde kant. Bij de meeste symbolen staat aangegeven hoe je deze op de verkeerde kant breit. Als dit er niet specifiek bij staat, brei je de steken hoe ze zich voordoen.
08.01.2020 - 09:47Miksi en llöydä ohjeesta muutamia kaavioita? Esim.2a ja 2d puuttuvat. Vai enkö ymmärrä jotain?
28.12.2019 - 09:43DROPS Design answered:
Hei Terhi Niemelä! Korjaamme sen. Siihen asti, ole hyvä ja katso alkuperäisestä norjalaisesta kuviosta. Hyvää neuloa!
04.01.2020 - 00:14