
Popular categories
Looking for a yarn?


|
|
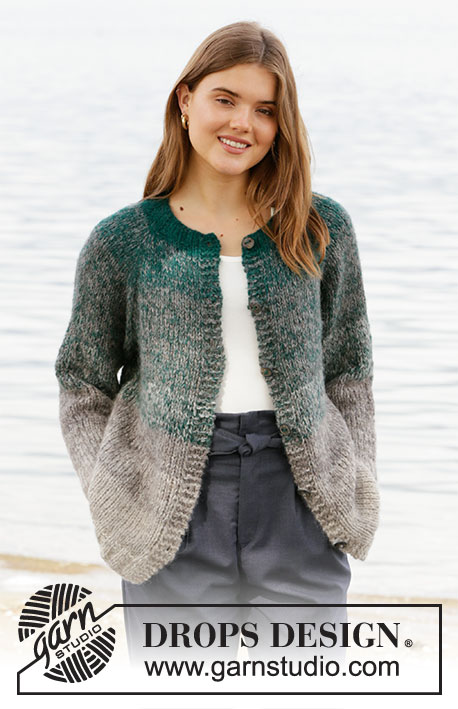
Forest Shadows |
|
 |
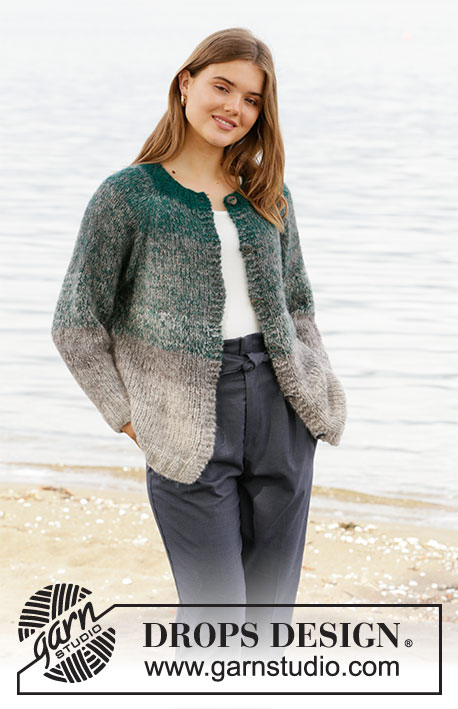 |
Knitted jacket with raglan in 3 strands DROPS Brushed Alpaca Silk. The piece is worked top down with stripes. Sizes S - XXXL.
DROPS 207-16 |
|
|
------------------------------------------------------- EXPLANATIONS FOR THE PATTERN: ------------------------------------------------------- RIDGE/GARTER STITCH (worked back and forth): Knit all rows. 1 ridge in height = Knit 2 rows. INCREASE TIP (evenly spaced): To work out how to increase evenly, count the total number of stitches on the needle (e.g. 54 stitches) minus the band stitches (= 8 stitches) and divide the remaining stitches by the number of increases to be made (e.g. 11) = 4.1. In this example, increase by making 1 yarn over after approx. each 4th stitch. On the next row work the yarn overs twisted to avoid holes. STRIPES-1: All stripes are worked with 3 strands. STRIPE 1: 7-7-8-8-8-9 cm with 2 strands forest green + 1 strand grey. STRIPE 2: 14-14-16-16-16-18 cm with 2 strands grey + 1 strand forest green. STRIPE 3: 7-7-8-8-8-9 cm with 1 strand forest green + 1 strand grey + 1 strand light grey. STRIPE 4: 7-7-8-8-8-9 cm with 2 strands grey + 1 strand light grey. STRIPE 5: 7-7-8-8-8-9 cm with 1 strand grey + 2 strands light grey. STRIPE 6: Work with 3 strands light grey as far as the rib. STRIPE 7: Work rib with 2 strands light grey + 1 strand off-white STRIPES-2 (for sleeves): All stripes are worked with 3 strands. Continue with STRIPES-1 – read description above, until stripe 3 is finished. The sleeve measures approx. 8-6-8-6-4-6 cm from the division. Continue the stripes as follows: STRIPE 4: 13-13-12-12-12-11 cm with 2 strands grey + 1 strand light grey. STRIPE 5: 13-13-12-12-12-11 cm with 1 strand grey + 2 strands light grey. STRIPE 6: Work with 3 strands light grey to finished length. RAGLAN: All increases are worked from the right side! Increase 1 stitch on each side of the marker thread in each transition between body and sleeves (= 8 stitches increased on the round) as follows: Work until there is 1 stitch left before marker thread, 1 yarn over, knit 2 (marker thread sits between these 2 stitches), 1 yarn over (= 2 stitches increased). Repeat at all marker threads. On the next row purl the yarn overs twisted to avoid holes. Then work the new stitches in stocking stitch. DECREASE TIP (for sleeves): Decrease 1 stitch on each side of the marker thread as follows: Work until there are 3 stitches left before the marker thread, knit 2 together, knit 2 (marker thread sits between these 2 stitches), slip 1 stitch as if to knit, knit 1 and pass the slipped stitch over the knitted stitch. BUTTONHOLES: Work buttonholes on the right band (when the garment is worn). Work from the right side when there are 3 stitches left on the row as follows: Make 1 yarn over, knit 2 together and knit 1. On the next row (wrong side), knit the yarn over to leave a hole. The first buttonhole is worked when the rib on the neck measures 2 cm. Then work the other 5-5-5-5-5-6 buttonholes with approx. 9½-9½-10-10-10-10 cm between each one. ------------------------------------------------------- START THE PIECE HERE: ------------------------------------------------------- JACKET – SHORT OVERVIEW OF THE PIECE: The piece is worked back and forth with circular needle, top down. The sleeves are worked in the round with short circular needle/double pointed needles. NECK: Cast on 54-58-58-62-66-66 stitches with circular needle size 6 mm and 3 strands forest green. Purl 1 row from the wrong side. Then work as follows: 4 band stitches in GARTER STITCH – read description above, rib (= knit 2 / purl 2) until there are 6 stitches left on the row, knit 2 and 4 band stitches in garter stitch. REMEMBER THE BUTTONHOLE on the right band – read description above. When the rib measures 4 cm, insert 1 marker in the piece. THE PIECE IS NOW MEASURED FROM HERE! YOKE: Knit 1 row from the right side where you increase 11-11-11-11-15-19 stitches evenly spaced – read INCREASE TIP = 65-69-69-73-81-85 stitches. Knit 1 row back from the wrong side (band stitches are knitted). Change to circular needle size 8 mm. Now insert 4 marker threads in the piece as follows: Insert the first marker thread after the first 14-15-15-16-18-19 stitches, skip the next 8 stitches (= sleeve), insert the next thread here, skip the next 21-23-23-25-29-31 stitches (= back piece), insert the next thread here, skip the next 8 stitches (= sleeve), insert the last thread here; there are 14-15-15-16-18-19 stitches between the last marker thread and end of row. Continue with stocking stitch and 4 band stitches in garter stitch on each side and work STRIPES-1 – read description above. AT THE SAME TIME on the first row from the right side begin to increase to RAGLAN – read description above. Increase like this every 2nd row a total of 12-13-15-16-16-17 times = 161-173-189-201-209-221 stitches. Then continue to increase every 2nd row on the front and back pieces (do not increase further on the sleeves = 4 stitches increased on round) 2-2-2-2-3-4 more times = 169-181-197-209-221-237 stitches. Continue working without increasing until the piece measures 21-23-25-27-29-31 cm. The next row from the wrong side is worked as follows: Work the first 28-30-32-34-37-40 stitches (= right front piece), place the next 32-34-38-40-40-42 stitches on 1 thread for sleeve, cast on 6-6-6-8-8-8 new stitches on the needle (= in side under sleeve), work the next 49-53-57-61-67-73 stitches (= back piece), place the next 32-34-38-40-40-42 stitches on 1 thread for sleeve, cast on 6-6-6-8-8-8 new stitches on the needle (= in side under sleeve), work the remaining 28-30-32-34-37-40 stitches (= left front piece). Measure now from here! BODY: = 117-125-133-145-157-169 stitches. Continue back and forth with STRIPES-1, stocking stitch and 4 band stitches in garter stitch on each side. When the piece measures 31 cm from the division, increase 17-21-21-21-25-25 stitches evenly spaced – remember INCREASE TIP = 134-146-154-166-182-194 stitches. Change to circular needle size 6 mm and work rib as follows: 4 band stitches in garter stitch, rib (= knit 2 / purl 2) until there are 6 stitches left on the row, knit 2 and finish with 4 band stitches in garter stitch. When the rib measures 4 cm, cast off with knit over knit and purl over purl. The jacket measures approx. 60-62-64-66-68-70 cm from the shoulder down. SLEEVE: Place the 32-34-38-40-40-42 stitches from the thread on the one side of the piece on short circular needle/double pointed needles size 8 mm and knit up 1 stitch in each of the 6-6-6-8-8-8 stitches cast on under the sleeve = 38-40-44-48-48-50 stitches. Insert a marker thread in the middle of the new stitches (= 3-3-3-4-4-4 new stitches on each side of the thread). Work stocking stitch and STRIPES-2; at the same time when the sleeve measures 4 cm decrease 2 stitches under the sleeve - read DECREASE TIP. Decrease like this every 4½-3½-3-2-2-2 cm a total of 7-8-9-11-10-11 times = 24-24-26-26-28-28 stitches. When the piece measures 38-36-35-33-31-30 cm (shorter measurements in larger sizes due to longer yoke) increase 4-4-6-6-8-8 stitches evenly spaced = 28-28-32-32-36-36 stitches. Change to double pointed needles size 6 mm and work rib (= knit 2 / purl 2) for 4 cm. Cast off with knit over knit and purl over purl. Cut and fasten the strands. The sleeve measures approx. 42-40-39-37-35-34 cm from the division. Work the other sleeve in the same way. ASSEMBLY: Sew buttons onto left band. |
|

|
|
|
Have you made this or any other of our designs? Tag your pictures in social media with #dropsdesign so we can see them! Do you need help with this pattern?You'll find tutorial videos, a Comments/Questions area and more by visiting the pattern on garnstudio.com. © 1982-2024 DROPS Design A/S. We reserve all rights. This document, including all its sub-sections, has copyrights. Read more about what you can do with our patterns at the bottom of each pattern on our site. |
|


With over 40 years in knitting and crochet design, DROPS Design offers one of the most extensive collections of free patterns on the internet - translated to 17 languages. As of today we count 304 catalogues and 11422 patterns - 11422 of which are translated into English (UK/cm).
We work hard to bring you the best knitting and crochet have to offer, inspiration and advice as well as great quality yarns at incredible prices! Would you like to use our patterns for other than personal use? You can read what you are allowed to do in the Copyright text at the bottom of all our patterns. Happy crafting!
Comments / Questions (36)
Re bonjour, vos explications font état de la rayure 1, sans préciser à quel moment il faut changer de rayure. J'avais envie de me servir de trois couleurs seulement. merci de m'aider, pour ma commande de pelotes
05.03.2020 - 19:24DROPS Design answered:
Bonjour Mme Devauchelle, les rayures-1 sont celles qui vont du col jusqu'en bas du gilet et les rayures-2 sont celles que l'on tricote sur les manches après la division de l'ouvrage. Nous ne sommes malheureusement pas en mesure de pouvoir recompter chaque modèle pour l'adapter à chaque demande, merci de bien vouloir contacter votre magasin DROPS pour toute assistance complémentaire. Bon tricot!
06.03.2020 - 09:00Merci beaucoup de votre réponse, j'hésite pour les couleurs, mais je vais le faire cordialement Myriam DEVAUCHELLE
05.03.2020 - 17:11J'ai envie de faire de modèle, avant de commander ma laine, pouvez vous me confirmer que l'on doit tricoter 3 fils ensemble (donc avec trois pelotes différentes) car le nombre de pelotes indiqué me parait peu. merci pour votre aide avant que je ne me décid
04.03.2020 - 16:55DROPS Design answered:
Bonjour Mme Devauchelle, effectivement, ce gilet se tricote bien avec 3 fils DROPS Brushed Alpaca Silk, rappelez-vous que les pelotes font 25 g, donc en vert forêt, il en faudra 4 par exemple en taille S. Attention également à votre échantillon, ces quantités correspondent à celles d'un gilet exécuté avec la bonne tension soit 10,5 m x 14 rangs jersey = 10 x 10 cm - plus d'infos ici sur l'échantillon. Bon tricot!
05.03.2020 - 09:52Quel nombre de pelotes faut il pour faire ce modèle én une seule couleur én taille M ?
14.11.2019 - 10:22DROPS Design answered:
Bonjour Mymie, vous trouverez la quantité nécessaire pour chaque taille dans l'en-tête des modèles, pour ce gilet en taille M il faut par ex 100 g en col. 11 soit 100 / 25 g la pelote Brushed Alpaca Silk = 4 pelotes - cf FAQ. Bon tricot!
14.11.2019 - 10:50Jag skulle vilja sticka denna underbara kofta i enfärgat. Hur mycket garn går det åt i storlek M?
09.11.2019 - 10:13DROPS Design answered:
Hei Pia. Det har vi dessverre ikke oversikten over, men vil tippe ca 450-550 gram. Jakken er strikket med 3 tråder. mvh DROPS design
11.11.2019 - 13:38The pattern for M size says “when the rib measures 4 cm, insert 1 marker in the piece. THE PIECE IS NOW MEASURED FROM HERE!”. But in the BODY: “When piece measures 31 cm increase 17-21-21-etc evenly spaced”. These 31 cm for the increase before the rib were measured from the under-arm increases. Now the total length for M size is correct: 4 cm (neck rib) + 23 cm (YOKE) + 31 cm (BODY) + 4 cm (rib) = 62 cm.
18.10.2019 - 18:19Kan man byta garn och isåfall till vilket?
02.10.2019 - 18:20DROPS Design answered:
Hej. Du kan byta ut garnet mot ett annat i samma garngrupp (dvs garngrupp C). Tänk bara på att du ska få samma stickfasthet som uppges i mönstret och att du får beräkna riktig garnåtgång. Lycka till!
03.10.2019 - 07:28Ich möchte aus der Brushes Alpaca Silk eine bunte Jacke stricken. In ihrer Anleitung wird mit 3 Fäden gestrickt. Muß ich dafür die drei Knäule zu einem Knäul aufwickeln , oder lass ich die Fäden zusammenlaufen ?
29.09.2019 - 18:50DROPS Design answered:
Liebe Ursel, am besten stricken Sie mit 1 Faden von jedem Knäuel (also keine extra Knäuel mit 3 Farben/Knäulen aufwikckeln). Viel Spaß beim stricken!
30.09.2019 - 11:30Thank you kindly
21.08.2019 - 21:09Love the colour changes, makes it look seamless
17.08.2019 - 01:51