DROPS Sky
DROPS Sky
74% Alpaca, 18% Polyamide, 8% Wool
from 7.20 $ /50g
DROPS Kid-Silk
DROPS Kid-Silk
75% Mohair, 25% Silk
from 6.75 $ /25g
Get the yarn to make this pattern from 63.00$.

The yarn cost is calculated from the pattern’s smallest size and the yarn’s cheapest product type. Looking for an even better price? You might find it on the DROPS Deals!

DROPS SS24

Simply Confident

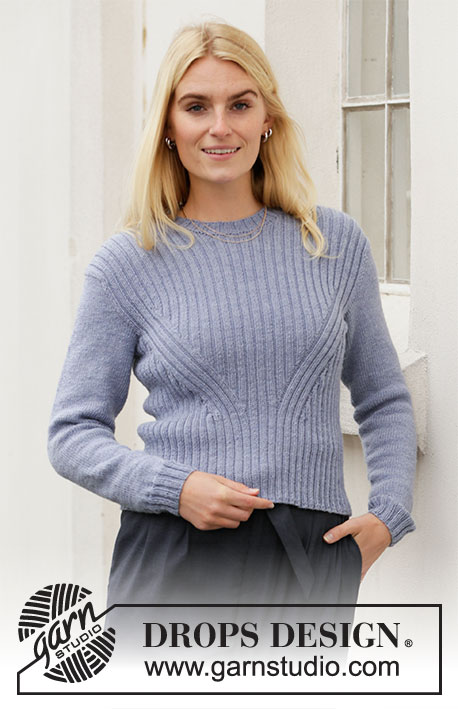
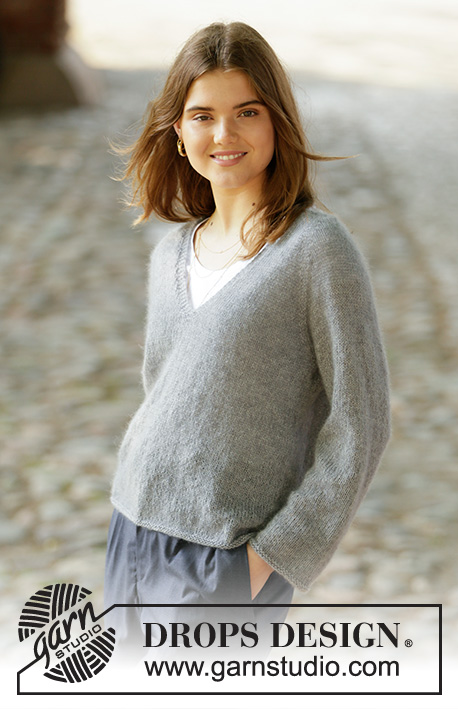
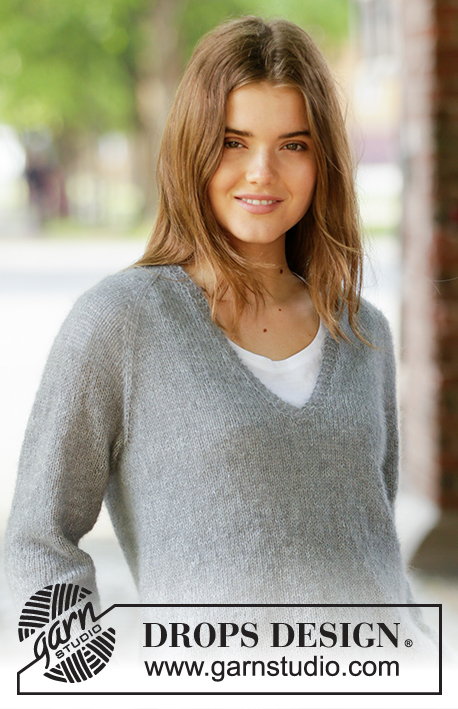
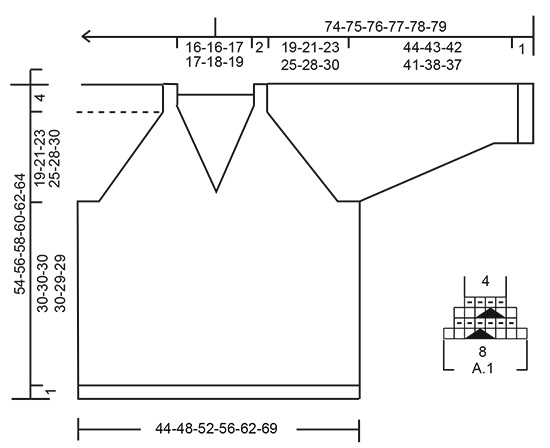
Knitted sweater with raglan and v-neck in DROPS Lace and DROPS Kid-Silk or DROPS Sky. The piece is worked top down. Sizes S - XXXL.

DROPS 205-14
DROPS Design: Pattern no la-042
Yarn group A + A or B
-------------------------------------------------------

SIZES:
S - M - L - XL - XXL – XXXL

Finished measurements:
Chest measurements: 88-96-104-112-124-138 cm = 34⅝"-37¾"-41"-44"-48¾"-54¼"
Full length: 54-56-58-60-62-64 cm = 21¼"-22"-22¾"-23⅝"-24⅜"-25¼"

All measurements in chart are in cm.

MATERIALS:
DROPS LACE from Garnstudio (belongs to yarn group A)
100-150-150-150-150-200 g color 0501, light grey
And use:
DROPS KID-SILK from Garnstudio (belongs to yarn group A)
100-100-125-125-150-150 g color 10, grey

Or use:
DROPS SKY from Garnstudio (belongs to yarn group B)
250-250-250-300-300-350 g color 04, grey

KNITTING GAUGE:
21 stitches in width and 28 rows in height with stockinette stitch and 1 strand Lace + 1 strand Kid-Silk (= 2 strands) or 1 strand Sky = 10 x 10 cm = 4" x 4".

NEEDLES:
DROPS DOUBLE POINTED NEEDLES SIZE 4 MM = US 6.
DROPS CIRCULAR NEEDLE SIZE 4 MM = US 6: Length 40 cm = 16" and 80 cm = 32" for stockinette stitch.
DROPS DOUBLE POINTED NEEDLES SIZE 3.5 MM = US 4.
DROPS CIRCULAR NEEDLE SIZE 3.5 MM = US 4: Length 40 cm = 16" and 80 cm = 32" for garter stitch edges.
Needle size is only a guide. If you get too many stitches on 10 cm = 4", change to a larger needle size. If you get too few stitches on 10 cm = 4", change to a smaller needle size.

-------------------------------------------------------

Alternative Yarn – See how to change yarns here
Yarn Groups A to F – Use the same pattern and change the yarn here
Yarn usage using an alternative yarn – Use our yarn converter here

-------------------------------------------------------

DROPS Sky
DROPS Sky
74% Alpaca, 18% Polyamide, 8% Wool
from 7.20 $ /50g
DROPS Kid-Silk
DROPS Kid-Silk
75% Mohair, 25% Silk
from 6.75 $ /25g
Get the yarn to make this pattern from 63.00$.

The yarn cost is calculated from the pattern’s smallest size and the yarn’s cheapest product type. Looking for an even better price? You might find it on the DROPS Deals!

Pattern instructions

NOTE: This pattern is written in American English. All measurements in charts are in cm. For conversion from inches to cm - click here. There are different terms for crocheting in American and British English. If this pattern includes crochet, click for "crochet terms" here. For this pattern in British English, please click here.
-------------------------------------------------------

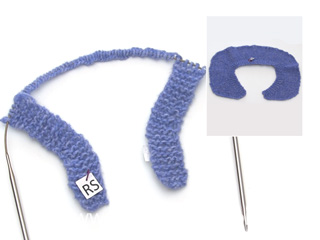
EXPLANATIONS FOR THE PATTERN:

-------------------------------------------------------

RIDGE/GARTER STITCH (worked in the round):
1 ridge in height = 2 rounds; Knit 1 round and purl 1 round.

RIDGE/GARTER STITCH (worked back and forth):
Knit all rows.
1 ridge in height = Knit 2 rows.

PATTERN:
See diagram A.1. The diagram shows all rows in the pattern seen from the right side.

SHORT ROWS-1 (for right neck-edge):
Start from the right side and work as follows: * 1 ridge back and forth over the first 3 stitches, 1 ridge back and forth over all 4 stitches *, work from *-* a total of 3 times.

SHORT ROWS-2 (for left neck-edge):
Start from the wrong side and work as follows: * 1 ridge back and forth over the first 3 stitches, 1 ridge back and forth over all 4 stitches *, work from *-* a total of 3 times, then knit 1 row from the wrong side over all 4 stitches.

RAGLAN:
All increases are worked from the right side!
Increase to raglan on each side of the marker thread as follows: Work until there is 1 stitch left before marker thread, 1 yarn over, knit 1 (marker thread sits here), knit 1, 1 yarn over (= 2 stitches increased). Increase like this at all the other marker threads (8 stitches increased on the round). On the next row/round work the yarn overs twisted to avoid holes. Then work the new stitches in stockinette stitch.

V-NECK:
All increases are worked from the right side!
Increase 1 stitch inside the 4 stitches in garter stitch on each side of the piece by making 1 yarn over. On the next row purl the yarn overs twisted to avoid holes. Then work the new stitches in stockinette stitch.

DECREASE TIP (for sleeves):
Decrease 1 stitch on each side of the marker thread as follows: Work until there are 3 stitches left before the marker thread, knit 2 together, knit 2 (marker thread sits between these 2 stitches), slip 1 stitch as if to knit, knit 1 and pass the slipped stitch over the knitted stitch.

-------------------------------------------------------

START THE PIECE HERE:

-------------------------------------------------------

SWEATER – SHORT OVERVIEW OF THE PIECE:
You first work 2 loose neck-edges. These are then placed on the circular needle and stitches are cast on for the neck as described in the text (the neck-edges are sewn together mid back and sewn onto the neck later).
Then the yoke is worked back and forth from mid front and top down. AT THE SAME TIME, you increase stitches for v-neck and raglan. When the increases to v-neck are finished the piece is continued in the round. The sleeves are worked in the round with double pointed needles/short circular needle, top down.

NECK-EDGES:
Cast on 4 stitches with needle size 3.5 mm = US 4 and Lace + Kid-Silk (= 2 strands) or 1 strand Sky and work GARTER STITCH back and forth – read description above (row 1 = right side).
When the neck edge measures 6-6-6½-6½-7-7½ cm = 2⅜"-2⅜"-2½"-2½"-2¾"-2⅞", work SHORT ROWS-1 – read description above. When the short rows are finished, work garter stitch back and forth over all 4 stitches for 6 cm = 2⅜" in all sizes; finish with a row from the wrong side (right neck-edge now measures 14-14-14½-14½-15-15½ cm = 5½"-5½"-5¾"-5¾"-6"-6⅛" in length on the inside where it is shortest). Cut the strand and lay the piece to one side.
Work left neck-edge in the same way, but when it measures 6-6-6½-6½-7-7½ cm = 2⅜"-2⅜"-2½"-2½"-2¾"-2⅞", work SHORT ROWS-2 – read description above. When the short rows are finished, work garter stitch back and forth over all 4 stitches for 6 cm = 2⅜" in all sizes; finish with a row from the right side (left neck-edge now measures 14-14-14½-14½-15-15½ cm = 5½"-5½"-5¾"-5¾"-6"-6⅛" in length on the inside where it is shortest). Place the stitches on circular needle size 4 mm = US 6 (do not cut the strand) and cast on 66-66-68-68-70-72 stitches with the same circular needle (straight after the left neck edge) then knit the 4 stitches from the right neck edge = 74-74-76-76-78-80 stitches on the needle. Work the next row from the wrong side as follows: 4 stitches in garter stitch, work 2 stitches in the next stitch (= 1 stitch increased), purl until there are 5 stitches left on row, work 2 stitches in the next stitch (= 1 stitch increased) and work 4 stitches in garter stitch = 76-76-78-78-80-82 stitches. Insert a marker in the middle of the 4 neck-edge stitches on one side. THE PIECE IS NOW MEASURED FROM HERE! Now work the yoke as described below.

YOKE:
Insert 1 marker thread in each transition between body and sleeves (= 4 marker threads) as follows: Insert 1 marker thread 5 stitches in from each side, i.e., after 4 stitches in garter stitch + 1 knitted stitch (= transition between front pieces and sleeves), insert the next 2 marker threads after 16 new stitches on each side (= transition between sleeves and back piece). There are 34-34-36-36-38-40 stitches between the last 2 marker threads (= back piece).
Work stockinette stitch with 4 stitches in garter stitch on each side towards the v-neck mid front. AT THE SAME TIME increase to raglan and v-neck as follows:
REMEMBER THE KNITTING GAUGE!

RAGLAN:
On the first row from the right side start to increase to RAGLAN – read description above. Increase to raglan every 2nd row a total of 24-28-31-34-36-38 times.

V-NECK:
On row 3 start to increase to V-NECK – read description above. Increase like this every 4th row 4-5-6-7-8-8 times, then every 2nd row 10-9-9-8-8-9 times (= a total of 14-14-15-15-16-17 stitches increased for the v-neck on each side).
When all increases to v-neck are finished, cut the yarn. Insert a marker on mid back. This is now the beginning of the round. Continue working in the round from right side; over the 8 stitches in garter stitch work pattern A.1. When A.1 has been completed in height 4 stitches have been decreased in the diagram. When all the increases to raglan (+ the 4 decreases in A.1) are finished there are 292-324-352-376-396-416 stitches on the round. Now continue with stockinette stitch until the piece measures 19-21-23-25-28-30 cm = 7½"-8¼"-9"-9¾"-11"-11¾" from the marker. Finish the round mid back. The next round is worked as follows:
NOTE: The piece is divided for body and sleeves and 1-1-1-2-4-6 stitches from each side of each sleeve are worked into the body; the transitions between body and sleeves are no longer at the marker threads: Work the first 42-46-50-54-59-64 stitches (= half back piece), place the next 62-70-76-80-80-80 stitches on a thread for sleeve and cast on 8-8-10-10-12-16 new stitches on the needle (= in side under sleeve), work the next 84-92-100-108-118-128 stitches (= front piece), place the next 62-70-76-80-80-80 stitches on a thread for sleeve and cast on 8-8-10-10-12-16 new stitches on the needle (= in side under sleeve), work the remaining 42-46-50-54-59-64 stitches (= half back piece). Body and sleeves are finished separately. THE PIECE IS NOW MEASURED FROM HERE!

BODY:
= 184-200-220-236-260-288 stitches. Work stockinette stitch in the round with circular needle size 4 mm = US 6. When the piece measures 30-30-30-30-29-29 cm = 11¾"-11¾"-11¾"-11¾"-11⅜"-11⅜" change to circular needle size 3.5 mm = US 4. Work 2 ridges. Bind off. The sweater measures approx. 54-56-58-60-62-64 cm = 21¼"-22"-22¾"-23⅝"-24⅜"-25¼" from the shoulder down.

SLEEVE:
Place the 62-70-76-80-80-80 stitches from the thread on the one side of the piece on short circular needle/double pointed needles size 4 mm = US 6 and knit up 1 stitch in each of the 8-8-10-10-12-16 stitches cast on under the sleeve = 70-78-86-90-92-96 stitches. Insert a marker thread in the middle of the new stitches (= 4-4-5-5-6-8 new stitches on each side). Work stockinette stitch in the round. When the sleeve measures 4 cm = 1½" decrease 2 stitches under the sleeve – read DECREASE TIP. Decrease like this every 3½-2½-2-2-1½-1½ cm = 1¼"-1"-¾"-¾"-½"-½" a total of 10-13-16-17-17-18 times = 50-52-54-56-58-60 stitches. When the sleeve measures 44-43-42-41-38-37 cm = 17¼"-17"-16½"-16⅛"-15"-14½" change to double pointed needles size 3.5 mm = US 4 and work 2 ridges. Bind off. The sleeve measures approx. 45-44-43-42-39-38 cm = 17¾"-17¼"-17"-16½"-15¼"-15". Work the other sleeve in the same way.

ASSEMBLY:
Sew the neck-edges together mid back with the seam on wrong side. Stretch the neck-edge slightly and sew to the neck at the back.

Diagram

All measurements in charts are in cm.

symbols = knit
symbols = purl
symbols = slip 1 stitch as if to knit, knit 2 together and pass the slipped stitch over (= 2 stitches decreased)
diagram

Each of our patterns has specific tutorial videos to help you.

Do you have a question? See a list of frequently asked questions (FAQ)

Knitting tension is what determines the final measurements of your work, and is usually measured per 10 x 10 cm. It is provided like so: number of stitches in width x number of rows in height - eg: 19 stitches x 26 rows = 10 x 10 cm.

The knitting tension is very individual; some people knit/crochet loosely while others work tightly. You adjust the knitting tension with the needle size, which is why the suggested needle size only serve as a guide! You need to adjust this (up or down) to ensure that YOUR knitting tension matches the knitting tension provided in the pattern. If you work with a different knitting tension than provided you will have a different yarn consumption, and your work will have different measurements than what the pattern suggests.

The knitting tension also determines which yarns can replace each other. As long as you achieve the same knitting tension you can replace one yarn with another.

See DROPS lesson: How to measure your tension/gauge

See DROPS video: How to make a gauge tension swatch

The required amount of yarn is provided in grams, eg: 450 g. To calculate how many balls you’ll need you first need to know how many grams are in 1 ball (25g, 50g or 100g). This information is available if you click on the individual yarn quality on our pages. Divide the amount required with the amount of each ball. For example, if each ball is 50g (the most common amount), the calculation will be as follows: 450 / 50 = 9 balls.

The important thing when changing from one yarn to another is that the knitting/crochet tension remains the same. This is so that the measurements of the finished piece will be the same as on the sketch provided. It is easier to achieve the same knitting tension using yarns from the same yarn group. It is also possible to work with multiple strands of a thinner yarn to achieve the knitting tension of a thicker one. Please try our yarn converter. We recommend you to always work a test swatch.

Please NOTE: when changing yarn the garment might have a different look and feel to the garment in the photo, due to individual properties and qualities of each yarn.

See DROPS lesson: Can I use a different yarn than the one mentioned in the pattern?

All our yarns are categorised into yarn groups (from A to F) according to thickness and knitting tension – group A contains the thinnest yarns and group F the thickest. This makes it easier for you to find alternative yarns to our patterns, should you wish to switch yarn. All yarns within the same group have a similar knitting tension and can easily replace each other. However, different yarn qualities have different structures and properties which will give the finished work a unique look and feel.

Click here for an overview of the yarns in each yarn group

At the top of all our patterns you’ll find a link to our yarn converter, which is a helpful tool should you wish to use a different yarn than suggested. By filling in the yarn quality you wish to replace, the amount (in your size) and number of strands, the converter will present good alternative yarns with the same knitting tension. Additionally it will tell you how much you’ll require in the new qualities and whether you’ll need to work with multiple strands. Most skeins are 50g (some are 25g or 100g).

If the pattern is worked with multiple colours, every colour will have to be converted separately. Similarly, if the pattern is worked with several strands of different yarns (for example 1 strand Alpaca and 1 strand Kid-Silk) you will have to find alternatives for each, individually.

Click here to see our yarn converter

Since different yarns have different qualities and textures we have chosen to keep the original yarn in our patterns. However, you can easily find options among our available qualities by using our yarn converter, or simply pick a yarn from the same yarn group.

It is possible that some retailers still have discontinued yarns in stock, or that someone has a few skeins at home that they would like to find patterns for.

The yarn converter will provide both alternative yarn as well as required amount in the new quality.

If you think it's hard to decide what size to make, it can be a good idea to measure a garment you own already and like the size of. Then you can pick the size by comparing those measures with the ones available in the pattern's size chart.

You'll find the size chart at the bottom of the pattern.

See DROPS lesson: How to read size chart

The needle size provided in the pattern serves only as a guide, the important thing is to follow the knitting tension. And since knitting tension is very individual, you will have to adjust the needle size to ensure that YOUR tension is the same as in the pattern – maybe you’ll have to adjust 1, or even 2 needle sizes, up or down to achieve the correct tension. For this, we recommend that you work test swatches.

Should you work with a different knitting tension than the one provided, the measurements of the finished garment might deviate from the measurement sketch.

See DROPS lesson: How to measure your tension/gauge

See DROPS video: How to make a gauge tension swatch

Working a garment top-down provides more flexibility and room for personal adjustment. For example it is easier to try the garment on while working, as well as making adjustments to length of yoke and shoulder caps.

The instructions are carefully explaining every step, in the correct order. Diagrams are adjusted to the knitting direction and are worked as usual.

The diagram depicts all rows/rounds, and every stitch seen from the right side. It is read from bottom to top, from right to left. 1 square = 1 stitch.

When working back and forth, every other row is worked from the right side and every other row is worked from the wrong side. When working from the wrong side, the diagram will have to be worked reversed: from left to right, knit stitches are purled, purl stitches are knit etc.

When working in the round every round is worked from the right side and the diagram are worked from right to left on all rounds.

See DROPS lesson: How to read knitting diagrams

The diagram depicts all rows/rounds, and every stitch seen from the right side. It is worked from bottom to top, from right to left.

When working back and forth every other row is worked from the right side: from right to left and every other row is worked from the wrong side: from left to right.

When working in the round, every row in the diagram are worked from the right side, from right to left.

When working a circular diagram you start in the middle and work your way outwards, counter clockwise, row by row.

The rows usually start with a given number of chain stitches (equivalent to the height of the following stitch), this will either be depicted in the diagram or explained in the pattern.

See DROPS lesson: How to read crochet diagrams

Instructions for working several diagrams after each other on the same row/round, will often be written like so: “work A.1, A.2, A.3 a total of 0-0-2-3-4 times". This means you work A.1 once, then A.2 is worked once, and A.3 is repeated (in width) the number of times provided for your size – in this case like so: S = 0 times, M = 0 times, L=2 times, XL= 3 times and XXL = 4 times.

The diagrams are worked as usual: begin with the first row in A.1, then work the first row in A.2 etc.

See DROPS lesson: How to read knitting diagrams

See DROPS lesson: How to read crochet diagrams

The total width of the garment (from wrist-to-wrist) will be larger in the larger sizes, despite the actual sleeves being shorter. The larger sizes have longer sleeve caps and wider shoulders, so there will be a good fit in all sizes.

The measurement sketch/schematic drawing provides information regarding the full length of the garment. If it’s a jumper or a jacket the length is measured from the highest point on the shoulder (usually closest to the neckline), and straight down to the bottom of the garment. It is NOT measured from the tip of shoulder. Similarly, the length of yoke is measured from the highest point on the shoulder and down to where yoke is split into body and sleeves.

See DROPS lesson: How to read a schematic drawing

Diagrams are often repeated on the round or in height. 1 repeat is the diagram the way it appears in the pattern. If it says to work 5 repeats of A.1 in the round, then you work A.1 a total of 5 times after/next to each other in the round. If it says to work 2 repeats of A.1 vertically/in height you work the entire diagram once, then begin again at the start and work the entire diagram one more time.

Chain stitches are slightly narrower than other stitches and to avoid working the cast-on edge too tight, we simply chain more stitches to begin with. The stitch count will be adjusted on the following row to fit the pattern and measurement sketch.

The rib edge is more elastic and will contract slightly compared to, for example, stocking stitch. By increasing before the rib edge, you avoid a visible difference in width between the rib edge and the rest of the body.

It’s very easy to cast off too tightly, and by making yarn overs while casting off (and simultaneously casting these off) you avoid a too tight cast off edge.

See DROPS video: How to bind off with yarn overs (yo)

To achieve an even increase (or decrease) you can increase on, for example: every 3rd and 4th row alternately, like so: work 2 rows and increase on the 3rd row, work 3 rows and increase on the 4th. Repeat this until the increase is complete.

See DROPS lesson: Increase or decrease 1 st on every 3rd and 4th row alternately

Should you prefer to work in the round instead of back and forth, you may of course adjust the pattern. You’ll need to add steeks mid-front (usually 5 stitches), and follow the instructions. When you would normally turn and work from the wrong side, simply work across the steek and continue in the round. At the end you’ll cut the piece open, pick up stitches to work bands, and cover the cut edges.

See DROPS video: How to knit steeks and cut open

Should you prefer to work back and forth instead of in the round, you may of course adjust the pattern so you work the pieces separately and then assemble them at the end. Divide the stitches for the body in 2, add 1 edge stitch in each side (for sewing) and work the front and back pieces separately.

See DROPS lesson: Can I adapt a pattern for circular needles into straight needles?

Pattern repeats can vary slightly in the different sizes, in order to get the correct proportions. If you’re not working the exact same size as the garment in the photo, yours might deviate slightly. This has been carefully developed and adjusted so that the complete impression of the garment is the same in all sizes.

Make sure to follow instructions and diagrams for your size!

If you have found a pattern you like which is available in women’s size it’s not very difficult to convert it to men’s size. The biggest difference will be the length of sleeves and body. Start working on the women size that you think would fit across the chest. The additional length will be worked right before you cast off for the armhole/sleeve cap. If the pattern is worked top-down you can add the length right after the armhole or before the first decrease on sleeve.

Regarding additional yarn amount, this will depend on how much length you add, but it is better with a skein too many than too few.

All yarns will have excess fibres (from production) that might come off as lint or shedding. Brushed yarns (ie hairier yarns) have more of these loose, excess fibres, causing more shedding.

Shedding also depends on what is worn under or over the garment, and whether this pulls at the yarn fibres. It’s therefore not possible to guarantee that there will be no shedding

Below are some tips on how to get the best result when working with hairier yarns:

1. When the garment is finished (before you wash it) shake it vigorously so the looser hairs come off. NOTE: do NOT use a lint roller, brush or any method that pulls at the yarn.

2. Place the garment in a plastic bag and put it in your freezer - the temperature will cause the fibres to become less attached to each other, and excess fibres will come off easier.

3. Leave in the freezer for a few hours before taking it out and shaking it again.

4. Wash the garment according to the instructions on the yarn label.

Pilling is a natural process that happens to even the most exclusive of fibers. It's a natural sign of wear and tear that is hard to avoid, and that is most visible in high friction areas of your garment like a sweater's arms and cuffs.

You can make your garment look as new by removing the pilling, using a fabric comb or a pill/lint remover.

Still can't find the answer you need? Then scroll down and leave your question so one of our experts can try to help you. This will be done normally within 5 to 10 working days.
In the meantime, you can read the questions and answers that others have left to this pattern or join the DROPS Workshop on Facebook to get help from fellow knitters/crocheters!

You might also like...

Post a comment to pattern DROPS 205-14

We would love to hear what you have to say about this pattern!

If you want to leave a question, please make sure you select the correct category in the form below, to speed up the answering process. Required fields are marked *.

Comments / Questions (68)

country flag Ela wrote:

Dziękuję za wyjaśnienie:) bardzo czytelny film.

06.03.2023 - 10:28

country flag Elżbieta wrote:

Witam, czy obszycie dekoltu dotyczy tylko tyłu czy nie?Lewe obszycie 14 cm + prawe obszycie 14 cm = 28 cm a na schemacie tyłu w rozmiarze M jest 16 cm. Jak to rozumieć ?

05.03.2023 - 13:46

DROPS Design answered:

Witaj Elu, zobacz video TUTAJ. To taki sam rodzaj konstrukcji, łatwiej jest sobie wyobrazić kształt dekoltu. Pozdrawiamy!

06.03.2023 - 09:47

country flag Dominika wrote:

Nie wiem czy czegoś nie widzę, ale ile mam nabrać oczek na start?

21.02.2023 - 12:22

DROPS Design answered:

Witaj Dominiko, zaczynamy od obszycia dekoltu (od góry swetra) i na drutach nr 3,5 należy nabrać 4 oczka. Dalej przerabiaj jak w opisie. Pozdrawiamy!

21.02.2023 - 13:34

country flag Iwona wrote:

Dzięki!!

08.11.2022 - 20:08

country flag Iwona wrote:

...jestem przy rozmieszczeniu markerów

04.11.2022 - 15:45

DROPS Design answered:

Witaj, po rozmieszczeniu nitek/markerów (są między oczkami, a nie w oczkach) w 1-szym rz. dodajesz 8 oczek na reglan. Przerabiasz 2-gi rząd na lewej stronie (narzuty przekręcając, aby uniknąć dziur). W 3-cim rzędzie dodajesz jednocześnie: 1) oczka na reglan (8 oczek) i 2) 2 oczka na formowanie dekoltu V. Obszycia dekoltu (które będą doszyte do dekoltu tyłu) są już gotowe i tutaj nie dodajesz żadnych oczek. Tak więc są rzędy gdzie dodasz 8 oczek oraz rzędy gdzie dodasz 10 oczek. Zaznaczam sobie to zawsze na osobnej kartce, aby nie pomylić częstotliwości dodawania oczek na poszczególnych fragmentach robótki. Pozdrawiamy!

07.11.2022 - 08:53

country flag Iwona wrote:

...czyli w jednym rzędzie dodać 12 oczek? (2 przy obszyciu, 2 przy dekolcie, 8 przy rękawach?

04.11.2022 - 15:27

DROPS Design answered:

Witaj Iwono, w którym miejscu we wzorze jesteś?

04.11.2022 - 15:37

country flag Iwona wrote:

Witam. Piszecie: " Dodać 1 oczko w odl. 4 oczek ściegiem francuskim od brzegu z każdej strony wykonując 1 narzut." oraz "Przerabiać kolejny rząd na lewej stronie robótki następująco: 4 oczka ściegiem francuskim, przerobić 2 razy następne oczko ". Nie rozumiem. Iwona

02.11.2022 - 19:38

DROPS Design answered:

Witaj Iwono, 'Przerabiać kolejny rząd na lewej stronie robótki następująco: 4 oczka ściegiem francuskim, przerobić 2 razy następne oczko ' dotyczy obszycia dekoltu. 'Dodać 1 oczko w odl. 4 oczek ściegiem francuskim od brzegu z każdej strony wykonując 1 narzut.' dotyczy dodawania oczek na formowanie dekoltu V. Pozdrawiamy!

04.11.2022 - 08:50

country flag Katja wrote:

Ich möchte gerne den Pulli stricken mit der Wollempfehlung drops lace. Ich finde diese Wolle aber nicht . Ist sie umbenannt worden oder gibt es eine Alternative? Viele Grüße Katja

24.02.2022 - 09:49

DROPS Design answered:

Liebe Katja, DROPS Lace gibt es jetzt nicht mehr, benutzen Sie den Garnumrechner um die beste Alternative zu finden- BabyAlpaca Silk hat die selbe Zusammensetzung. Ihr DROPS Laden kann Ihnen gerne damit auch telefonisch oder per E-Mail -helfen, die beste Alternative zu finden. Viel Spaß beim stricken!

24.02.2022 - 10:48

country flag Anita LE GOFF BLANCO wrote:

Bonjour Pour faire suite à mon message du 31 05 2021 Pouvez vous me dire où trouver la vidéo technique pour la couture du col en rangs raccourcis- merci

10.10.2021 - 20:38

DROPS Design answered:

Bonjour Mme Le Goff Blanco, cette vidéo est peut être celle qui vous conviendra, elle montre, à partir du time code 13:04, comment on va assembler le col (tricoté en rangs raccourcis pour un gilet) au milieu dos, puis le long de l'encolure. Bon tricot!

11.10.2021 - 07:56

country flag Kikiceleste wrote:

Bonjour, Existe-t-il un modèle qui ressemble à ce pull mais avec des explications plus faciles/ claires… je ne me sens pas capable avec ces explications. Je suis une tricoteuse « intermédiaire «  Merci d’avance

31.08.2021 - 10:07

DROPS Design answered:

Bonjour Kikiceleste, suivez attentivement toutes les indications pas à pas, posez vos question ici si besoin et /ou demandez de l'aide à votre magasin ou bien dans le groupe DROPS Workshop - ou bien encore, consultez la liste de nos modèles, l'un d'eux vous "parlera" peut-être davantage? Bon tricot!

31.08.2021 - 12:01