
Popular categories
Looking for a yarn?


|
|||||||||||||
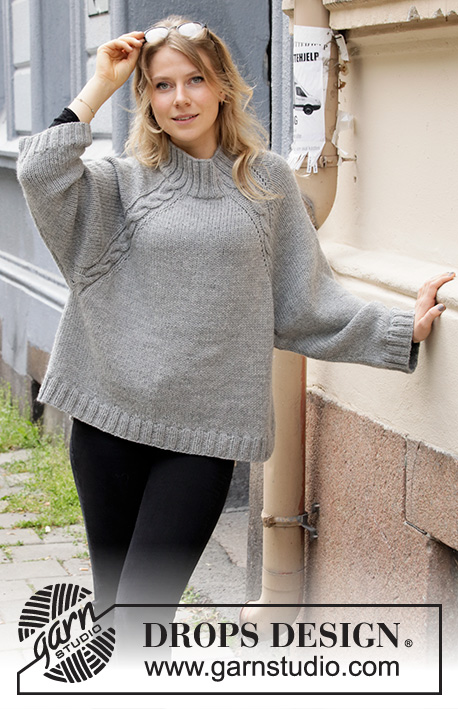
Sidewalk Café Sweater |
|||||||||||||
 |
 |
||||||||||||
Knitted jumper with raglan in DROPS Alaska. The piece is worked top down with cables. Sizes S - XXXL.
DROPS 205-45 |
|||||||||||||
|
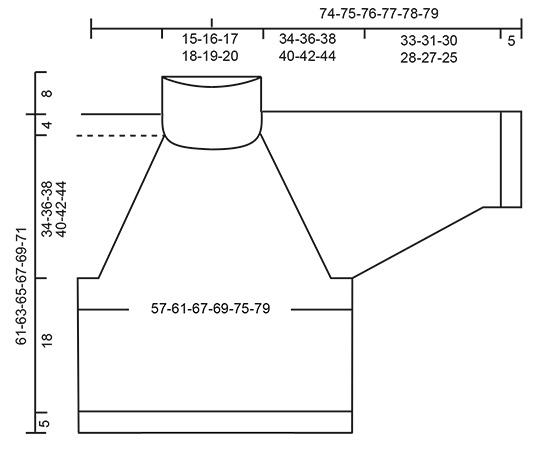
------------------------------------------------------- EXPLANATIONS FOR THE PATTERN: ------------------------------------------------------- PATTERN: See diagrams A.1 and A.2. INCREASE/DECREASE TIP (evenly spaced): To work out how to increase/decrease evenly, count the total number of stitches on needle (e.g. 88 stitches) and divide by the number of increases/decreases to be made (e.g. 12) = 7.3. In this example, increase by making 1 yarn over after approx. each 7th stitch. On the next round knit the yarn overs twisted to avoid holes. When decreasing work together approx. each 6th and 7th stitch. RAGLAN: Increase 1 stitch on each side of A.1/A.2 (= 8 stitches increased on round). Increase 1 stitch by making 1 yarn over. On the next round knit the yarn overs twisted to avoid holes. Work the new stitches in stocking stitch. DECREASE TIP: Decrease 1 stitch on each side of the marker thread as follows: Work until there are 3 stitches left before the marker thread, knit 2 together, knit 2 (marker thread sits between these 2 stitches), slip 1 stitch as if to knit, knit 1 and pass the slipped stitch over the knitted stitch. ------------------------------------------------------- START THE PIECE HERE: ------------------------------------------------------- JUMPER – SHORT OVERVIEW OF THE PIECE: The piece is worked in the round with circular needle, top down. The sleeves are worked in the round with short circular needle/double pointed needles. NECK: Cast on 88-92-96-96-100-108 stitches with short circular needle size 4.5 mm and Alaska. Knit 1 round then work rib (= knit 2 / purl 2) for 8 cm. Knit 1 round where you decrease 12-12-12-12-12-16 stitches evenly spaced – read INCREASE/DECREASE TIP = 76-80-84-84-88-92 stitches. Insert a marker here. THE PIECE IS NOW MEASURED FROM HERE! YOKE: Change to short circular needle size 6 mm and work pattern as follows from mid back: Knit 5-6-7-7-8-9 stitches (= half back piece), A.1 over the next 12 stitches, knit 4 (= right sleeve), A.2 over the next 12 stitches, knit 10-12-14-14-16-18 (= front piece), A.1 over the next 12 stitches, knit 4 (= left sleeve), A.2 over the next 12 stitches and knit the remaining 5-6-7-7-8-9 stitches. REMEMBER THE KNITTING TENSION! Continue this pattern in the round; AT THE SAME TIME on the next round start to increase to RAGLAN – read description above. Increase like this every 2nd round a total of 27-29-31-33-35-37 times = 292-312-332-348-368-388 stitches. Continue with pattern as before until the piece measures 34-36-38-40-42-44 cm. The next round is worked as follows: Work the first 40-43-46-48-51-54 stitches (= half back piece), place the next 66-70-74-78-82-86 stitches on a thread for sleeve and cast on 6-6-8-8-10-10 new stitches on the needle (= in side under sleeve), work the next 80-86-92-96-102-108 stitches (= front piece), place the next 66-70-74-78-82-86 stitches on a thread for sleeve and cast on 6-6-8-8-10-10 new stitches on the needle (= in side under sleeve), work the remaining 40-43-46-48-51-54 stitches (= half back piece). Body and sleeves are finished separately. THE PIECE IS NOW MEASURED FROM HERE. BODY: = 172-184-200-208-224-236 stitches. Continue in the round with stocking stitch until the piece measures 18 cm. Knit 1 round where you increase 32-36-36-40-44-44 stitches evenly spaced – remember INCREASE/DECREASE TIP = 204-220-236-248-268-280 stitches. Change to circular needle size 4.5 mm and work rib (= knit 2 / purl 2) for 5 cm. Cast off with knit over knit and purl over purl. The jumper measures approx. 61-63-65-67-69-71 cm from the shoulder down. SLEEVE: Place the 66-70-74-78-82-86 stitches from the thread on the one side of the piece on short circular needle size 6 mm and knit up 1 stitch in each of the 6-6-8-8-10-10 new stitches cast on under the sleeve = 72-76-82-86-92-96 stitches. Insert a marker thread in the middle of the new stitches under the sleeve (= 3-3-4-4-5-5 new stitches on each side of the marker thread). Work stocking stitch in the round. When the piece measures 2 cm start to decrease under the sleeve – read DECREASE TIP. Decrease like this every 2nd round a total of 6 times, then every 6-6-3-2½-2-2 cm 4-4-6-7-8-8 times = 52-56-58-60-64-68 stitches. When the piece measures 33-31-30-28-27-25 cm increase 12-16-14-16-16-16 stitches evenly spaced = 64-72-72-76-80-84 stitches. Change to double pointed needles size 4.5 mm and work rib (knit 2 / purl 2) for 5 cm. Cast off with knit over knit and purl over purl. The sleeve measures approx. 38-36-35-33-32-30 cm. Work the other sleeve in the same way. |
|||||||||||||
Diagram explanations |
|||||||||||||
|
|||||||||||||

|
|||||||||||||
|
|||||||||||||
|
Have you made this or any other of our designs? Tag your pictures in social media with #dropsdesign so we can see them! Do you need help with this pattern?You'll find tutorial videos, a Comments/Questions area and more by visiting the pattern on garnstudio.com. © 1982-2024 DROPS Design A/S. We reserve all rights. This document, including all its sub-sections, has copyrights. Read more about what you can do with our patterns at the bottom of each pattern on our site. |
|||||||||||||


With over 40 years in knitting and crochet design, DROPS Design offers one of the most extensive collections of free patterns on the internet - translated to 17 languages. As of today we count 304 catalogues and 11422 patterns - 11422 of which are translated into English (UK/cm).
We work hard to bring you the best knitting and crochet have to offer, inspiration and advice as well as great quality yarns at incredible prices! Would you like to use our patterns for other than personal use? You can read what you are allowed to do in the Copyright text at the bottom of all our patterns. Happy crafting!
Comments / Questions (15)
Hallo,ich verstehe nicht?\r\nDie Maschen die ich anschlage gehören doch zu der Armen und nicht zu Rumpfteil?Margarete
18.12.2023 - 23:37DROPS Design answered:
Liebe Margarete, schauen Sie mal diese Lektion ab Foto 8, kurz vor der Verteilung; die neu angeschlagenen Maschen (Foto 11 + 14) gehören zuerst zum Rumpfteil; wenn mann dann danach die Ärmel strickt, wird man Maschen in diese Maschen auffassen (Foto 18B). Viel Spaß beim stricken!
19.12.2023 - 07:56Hallo,ich verstehe nicht warum auf einmal sind 172 Maschen bei Rumpfteil? Es waren 80 Maschen Rückenteil und 80 M Vorderteil. Margarete
17.12.2023 - 21:08DROPS Design answered:
Liebe Margarete, und es wurde 6 Maschen unter jedem Ärmel angeschlagen so haben Sie 172 Maschen. Viel Spaß beim stricken!
18.12.2023 - 09:29Hi Where do I find the Decrease Tip for the initial sleeve decrease
24.06.2023 - 14:12DROPS Design answered:
Dear Tarsh, the Decrease Tip is found in the section EXPLANATIONS FOR THE PATTERN, before starting with the pattern instructions (right above START THE PIECE HERE). Happy knitting!
25.06.2023 - 13:34The sleeves would have been very long if I’d followed the pattern (they would have covered my hands!) Even so I had to order an extra ball of wool, I checked the tension before starting.
09.12.2021 - 01:10Wie wird der Zopf bei der Raglanzunahme gestrickt
25.01.2021 - 12:20DROPS Design answered:
Liebe Frau Ranke, ich verstehe leider nicht was Sie hier meinen, der Zopf beim Raglan wird wie im Diagram A.1 oder A.2 gestrickt - die Raglanzunahmen entstehen beidseiting von dem Diagram - siehe RAGLANZUNAHMEN. Viel Spaß beim stricken!
25.01.2021 - 13:56Hvordan strikker jeg kastet vridd når jeg har øket med kast på pinnen?
06.04.2020 - 19:17DROPS Design answered:
Hei Charlotte, Du strikker i bakerste løkka på kastet slik at du ikke får hull i arbeidet. God fornøyelse!
07.04.2020 - 07:50What size is the model wearing?
12.12.2019 - 09:11DROPS Design answered:
Dear Anna, our models are wearing either a size S or a size M - to find the right size, measure a similar garment you have and like the shape and compare these to the chart - read more here about sizing and convert into cm. Happy knitting!
12.12.2019 - 09:49No concuerda 27 veces aumentos talla S con el total de puntos , son menos .¿ Es así?. La reparticion de puntos de 40-66--80-66-40 no consigo entender esa distribución si seguimos el ranglsn con disminuciones
25.11.2019 - 00:32DROPS Design answered:
Hola Nuria. Para la talla S, comenzamos con 76 puntos + (8 puntos aumentados x 27 veces = 216 puntos) = 292 puntos. Al separar para las mangas y el cuerpo tenemos: 40 puntos (=mitad de la espalda) + 66 puntos de la manga + 80 puntos del delantero + 66 puntos de la manga + 40 puntos (=mitad de la espalda) = 292 puntos.
30.11.2019 - 21:47Ist das Muster in Hin- und Rückreihen gezeichnet oder sind das nur Hinreihen und in den Rückreihen werden die Maschen gestrickt, wie sie erscheinen?
20.10.2019 - 17:11DROPS Design answered:
Liebe Andrea, alle Reihen sind im Diagram gezeigt, hier lesen Sie mehr über Diagramme. Viel Spaß beim stricken!
21.10.2019 - 11:06Bellissimo questo modello: vorrei realizzarlo con 2 filati (A+A). Per la taglia S dimezzo la quantità, 300 +300? Grazie!
15.10.2019 - 08:36DROPS Design answered:
Buongiorno Anna Paola. Dipende da quale filato del gruppo A sceglie. Deve considerare non tanto il peso, ma la lunghezza del filato complessiva e quella del singolo gomitolo. In questa pagina trova indicazioni utili per la sostituzione del filato. Il suo rivenditore Drops di fiducia è a sua disposizione per fornirle tutto l’aiuto di cui ha bisogno. Buon lavoro!
15.10.2019 - 10:39