DROPS Kid-Silk
DROPS Kid-Silk
75% Mohair, 25% Silk
from 6.75 $ /25g
Get the yarn to make this pattern from 27.00$.

The yarn cost is calculated from the pattern’s smallest size and the yarn’s cheapest product type. Looking for an even better price? You might find it on the DROPS Deals!

DROPS SS24

Golden Fall

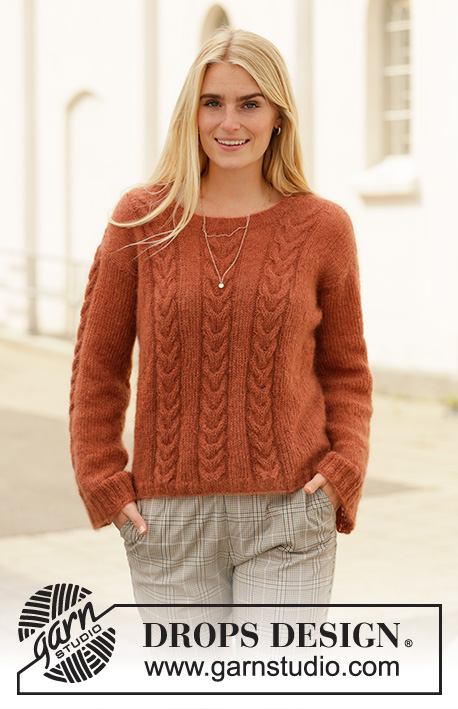
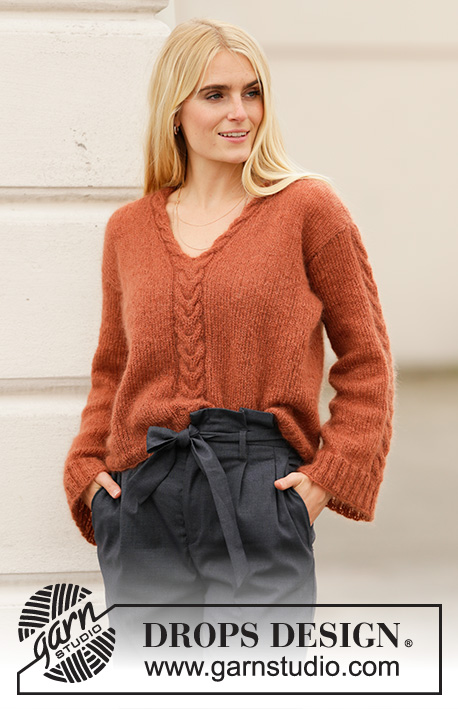
Knitted sweater in 2 strands DROPS Kid-Silk or 1 strand DROPS Brushed Alpaca Silk. The piece is worked with cables and V-neck with shawl collar. Sizes S - XXXL.

DROPS 205-37
DROPS Design: Pattern no ks-155
Yarn group A + A or C
-------------------------------------------------------

SIZES:
S - M - L - XL - XXL – XXXL

Finished measurements:
Chest measurements: 100-108-116-126-138-150 cm = 39⅜"-42½"-45¾"-49½"-54¼"-59"
Full length: 52-54-56-58-60-62 cm = 20½"-21¼"-22"-22¾"-23⅝"-24⅜"

All measurements in charts are in cm.

MATERIALS:
DROPS KID-SILK from Garnstudio (belongs to yarn group A)
200-225-225-250-275-300 g color 33, rust
Or use:
DROPS BRUSHED ALPACA SILK from Garnstudio (belongs the yarn group C)
150-175-175-200-225-250 color 22, light rust

KNITTING GAUGE:
17 stitches in width and 22 rows in height with stockinette stitch and 2 strands Kid-Silk or 1 strand Brushed Alpaca Silk = 10 x 10 cm = 4" x 4".

NEEDLES:
DROPS DOUBLE POINTED NEEDLES SIZE 5 MM = US 8.
DROPS CIRCULAR NEEDLE SIZE 5 MM = US 8: Length 40 cm = 16" and 80 cm = 32" for stockinette stitch.
DROPS DOUBLE POINTED NEEDLES SIZE 4 MM = US 6.
DROPS CIRCULAR NEEDLE SIZE 4 MM = US 6: Length 40 cm = 16" and 80 cm = 32" for rib.
DROPS CABLE NEEDLE – for cables.
Needle size is only a guide. If you get too many stitches on 10 cm = 4", change to a larger needle size. If you get too few stitches on 10 cm = 4", change to a smaller needle size.

-------------------------------------------------------

Alternative Yarn – See how to change yarns here
Yarn Groups A to F – Use the same pattern and change the yarn here
Yarn usage using an alternative yarn – Use our yarn converter here

-------------------------------------------------------

DROPS Kid-Silk
DROPS Kid-Silk
75% Mohair, 25% Silk
from 6.75 $ /25g
Get the yarn to make this pattern from 27.00$.

The yarn cost is calculated from the pattern’s smallest size and the yarn’s cheapest product type. Looking for an even better price? You might find it on the DROPS Deals!

Pattern instructions

NOTE: This pattern is written in American English. All measurements in charts are in cm. For conversion from inches to cm - click here. There are different terms for crocheting in American and British English. If this pattern includes crochet, click for "crochet terms" here. For this pattern in British English, please click here.
-------------------------------------------------------

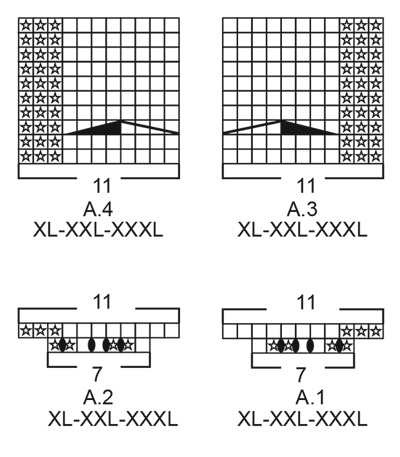
EXPLANATIONS FOR THE PATTERN:

-------------------------------------------------------

PATTERN:
See diagrams A.1 to A.4. The diagrams show all rows in the pattern seen from the right side.

DECREASE TIP-1 (evenly spaced):
To work out how to decrease evenly, count the total number of stitches over which to decrease (e.g. 46 stitches) and divide by number of decreases to be made (e.g. 9) = 5.1.
In this example, decrease by knitting approx each 4th and 5th stitch together.

DECREASE TIP-2 (for V-neck):
All decreases are worked from the right side!
Decrease 1 stitch before A.3 as follows: Work until there are 2 stitches left before A.3, knit 2 together (= 1 stitch decreased)
Decrease 1 stitch after A.4 as follows: Work A.4, slip 1 stitch as if to knit, knit 1 and pass the slipped stitch over the knitted stitch (= 1 stitch decreased).

DECREASE TIP-3 (for sleeves):
Decrease 1 stitch on each side of the marker thread as follows: Work until there are 3 stitches left before the marker thread, knit 2 together, knit 2 (marker thread sits between these 2 stitches), slip 1 stitch as if to knit, knit 1 and pass the slipped stitch over the knitted stitch.

INCREASE TIP (for sleeves):
Work until there is 1 stitch left before the marker thread, 1 yarn over, knit 2 (marker thread sits between these 2 stitches), 1 yarn over. On the next round knit the yarn overs twisted to avoid holes. Then work the new stitches in stockinette stitch.

-------------------------------------------------------

START THE PIECE HERE:

-------------------------------------------------------

SWEATER – SHORT OVERVIEW OF THE PIECE:
The piece is worked in the round with circular needle as far as the V-neck, then the front and back pieces are worked back and forth from mid front as far as the armholes. Finally the front and back pieces are finished separately. The sleeves are worked in the round with short circular needle/double pointed needles.

BODY:
Cast on 200-220-232-260-284-308 stitches with circular needle size 4 mm = US 6 and 2 strands Kid-Silk or 1 strand Brushed Alpaca Silk. Knit 1 round, then work rib (= knit 2 / purl 2) for 3 cm = 1⅛". Change to circular needle size 5 mm = US 8 and work the next round as follows: Insert 1 marker thread at the beginning of the round (= side), work stockinette stitch over the first 46-50-54-58-62-70 stitches – decrease 9-9-10-11-10-13 stitches evenly over these stitches – read DECREASE TIP-1, work A.1 over the next 5-5-5-7-7-7 stitches, A.2 over the next 5-5-5-7-7-7 stitches, work stockinette stitch over the next 46-50-54-58-62-70 stitches – decrease 9-9-10-11-10-13 stitches evenly over these stitches (= front piece), insert 1 marker thread here (= side), work stockinette stitch over the remaining 98-110-114-130-146-154 stitches – decrease 14-18-16-22-28-26 stitches evenly over these stitches (= back piece).
When A.1 and A.2 have been completed there are 174-190-202-224-244-264 stitches on the needle (= 90-98-104-116-126-136 stitches on front piece and 84-92-98-108-118-128 stitches on back piece).
Now work A.3 (= 8-8-8-11-11-11 stitches) over A.1 and A.4 (= 8-8-8-11-11-11 stitches) over A.2; the remaining stitches are worked in stockinette stitch. Continue this pattern, A.3 and A.4 are repeated in height. REMEMBER THE KNITTING GAUGE!
Work until the piece measures 34-35-36-37-38-39 cm = 13⅜"-13¾"-14¼"-14½"-15"-15¼" – adjust to after an even-numbered round. Now divide the piece for the neck between the 2 cables on the front piece.
Continue working back and forth from mid front, starting from the right side. Decrease for the V-neck on the first row from the right side – at the same time, when the piece measures 36-37-38-39-40-41 cm = 14¼"-14½"-15"-15¼"-15¾"-16⅛", bind off for the armholes; work as follows (pattern continues as before):
V-NECK:
Decrease for the V-neck on the first row from the right side - read DECREASE TIP-2. Decrease every 6th row a total of 2 times then every 4th row a total of 1-2-2-3-3-3 times and then every 2nd row a total of 7-6-7-6-7-8 times.
ARMHOLES:
When the piece measures 36-37-38-39-40-41 cm = 14¼"-14½"-15"-15¼"-15¾"-16⅛" bind off 10-14-14-18-18-20 stitches in each side (= 5-7-7-9-9-10 stitches on each side of the marker threads in the sides). Front and back pieces are finished separately as described below.

RIGHT FRONT PIECE:
Continue with stockinette stitch, A.4 and neck decreases as before. When the decreases for the neck are finished there are 30-32-34-38-42-45 stitches on the needle. Continue working until the piece measures 16-17-18-19-20-21 cm = 6¼"-6¾"-7"-7½"-8"-8¼" from where you bind off for the armhole (the piece measures a total of 52-54-56-58-60-62 cm = 20½"-21¼"-22"-22¾"-23⅝"-24⅜"). On the next row from the wrong side, bind off the first 22-24-26-27-31-34 stitches for the shoulder = 8-8-8-11-11-11 stitches on the needle. Continue with A.4 over the remaining stitches for the shawl collar for 6-6-7-7-7-8 cm = 2⅜"-2⅜"-2¾"-2¾"-2¾"-3⅛". On the next row from the right side knit the cable stitches together 2 and 2 = 5-5-5-7-7-7 stitches, bind off on the next row from the right side.

LEFT FRONT PIECE:
Continue with stockinette stitch, A.3 and decreases for V-neck. When the decreases for neck are finished there are 30-32-34-38-42-45 stitches left on the needle. Continue working until the piece measures 16-17-18-19-20-21 cm = 6¼"-6¾"-7"-7½"-8"-8¼" from where stitches were bind off for the armholes (the piece measures a total of 52-54-56-58-60-62 cm = 20½"-21¼"-22"-22¾"-23⅝"-24⅜"). On the next row from the right side bind off the first 22-24-26-27-31-34 stitches for the shoulder = 8-8-8-11-11-11 stitches. Continue with A.3 over the remaining stitches until the collar measures 6-6-7-7-7-8 cm = 2⅜"-2⅜"-2¾"-2¾"-2¾"-3⅛". On the next row from the right side knit the cable stitches together 2 and 2 = 5-5-5-7-7-7 stitches, bind off on the next row from the right side.

BACK PIECE:
= 74-78-84-90-100-108 stitches. Continue with stockinette stitch back and forth until the piece measures 14-15-16-17-18-19 cm = 5½"-6"-6¼"-6¾"-7"-7½" from where stitches were bind off for the armholes (the piece measures a total of 50-52-54-56-58-60 cm = 19¾"-20½"-21¼"-22"-22¾"-23⅝"). On the next row from the right side, bind off the middle 28-28-30-34-36-38 stitches for neck and each shoulder is finished separately. Bind off 1 stitch on the next row from the neck = 22-24-27-27-31-34 stitches left on shoulder. Continue working until the piece measures 52-54-56-58-60-62 cm = 20½"-21¼"-22"-22¾"-23⅝"-24⅜", loosely bind off. Work the other shoulder in the same way
.

SLEEVE:
Cast on 72-80-80-84-92-96 stitches with short circular needle/double pointed needles size 4 mm = US 6 and 2 strands Kid-Silk or 1 strand Brushed Alpaca Silk. Knit 1 round, then work rib (= knit 2 / purl 2) for 6 cm = 2⅜". Insert 1 marker thread at the beginning of the round; it will be used when decreasing and increasing mid under sleeve. Change to short circular needle size 5 mm = US 8 and work the next round as follows: Knit the first 30-34-34-34-38-42 stitches – decrease 8-10-8-9-11-13 stitches evenly over these stitches, work A.1 over the next 5-5-5-7-7-7 stitches, A.2 over the next 5-5-5-7-7-7 stitches, knit the remaining 32-36-36-36-40-40 stitches – decrease 10-12-10-11-13-11 stitches evenly over these stitches. When A.1 and A.2 have been completed there are 60-64-68-72-76-80 stitches on the needle.
Then work A.3 (= 8-8-8-11-11-11 stitches) over A.1 and work A.4 (= 8-8-8-11-11-11 stitches) over A.2; the remaining stitches are worked in stockinette stitch. When the piece measures 14 cm = 5½", decrease 2 stitches mid under sleeve – read DECREASE TIP-3. Repeat the decrease when the piece measures 35 cm = 13¾" = 56-60-64-68-72-76 stitches. Continue working until the sleeve measures 42-42-42-41-39-37 cm. Now increase 2 stitches mid under sleeve – read INCREASE TIP. Increase like this every 3 cm = 1⅛" a total of 2 times = 60-64-68-72-76-80 stitches. Continue working until the piece measures 49-48-48-46-44-41 cm = 19¼"-19"-19"-18"-17¼"-16⅛" – adjust to after an even-numbered round. Now work back and forth over all stitches until the piece measures 52-52-52-51-49-47 cm = 20½"-20½"-20½"-20"-19¼"-18½". On the next row from the right side knit the 6-6-6-8-8-8 cable stitches together 2 and 2 = 54-58-62-64-68-72 stitches. Bind off. Work the other sleeve in the same way.

ASSEMBLY:
Sew the shoulder seams inside the bind-off edge. Sew the collar together mid back with grafting stitches and then sew it to the neck at the back – the seam should turn in to the wrong side. Sew in the sleeves – sew the bind-off edge on the sleeve to the armhole and sew the opening under the sleeve to where stitches were bind off on the body.

This pattern has been corrected.

Updated online: 05.04.2024
The pattern is updated. Correction under sleeve.

Diagram

All measurements in charts are in cm.

symbols = knit from right side, purl from wrong side
symbols = purl from right side, knit from wrong side
symbols = between 2 stitches make 1 yarn over. On the next row/round work the yarn over twisted to avoid a hole
symbols = place 3 stitches on cable needle behind the piece, knit 3, knit 3 from cable needle
symbols = place 3 stitches on cable needle in front of the piece, knit 3, knit 3 from cable needle
symbols = place 4 stitches on cable needle behind the piece, knit 4, knit 4 from cable needle
symbols = place 4 stitches on cable needle in front of the piece, knit 4, knit 4 from cable needle

diagram
diagram
diagram
Do you have a question? See a list of frequently asked questions (FAQ)

Knitting tension is what determines the final measurements of your work, and is usually measured per 10 x 10 cm. It is provided like so: number of stitches in width x number of rows in height - eg: 19 stitches x 26 rows = 10 x 10 cm.

The knitting tension is very individual; some people knit/crochet loosely while others work tightly. You adjust the knitting tension with the needle size, which is why the suggested needle size only serve as a guide! You need to adjust this (up or down) to ensure that YOUR knitting tension matches the knitting tension provided in the pattern. If you work with a different knitting tension than provided you will have a different yarn consumption, and your work will have different measurements than what the pattern suggests.

The knitting tension also determines which yarns can replace each other. As long as you achieve the same knitting tension you can replace one yarn with another.

See DROPS lesson: How to measure your tension/gauge

See DROPS video: How to make a gauge tension swatch

The required amount of yarn is provided in grams, eg: 450 g. To calculate how many balls you’ll need you first need to know how many grams are in 1 ball (25g, 50g or 100g). This information is available if you click on the individual yarn quality on our pages. Divide the amount required with the amount of each ball. For example, if each ball is 50g (the most common amount), the calculation will be as follows: 450 / 50 = 9 balls.

The important thing when changing from one yarn to another is that the knitting/crochet tension remains the same. This is so that the measurements of the finished piece will be the same as on the sketch provided. It is easier to achieve the same knitting tension using yarns from the same yarn group. It is also possible to work with multiple strands of a thinner yarn to achieve the knitting tension of a thicker one. Please try our yarn converter. We recommend you to always work a test swatch.

Please NOTE: when changing yarn the garment might have a different look and feel to the garment in the photo, due to individual properties and qualities of each yarn.

See DROPS lesson: Can I use a different yarn than the one mentioned in the pattern?

All our yarns are categorised into yarn groups (from A to F) according to thickness and knitting tension – group A contains the thinnest yarns and group F the thickest. This makes it easier for you to find alternative yarns to our patterns, should you wish to switch yarn. All yarns within the same group have a similar knitting tension and can easily replace each other. However, different yarn qualities have different structures and properties which will give the finished work a unique look and feel.

Click here for an overview of the yarns in each yarn group

At the top of all our patterns you’ll find a link to our yarn converter, which is a helpful tool should you wish to use a different yarn than suggested. By filling in the yarn quality you wish to replace, the amount (in your size) and number of strands, the converter will present good alternative yarns with the same knitting tension. Additionally it will tell you how much you’ll require in the new qualities and whether you’ll need to work with multiple strands. Most skeins are 50g (some are 25g or 100g).

If the pattern is worked with multiple colours, every colour will have to be converted separately. Similarly, if the pattern is worked with several strands of different yarns (for example 1 strand Alpaca and 1 strand Kid-Silk) you will have to find alternatives for each, individually.

Click here to see our yarn converter

Since different yarns have different qualities and textures we have chosen to keep the original yarn in our patterns. However, you can easily find options among our available qualities by using our yarn converter, or simply pick a yarn from the same yarn group.

It is possible that some retailers still have discontinued yarns in stock, or that someone has a few skeins at home that they would like to find patterns for.

The yarn converter will provide both alternative yarn as well as required amount in the new quality.

If you think it's hard to decide what size to make, it can be a good idea to measure a garment you own already and like the size of. Then you can pick the size by comparing those measures with the ones available in the pattern's size chart.

You'll find the size chart at the bottom of the pattern.

See DROPS lesson: How to read size chart

The needle size provided in the pattern serves only as a guide, the important thing is to follow the knitting tension. And since knitting tension is very individual, you will have to adjust the needle size to ensure that YOUR tension is the same as in the pattern – maybe you’ll have to adjust 1, or even 2 needle sizes, up or down to achieve the correct tension. For this, we recommend that you work test swatches.

Should you work with a different knitting tension than the one provided, the measurements of the finished garment might deviate from the measurement sketch.

See DROPS lesson: How to measure your tension/gauge

See DROPS video: How to make a gauge tension swatch

Working a garment top-down provides more flexibility and room for personal adjustment. For example it is easier to try the garment on while working, as well as making adjustments to length of yoke and shoulder caps.

The instructions are carefully explaining every step, in the correct order. Diagrams are adjusted to the knitting direction and are worked as usual.

The diagram depicts all rows/rounds, and every stitch seen from the right side. It is read from bottom to top, from right to left. 1 square = 1 stitch.

When working back and forth, every other row is worked from the right side and every other row is worked from the wrong side. When working from the wrong side, the diagram will have to be worked reversed: from left to right, knit stitches are purled, purl stitches are knit etc.

When working in the round every round is worked from the right side and the diagram are worked from right to left on all rounds.

See DROPS lesson: How to read knitting diagrams

The diagram depicts all rows/rounds, and every stitch seen from the right side. It is worked from bottom to top, from right to left.

When working back and forth every other row is worked from the right side: from right to left and every other row is worked from the wrong side: from left to right.

When working in the round, every row in the diagram are worked from the right side, from right to left.

When working a circular diagram you start in the middle and work your way outwards, counter clockwise, row by row.

The rows usually start with a given number of chain stitches (equivalent to the height of the following stitch), this will either be depicted in the diagram or explained in the pattern.

See DROPS lesson: How to read crochet diagrams

Instructions for working several diagrams after each other on the same row/round, will often be written like so: “work A.1, A.2, A.3 a total of 0-0-2-3-4 times". This means you work A.1 once, then A.2 is worked once, and A.3 is repeated (in width) the number of times provided for your size – in this case like so: S = 0 times, M = 0 times, L=2 times, XL= 3 times and XXL = 4 times.

The diagrams are worked as usual: begin with the first row in A.1, then work the first row in A.2 etc.

See DROPS lesson: How to read knitting diagrams

See DROPS lesson: How to read crochet diagrams

The total width of the garment (from wrist-to-wrist) will be larger in the larger sizes, despite the actual sleeves being shorter. The larger sizes have longer sleeve caps and wider shoulders, so there will be a good fit in all sizes.

The measurement sketch/schematic drawing provides information regarding the full length of the garment. If it’s a jumper or a jacket the length is measured from the highest point on the shoulder (usually closest to the neckline), and straight down to the bottom of the garment. It is NOT measured from the tip of shoulder. Similarly, the length of yoke is measured from the highest point on the shoulder and down to where yoke is split into body and sleeves.

See DROPS lesson: How to read a schematic drawing

Diagrams are often repeated on the round or in height. 1 repeat is the diagram the way it appears in the pattern. If it says to work 5 repeats of A.1 in the round, then you work A.1 a total of 5 times after/next to each other in the round. If it says to work 2 repeats of A.1 vertically/in height you work the entire diagram once, then begin again at the start and work the entire diagram one more time.

Chain stitches are slightly narrower than other stitches and to avoid working the cast-on edge too tight, we simply chain more stitches to begin with. The stitch count will be adjusted on the following row to fit the pattern and measurement sketch.

The rib edge is more elastic and will contract slightly compared to, for example, stocking stitch. By increasing before the rib edge, you avoid a visible difference in width between the rib edge and the rest of the body.

It’s very easy to cast off too tightly, and by making yarn overs while casting off (and simultaneously casting these off) you avoid a too tight cast off edge.

See DROPS video: How to bind off with yarn overs (yo)

To achieve an even increase (or decrease) you can increase on, for example: every 3rd and 4th row alternately, like so: work 2 rows and increase on the 3rd row, work 3 rows and increase on the 4th. Repeat this until the increase is complete.

See DROPS lesson: Increase or decrease 1 st on every 3rd and 4th row alternately

Should you prefer to work in the round instead of back and forth, you may of course adjust the pattern. You’ll need to add steeks mid-front (usually 5 stitches), and follow the instructions. When you would normally turn and work from the wrong side, simply work across the steek and continue in the round. At the end you’ll cut the piece open, pick up stitches to work bands, and cover the cut edges.

See DROPS video: How to knit steeks and cut open

Should you prefer to work back and forth instead of in the round, you may of course adjust the pattern so you work the pieces separately and then assemble them at the end. Divide the stitches for the body in 2, add 1 edge stitch in each side (for sewing) and work the front and back pieces separately.

See DROPS lesson: Can I adapt a pattern for circular needles into straight needles?

Pattern repeats can vary slightly in the different sizes, in order to get the correct proportions. If you’re not working the exact same size as the garment in the photo, yours might deviate slightly. This has been carefully developed and adjusted so that the complete impression of the garment is the same in all sizes.

Make sure to follow instructions and diagrams for your size!

If you have found a pattern you like which is available in women’s size it’s not very difficult to convert it to men’s size. The biggest difference will be the length of sleeves and body. Start working on the women size that you think would fit across the chest. The additional length will be worked right before you cast off for the armhole/sleeve cap. If the pattern is worked top-down you can add the length right after the armhole or before the first decrease on sleeve.

Regarding additional yarn amount, this will depend on how much length you add, but it is better with a skein too many than too few.

All yarns will have excess fibres (from production) that might come off as lint or shedding. Brushed yarns (ie hairier yarns) have more of these loose, excess fibres, causing more shedding.

Shedding also depends on what is worn under or over the garment, and whether this pulls at the yarn fibres. It’s therefore not possible to guarantee that there will be no shedding

Below are some tips on how to get the best result when working with hairier yarns:

1. When the garment is finished (before you wash it) shake it vigorously so the looser hairs come off. NOTE: do NOT use a lint roller, brush or any method that pulls at the yarn.

2. Place the garment in a plastic bag and put it in your freezer - the temperature will cause the fibres to become less attached to each other, and excess fibres will come off easier.

3. Leave in the freezer for a few hours before taking it out and shaking it again.

4. Wash the garment according to the instructions on the yarn label.

Pilling is a natural process that happens to even the most exclusive of fibers. It's a natural sign of wear and tear that is hard to avoid, and that is most visible in high friction areas of your garment like a sweater's arms and cuffs.

You can make your garment look as new by removing the pilling, using a fabric comb or a pill/lint remover.

Still can't find the answer you need? Then scroll down and leave your question so one of our experts can try to help you. This will be done normally within 5 to 10 working days.
In the meantime, you can read the questions and answers that others have left to this pattern or join the DROPS Workshop on Facebook to get help from fellow knitters/crocheters!

You might also like...

Golden Fall

Sylvia, Germany

Golden Fall

Neulevirta, Finland

Golden Fall

LaWollFever

Post a comment to pattern DROPS 205-37

We would love to hear what you have to say about this pattern!

If you want to leave a question, please make sure you select the correct category in the form below, to speed up the answering process. Required fields are marked *.

Comments / Questions (49)

country flag Rosy wrote:

Très beau modèle, une réussite !

29.07.2019 - 09:02

country flag Hilde Verwimp wrote:

Waar kan ik hiervan het patroon vinden?

20.07.2019 - 10:48

DROPS Design answered:

Dag Hilde,

Dit patroon is nog niet gepupubliceerd, het moet nog nagelezen/vertaald worden. We zetten dagelijks nieuwe patronen online van de Herfst Wintercollectie 019/20, dus houd de site in de gaten.

23.07.2019 - 11:53

country flag Jacqueline wrote:

This is really beautiful, I would LOVE to make this!!! It's just absolutely perfect!!!!

29.06.2019 - 13:48

country flag Laurence wrote:

J'adore, parfait tel quel !

25.06.2019 - 17:19

country flag Mirjam wrote:

Perfekt som kjole.

22.06.2019 - 19:32

country flag Cristina wrote:

Walk in the park

20.06.2019 - 15:53

country flag Ellis wrote:

Thick yarns are nice for cushions, carpets, bags etc but not for sweaters. women need elegant clothes

09.06.2019 - 19:59

country flag Elena wrote:

Sleeves are too wide

07.06.2019 - 12:09

country flag Marianne wrote:

Would be lovely as a dress

06.06.2019 - 09:12