
Popular categories
Looking for a yarn?


|
|||||||||||||||||||||||||
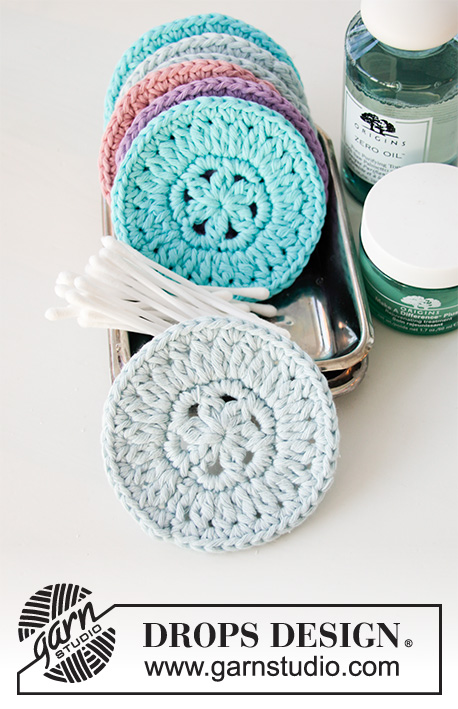
Beauty Pads |
|||||||||||||||||||||||||
 |
 |
||||||||||||||||||||||||
Crocheted makeup pads in DROPS Paris. Worked in the round in a circle.
DROPS 198-35 |
|||||||||||||||||||||||||
|
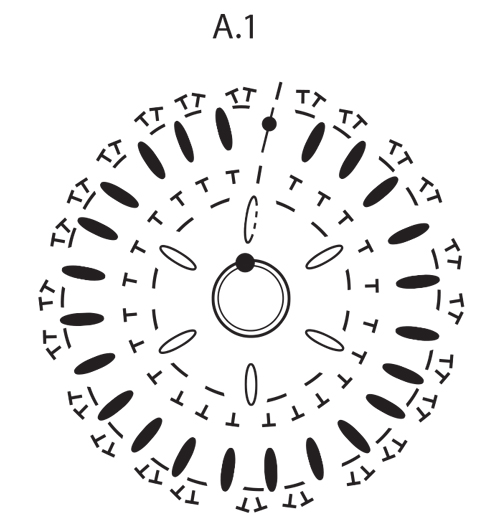
------------------------------------------------------- START THE PIECE HERE: ------------------------------------------------------- PADS - SHORT OVERVIEW OF THE PIECE: The piece is worked in the round in a circle, from the middle outwards. PADS: Follow diagram A.1, starting at the symbol in the middle; i.e. start by working 4 chain stitches and form them into a ring with 1 slip stitch in the first chain stitch as shown by the middle symbol. Then work according to diagram A.1. REMEMBER THE CROCHET TENSION. Complete the diagram, cut the strand and pull it through the last stitch. |
|||||||||||||||||||||||||
Diagram explanations |
|||||||||||||||||||||||||
|
|||||||||||||||||||||||||
|
|||||||||||||||||||||||||
|
Have you made this or any other of our designs? Tag your pictures in social media with #dropsdesign so we can see them! Do you need help with this pattern?You'll find tutorial videos, a Comments/Questions area and more by visiting the pattern on garnstudio.com. © 1982-2024 DROPS Design A/S. We reserve all rights. This document, including all its sub-sections, has copyrights. Read more about what you can do with our patterns at the bottom of each pattern on our site. |
|||||||||||||||||||||||||


With over 40 years in knitting and crochet design, DROPS Design offers one of the most extensive collections of free patterns on the internet - translated to 17 languages. As of today we count 304 catalogues and 11422 patterns - 11422 of which are translated into English (UK/cm).
We work hard to bring you the best knitting and crochet have to offer, inspiration and advice as well as great quality yarns at incredible prices! Would you like to use our patterns for other than personal use? You can read what you are allowed to do in the Copyright text at the bottom of all our patterns. Happy crafting!
Comments / Questions (14)
Er det bomulls garn eller er det merinoull man bruker til å hekle sånne Beauty Pads ?
14.01.2024 - 01:25DROPS Design answered:
Hei Malin, Drops Paris, som er brukt til å hekle Beauty Pads, er et bomullsgarn. God fornøyelse!
15.01.2024 - 06:49I just finished making these facial scrubbies and added a row of slip stitch in each single crochet in the last row of the pattern. Gave the scrubbie a nice finished look. They turned out very nice.
25.09.2021 - 18:51Wud there be written instructions for this beautiful pattern - I hv a had time reading diagrams. Much appreciate any help u can give me.
03.01.2021 - 05:00DROPS Design answered:
Hi Helen, Sadly, there are no written instructions for this pattern at the moment. Happy crafting!
04.01.2021 - 06:55Good afternoon ! I like this pattern but I need other size, bigger, tablecloth. Can you advice how to increase this diagram? Thank you
06.11.2020 - 10:44DROPS Design answered:
Dear Ekaterina, we are unfortunately not able to adjust every single pattern to every request - maybe our place mats could help you? Happy crocheting!
06.11.2020 - 11:59Where the pattern says:"start round with 3 chain stitches, work 1 treble crochet in first stitch and continue in the round as shown in diagram" which stitch is the first stitch? If it is the first T to the right of the symbol (the line with the dot on it) then why is it not shown as a different symbol to the others in that round? Or does it mean the first chain stitch in the chain of 3? Please help! Love the pattern otherwise. More eco kitchen bathroom patterns would be welcome.
29.06.2020 - 09:10DROPS Design answered:
Dear Jenny, you crochet the treble crochet in the first stitch on round below = 1 chain (= the | in diagram), ie the 3 chains replace first treble on round (you then continue with 2 trebles worked together in every double crochet from previous row - with 1 chain in between). Happy crocheting!
29.06.2020 - 09:21Bonjour, j'utilise beaucoup votre site pour le tricot et je le trouve lisible et tres pratique. Aujourd'hui j'aimerai commencer le crochet. Je me suis entrainée aux points de base. Je souhaiterai commencer un petit ouvrage facile. Cette notion de niveau de difficulté ou maitrise n'est pas indiquée, c'est dommage alors pourriez vous m'en indiquer quelques un. La difficulté réside aussi dans la lecture d'un diagramme. Merci beaucoup de prendre le temps pour nous
13.04.2020 - 09:29DROPS Design answered:
Bonjour Mme Rivière, le niveau de difficulté n'est pas indiqué car il pourrait apparaître différent d'un pays à l'autre, lisez attentivement les explications du modèle, vous trouverez ici comment déchiffrer un diagramme et n'hésitez pas à poser vos questions si besoin. Bon crochet!
14.04.2020 - 12:32Hi, I like this pattern but I think there is an error: The US pattern says the 5th round starts with 3 chains and a treble, when all other "long" stiches are doubles. (Also, the UK patterns says it should be a UK-treble (ie, a US-double), and the German pattern says it should be a Stäbchen (ie, a US-double).)
18.11.2019 - 03:53DROPS Design answered:
Dear Britta, thanks for noticing, pattern will be fixed asap. Happy crocheting!
18.11.2019 - 11:11Hat wunderbar geklappt. Danke!
09.10.2019 - 17:47Fant ut av diagrammet 😊 kjekk oppskrift. Har heklet mange nå til meg selv og datteren min 👍 blir vel litt ekstra også til små gaver.
14.09.2019 - 12:03Hei. Lurer på i siste rekke i diagrammet skal det være 1luftm og 2 fastm?
12.09.2019 - 20:25DROPS Design answered:
Hej Benedicte, sidste omgang hækles med 2 fastmasker rundt om hver luftmaskebue. God fornøjelse!
17.09.2019 - 13:28