DROPS Merino Extra Fine
100% Wool
from 4.55 $ /50g
Get the yarn to make this pattern from 59.15$.

The yarn cost is calculated from the pattern’s smallest size and the yarn’s cheapest product type. Looking for an even better price? You might find it on the DROPS Deals!

DROPS SS24

Winter Delight

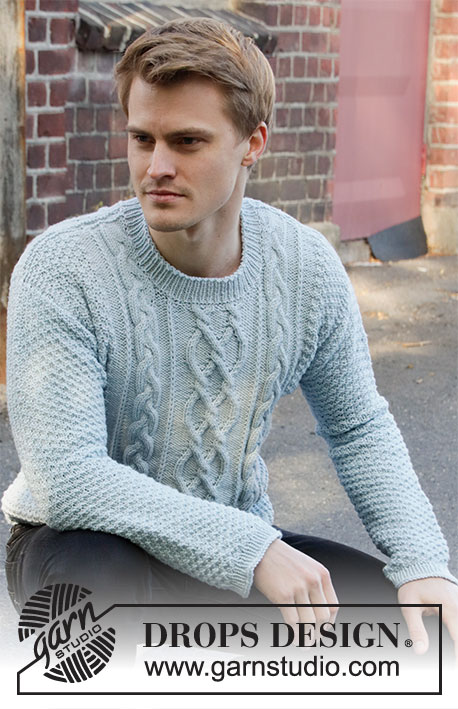
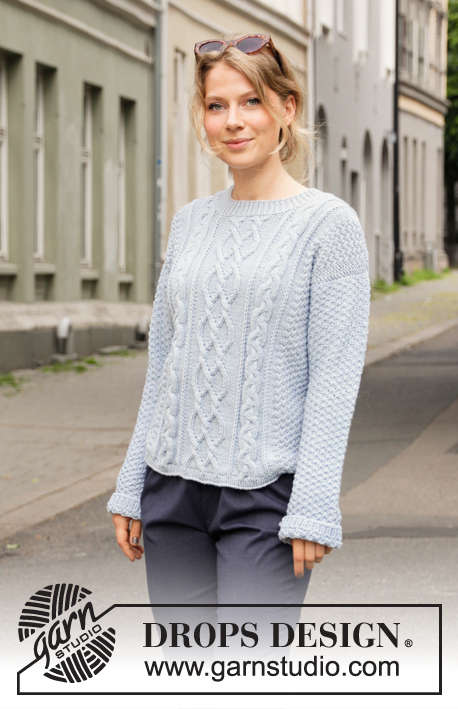
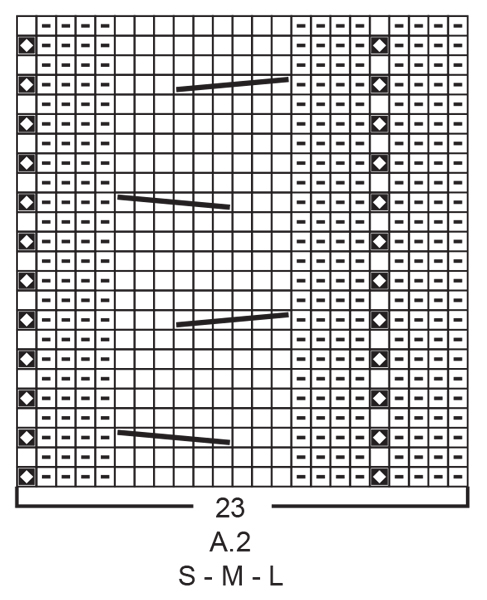
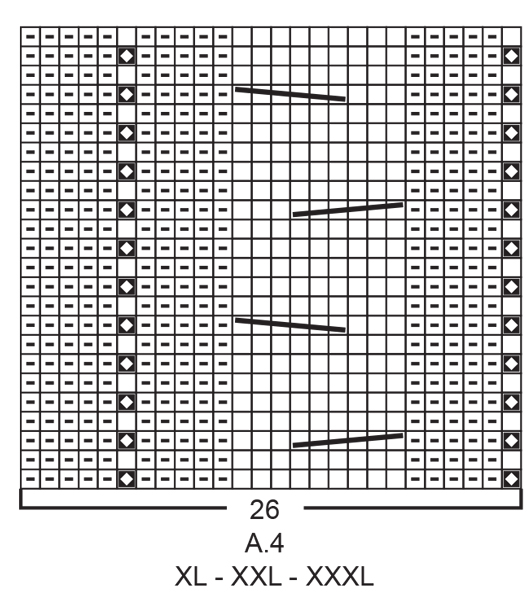
Knitted sweater with cables and double moss stitch. The piece is worked in DROPS Merino Extra Fine. Sizes S – XXXL.

DROPS 205-7
DROPS Design: Pattern no me-181
Yarn group B
-------------------------------------------------------

SIZES:
S - M - L - XL - XXL – XXXL

Finished measurements:
Chest measurements: 92-100-108-116-124-140 cm = 36¼"-39⅜"-42½"-45¾"-48¾"-55"
Full length: 56-58-60-62-64-66 cm = 22"-22¾"-23⅝"-24⅜"-25¼"-26"


MATERIALS:
DROPS MERINO EXTRA FINE from Garnstudio (belongs to yarn group B)
650-700-800-850-950-1050 g color 39, ice blue

KNITTING GAUGE:
20 stitches in width and 26 rows in height with stockinette stitch = 10 x 10 cm = 4" x 4".
20 stitches in width and 34 rows in height with double moss stitch = 10 x 10 cm = 4" x 4"
A.2 to A.4 (together 74-74-74-82-82-82 stitches) measure approx. 29-29-29-33-33-33 cm = 11⅜"-11⅜"-11⅜"-13"-13"-13" in width.

NEEDLES:
DROPS DOUBLE POINTED NEEDLES SIZE 4.5 MM = US 7.
DROPS CIRCULAR NEEDLE SIZE 4.5 MM = US 7: Length 40 cm = 16" and 80 cm = 32" for cables and double moss stitch.
DROPS DOUBLE POINTED NEEDLES SIZE 3.5 MM = US 4.
DROPS CIRCULAR NEEDLE SIZE 3.5 MM = US 4: Length 40 cm = 16" and 80 cm = 32" for rib.
DROPS CABLE NEEDLE – for cables.
Needle size is only a guide. If you get too many stitches on 10 cm = 4", change to a larger needle size. If you get too few stitches on 10 cm = 4", change to a smaller needle size.

-------------------------------------------------------

Alternative Yarn – See how to change yarns here
Yarn Groups A to F – Use the same pattern and change the yarn here
Yarn usage using an alternative yarn – Use our yarn converter here

-------------------------------------------------------

DROPS Merino Extra Fine
100% Wool
from 4.55 $ /50g
Get the yarn to make this pattern from 59.15$.

The yarn cost is calculated from the pattern’s smallest size and the yarn’s cheapest product type. Looking for an even better price? You might find it on the DROPS Deals!

Pattern instructions

NOTE: This pattern is written in American English. All measurements in charts are in cm. For conversion from inches to cm - click here. There are different terms for crocheting in American and British English. If this pattern includes crochet, click for "crochet terms" here. For this pattern in British English, please click here.
-------------------------------------------------------

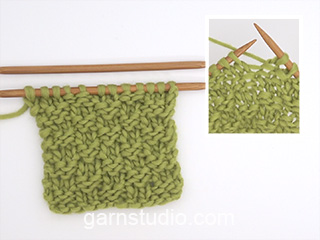
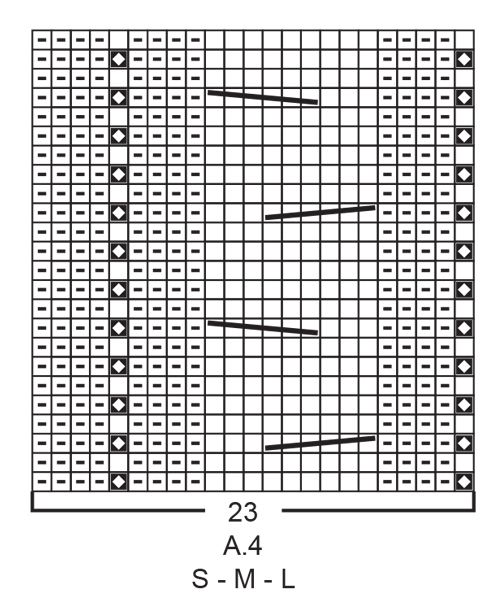
EXPLANATIONS FOR THE PATTERN:

-------------------------------------------------------

RIDGE/GARTER STITCH (worked back and forth):
Knit all rows.
1 ridge in height = Knit 2 rows.

PATTERN:
See diagrams A.1 to A.5. Choose diagram for your size (applies to A.2, A.3 and A.4). The diagrams show all rows in the pattern seen from the right side.

KNITTING TIP:
In this pattern you knit up stitches along the armholes and the sleeves are worked top down. This is to control the sleeve-length. If you would like to work the sleeves separately and sew them in afterwards, this can be done by casting on the same number of stitches as are knitted up along the armholes and then follow the instructions in the text. To sew in the sleeves place the sleeve under the garter stitch edge along the armholes so the edge is visible – sew in the outermost stitch along the garter stitch edge.

DECREASE TIP-1 (evenly spaced):
To work out how to decrease evenly, count the total number of stitches on needle (e.g. 44 stitches) and divide by number of decreases to be made (e.g. 10) = 4.4. All decreases are worked from the right side!
In this example decrease by knitting together alternately each 3rd and 4th stitch and each 4th and 5th stitch.

DECREASE TIP-2 (for mid under sleeve):
Decrease 1 stitch before the marker thread as follows: Work until there are 2 stitches left before the marker thread, knit 2 together if this stitch should be a knit stitch or purl 2 together if this stitch should be a purl stitch.
Decrease 1 stitch after the marker thread as follows: Knit 2 twisted if this stitch should be a knit stitch or purl 2 twisted together if this stitch should be a purl stitch.

-------------------------------------------------------

START THE PIECE HERE:

-------------------------------------------------------

SWEATER – SHORT OVERVIEW OF THE PIECE:
The front and back pieces are worked back and forth with circular needle, bottom up. The shoulder seams are sewn together, then stitches are knitted up around the armholes for the sleeves – read KNITTING TIP! The sleeves are worked back and forth with circular needle until the sleeve cap is finished, then the sleeve is continued in the round with short circular needle/double pointed needles to finished length. The bottom of the armhole is sewn together and finally the neck is worked.

BACK PIECE:
Cast on 108-116-124-132-140-156 stitches with circular needle size 3.5 mm = US 4 and Merino Extra Fine. Purl 1 row (= wrong side). The next row is worked as follows from the right side: 1 edge stitch in GARTER STITCH – read description above, * knit 1, purl 1 *, work from *-* until there is 1 stitch left on the row and finish with 1 edge stitch in garter stitch. Continue this rib for 2 cm = ¾" but adjust so the last row is worked from the right side.
Purl 1 row from the wrong side with 1 edge stitch in garter stitch in each side. Change to circular needle size 4.5 mm = US 7.
Now start the pattern by working the next row from the right side as follows: 1 edge stitch in garter stitch, work A.1 over the next 16-20-24-24-28-36 stitches (= 4-5-6-6-7-9 repeats of 4 stitches), work A.2 (= 23-23-23-26-26-26 stitches), A.3 (= 28-28-28-30-30-30 stitches), A.4 (= 23-23-23-26-26-26 stitches), A.5 over the next 16-20-24-24-28-36 stitches (= 4-5-6-6-7-9 repeats of 4 stitches), and finish with 1 edge stitch in garter stitch. Continue this pattern. REMEMBER THE KNITTING GAUGE!
When the piece measures 37-38-39-40-41-42 cm = 14½"-15"-15¼"-15¾"-16⅛"-16½" bind off 1-3-5-7-9-13 stitches at the beginning of the next 2 rows for the armholes = 106-110-114-118-122-130 stitches. Continue the pattern as before but now with 4 edge stitches in garter stitch on each side towards the armholes.
When the piece measures 54-56-58-60-62-64 cm = 21¼"-22"-22¾"-23⅝"-24⅜"-25¼", decrease 10 stitches evenly over the middle 44-44-44-48-48-48 stitches on the row – read DECREASE TIP-1 = 96-100-104-108-112-120 stitches left. On the next row (wrong side), bind off the middle 36-36-38-38-40-40 stitches for the neck and each shoulder is finished separately. Continue the pattern and bind off 1 stitch on the next row from the neck = 29-31-32-34-35-39 stitches left on shoulder. Continue working until the piece measures 55-57-59-61-63-65 cm = 21⅝"-22½"-23¼"-24"-24¾"-24¾"-25½". Knit 1 row from the right side and knit 1 row from the wrong side. Loosely bind off with knit from the right side. Work the other shoulder in the same way. The back piece measures approx. 56-58-60-62-64-66 cm = 22"-22¾"-23⅝"-24⅜"-25¼"-26" from the shoulder down.

FRONT PIECE:
Cast on 108-116-124-132-140-156 stitches with circular needle size 3.5 mm = US 4 and Merino Extra Fine. Purl 1 row (= wrong side). The next row is worked as follows from the right side: 1 edge stitch in GARTER STITCH – read description above, * knit 1, purl 1 *, work from *-* until there is 1 stitch left on the row and finish with 1 edge stitch in garter stitch. Continue this rib for 2 cm = ¾" but adjust so the last row is worked from the right side.
Purl 1 row from the wrong side with 1 edge stitch in garter stitch on each side. Change to circular needle size 4.5 mm = US 7.
Now start the pattern by working the next row from the right side as follows: 1 edge stitch in garter stitch, work A.1 over the next 16-20-24-24-28-36 stitches (= 4-5-6-6-7-9 repeats of 4 stitches), A.2 (= 23-23-23-26-26-26 stitches), A.3 (= 28-28-28-30-30-30 stitches), A.4 (= 23-23-23-26-26-26 stitches), A.5 over the next 16-20-24-24-28-36 stitches (= 4-5-6-6-7-9 repeats of 4 stitches) and finish with 1 edge stitch in garter stitch. Continue this pattern.
When the piece measures 37-38-39-40-41-42 cm = 14½"-15"-15¼"-15¾"-16⅛"-16½", bind off 1-3-5-7-9-13 stitches at the beginning of the next 2 rows for the armholes = 106-110-114-118-122-130 stitches. Continue the pattern as before but now with 4 edge stitches in garter stitch on each side towards the armholes.
When the piece measures 47-49-51-52-54-56 cm = 18½"-19¼"-20"-20½"-21¼"-22", decrease 10 stitches evenly over the middle 44-44-44-48-48-48 stitches on the row = 96-100-104-108-112-120 stitches left. On the next row (wrong side) place the middle 20-20-22-22-22-22 stitches on 1 thread for the neck and each shoulder is finished separately. Continue the pattern and bind off at the beginning of each row from the neck as follows: Bind off 2 stitches 3 times and then 1 stitch 3-3-3-3-4-4 times = 29-31-32-34-35-39 stitches left on the shoulder. Continue working until the piece measures 55-57-59-61-63-65 cm = 21⅝"-22½"-23¼"-24"-24¾"-24¾"-25½". Knit 1 row from the right side and knit 1 row from the wrong side. Loosely bind off with knit from the right side. Work the other shoulder in the same way.

ASSEMBLY:
Sew the shoulder seams inside the bind-off edge.

SLEEVE:
Knit up stitches along the armhole on the front and back pieces. Start in the corner of the armhole on the one side of the piece where stitches were bind off for the armhole and knit up from the right side 76-80-84-88-92-96 stitches inside the 1 edge stitch in garter stitch with circular needle size 4.5 mm = US 7 and Merino Extra Fine (do not knit up stitches along the bottom of the armhole) – read KNITTING TIP!
Work A.1 back and forth with 1 edge stitch in garter stitch on each side. When the sleeve measures 1-2-3-4-5-7 cm = ⅜"-¾"-1⅛"-1½"-2"-2¾" from where stitches were knitted up insert 1 marker on the row; this marker shows where the sleeve will be sewn to the bottom of the armhole and the sleeve is now measured from this marker!
Continue by working the sleeve in the round. Change to short circular needle or double pointed needles size 4.5 mm = US 7. Insert 1 marker thread at the beginning of the round and allow it to follow your work onwards; it will be used when decreasing mid under the sleeve.
Continue A.1 in the round over all stitches (= 19-20-21-22-23-24 repeats of 4 stitches). When the sleeve measures 3-2-3-2-3-2 cm = 1⅛"-¾"-1⅛"-¾"-1⅛"-¾" from the marker decrease 2 stitches mid under sleeve – read DECREASE TIP-2. Decrease like this every 3-3-2½-2½-2-2 cm = 1⅛"-1⅛"-1"-1"-¾"-¾" a total of 15-16-17-18-19-20 times = 46-48-50-52-54-56 stitches.
Continue working until the sleeve measures 49-48-47-46-45-42 cm = 19¼"-19"-18½"-18"-17¾"-16½" from the marker (there is approx. 2 cm = ¾" left to finished length; you can try the sweater on and work to desired length).
Change to double pointed needles size 3.5 mm = US 4 and work rib (= knit 1 / purl 1) for 2 cm = ¾". Loosely bind off with knit. The sleeve measures approx. 52-52-52-52-52-51 cm = 20½"-20½"-20½"-20½"-20½"-20" from where stitches were knitted up. Work the other sleeve in the same way.

ASSEMBLY:
Sew the side seams – sew in the outermost loop of the outermost stitch so the seam is flat. Sew the sleeve to the bottom of the armhole from the marker to the corner on each side.

NECK:
Knit up from the right side with short circular needle size 3.5 mm = US 4 approx. 80 to 94 stitches around the neck (including the stitches on the thread in front).
Purl 1 round. Knit 1 round where you increase evenly to 90-92-94-96-100-102 stitches. Then work rib in the round (= knit 1 / purl 1) for approx. 3 cm = 1⅛". Bind off with knit over knit and purl over purl.

This pattern has been corrected.

Updated online: 27.01.2023
The ribbing edge at the bottom of back and front piece has been edited into: 1 edge stitch in GARTER STITCH – read description above, * knit 1, purl 1 *, work from *-* until there is 1 stitch left on the row, finish with 1 edge stitch in garter stitch.

Diagram

All measurements in charts are in cm.

symbols = knit from right side. purl from wrong side
symbols = purl from right side, knit from wrong side
symbols = knit 1 in stitch under the next stitch
symbols = place 2 stitches on cable needle in front of piece, purl 1 and knit 2 from cable needle
symbols = place 1 stitch on cable needle behind piece, knit 2 and purl 1 from cable needle
symbols = place 2 stitches on cable needle in front of piece, knit 2 and knit 2 from cable needle
symbols = place 3 stitches on cable needle in front of piece, knit 3 and knit 3 from cable needle
symbols = place 3 stitches on cable needle behind piece, knit 3 and knit 3 from cable needle
diagram
diagram
diagram
diagram
diagram
diagram
diagram

Each of our patterns has specific tutorial videos to help you.

Do you have a question? See a list of frequently asked questions (FAQ)

Knitting tension is what determines the final measurements of your work, and is usually measured per 10 x 10 cm. It is provided like so: number of stitches in width x number of rows in height - eg: 19 stitches x 26 rows = 10 x 10 cm.

The knitting tension is very individual; some people knit/crochet loosely while others work tightly. You adjust the knitting tension with the needle size, which is why the suggested needle size only serve as a guide! You need to adjust this (up or down) to ensure that YOUR knitting tension matches the knitting tension provided in the pattern. If you work with a different knitting tension than provided you will have a different yarn consumption, and your work will have different measurements than what the pattern suggests.

The knitting tension also determines which yarns can replace each other. As long as you achieve the same knitting tension you can replace one yarn with another.

See DROPS lesson: How to measure your tension/gauge

See DROPS video: How to make a gauge tension swatch

The required amount of yarn is provided in grams, eg: 450 g. To calculate how many balls you’ll need you first need to know how many grams are in 1 ball (25g, 50g or 100g). This information is available if you click on the individual yarn quality on our pages. Divide the amount required with the amount of each ball. For example, if each ball is 50g (the most common amount), the calculation will be as follows: 450 / 50 = 9 balls.

The important thing when changing from one yarn to another is that the knitting/crochet tension remains the same. This is so that the measurements of the finished piece will be the same as on the sketch provided. It is easier to achieve the same knitting tension using yarns from the same yarn group. It is also possible to work with multiple strands of a thinner yarn to achieve the knitting tension of a thicker one. Please try our yarn converter. We recommend you to always work a test swatch.

Please NOTE: when changing yarn the garment might have a different look and feel to the garment in the photo, due to individual properties and qualities of each yarn.

See DROPS lesson: Can I use a different yarn than the one mentioned in the pattern?

All our yarns are categorised into yarn groups (from A to F) according to thickness and knitting tension – group A contains the thinnest yarns and group F the thickest. This makes it easier for you to find alternative yarns to our patterns, should you wish to switch yarn. All yarns within the same group have a similar knitting tension and can easily replace each other. However, different yarn qualities have different structures and properties which will give the finished work a unique look and feel.

Click here for an overview of the yarns in each yarn group

At the top of all our patterns you’ll find a link to our yarn converter, which is a helpful tool should you wish to use a different yarn than suggested. By filling in the yarn quality you wish to replace, the amount (in your size) and number of strands, the converter will present good alternative yarns with the same knitting tension. Additionally it will tell you how much you’ll require in the new qualities and whether you’ll need to work with multiple strands. Most skeins are 50g (some are 25g or 100g).

If the pattern is worked with multiple colours, every colour will have to be converted separately. Similarly, if the pattern is worked with several strands of different yarns (for example 1 strand Alpaca and 1 strand Kid-Silk) you will have to find alternatives for each, individually.

Click here to see our yarn converter

Since different yarns have different qualities and textures we have chosen to keep the original yarn in our patterns. However, you can easily find options among our available qualities by using our yarn converter, or simply pick a yarn from the same yarn group.

It is possible that some retailers still have discontinued yarns in stock, or that someone has a few skeins at home that they would like to find patterns for.

The yarn converter will provide both alternative yarn as well as required amount in the new quality.

If you think it's hard to decide what size to make, it can be a good idea to measure a garment you own already and like the size of. Then you can pick the size by comparing those measures with the ones available in the pattern's size chart.

You'll find the size chart at the bottom of the pattern.

See DROPS lesson: How to read size chart

The needle size provided in the pattern serves only as a guide, the important thing is to follow the knitting tension. And since knitting tension is very individual, you will have to adjust the needle size to ensure that YOUR tension is the same as in the pattern – maybe you’ll have to adjust 1, or even 2 needle sizes, up or down to achieve the correct tension. For this, we recommend that you work test swatches.

Should you work with a different knitting tension than the one provided, the measurements of the finished garment might deviate from the measurement sketch.

See DROPS lesson: How to measure your tension/gauge

See DROPS video: How to make a gauge tension swatch

Working a garment top-down provides more flexibility and room for personal adjustment. For example it is easier to try the garment on while working, as well as making adjustments to length of yoke and shoulder caps.

The instructions are carefully explaining every step, in the correct order. Diagrams are adjusted to the knitting direction and are worked as usual.

The diagram depicts all rows/rounds, and every stitch seen from the right side. It is read from bottom to top, from right to left. 1 square = 1 stitch.

When working back and forth, every other row is worked from the right side and every other row is worked from the wrong side. When working from the wrong side, the diagram will have to be worked reversed: from left to right, knit stitches are purled, purl stitches are knit etc.

When working in the round every round is worked from the right side and the diagram are worked from right to left on all rounds.

See DROPS lesson: How to read knitting diagrams

The diagram depicts all rows/rounds, and every stitch seen from the right side. It is worked from bottom to top, from right to left.

When working back and forth every other row is worked from the right side: from right to left and every other row is worked from the wrong side: from left to right.

When working in the round, every row in the diagram are worked from the right side, from right to left.

When working a circular diagram you start in the middle and work your way outwards, counter clockwise, row by row.

The rows usually start with a given number of chain stitches (equivalent to the height of the following stitch), this will either be depicted in the diagram or explained in the pattern.

See DROPS lesson: How to read crochet diagrams

Instructions for working several diagrams after each other on the same row/round, will often be written like so: “work A.1, A.2, A.3 a total of 0-0-2-3-4 times". This means you work A.1 once, then A.2 is worked once, and A.3 is repeated (in width) the number of times provided for your size – in this case like so: S = 0 times, M = 0 times, L=2 times, XL= 3 times and XXL = 4 times.

The diagrams are worked as usual: begin with the first row in A.1, then work the first row in A.2 etc.

See DROPS lesson: How to read knitting diagrams

See DROPS lesson: How to read crochet diagrams

The total width of the garment (from wrist-to-wrist) will be larger in the larger sizes, despite the actual sleeves being shorter. The larger sizes have longer sleeve caps and wider shoulders, so there will be a good fit in all sizes.

The measurement sketch/schematic drawing provides information regarding the full length of the garment. If it’s a jumper or a jacket the length is measured from the highest point on the shoulder (usually closest to the neckline), and straight down to the bottom of the garment. It is NOT measured from the tip of shoulder. Similarly, the length of yoke is measured from the highest point on the shoulder and down to where yoke is split into body and sleeves.

See DROPS lesson: How to read a schematic drawing

Diagrams are often repeated on the round or in height. 1 repeat is the diagram the way it appears in the pattern. If it says to work 5 repeats of A.1 in the round, then you work A.1 a total of 5 times after/next to each other in the round. If it says to work 2 repeats of A.1 vertically/in height you work the entire diagram once, then begin again at the start and work the entire diagram one more time.

Chain stitches are slightly narrower than other stitches and to avoid working the cast-on edge too tight, we simply chain more stitches to begin with. The stitch count will be adjusted on the following row to fit the pattern and measurement sketch.

The rib edge is more elastic and will contract slightly compared to, for example, stocking stitch. By increasing before the rib edge, you avoid a visible difference in width between the rib edge and the rest of the body.

It’s very easy to cast off too tightly, and by making yarn overs while casting off (and simultaneously casting these off) you avoid a too tight cast off edge.

See DROPS video: How to bind off with yarn overs (yo)

To achieve an even increase (or decrease) you can increase on, for example: every 3rd and 4th row alternately, like so: work 2 rows and increase on the 3rd row, work 3 rows and increase on the 4th. Repeat this until the increase is complete.

See DROPS lesson: Increase or decrease 1 st on every 3rd and 4th row alternately

Should you prefer to work in the round instead of back and forth, you may of course adjust the pattern. You’ll need to add steeks mid-front (usually 5 stitches), and follow the instructions. When you would normally turn and work from the wrong side, simply work across the steek and continue in the round. At the end you’ll cut the piece open, pick up stitches to work bands, and cover the cut edges.

See DROPS video: How to knit steeks and cut open

Should you prefer to work back and forth instead of in the round, you may of course adjust the pattern so you work the pieces separately and then assemble them at the end. Divide the stitches for the body in 2, add 1 edge stitch in each side (for sewing) and work the front and back pieces separately.

See DROPS lesson: Can I adapt a pattern for circular needles into straight needles?

Pattern repeats can vary slightly in the different sizes, in order to get the correct proportions. If you’re not working the exact same size as the garment in the photo, yours might deviate slightly. This has been carefully developed and adjusted so that the complete impression of the garment is the same in all sizes.

Make sure to follow instructions and diagrams for your size!

If you have found a pattern you like which is available in women’s size it’s not very difficult to convert it to men’s size. The biggest difference will be the length of sleeves and body. Start working on the women size that you think would fit across the chest. The additional length will be worked right before you cast off for the armhole/sleeve cap. If the pattern is worked top-down you can add the length right after the armhole or before the first decrease on sleeve.

Regarding additional yarn amount, this will depend on how much length you add, but it is better with a skein too many than too few.

All yarns will have excess fibres (from production) that might come off as lint or shedding. Brushed yarns (ie hairier yarns) have more of these loose, excess fibres, causing more shedding.

Shedding also depends on what is worn under or over the garment, and whether this pulls at the yarn fibres. It’s therefore not possible to guarantee that there will be no shedding

Below are some tips on how to get the best result when working with hairier yarns:

1. When the garment is finished (before you wash it) shake it vigorously so the looser hairs come off. NOTE: do NOT use a lint roller, brush or any method that pulls at the yarn.

2. Place the garment in a plastic bag and put it in your freezer - the temperature will cause the fibres to become less attached to each other, and excess fibres will come off easier.

3. Leave in the freezer for a few hours before taking it out and shaking it again.

4. Wash the garment according to the instructions on the yarn label.

Pilling is a natural process that happens to even the most exclusive of fibers. It's a natural sign of wear and tear that is hard to avoid, and that is most visible in high friction areas of your garment like a sweater's arms and cuffs.

You can make your garment look as new by removing the pilling, using a fabric comb or a pill/lint remover.

Still can't find the answer you need? Then scroll down and leave your question so one of our experts can try to help you. This will be done normally within 5 to 10 working days.
In the meantime, you can read the questions and answers that others have left to this pattern or join the DROPS Workshop on Facebook to get help from fellow knitters/crocheters!

You might also like...

Winter Delight in DROPS Muskat

Ida Pauline Buran, Norway

Winter Delight Muskat

Giovanna, Italy

Post a comment to pattern DROPS 205-7

We would love to hear what you have to say about this pattern!

If you want to leave a question, please make sure you select the correct category in the form below, to speed up the answering process. Required fields are marked *.

Comments / Questions (30)

country flag Murielle wrote:

Qu'entendez vous par ne pas relever les mailles me long du bas de l'emmanchure

20.11.2020 - 19:08

DROPS Design answered:

Bonjour Murielle, quand vous avez tricoté le dos et le devant, vous avez rabattu pour les emmanchures de chaque côté 1-3-5-7-9-13 mailles. Lorsque vous relevez les mailles des manches, commencez à les relever juste après ces mailles rabattues et arrêtez juste avant. La partie de la manche tricotée en allers et retours sera assemblée ensuite aux 1-3-5-7-9-13 mailles rabattues des emmanchures sur le dos/le devant. Bon tricot!

23.11.2020 - 08:01

country flag Åshild Hellesund wrote:

Oppskrift 205-7 mangler mønster A.1 og A.5

02.09.2020 - 19:38

DROPS Design answered:

Hej Åshild. Du hittar de längst ner, till höger om måttskissen. Mvh DROPS Design

03.09.2020 - 08:07

country flag Sar wrote:

Hei, er det mulig å strikke glattstrikk på hele bakstykket istedenfor mønster med samme garnmengde som er oppgitt til oppskriften? Eller trengs det mer garn ?

11.04.2020 - 13:21

DROPS Design answered:

Hei Sar. Du kan strikke bakstykket i glattstrikk, men bakstykket vil da bli større enn forstykket. Mønstret på fremstykket trekker seg sammen, det vil også bli en forskjell på ryggen og ermene. Det vil ikke gå mer garn. mvh DROPS design

17.04.2020 - 15:11

country flag Bertrand Annie wrote:

Comment je fais pour relever les mailles Leblanc de l emmanchée un rang sur deux ce qui serai plus joli et je n ai pas assez de mailles ou tous les rangs ce qui me parai difficile et j en ai trop Merci je tricitte ce pull avec une laine pas utilisée trouvé e dans les placards car c est le pull du confinement sante a vous et merci

09.04.2020 - 14:36

DROPS Design answered:

Bonjour Mme Bertrand, cette vidéo montre comment relever des mailles le long d'un côté comme celui des emmanchures. On relève habituellement 3 mailles tous les 4 rangs, mais vous pourrez toujours ajuster au 1er rang de la manche en diminuant/augmentant à intervalles réguliers pour avoir le bon nombre ensuite. Bon tricot!

09.04.2020 - 17:58

country flag Giovanna wrote:

Ciao, come posso diminuire le maglie centrali cercando di non rovinare il disegno? Grazie

16.02.2020 - 19:20

DROPS Design answered:

Buongiorno Giovanna. Potrebbe scegliere la distanza che le piace dopo aver incrociato le maglie per la treccia, p.es 1 o 2 ferri dopo l'intreccio. Buon lavoro!

17.02.2020 - 11:08

country flag Marja wrote:

Volgens de uitleg van het PATROON laat het telpatroon alle naalden aan de goede kant zien. Dat klopt niet: het patroon laat de goede ÉN de verkeerde kant zien. Op deze manier ziet het patroon een stuk langer uit.

02.02.2020 - 13:25

country flag Margit wrote:

Ich würde sehr gerne diesen Pullover stricken. Allerdings kann ich das Diagramm A1 nicht finden.

28.12.2019 - 12:29

DROPS Design answered:

Liebe Margit. A.1 liegt direkt unter Arm (siehe das Diagramm) Viel Spaß beim stricken!

29.12.2019 - 00:01

country flag Valerie wrote:

In the pattern diagram ledger for diamond shape it instructs “knit 1 in stitch under the next stitch” I have not come across this knitting term below value a description of what I am meant to be doing?

26.12.2019 - 18:14

DROPS Design answered:

Dear Valerie, you might recognise the term "knitting below" better, which means that when you knit the stitch instead of putting the needle in the next stitch, you put it in the stitch that sits directly below the next stitch and knit that one, so when you take it off it will form a stitch that looks much like when you knit a stitch and a yarnover togethe, without having to knit a row of stitches and yos. This technique is used in fisherman's ribbing as well. Happy Knitting!

27.12.2019 - 10:05

country flag Elke Linssen wrote:

Laut Anleitung wird das Zopfmuster kraus rechts gestrickt. Ist das wirklich richtig? Irgendwie zweifel ich daran.

31.10.2019 - 17:46

DROPS Design answered:

Liebe Frau Linssen, die Zöpfe werden glatt rechts gestrickt; bei den Hinreihen stricken Sie die Maschen rechts und bei den Rückreihen stricken Sie diesen Maschen links - hier lesen Sie mehr über Diagramme. Viel Spaß beim stricken!

04.11.2019 - 14:17

country flag Priscilla Walker wrote:

Under PATTERN it states - See diagrams A.1 to A.5 You also state within the pattern work A.1 over the next 16-20-24-24-28-36 stitches (= 4-5-6-6-7-9 repeats of 4 stitches). Where / what is A.1. and A.5? I would love to knit this but need to know before I start that I have all the correct information. Thank you. Cilla

19.10.2019 - 11:53

DROPS Design answered:

Dear Mrs Walker, you will find A.1 + A.5 under the sleeve of the measurement chart, they are small diagrams worked over 4 stitches and 4 rows. Happy knitting!

21.10.2019 - 09:25