
Popular categories
Looking for a yarn?


|
|||||||||||||||||||||||||
Winter Delight Jacket |
|||||||||||||||||||||||||
 |
 |
||||||||||||||||||||||||
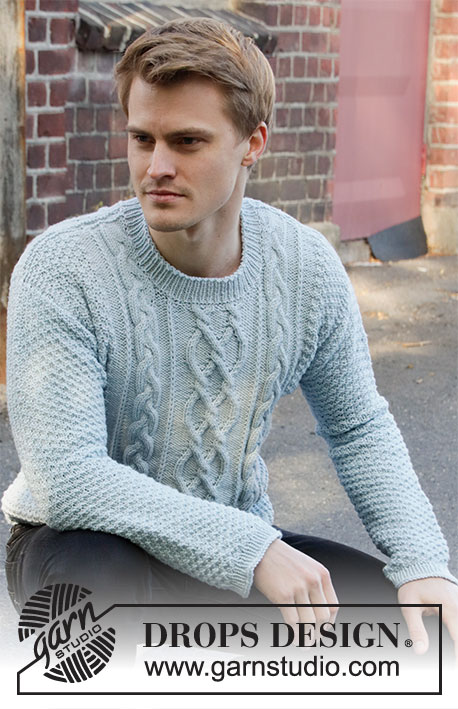
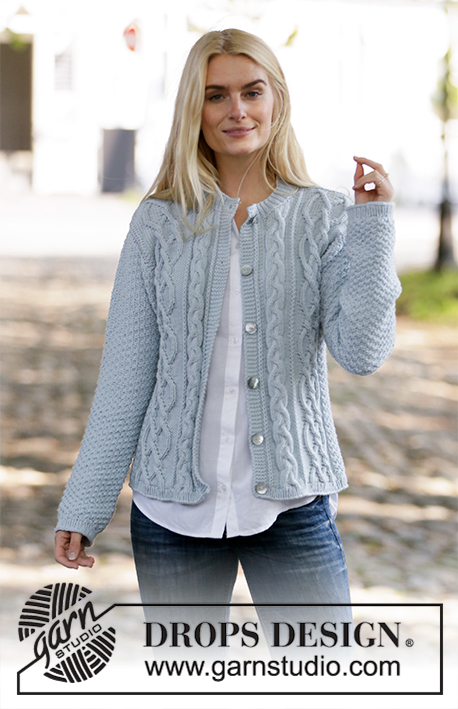
Knitted jacket with cables and double moss stitch. The piece is worked in DROPS Merino Extra Fine. Sizes S – XXXL.
DROPS 205-6 |
|||||||||||||||||||||||||
|
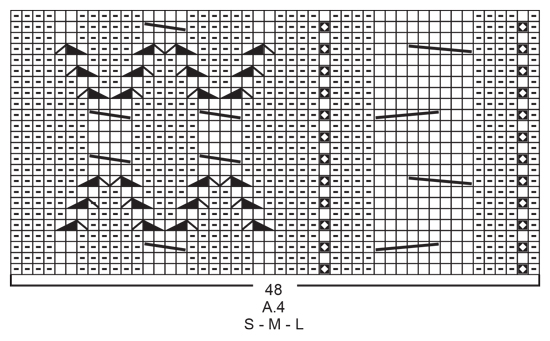
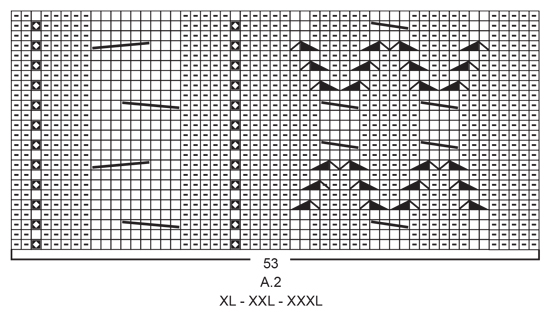
------------------------------------------------------- EXPLANATIONS FOR THE PATTERN: ------------------------------------------------------- RIDGE/GARTER STITCH (worked back and forth): Knit all rows. 1 ridge in height = Knit 2 rows. PATTERN: See diagrams A.1 to A.5. Choose diagram for your size (applies to A.2 and A.4). The diagrams show all rows in the pattern seen from the right side. KNITTING TIP: In this pattern you knit up stitches along the armholes and the sleeves are worked top down. This is to control the sleeve-length. If you would like to work the sleeves separately and sew them in afterwards, this can be done by casting on the same number of stitches as are knitted up along the armholes and then following the instructions in the text. To sew in the sleeves place the sleeve under the garter stitch edge along the armholes so the edge is visible – sew in the outermost stitch along the garter stitch edge). DECREASE TIP (for mid under sleeve): Decrease 1 stitch before the marker thread as follows: Work until there are 2 stitches left before the marker thread, knit 2 together if this stitch should be a knit stitch or purl 2 together if this stitch should be a purl stitch. Decrease 1 stitch after the marker thread as follows: Knit 2 twisted if this stitch should be a knit stitch or purl 2 twisted together if this stitch should be a purl stitch. BUTTONHOLES: Work buttonholes on right band (when garment is worn). 1 BUTTONHOLE = Start from the right side and knit together the second and third stitch from the edge and make 1 yarn over. On the next row (wrong side) knit the yarn over to leave a hole. Work buttonholes when the piece measures: S: 2, 11, 21, 30 and 40 cm M: 2, 12, 22, 32 and 42 cm L: 2, 10, 19, 27, 36 and 44 cm XL: 2, 11, 20, 29, 38 and 46 cm XXL: 2, 11, 20, 29, 38 and 47 cm XXXL: 2, 12, 21, 31, 40 and 49 cm NOTE: The last buttonhole is worked on the neck. ------------------------------------------------------- START THE PIECE HERE: ------------------------------------------------------- JACKET – SHORT OVERVIEW FOR THE PIECE: Front and back pieces are worked back and forth with circular needle, bottom up. The shoulder seams are sewn together then stitches are knitted up around the armholes for the sleeves – read KNITTING TIP! The sleeves are worked back and forth with circular needle until the sleeve cap is finished, then the sleeve is continued in the round, top down with short circular needle/double pointed needles to finished length. The bottom of the armhole is then sewn up and the neck worked to finish. BACK PIECE: Cast on 119-127-135-145-153-169 stitches with circular needle size 3.5 mm and Merino Extra Fine. Purl 1 row (= wrong side). The next row is worked as follows from the right side: 1 edge stitch in GARTER STITCH – read description above, * knit 1, purl 1 *, work from *-* until there are 2 stitches left on the row, knit 1 and finish with 1 edge stitch in garter stitch. Continue this rib for 2 cm but adjust so the last row has been worked from the right side. Purl 1 row from the wrong side with 1 edge stitch in garter stitch in each side. Change to circular needle size 4.5 mm. Now start the pattern by working the next row from the right side as follows: 1 edge stitch in garter stitch, work A.1 over the next 8-12-16-16-20-28 stitches (= 2-3-4-4-5-7 repeats of 4 stitches), work A.2 (= 48-48-48-53-53-53 stitches), A.3 (= 5 stitches), A.4 (= 48-48-48-53-53-53 stitches), A.5 over the next 8-12-16-16-20-28 stitches (2-3-4-4-5-7 repeats of 4 stitches) and finish with 1 edge stitch in garter stitch. Continue this pattern. REMEMBER THE KNITTING TENSION! When the piece measures 37-38-39-40-41-42 cm cast off 5-7-7-7-7-7 stitches at the beginning of the next 2 rows for the armholes = 109-113-121-131-139-155 stitches. Continue the pattern as before but now with 4 edge stitches in garter stitch on each side towards the armholes. When the piece measures 54-56-58-60-62-64 cm decrease 12 stitches evenly over the middle 43-43-43-48-48-48 stitches on the row = 97-101-109-119-127-143 stitches left. On the next row cast off the middle 29-29-31-31-33-33 stitches for the neck and each shoulder is finished separately. Continue the pattern and cast off 1 stitch on the next row from the neck = 33-35-38-43-46-54 stitches left on shoulder. Continue working until the piece measures 55-57-59-61-63-65 cm. Knit 1 row from the right side where you decrease 4 stitches evenly spaced over the cable on the shoulder = 29-31-34-39-42-50 stitches. Knit 1 row from the wrong side. Loosely cast off with knit from the right side. Work the other shoulder in the same way. The back piece measures approx. 56-58-60-62-64-66 cm from the shoulder down. RIGHT FRONT PIECE (when the garment is worn): Cast on 62-66-70-75-79-87 stitches (including 5 band stitches towards mid front) with circular needle size 3.5 mm and Merino Extra Fine. Purl 1 row (= wrong side). The next row is worked as follows from the right side (i.e. from mid front): 5 band stitches in garter stitch, * knit 1, purl 1 *, work from *-* until there is 1 stitch left on the row and finish with 1 edge stitch in garter stitch. Continue this rib for 2 cm but adjust so that the last row is worked from the right side – remember BUTTONHOLES on the band – read description above. Purl 1 row from the wrong side with 1 edge stitch in garter stitch on the side and 5 band stitches in garter stitch towards mid front. Change to circular needle size 4.5 mm. Now start the pattern, working the next row from the right side as follows: 5 band stitches in garter stitch, work A.4 (= 48-48-48-53-53-53 stitches), A.5 over the next 8-12-16-16-20-28 stitches (= 2-3-4-4-5-7 repeats of 4 stitches) and finish with 1 edge stitch in garter stitch towards the side. Continue this pattern. When the piece measures 37-38-39-40-41-42 cm cast off 5-7-7-7-7-7 stitches for the armhole at the beginning of the row from the wrong side = 57-59-63-68-72-80 stitches. Continue this pattern but now with 4 edge stitches in garter stitch towards the armhole. When the piece measures 48-50-52-53-55-57 cm decrease from the right side 6 stitches evenly spaced over the first 18 stitches in A.4 = 51-53-57-62-66-74 stitches left. On the next row place the outermost 9-9-9-9-10-10 stitches towards mid front on 1 strand for the neck (without working them). Continue this pattern and cast off for the neck at the beginning of each row from neck as follows: Cast off 2 stitches 3 times in all sizes and then 1 stitch 3-3-4-4-4-4 times = 33-35-38-43-46-54 stitches left on the shoulder. Continue working until the piece measures 55-57-59-61-63-65 cm. Knit 1 row from the right side where you decrease 4 stitches evenly over the cable on the shoulder = 29-31-34-39-42-50 stitches. Knit 1 row from the wrong side then cast off loosely with knit from the right side. The front piece measures approx. 56-58-60-62-64-66 cm from the shoulder down. LEFT FRONT PIECE (when the garment is worn): Cast on 62-66-70-75-79-87 stitches (including 5 band stitches towards mid front) with circular needle size 3.5 mm and Merino Extra Fine. Purl 1 row (= wrong side). The next row is worked as follows from the right side (i.e. from the side): 1 edge stitch in garter stitch, * purl 1, knit 1 *, work from *-* until there are 5 stitches left on the row and finish with 5 band stitches in garter stitch towards mid front. Continue this rib for approx. 2 cm but adjust so the last row worked is from the right side. Purl 1 row from the wrong side with 5 band stitches in garter stitch towards mid front and 1 edge stitch in garter stitch towards the side. Change to circular needle size 4.5 mm. Now start the pattern by working the next row from the right side as follows: 1 edge stitch in garter stitch, work A.1 over the next 8-12-16-16-20-28 stitches (= 2-3-4-4-5-7 repeats of 4 stitches), A.2 (= 48-48-48-53-53-53 stitches) and finish with 5 band stitches in garter stitch towards mid front. Continue this pattern. When the piece measures 37-38-39-40-41-42 cm cast off 5-7-7-7-7-7 stitches for the armhole at the beginning of the next row from the right side = 57-59-63-68-72-80 stitches. Continue the pattern as before with 4 edge stitches in garter stitch towards the armhole. When the piece measures 48-50-52-53-55-57 cm decrease 6 stitches evenly spaced over the last 18 stitches in A.2 = 51-53-57-62-66-74 stitches left. On the next row place the outermost 9-9-9-9-10-10 stitches towards mid front on 1 thread for the neck, but to avoid cutting the strand work the stitches before placing them on the thread. Continue the pattern and cast off for the neck at the beginning of each row from the neck as follows: Cast off 2 stitches 3 times in all sizes and then 1 stitch 3-3-4-4-4-4 times = 33-35-38-43-46-54 stitches left on the shoulder. Continue working until the piece measures 55-57-59-61-63-65 cm. Knit 1 row from the right side where you decrease 4 stitches evenly spaced over the cable on the shoulder = 29-31-34-39-42-50 stitches. Knit 1 row from the wrong side. Loosely cast off with knit from the right side. ASSEMBLY: Sew the shoulder seams inside the cast-off edge. SLEEVE: Knit up stitches along the armhole on the front and back pieces. Start in the corner of the armhole on the one side of the piece where stitches were cast off for the armhole and knit up from the right side 76-80-84-88-92-96 stitches inside the 1 edge stitch in garter stitch with circular needle size 4.5 mm and Merino Extra Fine (do not knit up stitches along the bottom of the armhole) – read KNITTING TIP! Work A.1 back and forth with 1 edge stitch in garter stitch on each side. When the sleeve measures 3-4-4-4-4-4 cm from where stitches were knitted up insert 1 marker on the row; this marker shows where the sleeve will be sewn to the bottom of the armhole and the sleeve is now measured from this marker! Continue by working the sleeve in the round. Change to short circular needle or double pointed needles size 4.5 mm. Insert 1 marker thread at the beginning of the round and allow it to follow your work onwards; it will be used when decreasing mid under the sleeve. Continue A.1 in the round over all stitches. When the sleeve measures 2-3-2-3-3-2 cm from the marker decrease 2 stitches mid under sleeve – read DECREASE TIP-2. Decrease like this every 3-2½-2½-2-2-1½ cm a total of 15-16-17-18-19-20 times = 46-48-50-52-54-56 stitches. Continue working until the sleeve measures 47-46-45-43-42-39 cm from the marker (there is approx. 2 cm left to finished length; you can try the jacket on and work to desired length). NOTE: Shorter measurements in larger sizes due to wider shoulders and longer sleeve cap. Change to double pointed needles size 3.5 mm and work rib (= knit 1 / purl 1) for 2 cm but adjust so that on first round of rib you knit over knit and purl over purl. Loosely cast off with knit. The sleeve measures approx. 52-52-51-49-48-45 cm from where stitches were knitted up. Work the other sleeve in the same way. ASSEMBLY: Sew the side seams – sew in the outermost loop of the outermost stitch so the seam is flat. Sew the sleeve to the bottom of the armhole from the marker to the corner on each side. NECK: Knit up from the right side with circular needle 3.5 mm approx. 90 to 100 stitches around the neck (including the stitches on the threads in front). Knit 1 row from the wrong side. Knit 1 row from the right side where you increase the number of stitches evenly to 99-101-103-105-109-111 stitches (the number of stitches should be divisible by 2 + 1). The next row is worked as follows from the wrong side: S, M and L: 5 band stitches in garter stitch, knit 1, purl 1 *, work from *-* until there are 6 stitches left on the row, knit 1 and finish with 5 band stitches in garter stitch. XL, XXL and XXXL: 5 band stitches in garter stitch, knit 2, * purl 1, knit 1 *, work from *-* until there are 8 stitches left on the row, purl 1, knit 2 and finish with 5 band stitches in garter stitch. Continue this rib but after 1 cm work the last buttonhole over the other buttonholes on the right band. Cast off with garter stitch over garter stitch, knit over knit and purl over purl when the neck measures 3 cm. ASSEMBLY: Sew buttons onto the left band. |
|||||||||||||||||||||||||
Diagram explanations |
|||||||||||||||||||||||||
|
|||||||||||||||||||||||||

|
|||||||||||||||||||||||||
|
|||||||||||||||||||||||||

|
|||||||||||||||||||||||||
|
|||||||||||||||||||||||||

|
|||||||||||||||||||||||||

|
|||||||||||||||||||||||||
|
Have you made this or any other of our designs? Tag your pictures in social media with #dropsdesign so we can see them! Do you need help with this pattern?You'll find tutorial videos, a Comments/Questions area and more by visiting the pattern on garnstudio.com. © 1982-2024 DROPS Design A/S. We reserve all rights. This document, including all its sub-sections, has copyrights. Read more about what you can do with our patterns at the bottom of each pattern on our site. |
|||||||||||||||||||||||||


With over 40 years in knitting and crochet design, DROPS Design offers one of the most extensive collections of free patterns on the internet - translated to 17 languages. As of today we count 304 catalogues and 11422 patterns - 11422 of which are translated into English (UK/cm).
We work hard to bring you the best knitting and crochet have to offer, inspiration and advice as well as great quality yarns at incredible prices! Would you like to use our patterns for other than personal use? You can read what you are allowed to do in the Copyright text at the bottom of all our patterns. Happy crafting!
Comments / Questions (26)
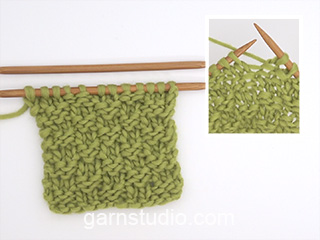
Bonjour\r\nDans le diagramme comment on tricote une maille endroit en piquant sous la maille suivante svp\r\nMerci
09.06.2023 - 06:37DROPS Design answered:
Bonjour Mme Cousin, dans cette vidéo, nous montrons comment tricoter une maille en piquant sous la maille du rang précédent, on appelle parfois cette maille "une maille double". Bon tricot!
09.06.2023 - 09:39Bonjour je ne comprends pas les diminutions de l’encolure du dos pouvez-vous m’aider Merci
12.03.2023 - 15:43DROPS Design answered:
Bonjour Mme Chassagne, pour l'encolure du devant droit, tricotez le début du rang comme avant, mais en même temps, diminuez 6 mailles dans les 18 premières mailles de A.4 et tricotez les mailles restantes comme avant, au rang suivant sur l'envers, mettez les 9-10 dernières mailles (côté encolure) en attente sur un fil et continuez le point fantaisie comme avant, en même temps, rabattez au début de chaque rang à partir de l'encolure 3 x 2 m et 3ou 4 fois 1 m. Avant de rabattre les mailles de l'épaule, vous devrez de nouveau diminuer des mailles dans les torsades. Diminuer ainsi permet de bien conserver la bonne largeur sans déformation. Bon tricot!
13.03.2023 - 10:03Grüezi. Ich stricke die Jacke in xxxl. Ich weiss nicht was mit den Diagrammen A2 und A4 gemeint ist. Sie sind seitenverkehrt. Muss ich eins auswählen? Vielen Dank für ihre Antwort. Esther
10.02.2022 - 20:16DROPS Design answered:
Liebe Frau Duss, die Diagramme stricken Sie wie bei der schriftlichen Anleitung erklärt, dh beim Rückenteil stricken Sie: 1 Rand-M, A.1 über 28 M, A.2, A.3, A.4, A.5 über 28 M, 1 Randmasche. Beim rechten Vorderteil stricken Sie dann A.4 innerhalb die BlendeMaschen und beim linken Vorderteil stricken Sie A.2 auch innderhalb die Blende Maschen. Kann das Ihnen helfen? Hier lesen Sie auch mehr über Diagramme. Viel Spaß beim stricken!
11.02.2022 - 09:17Vielen Dank, ich das ist ja eh schon am Ende des Zopfes habe ich grad desehen 😊 dann macht es Sinn.
27.11.2021 - 13:47Hallo liebes Drops Team, Ich bin jetzt beim rechten Vorderteil und verstehe nicht wie man im Muster A4 Maschen abnehmen kann, das verändert ja dann das ganze Zopfmuster. Könnt Ihr mir das bitte erklären? Vielen Dank und liebe Grüsse, Anita
19.11.2021 - 20:15DROPS Design answered:
Liebe Anita, meinen Sie die Abnahmen nach 48-50-52-53-55-57 cm ? Hier sollen Sie einfach die ersten 18 M in A.4 stricken und gleichzeitig 6 Maschen regelmäßig verteilt abnehmen - diese Maschen können Sie mit 2 re zs in den großen Zopf abnehmen, so wird die Arbeit die richtige breite behalten. Viel Spaß beim stricken!
22.11.2021 - 07:19Ik heb dit vest al eerder gebreid maar wil het nog een keer breien, nu met Soft Tweed. Als ik achterpand en voorpanden in een keer wil breien tot de armsgaten i.p.v. alle onderdelen apart, hoef ik dan alleen de kantsteken weg te laten, of kom ik dan niet uit met het telpatroon?
07.11.2021 - 11:11DROPS Design answered:
Dag Anna,
Je kunt dan inderdaad kantsteken weglaten en heen en weer breien van midden voor naar midden voor.
11.11.2021 - 07:46Eestikeelses tõlkes on juhendites vist viga? Vasaku hõlma esimese kahandamise juures on mainitud pahempoolset rida. Tobe viga, aga jõudsin pärast seda ühe mustrikorra kududa, enne kui aru sain. Esimese kampsuni asi.
16.06.2021 - 20:01DROPS Design answered:
Tere Krista! Käeaugu jaoks kootakse maha rea alguses, ehk paremal hõlmal tuleb seda siis teha töö pahempoolse rea alguses. Vasakul hõlmal töö parempoolse rea alguses. Et käeaugud jääks külgedele. Seljaosal kootakse käeaugud maha algul töö parempoolse rea alguses ja teisel küljel siis töö pahempoolse rea alguses. Head kudumist!
27.06.2021 - 18:16Hi there, I have just finished knitting this jacket. It was very interesting to knit, and is lovely. Fits perfectly, knit up exactly to the pattern and will be a warm, comfy wear for winter months. Now looking for my next project to build my skills. I l also love your wool, and have used it for both my own items and to knit for my husband. Kind regards, Pat
13.06.2021 - 18:25Bonjour, Je ne trouve pas de tutoriel pour le modèle DROPS/205/6 winter delight jacket pour les manches. Merci de bien vouloir me guider
02.06.2021 - 17:29DROPS Design answered:
Bonjour Mme Leval, les explications des manches se trouvent après le premier paragraphe ASSEMBLAGE juste après le devant gauche, et avant le 2ème ASSEMBLAGE, juste avant le col. Bon tricot!
03.06.2021 - 08:11Bonjour, Je ne comprends pas cela : A.1 au-dessus des 8-12-16-16-20-28 mailles suivantes . Cela veut dire que l'on commence le schéma à la 8,,12,16... maille du diagramme ? ou que l'on commence au 8,12,16... rang du diagramme ? ou que l'on saute 8-12-16.. mailles avant de commencer le diagramme ? L'expression est curieuse .. au-dessus des mailles suivantes ...
02.06.2021 - 14:01DROPS Design answered:
Bonjour Geneviève, vous devez en fait tricoter ces 8-12-16-16-20-28 mailles suivantes en suivant A.1 - le diagramme A.1 se composant de 4 mailles, vous allez répéter 2-3-4-4-5-7 ces 4 mailles. Bon tricot!
02.06.2021 - 16:12