
Popular categories
Looking for a yarn?


|
|
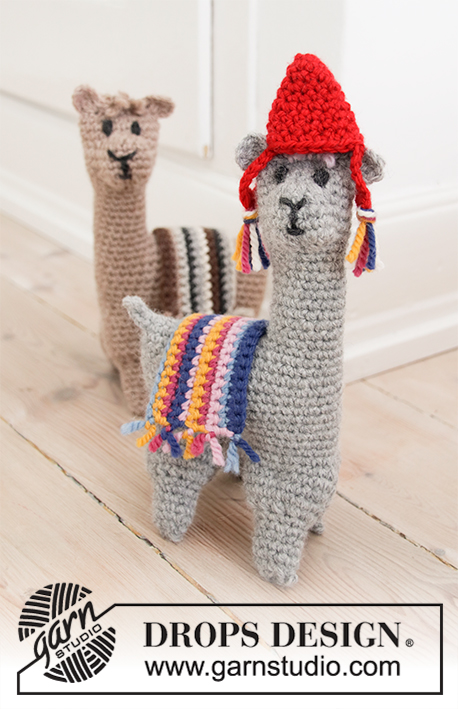
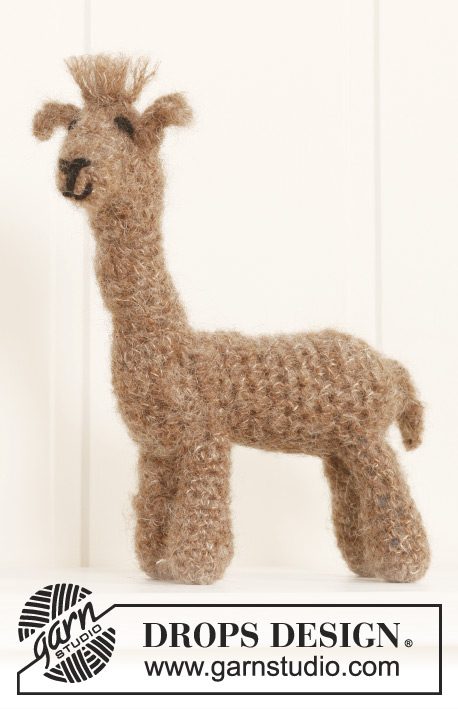
Here's Roger! |
|
 |
 |
Crocheted Alpaca or Lama in 2 strands DROPS Andes or Snow.
DROPS Children 35-11 |
|
|
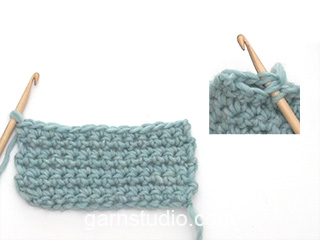
---------------------------------------------------------- EXPLANATION FOR THE PATTERN: ---------------------------------------------------------- CROCHET TIP-1: Work rounds without a transition (i.e. as a spiral). I.e.: Work in the round without stopping, there is a marker thread marking the rounds beginning and ending - do not work a slip stitch at the end of every round. Crochet together-1: Work 4 TREBLE CROCHETS TOGETHER to 1 treble crochet as follows: * Make 1 yarn over, insert hook in next stitch, get yarn, make 1 yarn over and pull yarn through the 2 first loops on hook *, repeat from *-* 3 more times, make 1 yarn over and pull yarn through all 5 loops on hook (= 3 treble crochets decreased). Crochet together-2: Work 2 DOUBLE CROCHETS together into 1 double crochet as follows: Insert hook in next stitch, get yarn *, repeat from *-* one more time, make a yarn over and pull yarn through all 3 loops on hook = 1 double crochet decreased. ---------------------------------------------------------- START THE PIECE HERE: ---------------------------------------------------------- ALPACA - SHORT OVERVIEW OF THE PIECE: Work entire piece in double yarn. Piece is worked in the round from top of head and down, then cast on for body and work downwards to the legs. Then fill the alpaca with some cotton wool and sew together under stomach, then work top of head together, while working the ears. HEAD/BODY: Work 19 chain stitches on hook size 8 mm with 2 strands with the colour of alpaca. ROUND 1: Work this row into a ring by working 2 double crochets in first chain stitch, then work 1 double crochet in every chain stitch = 20 double crochets on round. Insert a marker at beginning of round. Work in a spiral - read CROCHET TIP-1 in explanation above. ROUND 2: Work 1 double crochet in each stitch. ROUND 3: Work 1 double crochet in each of the first 3 stitches, 1 half treble crochet in next stitch, 2 treble crochets + 1 double treble crochet in next stitch, 1 double treble crochet and 2 treble crochets in next stitch, 1 half treble crochet in next stitch, then work 1 double crochet in each of the next 13 stitches - 4 stitches have been increased for nose = 24 stitches on round. ROUND 4 and 5: Work 1 double crochet in every stitch. REMEMBER THE CROCHET TENSION! ROUND 6: Work 1 double crochets in each of the first 4 stitches, work the next 4 stitches together into 1 stitch - read CROCHET TOGETHER-1 in explanation above, work the next 4 stitches together into 1 stitch - read CROCHET TOGETHER-1 in explanation above, then work 1 double crochets in each of the next 12 stitches - 6 stitches have been decreased for nose = 18 stitches on round. ROUND 7 to 18: Work 1 double crochet in each stitch (= neck). ROUND 19: Work 17 new chain stitches, turn piece and work back in these chain stitches as follows: In the 2nd stitch from hook work 2 double crochets, work 2 double crochets in each of the next 2 stitches ( =the tail) - 13 chain stitches remain. Work 1 double crochet in every chain stitch and then work 18 double crochets around the neck, then work double crochets towards the tail in same chain stitch row but on opposite side as follows: 1 double crochet in each of the 13 chain stitches towards the tail. Round now begins and ends under the tail, and there are 44 stitches around the body. ROUND 20: Lift the tail so that the body can be worked in the round, work 1 double crochet in each stitch. ROUND 21 to 32: Work 1 double crochet in each stitch = 13 rounds in total for body. Now work the legs of the alpaca, begin mid back. FIRST LEG = RIGHT BACK LEG. ROUND 1: Work 1 double crochet in each of the first 9 stitches, work 9 chain stitches. ROUND 2: Work 1 double crochet in the first of the 9 double crochets, this is now a circle, and continue piece in the round with 1 double crochet in each double crochet and 1 double crochet in each chain stitch = 18 stitches. Insert a marker at beginning of round. ROUND 3 to 4: Work 1 double crochet in each stitch. ROUND 5: Now work all stitches together 2 by 2 - read CROCHET TOGETHER-2 in explanation above = 9 double crochets on round. ROUND 6 to 12: Work 1 double crochet in each stitch. Cut the yarn. Fold the circle flat together and sew hole together so that leg is flat and wide in the same direction as body. SECOND LEG = RIGHT FRONT LEG: Skip 4 stitches (= mid under stomach). ROUND 1: Work 1 double crochet in each of the front 9 stitches on the right side of body, then work 9 chain stitches. ROUND 2: Work 1 double crochet in the first of the 9 double crochets, this is now a circle, and continue piece in the round with 1 double crochet in each double crochet and 1 double crochet in each chain stitch = 18 stitches. Insert a marker at beginning of round. ROUND 3 to 4: Work 1 double crochet in each stitch. ROUND 5: Now work all stitches together 2 by 2 - read CROCHET TOGETHER-2 in explanation above = 9 double crochets on round. ROUND 6 to 12: Work 1 double crochet in each stitch. Cut the yarn. Fold the circle flat together and sew hole together so that leg is flat and wide in the same direction as body. THIRD LEG = LEFT FRONT LEG: ROUND 1: Work 1 double crochet in each of the front 9 stitches on the left side of body, then work 9 chain stitches. ROUND 2: Work 1 double crochet in the first of the 9 double crochets, this is now a circle, and continue piece in the round with 1 double crochet in each double crochet and 1 double crochet in each chain stitch = 18 stitches. Insert a marker at beginning of round. ROUND 3 to 4: Work 1 double crochet in each stitch. ROUND 5: Now work all stitches together 2 by 2 - read CROCHET TOGETHER-2 in explanation above = 9 double crochets on round. ROUND 6 to 12: Work 1 double crochet in each stitch. Cut the yarn. Fold the circle flat together and sew hole together so that leg is flat and wide in the same direction as body. FOURTH LEG = LEFT BACK LEG: Skip 4 stitches (= mid under stomach). ROUND 1: Work 1 double crochet in each of the last 9 stitches at the back of body, then work 9 chain stitches. ROUND 2: Work 1 double crochet in the first of the 9 double crochets, this is now a circle, and continue piece in the round with 1 double crochet in each double crochet and 1 double crochet in each chain stitch = 18 stitches. Insert a marker at beginning of round. ROUND 3 to 4: Work 1 double crochet in each stitch. ROUND 5: Now work all stitches together 2 by 2 - read CROCHET TOGETHER-2 in explanation above = 9 double crochets on round. ROUND 6 to 12: Work 1 double crochet in each stitch. Cut the yarn. Fold the circle flat together and sew hole together so that leg is flat and wide in the same direction as body. ASSEMBLY: Sew the alpaca’s eyes, nose and mouth with a double dark grey strand - see picture for placement and shape. Then fill the alpaca with some cotton wool and sew body together mid under stomach. Fill the head with some cotton wool. Fold the hole at the top of head flat together with face at the front. Work the last row where head is worked together and one ear is worked at the beginning and end, as follows: Begin in the first stitch in the right side: In the same stitch work 4 chain stitches, 2 double treble crochets, 4 chain stitches, 1 slip stitch = 1 ear. Then work hole at the top of head together as follows: Work double crochet through both layers of the flat circle, 1 stitch in every stitch to and with next to last stitch. In last stitch work the other ear as follows: 4 chain stitches, 2 double treble crochets, 4 chain stitches, 1 slip stitch. Cut and fasten the yarn. Tie some hair at the top of head with double knots. BLANKET: Work blanket back and forth with 2 strands and double crochets - work every row in its own colour - leave approx. 10 cm thread for fringes in each end. Work 20 chain stitches with colour 1, * switch to next colour, turn piece, work 1 row double crochets with 1 stitch in every stitch, * Repeat from *-* until 10 rows have been worked. The blanket should with worked with even numbers so that knots in each end can be tied 2 and 2 for fringes. Cut fringes to a length of approx. 1 cm. HAT: Work hat with 2 strands in the round in a circle, top down - read CROCHET TIP-1. Work 4 chain stitches with 2 strands christmas red and form a ring with a slip stitch in first chain stitch. Work 1 chain stitch and 5 double crochets around chain stitch ring (= 6 stitches). Insert 1 marker at beginning of round and move the marker upwards. Continue to work as follows: Round 1: Work 2 double crochets in the first stitch, * work 1 double crochet in next stitch, work 2 double crochets in next stitch *, repeat from *-* the entire round = 9 double crochets. Round 2: Work 1 double crochet in each stitch on round. Round 3: * Work 2 double crochet in next stitch, work 1 double crochet in the next 2 stitches *, repeat from *-* the entire round = 12 double crochets. Round 4: Work as 2nd round. Round 5: * Work 2 double crochet in next stitch, work 1 double crochet in the next 2 stitches *, repeat from *-* the entire round = 16 double crochets. Round 6: Work as 2nd round. Work last round as follows: Work 1 double crochet in each of the first 4 stitches. Now work an ear flap as follows: Work 6 chain stitches, in the 3rd chain stitch work 1 half treble crochet + 1 treble crochet. Work 3 chain stitches. Continue to work 1 double crochet in each of the next 8 stitches, work the other ear flap as follows: Work 6 chain stitches, in the 3rd chain stitch work 1 half treble crochet + 1 treble crochet. Work 3 chain stitches and work 1 double crochet in each of the last 4 stitches. Fasten round with a slip stitch in the first double crochet on round, fasten off. Tassels: Use left-over yarn in different colours: Gather 6 strand of 15-20 cm in a bundle, and fasten them at the end of each ear flap. |
|
|
Have you made this or any other of our designs? Tag your pictures in social media with #dropsdesign so we can see them! Do you need help with this pattern?You'll find tutorial videos, a Comments/Questions area and more by visiting the pattern on garnstudio.com. © 1982-2024 DROPS Design A/S. We reserve all rights. This document, including all its sub-sections, has copyrights. Read more about what you can do with our patterns at the bottom of each pattern on our site. |
|


With over 40 years in knitting and crochet design, DROPS Design offers one of the most extensive collections of free patterns on the internet - translated to 17 languages. As of today we count 304 catalogues and 11422 patterns - 11422 of which are translated into English (UK/cm).
We work hard to bring you the best knitting and crochet have to offer, inspiration and advice as well as great quality yarns at incredible prices! Would you like to use our patterns for other than personal use? You can read what you are allowed to do in the Copyright text at the bottom of all our patterns. Happy crafting!
Comments / Questions (5)
Bij de instructies staat drops andes, dubbele draad en haaknaald 8. Maar het label van drops andes zegt haaknaald 9 (enkele draad). Kloppen de instructies wel? Wat is de juiste haaknaald en haren?
06.10.2020 - 16:41DROPS Design answered:
Dag Arianne,
Het kan inderdaad zo zijn dat de stekenverhouding in het patroon anders is dan wat op het label staat. In dit geval moet je met een dunnere haaknaald haken omdat het werk dan strakker wordt, wat een mooier resultaat geeft bij dit patroon. Het gaat erom dat de stekenverhouding uit het patroon klopt end dat je daar een juiste naalddikte bij zoekt. Maak dus altijd even een proeflapje en pas evt. de naalddikte aan.
10.10.2020 - 11:22Bonjour, je vous envoie un petit message car je me demande si il faut doubler la laine pour l\'échantillon ? Mon échantillon est très loin du compte et cela me met le doute. Merci beaucoup.
30.08.2020 - 11:32DROPS Design answered:
Bonjour Héléna, seule la couverture se crochète avec 2 fils Andes ou Eskimo, le lama se crochète avec 1 seul fil Andes ou Eskimo - plus d'infos sur l'échantillon ici. Bon crochet!
31.08.2020 - 10:30Ich bitte um Erlaubnis a) die Anleitung für die Gruppe Nadelspiel Krefeld-Linn mehrfach zu drucken b) die Produkte auf jedem Wege uz Gunsten des Krefelder Zoos zu verkaufen c) auf die Nennung der Quelle beim Tier zu verzichten d) jegliche Wolle zu nutzen e) drops in die Sponsor-Liste aufzunehmen (mit Quellenhinweis) Liebe Grüße, Kerstin
06.01.2020 - 15:16DROPS Design answered:
Liebe Frau Pauly, Solange dies nicht als kommerzielles Unternehmen geschieht, sondern eher als Wohltätigkeitslauf, in dem viele Menschen für wohltätige Zwecke häkeln, sollte es kein Problem geben.
07.01.2020 - 12:06Thanks very much for the pattern, but can you help with Row 19. When you say, 13 chain stitches remain - do you mean make another 13 chain stitches? If you just dc down the original 13 chain stitches after the tail , there are 31 stitches in total. Have I misunderstood 'then work double crochets towards the tail in same chain stitch row but on opposite side as follows'. Could you try explaining another way? Thanks very much :-)
28.09.2019 - 19:55DROPS Design answered:
Dear Nicki, at the end of row 19, there are 13 chains left from the 19 chains you cast on at the beginning of this row. Work then 1 dc in each of these 13 chains, 1 dc in each of the 18 stitches from the neck (= row 18) + 1dc in each of the 13 chains from the beg of the row (work now in the opposite side of these chains) = 44 sts for the body. The rounds now start under tail. Happy crocheting!
30.09.2019 - 10:21Hvordan skal benene syes sammen? De 4 masker under maven lukker jo ikke det hele af. Mvh Helle
10.07.2019 - 15:57DROPS Design answered:
Hei Helle. Benene sys sammen på samme måte som magen. Du kan sy en sammenhengde søm langs hele undersiden av alpakaen. God fornøyelse
12.07.2019 - 08:36