
Popular categories
Looking for a yarn?


|
|
Big Dolly |
|
 |
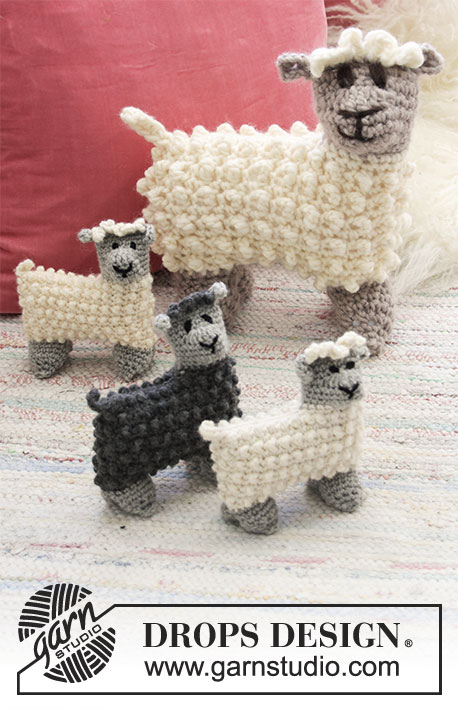 |
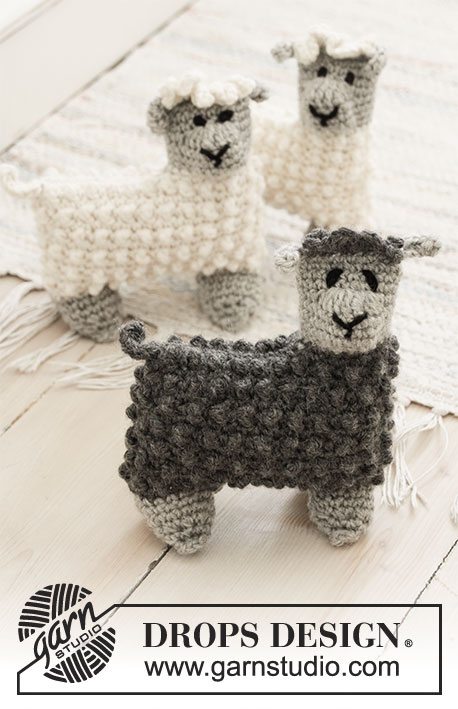
Crocheted sheep in DROPS Snow or 2 strands DROPS Big Merino.
DROPS Children 35-8 |
|
|
---------------------------------------------------------- EXPLANATION FOR THE PATTERN: ---------------------------------------------------------- CROCHET TIP-1: Work rounds without a transition (i.e. as a spiral). I.e.: Work in the round without stopping, and there is a marker thread marking the rounds beginning and ending - do not work a slip stitch at the end of every round. CROCHET TIP-2: It is important that the double crochet between the double treble crochets on body is worked tight, so that the double treble crochet becomes a bobble. If you want larger bobbles work a triple treble crochet instead of double treble crochets. Crochet together-1: Work 4 TREBLE CROCHETS TOGETHER to 1 treble crochet as follows: * Make 1 yarn over, insert hook in next stitch, get yarn, make 1 yarn over and pull yarn through the 2 first loops on hook *, repeat from *-* 3 more times, make 1 yarn over and pull yarn through all 5 loops on hook (= 3 treble crochets decreased). Crochet together-2: Work 2 DOUBLE CROCHETS together into 1 double crochet as follows: *Insert hook in next stitch, get yarn *, repeat from *-* one more time, make 1 yarn over and pull yarn through all 3 loops on hook = 1 double crochet decreased. ---------------------------------------------------------- START THE PIECE HERE: ---------------------------------------------------------- SHEEP - SHORT OVERVIEW OF THE PIECE: If the sheep is worked in Snow, work it with 1 strand on hook size 8 mm, and if the sheep is worked in Big Merino, work it with 2 strands on hook size 8 mm. Piece is worked in the round from top of head and down, then cast on for body and work downwards to the legs. Fill the sheep with some cotton-wool and sew together under stomach. Work top of head together, at the same time work the ears. HEAD/BODY: Work 19 chain stitches on hook size 8 mm with light grey. ROUND 1: Work this row into a ring by working 2 double crochets in first chain stitch, then work 1 double crochet in every chain stitch = 20 double crochets on round. Insert a marker at beginning of round - read CROCHET TIP-1 in explanation above. ROUND 2: Work 1 double crochet in each stitch. ROUND 3: Work 1 double crochet in each of the first 3 stitches, 1 half treble crochet in next stitch, 2 treble crochets and 1 double treble crochet in next stitch, 1 double treble crochet and 2 treble crochets in next stitch, 1 half treble crochet in next stitch, then work 1 double crochet in each of the next 13 stitches - 4 stitches have been increased for nose = 24 stitches on round. ROUND 4 and 5: Work 1 double crochet in every stitch. REMEMBER THE CROCHET TENSION! ROUND 6: Work 1 double crochet in the first 4 stitches, work the next 4 stitches together into 1 stitch - read CROCHET TOGETHER-1 in explanation above, work the next 4 stitches together into 1 stitch - read CROCHET TOGETHER-1 in explanation above. Then work 1 double crochet in each of the next 12 stitches - 6 stitches have been decreased for nose = 18 stitches on round. ROUND 7: Work 1 double crochet in each stitch. Cut the yarn and switch to off white (colour on body). ROUND 8: Work 1 double crochet in each stitch. ROUND 9: Work 17 new chain stitches, turn piece and work back in these chain stitches as follows: In the 2nd stitch from hook work 2 half treble crochets, work 2 half treble crochets, in each of the next 2 stitches, (= the tail) - 13 chain stitches remain. Work 1 double crochet in each chain stitch, then work 18 double crochets around the neck. Then work double crochet towards the tail in same chain stitch row, but on opposite side, as follows: 1 double crochet in each of the 13 chain stitches towards the tail. Now begin and end round under the tail, and there are 44 stitches around the body. ROUND 10: Lift the tail so that the body can be worked in the round. Begin to work 1 double crochet in first stitch and then 1 double treble crochet in next stitch, read CROCHET TIP-2 in explanation above. Repeat these 2 stitches around the entire body. ROUND 11: Work 1 double crochet in each stitch. Repeat ROUND 10 and 11 until body measures approx. 12 cm - make sure to finish with ROUND 11. Cut the yarn and switch light grey. Now work the legs of the sheep, begin mid back. FIRST LEG = RIGHT BACK LEG. ROUND 1: Work 7 double crochets, work 7 chain stitches. ROUND 2: Work 1 double crochet in the first of the 7 double crochets, this is now a circle, and continue piece in the round with 1 double crochet in every double crochet and 1 double crochet in each chain stitch = 14 stitches. Insert a marker at beginning of round. ROUND 3 to 4: Work 1 double crochet in each stitch. ROUND 5: Now work all stitches together 2 by 2 - read CROCHET TOGETHER-2 in explanation above = 7 double crochets on round. ROUND 6 and 7: Work 1 double crochet in each stitch. Cut the yarn. Fold the circle flat together and sew hole together so that leg is flat and wide in the same direction as body. SECOND LEG = RIGHT FRONT LEG: Skip 8 stitches (= mid under stomach). ROUND 1: Work 7 double crochets in the front 7 stitches on the right side of body, and then work 7 chain stitches. ROUND 2: Work 1 double crochet in the first of the 7 double crochets, this is now a circle, and continue piece in the round with 1 double crochet in every double crochet and 1 double crochet in each chain stitch = 14 stitches. Insert a marker at beginning of round. ROUND 3 to 4: Work 1 double crochet in each stitch. ROUND 5: Now work all stitches together 2 by 2 - read CROCHET TOGETHER-2 in explanation above = 7 double crochets on round. ROUND 6 and 7: Work 1 double crochet in each stitch. Cut the yarn. Fold the circle flat together and sew hole together so that leg is flat and wide in the same direction as body. THIRD LEG = LEFT FRONT LEG: ROUND 1: Work 7 double crochets in the front 7 stitches on the left side of body, and then work 7 chain stitches. ROUND 2: Work 1 double crochet in the first of the 7 double crochets, this is now a circle, and continue piece in the round with 1 double crochet in every double crochet and 1 double crochet in each chain stitch = 14 stitches. Insert a marker at beginning of round. ROUND 3 to 4: Work 1 double crochet in each stitch. ROUND 5: Now work all stitches together 2 by 2 - read CROCHET TOGETHER-2 in explanation above = 7 double crochets on round. ROUND 6 and 7: Work 1 double crochet in each stitch. Cut the yarn. Fold the circle flat together and sew hole together so that leg is flat and wide in the same direction as body. FOURTH LEG = LEFT BACK LEG: Skip 8 stitches (= mid under stomach). ROUND 1: Work 7 double crochets in the last 7 stitches at the back on the left side of body, and then work 7 chain stitches. ROUND 2: Work 1 double crochet in the first of the 7 double crochets, this is now a circle, and continue piece in the round with 1 double crochet in every double crochet and 1 double crochet in each chain stitch = 14 stitches. Insert a marker at beginning of round. ROUND 3 to 4: Work 1 double crochet in each stitch. ROUND 5: Now work all stitches together 2 by 2 - read CROCHET TOGETHER-2 in explanation above = 7 double crochets on round. ROUND 6 and 7: Work 1 double crochet in each stitch. Cut the yarn. Fold the circle flat together and sew hole together so that leg is flat and wide in the same direction as body. ASSEMBLY: Sew the sheep’s eyes, nose and mouth with a dark grey strand - see picture for placement and shape. Then fill the sheep with some cotton wool and sew body together mid under stomach. Fold the hole at the top of head flat together with face at the front. Work a last row with light grey where head is worked together and work one ear at the beginning and end as follows: In the first stitch in the right side work as follows: 4 chain stitches, 2 double treble crochets, 4 chain stitches, 1 slip stitch = 1 ear. Then work hole at the top of head together as follows: Work double crochet through both layers of the flat circle, 1 stitch in every stitch to and with next to last stitch. In last stitch work the other ear as follows: 4 chain stitches, 2 double treble crochets, 4 chain stitches, 1 slip stitch. Cut and fasten the yarn. HAIR: Now work hair at the top of head with off white as follows: In first stitch after first ear work: 1 slip stitch, * 4 chain stitches, 1 double treble crochet, 4 chain stitches and then 1 double crochet in next stitch *, repeat *-* along the top of the head. Finish by replacing last double crochet with 1 slip stitch in same stitch as last double treble crochet. Cut and fasten the yarn. |
|
|
Have you made this or any other of our designs? Tag your pictures in social media with #dropsdesign so we can see them! Do you need help with this pattern?You'll find tutorial videos, a Comments/Questions area and more by visiting the pattern on garnstudio.com. © 1982-2024 DROPS Design A/S. We reserve all rights. This document, including all its sub-sections, has copyrights. Read more about what you can do with our patterns at the bottom of each pattern on our site. |
|


With over 40 years in knitting and crochet design, DROPS Design offers one of the most extensive collections of free patterns on the internet - translated to 17 languages. As of today we count 304 catalogues and 11422 patterns - 11422 of which are translated into English (UK/cm).
We work hard to bring you the best knitting and crochet have to offer, inspiration and advice as well as great quality yarns at incredible prices! Would you like to use our patterns for other than personal use? You can read what you are allowed to do in the Copyright text at the bottom of all our patterns. Happy crafting!
Comments / Questions (4)
Den här raden i varv 6 på huvud och kropp är väldigt lätt att missförstå "Virka 4 fastmaskor i varje maska". Man kan tro att det ska vara 4m i samma maska. Borde stå 4 fastmaskor, en i varsin m. Gäller även längre fram i varvet där det står 12 m i varje.
11.01.2023 - 19:33Hej, jag har virkat t.o.m varv 9 på Huvud/Kropp men har sen fastnat då jag inte förstår hur varv 10 virkas runt. Maskorna förstår jag men inte hur man kommer runt efter varv 9. Skulle uppskatta en kort video eller en förklaring. Tack på förhand.
17.09.2021 - 17:05DROPS Design answered:
Hej Kristina. Jag är inte helt säker på att jag förstår vad du menar, men varvet börjar och slutar nu under svansen så det är där du startar och virkar sedan som det står runt kroppen. Kanske någon av våra virk-videor kan vara till hjälp? Vi har dessvärre ingen på just detta mönster men det kan hända att en till ett annat mönster kan vara till hjälp. Mvh DROPS Design
22.09.2021 - 09:30This pattern is not typical of any other amigurumi I've ever done. Every other leg has been started with a magic circle and attached later or crocheted as part of the body. Please tell, are the legs supposed to be closed at the top too? And then the body is one long closed seam while the legs dangle with left and right right next to each other? This is really confusing and I'd appreciate some help. Diagrams, under these odd circumstance would've been helpful. Interesting concept though.
27.11.2020 - 11:15DROPS Design answered:
Dear Rhonda, legs are worked from the stitches on the bottom of body and are sewn flat (they should be flat and wide in the same direction as body) - then after 4 legs have been worked, sew the sem flat on the bottom of body (the remaining sts unworked between legs). Happy crocheting!
30.11.2020 - 07:32Ich verstehe überhaupt nicht, wie der Körper gehäkelt werden soll.... Ab Runde 9!? Ich habe nun einen Kopf (oben offen) mit einer Luftmaschenschnur daran, an deren Ende ein Schwanz ist!? Dann "2.RUNDE: 1 feste Masche die erste der 7 festen Maschen, es ist nun eine Runde entstanden, 1 feste Masche in jede feste Masche und 1 feste Masche in jede Luftmasche rundum häkeln = 14 Maschen." Wie kommt man auf 14? Und was genau ist nun die Runde? Danke schonmal!
12.01.2020 - 23:18DROPS Design answered:
Liebe Frau Berit, es war etwas nicht richtig bei der 9. Runde, es wurde jetzt korrigiert, schauen Sie mal ob es Ihnen klarer ist. Viel Spaß beim häkeln!
14.01.2020 - 09:25