
Popular categories
Looking for a yarn?


|
|
Lake Autumn |
|
 |
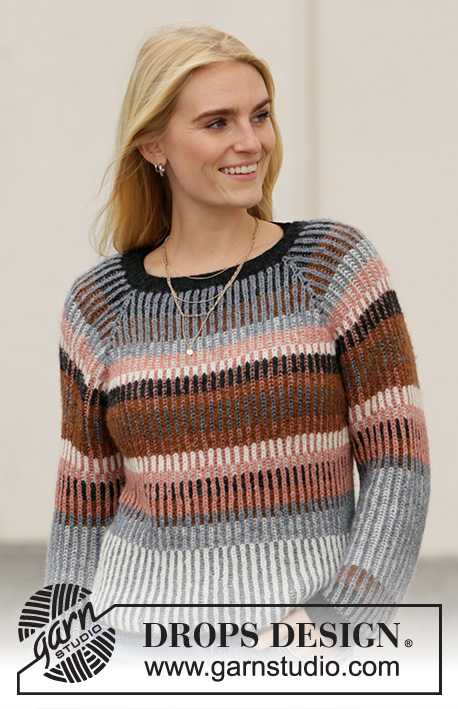 |
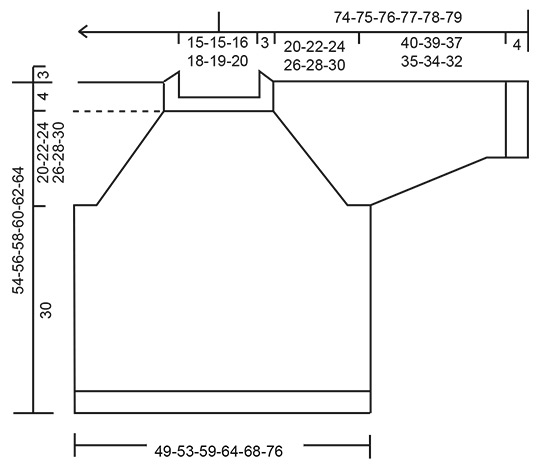
Knitted jumper with raglan in DROPS Sky. Piece is knitted top down with English rib and stripes in 2 colours. Size: S - XXXL
DROPS 206-2 |
|
|
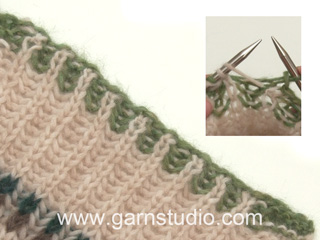
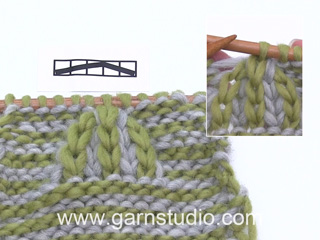
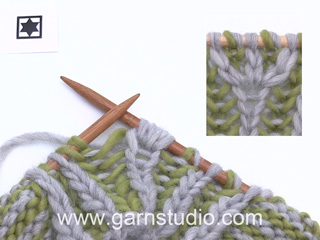
---------------------------------------------------------- EXPLANATION FOR THE PATTERN: ---------------------------------------------------------- INCREASE TIP (evenly): To calculate how to increase evenly, use the total number of stitches on row (e.g. 124 stitches) and divide stitches by number of increases to be done (e.g. 4) = 31. In this example increase by making 1 yarn over after every 31st stitch. On next round work yarn overs twisted to avoid holes. ENGLISH RIB IN 2 COLOURS: NOTE: (1) is the colour that is visible as English rib stitch on the right side of piece, and (2) is the colour places behind, and which is visible as English rib stitch on the wrong side of piece. If you are in doubt of what colour next round should be worked with, see what colour the previous round was worked with on the colour of the yarn overs. ROUND 1: Worked with colour (1): * Knit 1, 1 yarn over, slip 1 stitch as if to purl *, work from *-*. ROUND 2: Worked with colour (2): Work * 1 yarn over, slip 1 stitch purlwise, purl together yarn over and slipped stitch *, work from *-*. ROUND 3: Worked with colour (1): * Knit together yarn over and slipped stitch, 1 yarn over, slip 1 stitch as if to purl *, repeat from *-*. Repeat rounds 2 to 3. STRIPES-1: NOTE: (1) is the colour that is visible as English rib stitch on the right side of piece, and (2) is the colour places behind, and which is visible as English rib stitch on the wrong side of piece. STRIPE 1: 4-4-4-5-5-5 cm with (1) denim blue and (2) black. STRIPE 2: 4-4-4-5-5-5 cm with (1) denim blue and (2) hazelnut. STRIPE 3: 2½ cm with (1) denim blue and (2) white. STRIPE 4: 2½ cm with (1) brick and (2) white. STRIPE 5: 1½ cm with (1) white and (2) brick. STRIPE 6: 2½ cm with (1) black and (2) brick. STRIPE 7: 1½ cm with (1) hazelnut and (2) brick. STRIPE 8: 4-4-4-5-5-5 cm with (1) hazelnut and (2) denim blue. STRIPE 9: 2½ cm with (1) hazelnut and (2) brick. STRIPE 10: 2½ cm with (1) white and (2) brick. STRIPE 11: 1½ cm with (1) brick and (2) white. STRIPE 12: 2½ cm with (1) brick and (2) black. STRIPE 13: 2½ cm with (1) brick and (2) hazelnut. STRIPE 14: 1½ cm with (1) denim blue and (2) hazelnut. STRIPE 15: 4-5-5-6-6-7 cm with (1) denim blue and (2) white. STRIPE 16: Work with (1) white and (2) denim blue until finished measurements (= approx. 11-12-14-12-14-15 cm). STRIPE-2 (applies to sleeves): Continue with stripes in STRIPES-1 (so that stripes on sleeves and body are the same) until 14th stripe is finished vertically. Then work stripes on sleeve as follows: STRIPE 15: Work with (1) denim blue and (2) white until sleeve measures 32-31-29-27-26-24 cm from where yoke was divided into sleeves and body (8 cm now remains on sleeve until rib of 4 cm is worked). STRIPE 16: 4 cm with (1) denim blue and (2) hazelnut. STRIPE 17: 4 cm with (1) denim blue and (2) black. RAGLAN: All increases are done on 3 round in English rib pattern! NOTE: If the knitting tension is not correct vertically the raglan increase will be too short/long vertically. Raglan increase is written in both number of round and cm. If the knitting tension is incorrect vertically, work raglan increase in cm. Increase as follows: Work until stitch (+ yarn over) after marker thread and increase 4 stitches (= 2 stitches on each side of stitch after marker thread) as follows: * Knit yarn over and stitch together but wait to slip stitch and yarn over off the needle, make 1 yarn over on right needle *, work from *-* 2 times in total and knit stitch and yarn over together 1 more time = 5 stitches (= 4 stitches increased). Repeat in stitches after each of the remaining marker threads on round = 16 stitches increased on round. On next round work the increased stitches in English rib pattern - there are no English rib yarn overs in increase, so on next round in English rib pattern work stitch to be worked together yarn over, without yarn over. DECREASE TIP-1 (applies to sleeves): Decrease is done on 3 round in English rib pattern. Knit the middle 3 stitches (+ yarn overs that belong to stitches) together = 2 stitches decreased. DECREASE TIP-2 (applies to sleeves): All decreases are done on 3 round in English rib pattern. Decrease as follows: Work like this until 2 stitches remain before marker thread (stitch after marker thread is middle stitch under sleeve = a stitch with knit + yarn over that belong to the stitch), slip the next 3 stitches (+ yarn overs that belong to stitches) loosely over on to right needle as if to knit together, knit the next 2 stitches (+ yarn over that belongs to stitch) together, then pass the 3 slipped stitches over stitches knitted together (= 4 stitches decreased). ---------------------------------------------------------- START THE PIECE HERE: ---------------------------------------------------------- JUMPER - SHORT OVERVIEW OF THE PIECE: Worked in the round on circular needle, top down. Work sleeves in the round on a short circular needle/double pointed needles. NECK EDGE: Cast on 104-108-112-120-124-128 stitches on a short circular needle size 3 mm with black. Knit 1 round, then work rib = knit 1/purl 1 for 3 cm. Knit 1 round while increasing 0-0-0-0-4-12 stitches evenly - read INCREASE TIP (evenly spaced) = 104-108-112-120-128-140 stitches. Knit 1 round. Insert a marker here. NOW MEASURE PIECE FROM HERE! YOKE: Switch to circular needle size 4 mm. Now work ENGLISH RIB WITH 2 COLOURS and STRIPES-1 - read explanation above. When 2 rounds have been worked with English rib with 2 colours, insert 4 marker threads in piece without working (insert all marker threads before a knit stitch + yarn over that belongs to stitch): Insert a marker thread at the beginning of round (= mid-back), skip the next 18-18-20-22-24-26 stitches, insert a marker thread here, skip the next 16 stitches, insert a marker thread here, skip the next 36-38-40-44-48-54 stitches, insert a marker thread here, skip the next 16 stitches, insert a marker thread here, there are 18-20-20-22-24-28 stitches between the last marker thread and beginning of round. REMEMBER THE KNITTING TENSION! There are now a marker thread in each transition between sleeves and body. The marker threads follow the middle of the increased stitches in each raglan onwards. Continue in the round with English rib with 2 colours and stripes, AT THE SAME TIME on next round (= 3rd round in English rib) begin increase for RAGLAN - read explanation above. Increase like this every 8th round (approx. every 2 cm – read KNITTING TIP) 10-11-12-13-14-15 times in total = 264-284-304-328-352-380 stitches. When all increases are done, the piece measures approx. 20-21-23-25-27-29 cm. Work until piece measures 20-22-24-26-28-30 cm from marker, finish after 2nd round in English rib with 2 colours. Work next round as follows: Work the first 39-41-45-49-53-57 stitches (= half back piece), slip the next 55-59-63-67-71-75 stitches on a stitch holder for sleeve, cast on 7-7-11-11-11-15 new stitches on needle (= in the side under sleeve), work the next 77-83-89-97-105-115 stitches (= front piece), slip the next 55-59-63-67-71-75 stitches on a stitch holder for sleeve, cast on 7-7-11-11-11-15 new stitches on needle (in the side under sleeve), work the remaining 38-42-44-48-52-58 stitches (=half back piece). Finish body and sleeves separately. NOW MEASURE PIECE FROM HERE! BODY: There are now 168-180-200-216-232-260 stitches on round. Continue with English rib with 2 colours. When piece measures 30 cm, the body is done. Cast of by knitting with denim blue - cast off yarn overs as stitches. Jumper measures approx. 54-56-58-60-62-64 cm from shoulder and down. SLEEVE: Slip the 55-59-63-67-71-75 stitches from stitch holder in one side of piece back on a short circular needle/double pointed needles size 4 mm and pick in addition up 1 stitch in each of the new 7-7-11-11-11-15 new stitches cast on in the side under sleeve = 62-66-74-78-82-90 stitches. Continue with English rib with 2 colours and work STRIPES-2. AT THE SAME TIME on first round insert a marker thread before the middle stitch under sleeve, i.e. before a knit stitch. Next time 3rd round in English rib is worked, decrease 2 stitches mid under sleeve – read DECREASE TIP-1 = 60-64-72-76-80-88 stitches. After decrease the marker thread should be placed before the middle stitch under sleeve, i.e. before a knit stitch. When sleeve measures 4 cm from division, decrease 4 stitches under sleeve - read DECREASE TIP-2. Decrease like this approx. every 9-8-5-4-4-3 cm 4-4-6-6-7-8 times in total = 44-48-48-52-52-56 stitches. When sleeve measures 40-39-37-35-34-32 cm – adjust so that next row is 3rd round in English rib pattern, switch to double pointed needles size 3 and black. Work next round as follows: * Knit yarn over and slipped stitch together, purl 1 *, work from *-* the entire round = 44-48-48-52-52-56 stitches. Now work rib (= knit 1/purl 1) for 4 cm. Cast off stitches with knit over knit and purl over purl. Sleeve measures approx. 44-43-41-39-38-36 cm from division. Work the other sleeve the same way. |
|
|
|
|
Have you made this or any other of our designs? Tag your pictures in social media with #dropsdesign so we can see them! Do you need help with this pattern?You'll find tutorial videos, a Comments/Questions area and more by visiting the pattern on garnstudio.com. © 1982-2024 DROPS Design A/S. We reserve all rights. This document, including all its sub-sections, has copyrights. Read more about what you can do with our patterns at the bottom of each pattern on our site. |
|


With over 40 years in knitting and crochet design, DROPS Design offers one of the most extensive collections of free patterns on the internet - translated to 17 languages. As of today we count 304 catalogues and 11422 patterns - 11422 of which are translated into English (UK/cm).
We work hard to bring you the best knitting and crochet have to offer, inspiration and advice as well as great quality yarns at incredible prices! Would you like to use our patterns for other than personal use? You can read what you are allowed to do in the Copyright text at the bottom of all our patterns. Happy crafting!
Comments / Questions (45)
På omgang 1 i pantentstrikken økes jo det 1 maske ved hvert kast, da får jeg ikke antall til å stemme? Blir mer enn 112 masker somjeg har lagt opp.
17.01.2021 - 13:24DROPS Design answered:
Hei Eli, I patentstrikk teller man ikke kastene når man teller masker. De hører til strikket maskene, og blir felt på neste omgang når de strikkes sammen. God fornøyelse!
20.01.2021 - 08:23Beste, Klopt het dat aan de onderkant van het lijf van deze trui er geen afboording gebeurt (in tegenstelling tot wat de tekening van het patroon aangeeft?). Dit gebeurt bv. wel bij de mouwen. Is daar een speciale reden voor?
15.04.2020 - 12:32DROPS Design answered:
Dag Evaloena,
Er is geen speciale reden voor, maar dit is gewoon hoe de ontwerper het heeft bedacht. Je bent er natuurlijk vrij in om dit naar eigen smaak aan te passen.
16.04.2020 - 12:32Efter 11 udtagninger i kroppen har jeg 240 masker, altså 44 for mange på nuværende tidspunkt. Jeg strikker str xl. Jeg er startet med de angivne 120 masker og tager ud som beskrevet....tror jeg. Det ligner billederne helt perfekt Enten kan der være en fejl i opskriften, ELLER jeg tager 4 masker for meget ud på hver udtagning. Men jeg strikker 5 masker i hver “udtagningsmaske”
02.04.2020 - 08:12DROPS Design answered:
Hej Du ska öka 16 m på varje omgang när du ökar till raglan ( 4 m vid vare merketråd). Efter 11 udtagninger borde du då ha (11 x 16 m) + 120 m = 296 m. Mvh DROPS Design
16.04.2020 - 09:00Bonjour, Je suis en train de tricoter (enfin j'essaie) ce modèle. Pour la manche, à la diminution-2, vous dites qu'elle se fait sur un tour 3 mais votre explication est autour du fil marqueur. Je suis un peu perdue, existe t'il une vidéo qui pourrait m'aider ? Merci beaucoup Isabelle
29.03.2020 - 14:54DROPS Design answered:
Bonjour Isabelle, cette diminution se commence à la fin d'un tour-2 des côtes anglaises, quand il reste 2 mailles avant le fil marqueur (= 2 mailles avant la fin du tour): vous glissez les 3 mailles suivantes à l'endroit (= les 2 dernières mailles du tour + la 1ère maille du tour), tricotez les 2 m suivantes à l'endroit et passez les 3 m glissées par-dessus les mailles tricotées ensemble - n'oubliez pas de bien faire suivre votre marqueur pour que la diminution suivante se fasse au bon niveau. Bon tricot!
30.03.2020 - 10:47Hi, I have problems with the sleeves. In the pattern you write: "STRIPE 15: Work with (1) denim blue and (2) white until sleeve measures 32-31-29-27-26-24 cm from where yoke was divided into sleeves and body (8 cm now remains on sleeve until rib of 4 cm is worked)." Are the measurements reversed (i.e. should it be "24-26-27-29-31-32 cm" so the sleeve measure for size S is shortest?
28.02.2020 - 17:23DROPS Design answered:
Dear Thora. the pattern is correct. In the sleeves, the measurements are shorter for larger sizes due to the longer yoke. Happy knitting!
29.02.2020 - 23:31Hej. Har store problemer med ærmerne efter tredie indtagning. Pga de foregående indtag er midterste maske lige efter mærketråd nu også der hvor jeg skifter farve og omgang. Indtaget skal foretages på 3.omgang og starte 2 masker før midten men så skal jeg jo starte på 2.omgang?? Kan ikke helt gennemskue hvordan jeg skal gribe det an??
19.12.2019 - 08:52DROPS Design answered:
Hej Pernille, mærketråden skal efter fellingen fortsatt være plassert før den midterste masken under ermet. Og fellingen skal fortsættes ifølge Felletips 2 uanset farge. God fornøjelse!
15.01.2020 - 12:16Ik vind dit een heel mooi patroon, maar ik zou deze trui liever in een kleur breien. Hoe veel gram garen heb ik dan nodig?
13.11.2019 - 17:17DROPS Design answered:
Dag Tirsa,
Ik heb even gekeken naar vergelijkbare truien in Engelse patentsteek in 1 kleur en het verschil is niet echt groot, ongeveer 1 bol minder nodig schat ik in. Je kunt je verkooppunt overigens vragen binnen welke termijn je overgebleven bollen in kunt leveren.
15.11.2019 - 12:23Bonjour, Je voudrais faire ce pull en cotes anglaises "non bicolores"... C'est la même chose ? Merci pour vos réponses qui sont toujours rapides et efficaces ;) Isabelle
21.10.2019 - 20:55DROPS Design answered:
Bonjour Isabelle et merci. Vous pouvez tout à fait tricoter ce pull en côtes anglaises avec une seule couleur, il vous suffira juste de ne pas suivre les rayures, pensez toujours à bien vérifier votre échantillon en tous les cas. Bon tricot!
22.10.2019 - 10:46Bonjour, Je termine par un jeté et une maille glissée à l'envers au tour 1 et je recommence par un jeté au tour2 ? Je suis un peu perdue... Merci pour votre aide Isabelle
20.10.2019 - 20:45DROPS Design answered:
Bonjour Isabelle, cette vidéo montre comment tricoter des côtes anglaises bicolores en rond (sans changement de couleur comme dans les rayures de ce modèle). N'hésitez pas à vous entraîner auparavant. Bon tricot!
21.10.2019 - 11:18Jeg har virkeligt sværtede at “integrere” de 4 masker, der er taget ud efter mærketråd....altså, hvordan får jeg dem strikket ind i mønstret. Jeg har brug for en slavisk gennemgang. Nogen, der kan hjælpe?
01.10.2019 - 15:52DROPS Design answered:
Hej Helle, har du set vores videoer, her er en af dem
How to increase 4 stitches in 1 stitch and yarn over with 2-colour in English Rib from Garnstudio Drops design on Vimeo.
02.10.2019 - 11:02