
Popular categories
Looking for a yarn?


|
|
Lake Autumn |
|
 |
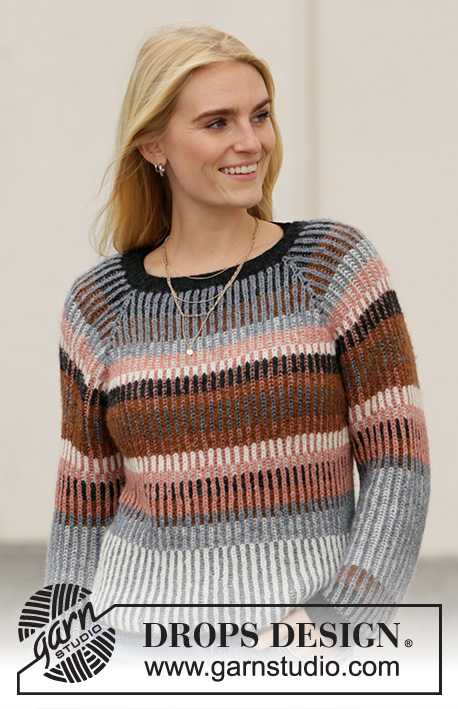 |
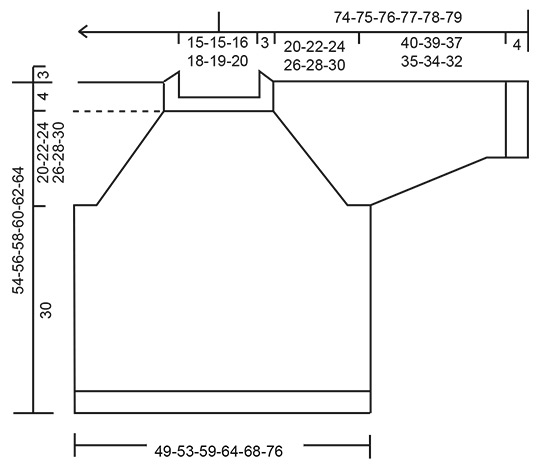
Knitted jumper with raglan in DROPS Sky. Piece is knitted top down with English rib and stripes in 2 colours. Size: S - XXXL
DROPS 206-2 |
|
|
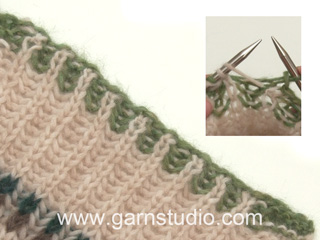
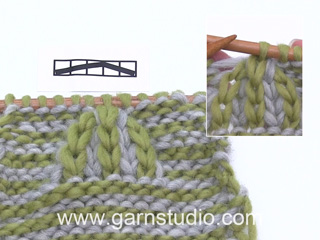
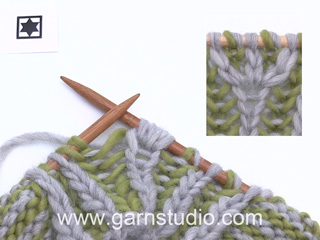
---------------------------------------------------------- EXPLANATION FOR THE PATTERN: ---------------------------------------------------------- INCREASE TIP (evenly): To calculate how to increase evenly, use the total number of stitches on row (e.g. 124 stitches) and divide stitches by number of increases to be done (e.g. 4) = 31. In this example increase by making 1 yarn over after every 31st stitch. On next round work yarn overs twisted to avoid holes. ENGLISH RIB IN 2 COLOURS: NOTE: (1) is the colour that is visible as English rib stitch on the right side of piece, and (2) is the colour places behind, and which is visible as English rib stitch on the wrong side of piece. If you are in doubt of what colour next round should be worked with, see what colour the previous round was worked with on the colour of the yarn overs. ROUND 1: Worked with colour (1): * Knit 1, 1 yarn over, slip 1 stitch as if to purl *, work from *-*. ROUND 2: Worked with colour (2): Work * 1 yarn over, slip 1 stitch purlwise, purl together yarn over and slipped stitch *, work from *-*. ROUND 3: Worked with colour (1): * Knit together yarn over and slipped stitch, 1 yarn over, slip 1 stitch as if to purl *, repeat from *-*. Repeat rounds 2 to 3. STRIPES-1: NOTE: (1) is the colour that is visible as English rib stitch on the right side of piece, and (2) is the colour places behind, and which is visible as English rib stitch on the wrong side of piece. STRIPE 1: 4-4-4-5-5-5 cm with (1) denim blue and (2) black. STRIPE 2: 4-4-4-5-5-5 cm with (1) denim blue and (2) hazelnut. STRIPE 3: 2½ cm with (1) denim blue and (2) white. STRIPE 4: 2½ cm with (1) brick and (2) white. STRIPE 5: 1½ cm with (1) white and (2) brick. STRIPE 6: 2½ cm with (1) black and (2) brick. STRIPE 7: 1½ cm with (1) hazelnut and (2) brick. STRIPE 8: 4-4-4-5-5-5 cm with (1) hazelnut and (2) denim blue. STRIPE 9: 2½ cm with (1) hazelnut and (2) brick. STRIPE 10: 2½ cm with (1) white and (2) brick. STRIPE 11: 1½ cm with (1) brick and (2) white. STRIPE 12: 2½ cm with (1) brick and (2) black. STRIPE 13: 2½ cm with (1) brick and (2) hazelnut. STRIPE 14: 1½ cm with (1) denim blue and (2) hazelnut. STRIPE 15: 4-5-5-6-6-7 cm with (1) denim blue and (2) white. STRIPE 16: Work with (1) white and (2) denim blue until finished measurements (= approx. 11-12-14-12-14-15 cm). STRIPE-2 (applies to sleeves): Continue with stripes in STRIPES-1 (so that stripes on sleeves and body are the same) until 14th stripe is finished vertically. Then work stripes on sleeve as follows: STRIPE 15: Work with (1) denim blue and (2) white until sleeve measures 32-31-29-27-26-24 cm from where yoke was divided into sleeves and body (8 cm now remains on sleeve until rib of 4 cm is worked). STRIPE 16: 4 cm with (1) denim blue and (2) hazelnut. STRIPE 17: 4 cm with (1) denim blue and (2) black. RAGLAN: All increases are done on 3 round in English rib pattern! NOTE: If the knitting tension is not correct vertically the raglan increase will be too short/long vertically. Raglan increase is written in both number of round and cm. If the knitting tension is incorrect vertically, work raglan increase in cm. Increase as follows: Work until stitch (+ yarn over) after marker thread and increase 4 stitches (= 2 stitches on each side of stitch after marker thread) as follows: * Knit yarn over and stitch together but wait to slip stitch and yarn over off the needle, make 1 yarn over on right needle *, work from *-* 2 times in total and knit stitch and yarn over together 1 more time = 5 stitches (= 4 stitches increased). Repeat in stitches after each of the remaining marker threads on round = 16 stitches increased on round. On next round work the increased stitches in English rib pattern - there are no English rib yarn overs in increase, so on next round in English rib pattern work stitch to be worked together yarn over, without yarn over. DECREASE TIP-1 (applies to sleeves): Decrease is done on 3 round in English rib pattern. Knit the middle 3 stitches (+ yarn overs that belong to stitches) together = 2 stitches decreased. DECREASE TIP-2 (applies to sleeves): All decreases are done on 3 round in English rib pattern. Decrease as follows: Work like this until 2 stitches remain before marker thread (stitch after marker thread is middle stitch under sleeve = a stitch with knit + yarn over that belong to the stitch), slip the next 3 stitches (+ yarn overs that belong to stitches) loosely over on to right needle as if to knit together, knit the next 2 stitches (+ yarn over that belongs to stitch) together, then pass the 3 slipped stitches over stitches knitted together (= 4 stitches decreased). ---------------------------------------------------------- START THE PIECE HERE: ---------------------------------------------------------- JUMPER - SHORT OVERVIEW OF THE PIECE: Worked in the round on circular needle, top down. Work sleeves in the round on a short circular needle/double pointed needles. NECK EDGE: Cast on 104-108-112-120-124-128 stitches on a short circular needle size 3 mm with black. Knit 1 round, then work rib = knit 1/purl 1 for 3 cm. Knit 1 round while increasing 0-0-0-0-4-12 stitches evenly - read INCREASE TIP (evenly spaced) = 104-108-112-120-128-140 stitches. Knit 1 round. Insert a marker here. NOW MEASURE PIECE FROM HERE! YOKE: Switch to circular needle size 4 mm. Now work ENGLISH RIB WITH 2 COLOURS and STRIPES-1 - read explanation above. When 2 rounds have been worked with English rib with 2 colours, insert 4 marker threads in piece without working (insert all marker threads before a knit stitch + yarn over that belongs to stitch): Insert a marker thread at the beginning of round (= mid-back), skip the next 18-18-20-22-24-26 stitches, insert a marker thread here, skip the next 16 stitches, insert a marker thread here, skip the next 36-38-40-44-48-54 stitches, insert a marker thread here, skip the next 16 stitches, insert a marker thread here, there are 18-20-20-22-24-28 stitches between the last marker thread and beginning of round. REMEMBER THE KNITTING TENSION! There are now a marker thread in each transition between sleeves and body. The marker threads follow the middle of the increased stitches in each raglan onwards. Continue in the round with English rib with 2 colours and stripes, AT THE SAME TIME on next round (= 3rd round in English rib) begin increase for RAGLAN - read explanation above. Increase like this every 8th round (approx. every 2 cm – read KNITTING TIP) 10-11-12-13-14-15 times in total = 264-284-304-328-352-380 stitches. When all increases are done, the piece measures approx. 20-21-23-25-27-29 cm. Work until piece measures 20-22-24-26-28-30 cm from marker, finish after 2nd round in English rib with 2 colours. Work next round as follows: Work the first 39-41-45-49-53-57 stitches (= half back piece), slip the next 55-59-63-67-71-75 stitches on a stitch holder for sleeve, cast on 7-7-11-11-11-15 new stitches on needle (= in the side under sleeve), work the next 77-83-89-97-105-115 stitches (= front piece), slip the next 55-59-63-67-71-75 stitches on a stitch holder for sleeve, cast on 7-7-11-11-11-15 new stitches on needle (in the side under sleeve), work the remaining 38-42-44-48-52-58 stitches (=half back piece). Finish body and sleeves separately. NOW MEASURE PIECE FROM HERE! BODY: There are now 168-180-200-216-232-260 stitches on round. Continue with English rib with 2 colours. When piece measures 30 cm, the body is done. Cast of by knitting with denim blue - cast off yarn overs as stitches. Jumper measures approx. 54-56-58-60-62-64 cm from shoulder and down. SLEEVE: Slip the 55-59-63-67-71-75 stitches from stitch holder in one side of piece back on a short circular needle/double pointed needles size 4 mm and pick in addition up 1 stitch in each of the new 7-7-11-11-11-15 new stitches cast on in the side under sleeve = 62-66-74-78-82-90 stitches. Continue with English rib with 2 colours and work STRIPES-2. AT THE SAME TIME on first round insert a marker thread before the middle stitch under sleeve, i.e. before a knit stitch. Next time 3rd round in English rib is worked, decrease 2 stitches mid under sleeve – read DECREASE TIP-1 = 60-64-72-76-80-88 stitches. After decrease the marker thread should be placed before the middle stitch under sleeve, i.e. before a knit stitch. When sleeve measures 4 cm from division, decrease 4 stitches under sleeve - read DECREASE TIP-2. Decrease like this approx. every 9-8-5-4-4-3 cm 4-4-6-6-7-8 times in total = 44-48-48-52-52-56 stitches. When sleeve measures 40-39-37-35-34-32 cm – adjust so that next row is 3rd round in English rib pattern, switch to double pointed needles size 3 and black. Work next round as follows: * Knit yarn over and slipped stitch together, purl 1 *, work from *-* the entire round = 44-48-48-52-52-56 stitches. Now work rib (= knit 1/purl 1) for 4 cm. Cast off stitches with knit over knit and purl over purl. Sleeve measures approx. 44-43-41-39-38-36 cm from division. Work the other sleeve the same way. |
|
|
|
|
Have you made this or any other of our designs? Tag your pictures in social media with #dropsdesign so we can see them! Do you need help with this pattern?You'll find tutorial videos, a Comments/Questions area and more by visiting the pattern on garnstudio.com. © 1982-2024 DROPS Design A/S. We reserve all rights. This document, including all its sub-sections, has copyrights. Read more about what you can do with our patterns at the bottom of each pattern on our site. |
|


With over 40 years in knitting and crochet design, DROPS Design offers one of the most extensive collections of free patterns on the internet - translated to 17 languages. As of today we count 304 catalogues and 11422 patterns - 11422 of which are translated into English (UK/cm).
We work hard to bring you the best knitting and crochet have to offer, inspiration and advice as well as great quality yarns at incredible prices! Would you like to use our patterns for other than personal use? You can read what you are allowed to do in the Copyright text at the bottom of all our patterns. Happy crafting!
Comments / Questions (45)
Hallo, ist es möglich, die Halsblende auf 13 cm zu verlängern und dann doppelt zu arbeiten, oder würde das den Sitz des Pullovers verändern?
06.01.2023 - 17:00DROPS Design answered:
Liebe Sisa, wenn Sie die Halsblende länger stricken, wird es etwas unterschiedlich aussehen, dh mit einer längeren Halsblende (ca doppel länger mit ca 6,5 cm anstatt 3 cm), die Passe sollte aber genauso lang sein (sollte Ihre Maschenprobe in der Höhe auch richtig sein). Viel Spaß beim stricken!
09.01.2023 - 08:36Forstår ikke jeres raglan udtagning. Jeg kan godt se hvordan I tager 4 masker ud i samme maske, men jeg forstår ikke hvor jeg skal sætte min markør bagefter. Lige nu har keg strikket uden at flytte markøren, men det bliver forkert, da man så kun tager ud til en side. I skriver noget med 2 masker på hver side af masken, det forstår jeg ikke. Så har brug for hjælp til at få min raglanærmer pæn og symmetrisk.
02.01.2023 - 06:24DROPS Design answered:
Hei Eva. Du øker med 4 masker i 1 maske = 5 masker. Om du da setter en markør i den 3. masken av disse 5, har du 2 masker på hver side av masken med merke (den midterste masken). Ta en titt på denne vidoen, kanskje den kan hjelpe å forstå: Hvordan tages der ud i helpatent og hvordan strikkes næste omgang mvh DROPS Design
05.01.2023 - 14:09Grazie per la risposta. Comunque ho già risolto perché ho trovato la correzione nel modello in inglese. Riterrei opportuno correggerlo anche in italiano.
29.12.2022 - 07:46DROPS Design answered:
Buonasera Anna Dora, abbiamo corretto la spiegazione anche nella versione italiana. Buon lavoro!
29.12.2022 - 19:07Buonasera, nel fare gli aumenti dello sprone, per la taglia M, c'è una differenza di due maglie: alla fine del giro, invece di 18 maglie (18+16+38+16+18 per un totale di 106 maglie) ne restano 20, (18+16+38+16+20 per il totale effettivo di 108 maglie) . C'è forse qualcosa da correggere? Grazie
17.12.2022 - 15:08DROPS Design answered:
Buonasera Anna Dora, al momento non sono emerse correzioni per questo modello. Buon lavoro!
28.12.2022 - 19:13Hey there - I’m starting the yoke and wanted to ask if short rows should be incorporated to balance the front and back. if so, how would you suggest altering the pattern?
31.08.2021 - 16:38DROPS Design answered:
Dear Emma, please understand that we cannot modify our patterns to each individual request. This modell does not have a raised neckline, because short rows would break the lines of the two colored english rib.Happy Stitching!
31.08.2021 - 17:03Hvis man vil vælge kun én farve, hvor mange garnnøgler skal der bruges, alt efter str.?
21.06.2021 - 19:56DROPS Design answered:
Hei Chau. Det har vi ikke oversikten over, men sammenlignet med andre ensfarget gensere i helpatent vil du bruke mindre enn hva det er oppgitt til denne genseren (mellom 50-150 gram, avhengig av hvilken str. du strikker). Ta en titt på f.eks DROPS 207-40. mvh DROPS design
28.06.2021 - 10:57Thank you for answering my last query. I have another one ! My tension is about half what it should be vertically. Should it really be 42 rows to 10 cm ? The width is coming close to 17 st.
19.03.2021 - 13:53DROPS Design answered:
Dear Mrs Bath, tension should be 42 sts with English rib (= 21 visible "knit" stitches from RS). Getting the correct tension is important to get the correct measurements - read more here. Happy knitting!
19.03.2021 - 15:23I am putting in the markers at the start of the yolk. If I put them at 18 stitches,then 16,and 38, there are more than 20 stitches back to the start of the round .Surely it should say 18, 16, 38, 16 ,20 . The size I am making has 108 stitches. This means there are 5 markers (including the middle back ) Is this correct ?
11.03.2021 - 12:32DROPS Design answered:
Dear Mrs Bath, that's right, English pattern will be edited - thanks for noticing. Happy knitting!
11.03.2021 - 14:41Thanks for your last info. I am a little confused about which stitch I should be increasing in on the 5 increased stitches. You say the first after the marker but it looks wrong. The middle of the 3 raglan stitches looks right. Can you confirm whether it is the middle stitch of the 5 raglan increase or the 1st of the 3 I should be increasing in. Thanks.
05.02.2021 - 14:05DROPS Design answered:
Dear Mrs Emms, marker threads should be inserted before a stitch that will be knitted together with the yarn over - and you will increase 4 sts by working 5 stitches in the stitch after the marker thread - when there are the 5 new stitches on the needle, move the marker after the 2nd of the 5 sts = the 3rd of these 5 sts is the stitch you will increase later in.Ie you will always increase in the stitch in the middle of these 5 stitches just as shown in the previous linked video. Happy knitting!
05.02.2021 - 15:13Good afternoon, I am finding this pattern very difficult to understand. No. 1 is it intended that the rounds are 3 plus a repeat of 2 and 3 every time? No. 2 I seem to have yarn overs in places where I don't want them as well, particularly after 2 of the raglan increases which I've just started. I'm not yet sure whether the pattern is going to come out as it should, or whether I'm still doing something wrong. Thanks for your help on the skirt I just made, it's lovely.
27.01.2021 - 16:30DROPS Design answered:
Dear Mrs Emms, the first round of the English rib is just a "set up row", then you will repeat round 2 and 3 - see also that video. When you increase for raglan, you will make some yarn overs, these yarn overs are for the increases, and should be worked as stitches on next round - this video shows how to increase in 2-coloured English rib and should be help you to visualize how it should looks like. Happy knitting!
28.01.2021 - 09:07