
Popular categories
Looking for a yarn?


|
||||||||||||||||||||||||||||
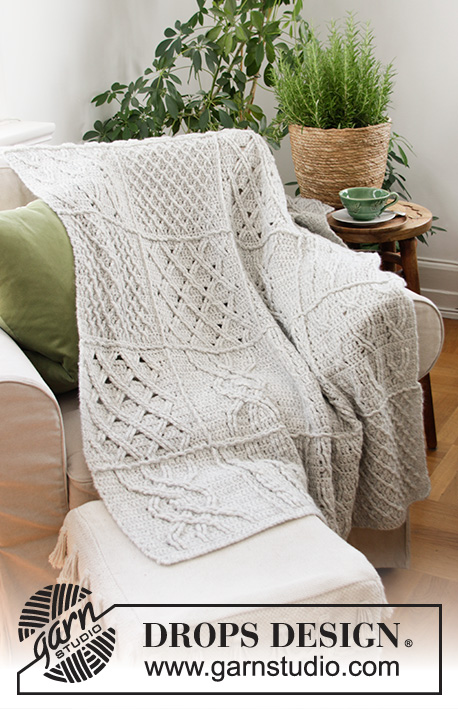
Celtic Comfort |
||||||||||||||||||||||||||||
 |
 |
|||||||||||||||||||||||||||
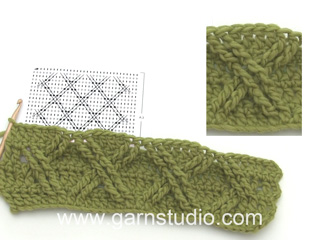
Crocheted blanket in DROPS Air. The piece is worked in squares with cables and relief stitches.
DROPS 203-1 |
||||||||||||||||||||||||||||
|
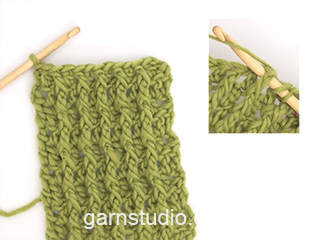
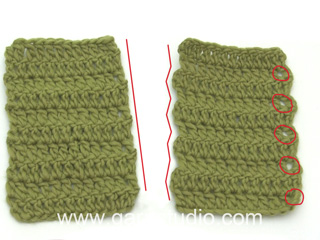
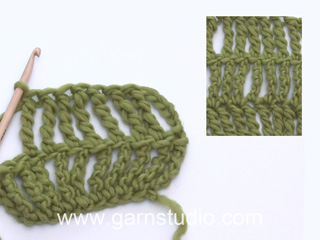
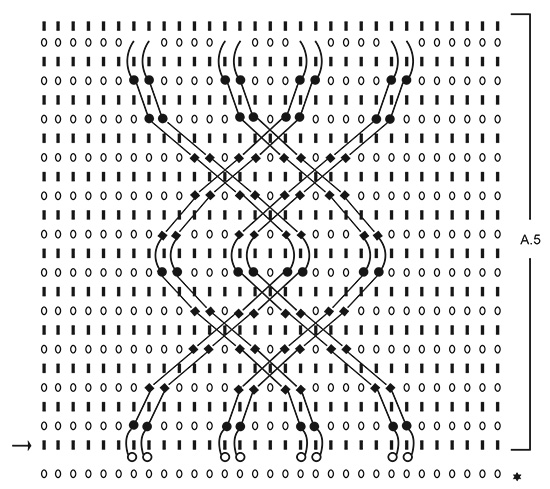
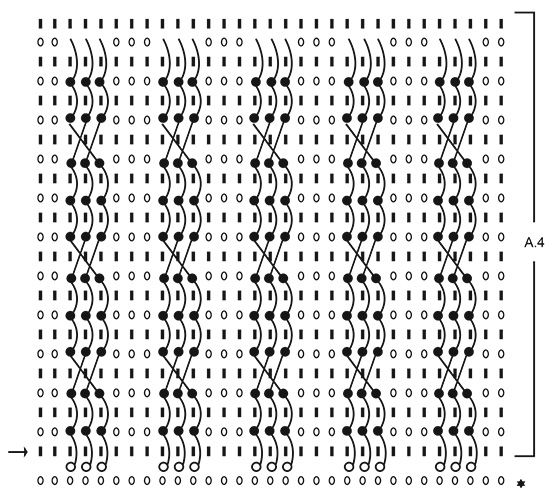
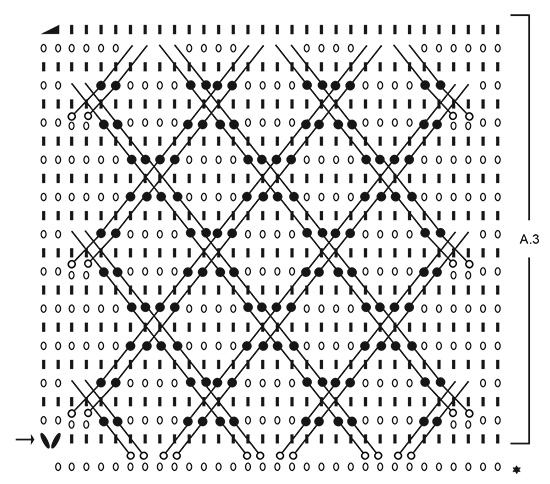
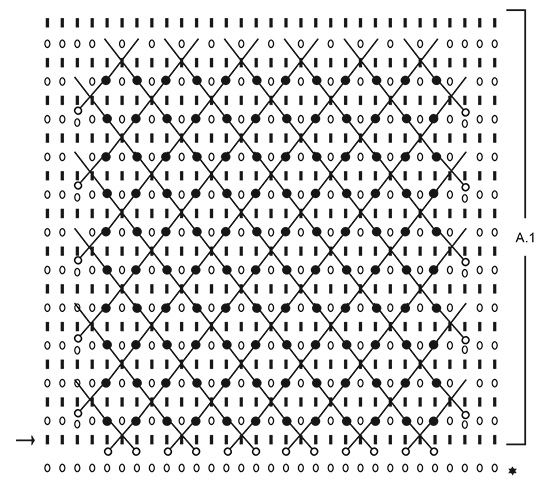
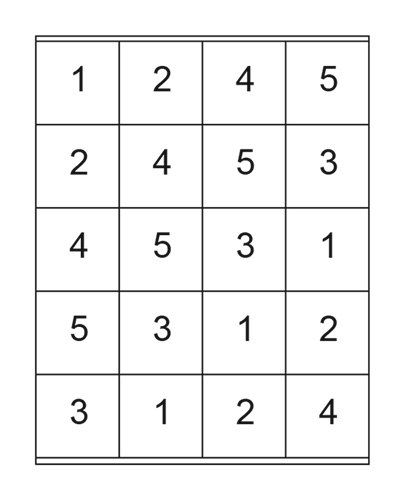
------------------------------------------------------- EXPLANATIONS FOR THE PATTERN: ------------------------------------------------------- CHAIN STITCH: If you work outermost on the hook the chain stitch will often be too tight; 1 chain stitch should be as long as 1 double crochet is wide. CROCHET INFORMATION: At the beginning of each row of double crochets work 1 chain stitch (in addition to the first double crochet). At the beginning of each row of double crochets replace the first double crochet with 3 chain stitches. PATTERN: See diagrams A.1 to A.5. SQUARES: Work 4 of each of the following squares: SQUARE 1: See diagram A.1. SQUARE 2: See diagram A.2. SQUARE 3: See diagram A.3. SQUARE 4: See diagram A.4. SQUARE 5: See diagram A.5. QUADRUPLE-DOUBLE CROCHET: Make 4 yarn overs, insert hook around stitch, pick up strand, make 1 yarn over and pull the strand through the first 2 loops on the hook *, repeat from *-* a total of 5 times = 1 stitch. ------------------------------------------------------- START THE PIECE HERE: ------------------------------------------------------- BLANKET – SHORT OVERVIEW OF THE PIECE: The blanket is made up of 20 squares. Work 4 of each of the 5 different squares. Work all the squares first before working them together and finally working an edge along both short sides of the blanket. CROCHET SQUARE: Work 33 chain stitches (including 3 chain stitches to turn with) using hook size 5.5 mm = US I/9 and Air – read CHAIN STITCH. Turn and work 1 double crochet in the 4th chain stitch from the hook (= 2 double crochets) – read CROCHET INFORMATION, work 1 double crochet in each chain stitch to end of row = 31 double crochets. Then work back and forth according to the diagram – read SQUARES and TRIPLE-TREBLE CROCHET. REMEMBER THE CROCHET GAUGE! When the diagram has been completed, cut and fasten the strand. The square measures approx. 24 x 24 cm = 9½" x 9½" . ASSEMBLY: Lay the squares out with the square numbers corresponding to the numbers in the illustration (4 squares in width and 5 in length). Make sure all squares are lying with the right side up and with the same crochet direction. The squares are worked together in length, then these lengths are worked together in width. Work together as follows: Lay 2 squares together, wrong side to wrong side. Work through both layers as follows: ** 1 double crochet in corner, * 3 chain stitches, skip forward approx. 1½-2 cm = ½"-¾", work 1 double crochet in next stitch *. Work from *-* up to and including the next corner and work 3 chain stitches (= transition to next 2 squares) **. Repeat from **-** along the whole length and finish with 1 double crochet in the last corner. Cut and fasten the strands. Work all the lengths together, then the lengths together in width in the same way. EDGE: Now work an edge along the one short side of the blanket as follows: Fasten the strand with 1 slip stitch in the first stitch in the corner and then work 3 chain stitches (= 1 double crochet), work 1 double crochet in each of the remaining double crochets along this side (= 4 squares of 31 stitches) = 124 double crochets. Cut and fasten the strand. Work a similar edge along the other short side. |
||||||||||||||||||||||||||||
Diagram explanations |
||||||||||||||||||||||||||||
|
||||||||||||||||||||||||||||
|
||||||||||||||||||||||||||||
|
||||||||||||||||||||||||||||
|
||||||||||||||||||||||||||||

|
||||||||||||||||||||||||||||
|
||||||||||||||||||||||||||||
|
||||||||||||||||||||||||||||
|
Have you made this or any other of our designs? Tag your pictures in social media with #dropsdesign so we can see them! Do you need help with this pattern?You'll find tutorial videos, a Comments/Questions area and more by visiting the pattern on garnstudio.com. © 1982-2024 DROPS Design A/S. We reserve all rights. This document, including all its sub-sections, has copyrights. Read more about what you can do with our patterns at the bottom of each pattern on our site. |
||||||||||||||||||||||||||||


With over 40 years in knitting and crochet design, DROPS Design offers one of the most extensive collections of free patterns on the internet - translated to 17 languages. As of today we count 304 catalogs and 11422 patterns - 11417 of which are translated into English (US/in).
We work hard to bring you the best knitting and crochet have to offer, inspiration and advice as well as great quality yarns at incredible prices! Would you like to use our patterns for other than personal use? You can read what you are allowed to do in the Copyright text at the bottom of all our patterns. Happy crafting!
Comments / Questions (49)
Is it possible to get a written pattern?
21.02.2022 - 03:05DROPS Design answered:
Hi Jerrian, We do not produce paper patterns anymore, to save on paper use and decrease our environmental footprint. You can print out the pattern yourself by using the button below and to the right of the photos. Happy crafting!
21.02.2022 - 07:07I'm new to reading the diagrams. I don't see an explanation for the diamond symbol in the A5 block. Can you please explain it to me?
21.02.2022 - 02:42DROPS Design answered:
Dear Jerrian, do you mean the last symbol in the diagram key? That's a line finishing with a black square - this video shows how to crochet A.5 and might then help you. Happy crocheting!
21.02.2022 - 10:20Bonjour Pourquoi ne faire une bordure uniquement en haut et bas et non pas sur les côtés. Merci de votre réponse. Cordialement.
06.02.2022 - 21:10DROPS Design answered:
Bonjour Françoise, c'est un choix de la styliste, vous pouvez naturellement choisir de procéder autrement. Bon crochet!
07.02.2022 - 10:36Bonjour Je n'ai jamais fais de torsades au crochet et ne comprends pas comment les faire. Je commence par le diagramme A1 et voudrais savoir comment démarrer le 1er rg et faire les 6 torsades et de même pour le 2ème rg de torsades pour que celles-ci soient dans leur prolongement. Merci de votre aide. Cordialement
26.01.2022 - 20:42DROPS Design answered:
Bonjour Françoise, nous avons une vidéo pour chacun des carrés, retrouvez celle du diagramme A.1 ici, rappelez-vous de bien suivre le diagramme en même temps. Vous devriez ainsi comprendre comment procéder; n'hésitez pas à ralentir le débit si besoin (en cliquant sur la roue crantée, en cours de lecture). Bon crochet!
27.01.2022 - 08:43Salve! Nel diagramma il simbolo della quinta riga indica " 2 maglie base nella stessa maglia". È un errore di trascrizione per cui si intendono due maglie basse nella stessa maglia? Perché in caso contrario non so cosa vuol dire e nel video tutorial non viene fatto vedere il secondo giro. Grazie.
21.11.2021 - 17:23DROPS Design answered:
Buonasera Ester, abbiamo corretto il testo, erano maglie basse. Buon lavoro!
21.11.2021 - 21:51Hei, takk for en flott oppskrift. Jeg synes det er litt vanskelig å forstå hvordan lappene skal monteres sammen. Kunne dere lagt ut bilder (steg for steg) eller video i tillegg til forklaringen?
29.12.2020 - 10:28DROPS Design answered:
Hej Stine, Se her hvordan du kan gøre: Montering af tæppe eller her finder du endnu flere måder at gøre det på: Montering - hækle sammen
07.01.2021 - 13:54Hallo, Is er ook een deken als deze maar dsn om te breien? Mijn haakskils zijn niet zo goed.
31.07.2020 - 07:44DROPS Design answered:
Dag Evelone,
Helaas is er van deze alleen een versie om te haken. Misschien vindt je een geschikt patroon tussen de gebreide dekens met kabels.
02.08.2020 - 19:04Modello bellissimo, lana stupenda. Ne ho finita una di 35 quadrati. Ho iniziato la seconda di un altro colore. Grazie
23.07.2020 - 21:17A może Drops Muskat? Już sama nie wiem. Dziewiarki proponowały jeszcze: Drops Muskat Drops Paris Drops You #8 Scheepjes Cahlista Nie widziałam tych włóczek, dlatego ciężko mi wybrać. To ma być narzuta na kanapę, odporna na częste siedzenie na niej. Drops Muskat to dobra bawełna merceryzowana, ale cieńsza.
13.07.2020 - 20:26DROPS Design answered:
Witaj Kasiu, to jest w końcu koc. Nie musisz się tak bardzo trzymać wymiarów. Jak weźmiesz Muskat, weź też mniejsze szydełko. Jak koc będzie za mały, możesz jeszcze dorobić kwadratów. Miłej pracy!
14.07.2020 - 10:47Czy Drops Cotton Light będzie dobra do tego wzoru? Ile motków potrzeba? Wzór jest piękny. Czy słupki nakładane to słupki reliefowe od przodu (for example: front post treble crochet)?
12.07.2020 - 11:05DROPS Design answered:
Witaj Kasiu, Cooton Light jest z Grupy B, a nie C. Z włóczek w promocji lepsza będzie DROPS Paris (1 nitka) 1300g lub DROPS Bomull-Lin (1 nitka) 1148g. Co do słupków nakładanych to są inaczej słupki reliefowe. Zobacz filmy video do tego wzoru, w których dokładnie pokazujemy jak je wykonać . Powodzenia!
13.07.2020 - 10:48