
Popular categories
Looking for a yarn?


|
||||||||||||||||||||||||||||||||||||||||
Beach Ballet |
||||||||||||||||||||||||||||||||||||||||
 |
 |
|||||||||||||||||||||||||||||||||||||||
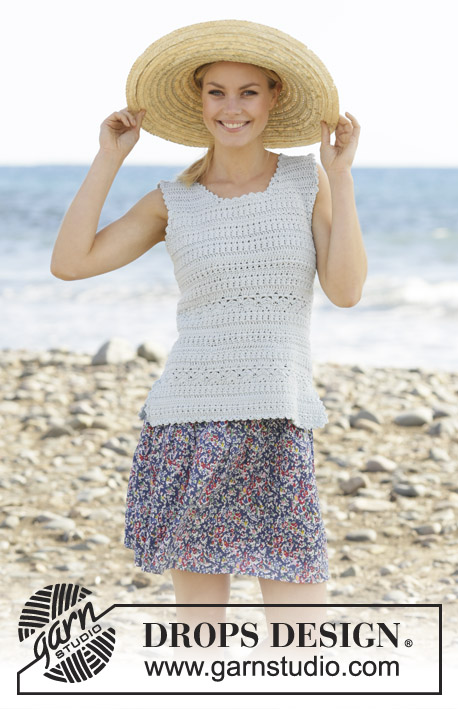
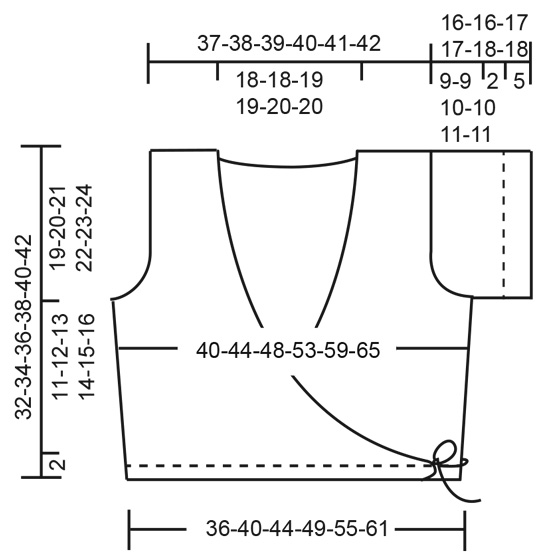
Crocheted top in DROPS Belle. The piece is worked with wrap-around style, treble crochets and fans. The piece is worked top down. Sizes S - XXXL.
DROPS 199-47 |
||||||||||||||||||||||||||||||||||||||||
|
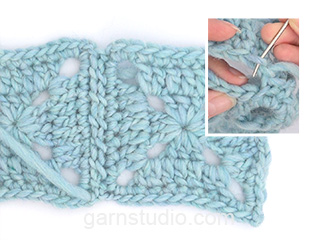
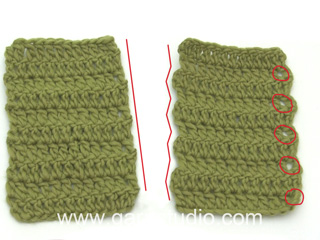
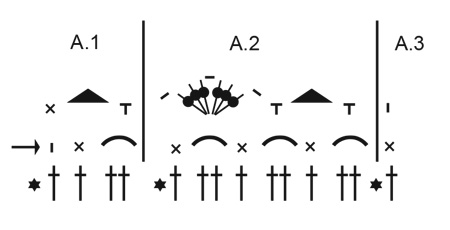
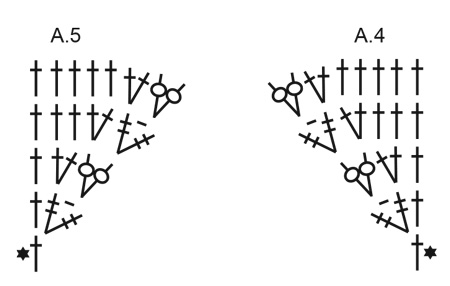
------------------------------------------------------- EXPLANATIONS FOR THE PATTERN: ------------------------------------------------------- CROCHET INFORMATION: First treble crochet at the beginning of each row is replaced by 3 chain stitches. INCREASE TIP: Increase 1 treble crochet by working 2 treble crochets in same treble crochet. Increase 2 stitches by working as shown in A.4 on right front piece and A.5 on left front piece – NOTE: First double treble crochet at beginning of each row is replaced by 4 chain stitches. DECREASE TIP (for sides): Decrease 1 treble crochet by working 2 treble crochets together as follows: * Make 1 yarn over, insert hook through next stitch, pick up strand, 1 yarn over and pull strand through the first 2 loops on hook *, work from *-* 1 more time, make 1 yarn over and pull strand through all 3 loops on hook(= 1 treble crochet decreased). PATTERN: See diagrams A.1 to A.7. (A.6 shows how rounds start and finish). INCREASE/DECREASE TIP (evenly spaced): To work out how to decrease/increase evenly, count the total number of stitches, (e.g. 68 stitches) and divide by number of decreases/increases to be made (e.g. 4) = 17. In this example, decrease by working together each 16th and 17th stitch. When increasing work 2 treble crochets in each 17th treble crochet. ------------------------------------------------------- START THE PIECE HERE: ------------------------------------------------------- TOP - SHORT OVERVIEW OF THE PIECE: Front and back pieces are worked back and forth separately, top down. The pieces are sewn together, and then you work fans along the bottom edge. The sleeves are worked back and forth, top down as far as the armholes, and then worked in the round. A small decorative edge is worked along the front pieces/back piece/neck. The top is wrapped around by placing the right front piece on top of the left front piece and then tying around the waist. RIGHT FRONT PIECE: Work 21-22-22-25-24-25 chain stitches with hook size 4 mm and Belle. Turn and work 1 treble crochet in the 4th chain stitch from the hook (= 2 treble crochets), work 1 treble crochet in each of the next 5-6-6-3-2-3 chain stitches, * skip 1 chain stitch, work 1 treble crochet in each of the next 5 chain stitches *, work from *-* to end of row = 17-18-18-20-19-20 treble crochets. Work a total of 6-7-8-6-7-6 rows with 1 treble crochet in each treble crochet – read CROCHET INFORMATION and REMEMBER THE CROCHET TENSION! Then increase to neck and armholes at the same time as follows: NECK: On the next row (= from the right side) start to increase for neck at the end of the row – read INCREASE TIP. Increase by 1 treble crochet a total of 2-3-3-0-1-1 times, then increase 2 stitches (as shown in A.4) a total of 19-19-20-26-26-29 times (= a total of 40-41-43-52-53-59 treble crochets increased for neck). ARMHOLE: When the piece measures 16-16-16-17-16-14 cm start to increase for armhole – read INCREASE TIP. Increase 1 treble crochet 0-1-1-1-0-1 time, then increase 2 stitches 0-1-2-3-5-7 times. At the end of the first row from the wrong side work 5-5-6-7-8-8 loose chain stitches (including 3 chain stitches to turn with) for the armhole (= a total of 3-6-9-12-16-21 treble crochets increased for armhole). The piece measures approx. 19-20-21-22-23-24 cm. Turn and work 1 treble crochet in the 4th chain stitch from the hook (= 2 treble crochets), work 1 treble crochet in each of the next 1-1-2-3-4-4 chain stitches and work to end of row as before. On the next row decrease 1 treble crochet in the side (i.e. towards the armhole) – read DECREASE TIP. Decrease like this every 2nd row a total of 4 times (=4 treble crochets decreased), the increases for neck continue as before. When all the decreases (towards the side) and increases (for neck and armhole) are finished there are 56-61-66-80-84-96 treble crochets on the last row. The piece measures approx. 30-32-34-36-38-40 cm from the shoulder down. Cut and fasten strand. LEFT FRONT PIECE: Work 21-22-22-25-24-25 chain stitches with hook size 4 mm and Belle. Turn and work 1 treble crochet in the 4th chain stitch from the hook (= 2 treble crochets), work 1 treble crochet in each of the next 5-6-6-3-2-3 chain stitches, * skip 1 chain stitch, work 1 treble crochet in each of the next 5 chain stitches *, work from *-* to end of row = 17-18-18-20-19-20 treble crochets. Work a total of 6-7-8-6-7-6 rows with 1 treble crochet in each treble crochet – read CROCHET INFORMATION and REMEMBER THE CROCHET TENSION! Then increase to neck and armholes at the same time as follows: NECK: On the next row (= from the right side) start to increase for neck at the beginning of the row – remember INCREASE TIP. Increase by 1 treble crochet a total of 2-3-3-0-1-1 times, then increase 2 stitches (as shown in A.5) a total of 19-19-20-26-26-29 times (= a total of 40-41-43-52-53-59 treble crochets increased for neck). ARMHOLE: When the piece measures 16-16-16-17-16-14 cm start to increase for the armhole – read INCREASE TIP. Increase 1 treble crochet 0-1-1-1-0-1 time, then increase 2 stitches 0-1-2-3-5-7 times. At the end of the first row from the right side work 5-5-6-7-8-8 loose chain stitches (including 3 chain stitches to turn with) for the armhole (= a total of 3-6-9-12-16-21 treble crochets increased for the armhole). The piece measures approx. 19-20-21-22-23-24 cm. Turn and work 1 treble crochet in the 4th chain stitch from the hook (= 2 treble crochets), work 1 treble crochet in each of the next 1-1-2-3-4-4 chain stitches and work to end of row as before. On the next row decrease 1 treble crochet in the side (i.e. towards the armhole) – remember DECREASE TIP. Decrease like this every 2nd row a total of 4 times (=4 treble crochets decreased), the increases for neck continue as before. When all the decreases (towards the side) and increases (for neck and armhole) are finished there are 56-61-66-80-84-96 treble crochets on the last row. The piece measures approx. 30-32-34-36-38-40 cm from the shoulder down. Cut and fasten strand. BACK PIECE: RIGHT SHOULDER: Work 21-22-22-25-24-25 chain stitches with hook size 4 mm and Belle. Turn and work first row from wrong side as follwos: work 1 treble crochet in 4th chain stitch from hook (= 2 treble crochets), then work 1 treble crochet in each of the next 5-6-6-3-2-3 chains, * skip 1 chain stitch, crochet 1 treble crochet in each of the next 5 chain stitches*, repeat from *-* to end of row = 17-18-18-20-19-20 treble crochets. Cut the strand and put aside LEFT SHOULDER: Work 21-22-22-25-24-25 chain stitches with hook size 4 mm and Belle. Turn and work first row from wrong side as follows: 1 treble crochet in 4th chain stitch from the hook (= 2 treble crochets), work 1 treble crochet in each of the next 5-6-6-3-2-3 chain stitches, * skip 1 chain stitch, work 1 treble crochet in each of the next 5 chain stitches *, work from *-* to end of row = 17-18-18-20-19-20 treble crochets. On the next row (from right side), crochet 1 treble crochet in each treble crochet until 1 treble crochet remains and work 2 treble crochets in the last treble crochet (towards the neck = 18-19-19-21-20-21 treble crochets for left shoulder. Then crochet loosely 30-30-32-32-34-34 chain stitches for neck, take right shoulder and starting from right side, crochet 1 treble crochet in each of the next 16-17-17-19-18-19 treble crochets (= 18-19-19-21-20-21 treble crochets for right shoulder). BACK PIECE: Start on left shoulder (from wrong side) and work 1 treble crochet in each of the first 18-19-19-21-20-21 treble crochets, work 1 treble crochet in each of the 30-30-32-32-34-34 chain stitches in the neck and 1 treble crochet in each of the 18-19-19-21-20-21 treble crochets on right shoulder = 66-68-70-72-74-76 treble crochets. Work 1 treble crochet in each treble crochet until the piece measures 16-16-16-17-16-14 cm. Now start to increase for the armholes on each side of the piece as follows: Increase 1 treble crochet 0-1-1-1-0-1 times, then 2 treble crochets 0-1-2-3-5-7 times = 66-74-80-86-94-106 treble crochets. Cut the strand. Work the next row as follows: Work 3-3-4-5-6-6 loose chain stitches for the armhole, 1 treble crochet in each treble crochet and finish with 5-5-6-7-8-8 loose chain stitches (including 3 chain stitches to turn with) for the armhole = 72-80-88-96-106-118 stitches. Turn and work 1 treble crochet in 4th chain stitch from hook (= 2 treble crochets), work 1 treble crochet in each of the next 1-1-2-3-4-4 chain stitches, 1 treble crochet in each treble crochet and 1 treble crochet in each of the 3-3-4-5-6-6 last chain stitches = 72-80-88-96-106-118 treble crochets. On the next row decrease 1 treble crochet on each side of the piece – remember DECREASE TIP. Decrease like this every 2nd row a total of 4 times = 64-72-80-88-98-110 treble crochets. Continue working until you have the same number of rows as on the front pieces, i.e. the piece measures approx. 30-32-34-36-38-40 cm from the shoulder down. Cut and fasten strand. ASSEMBLY: Sew shoulder seams and side seams - sew in outermost loop of outermost stitch so the seam is flat. FAN-EDGE (bottom edge): = 176-194-212-248-266-302 treble crochets on last row (both front and back pieces). Start on right front piece from the wrong side and work as follows: Work A.1 over the first 4 treble crochets, A.2 until there is 1 treble crochet left (= 19-21-23-27-29-33 repeats of 9 treble crochets) and finish with A.3 over the last treble crochet. When A.1 to A.3 have been completed, cut and fasten the strand. DECORATIVE EDGE (along front pieces and back piece/neck): Start at bottom of tip on right front piece from the right side and fasten the strand with 1 slip stitch in the first stitch. Work 1 double crochet around the first row, * 3 chain stitches, 1 double crochet around next row *, work from *-* along the whole front piece, neck and down the left front piece, finishing at the tip. Cut and fasten the strand. SLEEVE: The sleeve is worked top down, starting with the sleeve cap. Work 42-48-44-45-42-46 chain stitches (including 3 chain stitches to turn with) with hook size 4 mm and Belle. Turn and work 1 treble crochet in 4th chain stitch from the hook (= 2 treble crochets), work 1 treble crochet in each of the next 2-1-4-5-2-6 chain stitches, * skip 1 chain stitch, work 1 treble crochet in each of the next 5 chain stitches *, work from *-* to end of row = 34-39-36-37-34-38 treble crochets. On the next row increase 2 treble crochets on each side of the piece (increase 2 treble crochets by working 3 treble crochets in same treble crochet). Increase like this a total of 7-7-8-8-9-9 times on each side = 62-67-68-69-70-74 treble crochets. Cut the strand. Work 3-3-4-5-6-6 loose chain stitches for armhole, work 1 treble crochet in each of the 62-67-68-69-70-74 treble crochets and finish with 3-3-4-5-6-6 loose chain stitches for armhole. Then join the piece with 1 slip stitch in the first chain stitch = 68-73-76-79-82-86 stitches. Now work in the round as follows: Work A.6 (shows how rounds start and finish), repeat A.7 to end of round (= 7-8-8-9-9-10 repeats of 9 treble crochets) – AT THE SAME TIME on the first round adjust the number of stitches by increasing/decreasing to 64-73-73-82-82-91 treble crochets – read INCREASE/DECREASE TIP. Continue until A.6 and A.7 have been completed. Cut and fasten strand. Work the other sleeve in the same way. ASSEMBLY: Sew in sleeves - sew in outermost loop of outermost stitch so the seam is flat. TWISTED CORD: Cut 2 strands measuring 6 metres of Belle. Twist them together until they begin to resist, fold double and they will continue to twist. Tie a knot in each end. Tie one end to the tip of the right front piece. Make 1 more cord in the same way and tie to the tip of the left piece. |
||||||||||||||||||||||||||||||||||||||||
Diagram explanations |
||||||||||||||||||||||||||||||||||||||||
|
||||||||||||||||||||||||||||||||||||||||
|
||||||||||||||||||||||||||||||||||||||||
|
||||||||||||||||||||||||||||||||||||||||

|
||||||||||||||||||||||||||||||||||||||||
|
||||||||||||||||||||||||||||||||||||||||
|
Have you made this or any other of our designs? Tag your pictures in social media with #dropsdesign so we can see them! Do you need help with this pattern?You'll find tutorial videos, a Comments/Questions area and more by visiting the pattern on garnstudio.com. © 1982-2024 DROPS Design A/S. We reserve all rights. This document, including all its sub-sections, has copyrights. Read more about what you can do with our patterns at the bottom of each pattern on our site. |
||||||||||||||||||||||||||||||||||||||||


With over 40 years in knitting and crochet design, DROPS Design offers one of the most extensive collections of free patterns on the internet - translated to 17 languages. As of today we count 304 catalogues and 11422 patterns - 11422 of which are translated into English (UK/cm).
We work hard to bring you the best knitting and crochet have to offer, inspiration and advice as well as great quality yarns at incredible prices! Would you like to use our patterns for other than personal use? You can read what you are allowed to do in the Copyright text at the bottom of all our patterns. Happy crafting!
Comments / Questions (78)
Hej! Jag förstår inte hur jag ska öka för ärmhål.
22.05.2023 - 21:39DROPS Design answered:
Hej Sara, hvilken størrelse virkar du?
23.05.2023 - 11:42I svarede mig, men har ikke svaret på mit spørgsmål. Jeg forstår godt, at jeg skal hækle hver skulder for sig, og derefter hækle dem sammen. Men jeg synes altså de vender forkert. På højre skulder skal jeg starte med udtagning, to masker i en, og i skriver, at det er mod halsen. I den anden ende skal jeg hækle lm som netop bliver halsen. De skal så forbindes med udtagningen på venstre skulder, hvor udtagningen så Er mod halsen. HVAD SKAL VENDES OM, NOGET ER GALT.
17.05.2023 - 20:39DROPS Design answered:
Hej Nadja, ja det stemmer, du er nødt til at hækle hele rækken tilbage først, inden du hækler rækken med de løse luftmasker i midten. Da vil du også have lige mange rækker på højre og venstre rygstykke. Vi skal skrive den række tydeligere ind i opskriften. Du er nu tilbage på venstre rygstykke og behøver derfor ikke klippe tråden (det retter vi også) - Skriv gerne dine funderinger her i stedet for på FB, da har vi større chance for at hjælpe dig og rette eventuelle fejl - Rigtig god dag! :)
23.05.2023 - 09:14Synes virkelig, at det er en forvirrende opskrift, men nu er Jeg er ved skulder og bagstykke. Der skal to masker i samme maske ind mod halsen, det forstår jeg, men hvordan skal de 30 lm så sidde på den modsatte side af højre stykke? og forbindes med skulderen på venstre stykke? Så bliver de to masker i en (mod hals) altså mod ærme og ikke hals. Hvorfor skal tråden klippes men ikke hæftes på venstre skulder?
15.05.2023 - 17:27DROPS Design answered:
Hej Nadja, venstre og højre skulder bagpå hækler du hver for sig først og så hækler du dem sammen fra hvor der står RYGSTYKKE: Start på venstre skulder ...
17.05.2023 - 08:06How do you read the written pattern? im finding it very confusing, if there by any chance a row by row version?
06.04.2023 - 00:43DROPS Design answered:
Dear Jen, this is the only version of the pattern available, which combines written instructions and charts. We recommend you read the following lesson for understanding our patterns; you will mostly follow the written instructions and go to the specific charts when the text indicates it: https://www.garnstudio.com/lesson.php?id=79&cid=19 Happy crochetting!
06.04.2023 - 23:04Hallo, ich habe ein Problem beim Armausschnitt. Da heisst es für Gr. S 1 Stäbchen 0x zunehmen, dann 2 Maschen 0x zunehemen .......und in der Klammer dann insgesamt 3 Maschen zugenommen. Ich habe bis dahin aber doch gar nichts zugenommen. Wo kommen die 3 Maschen her? Danke im Voraus
28.02.2023 - 23:43DROPS Design answered:
Liebe Frau Lau, in S nimmt keine Masche für Armausschnitt zu, am ende der 1. Rückreihe häkeln Sie dann nur 5 Luftmaschen (= einschl. 3 Wende-Lm), so haben Sie 3 neuen Maschen: 3 Lm als 1. Stäbchen, 1 Stäbchen in die 4. Lm ab der Nadel + 1 Stäbchen in die nächste (= 5.) Lm. Viel Spaß beim häkeln!
01.03.2023 - 09:47Hej! Jag virkar ena framstycket och har precis nått 16 cm (storlek medium) så jag ska börja öka till ärmhål. Men jag förstår inte om jag ska öka 1 stolpe 1 gång och öka 2 maskor 1 gång på samma varv, och isåfall när på varvet? (i slutet/början?) sedan står det att jag ska virka luftmaskor i slutet på första varvet på avigsidan, så ska jag göra alla dessa ökningar på samma varv eller olika? Och hur vet jag vilken som är avigsidan och rätsidan?
23.08.2022 - 23:58Guten Abend! Ich bin jetzt beim Ärmel. Muss man seitlich die zwei Maschen in jeder Reihe oder in jeder zweiten Reihe zunehmen?
27.07.2022 - 22:39DROPS Design answered:
Liebe Dagmar, es werden beiseitig 2 Stäbchen 7-7-8-8-9-9 x zugenommen (= häkeln Sie 3 Stäbchen in dasselbe Stäbchen am Anfang + am Ende jeder Reihe). Viel Spaß beim häkeln!
01.08.2022 - 11:32Hello, I am sorry to say this, but this is the most confusing pattern I have ever read. Please do a row - by - row pattern. Everyone has a problem with it! It is so much easier if I can check at every row of I got the stiches right. And the (= 41 dobule crochets increased for neck) is the worst of all, because I dont see if it is for the 19 rows or 16 cm?! Also, you have to increase other stiches, so the total of dobule crochets isnt helpful. Sorry, this pattern does not work for me.
01.07.2022 - 13:42DROPS Design answered:
Dear Nikoletta, this is the only format of the pattern available, mixing charts and written instructions. You work the increases for the neck on each row 19 times in total (that's 38 rows, because you only increase in rows that start from the neck). After this, you have increased 41 double crochets for the neck. AT THE SAME TIME as you start working the increases for the neck, you have to be measuring the work and, when the work measures 16 cm, start increasing for the armholes. From this point on, you will be working the increases for the neck and the increases on the armholes at the same time. Happy knitting!
02.07.2022 - 16:58Hej. Jeg er gået igang med denne top, men som stort set alle andre i kommentarfeltet forstår jeg ikke hvordan halsen skal laves på forstykkerne. Kan i ikke skrive opskriften med ord (som indtil halsen på højre forstykke) i stedet for at lave en blanding af tekst, henvisninger og diagram? Jeg bliver f.eks. forvirret af at i svarer at man skal lave to rækker med ét udtag, når diagrammet kun viser én række med ét udtag i halsen.
26.06.2022 - 16:35DROPS Design answered:
Hei Anna. Design avd. har dessverre ikke muligheten til å omskrive en oppskrift der det ikke er feil på, men vi kan prøve så godt vi kan med å forklare deg hvordan det skal hekles. Men da er det fint om du opplyser hvilken str. du hekler. mvh DROPS Design
27.06.2022 - 10:15Jeg forstår slet ikke jeres diagram, Heller ikke jeres forklaring på det, så har måtte give op allerede ved udtagning med model A4 😅 ville ønske i kunne forklare det på en måde så folk der ikke bruger diagrammer normalt kunne forstå
08.06.2022 - 10:05