DROPS Paris
DROPS Paris
100% Cotton
from 1.25 € /50g
Get the yarn to make this pattern from 2.50€.

The yarn cost is calculated from the pattern’s smallest size and the yarn’s cheapest product type. Looking for an even better price? You might find it on the DROPS Deals!

DROPS SS24

Dive

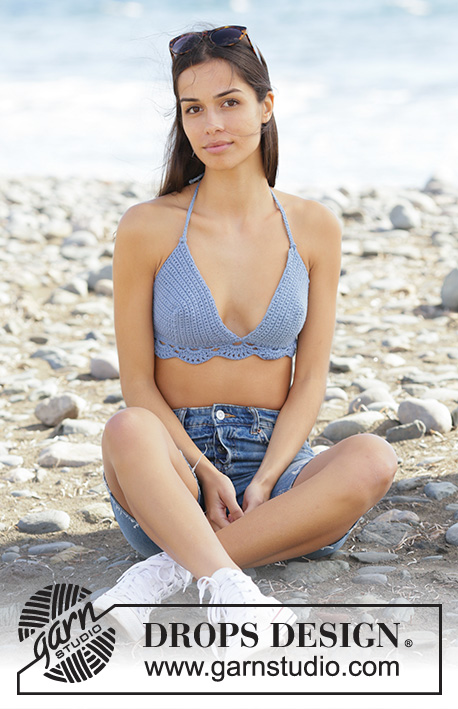
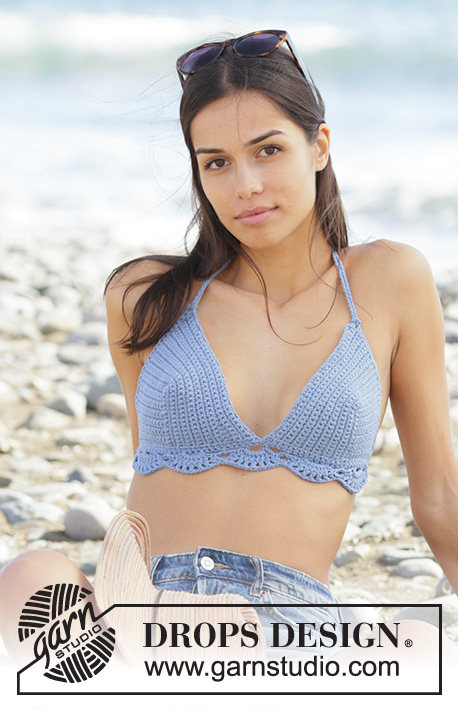
Crocheted bikini top in DROPS Paris. Piece is worked with double crochets and fans. Size: S - XXXL

DROPS 199-54
DROPS design: Pattern w-747
Yarn group C or A + A
----------------------------------------------------------

SIZE:
S - M - L - XL - XXL - XXXL

MATERIALS:
DROPS PARIS from Garnstudio (belongs to yarn group C)
100-100-100-150-150-150 g colour no 30, jeans blue

CROCHET TENSION:
18 double crochets in width and 21 rows vertically = 10 x 10 cm.

CROCHET HOOK:
DROPS CROCHET HOOK SIZE 3.5 mm
Hook size is only a suggestion! If you have too many stitches on 10 cm switch to larger hook. If you have too few stitches on 10 cm switch to smaller hook.

-------------------------------------------------------

Alternative Yarn – See how to change yarns here
Yarn Groups A to F – Use the same pattern and change the yarn here
Yarn usage using an alternative yarn – Use our yarn converter here

-------------------------------------------------------

More like this:
Women Bikinisfan pattern
DROPS Paris
DROPS Paris
100% Cotton
from 1.25 € /50g
Get the yarn to make this pattern from 2.50€.

The yarn cost is calculated from the pattern’s smallest size and the yarn’s cheapest product type. Looking for an even better price? You might find it on the DROPS Deals!

Pattern instructions

NOTE: This pattern is written in British English. All measurements in charts are in cm. For conversion from cm to inches - click here. There are different terms for crocheting in British and American English. If this pattern includes crochet, click for "crochet terms" here. For this pattern in American English, please click here.
----------------------------------------------------------

EXPLANATION FOR THE PATTERN:

----------------------------------------------------------

PATTERN: 
See diagrams A.1 to A.3.

CROCHET INFORMATION:
Begin every row with 1 chain stitch (does not replace first double crochet).

DECREASE/INCREASE TIP:
Decrease 1 double crochet as follows:
Insert hook in next stitch, get yarn *, repeat from *-* one more time, make a yarn over and pull yarn through all 3 stitches on hook.
Increase 1 double crochet as follows:
Work 2 double crochets in same stitch.

----------------------------------------------------------

START THE PIECE HERE:

----------------------------------------------------------

BIKINI TOP - SHORT OVERVIEW OF THE PIECE:
Worked back and forth. First work 2 bra cups, then work these 2 parts together with 1 edge around the entire piece. Then work a fan edge back and forth in bottom edge of bra cups. Fasten bikini top with straps in the neck and on back.

RIGHT BRA CUP:
Work 16-17-18-19-20-21 loose chain stitches on hook size 3.5 mm with Paris. Turn and work 1 double crochet in 2nd chain stitch from hook and then work 1 double crochet in every chain stitch the entire row = 15-16-17-18-19-20 double crochets. Then work rows with 1 double crochet in every double crochet - read CROCHET INFO. REMEMBER THE CROCHET TENSION! When piece measures approx. 8-9-9½-10-10½-11 cm, work next row as follows (= wrong side):
Work 1 double crochet in each of the first 14-15-16-17-18-19 double crochets, work 3 double crochets in next stitch (= 2 stitches increased), continue along the side downwards and work 15-16-17-18-19-20 double crochet evenly around edge stitch down along this side = 32-34-36-38-40-42 double crochets. Then work rows with 1 double crochet in every double crochet for approx. 8-9-9½-10-10½-11 cm – adjust after a row from wrong side. Cut and fasten the yarn.

LEFT BRA CUP:
Work 16-17-18-19-20-21 loose chain stitches on hook size 3.5 mm with Paris. Turn and work 1 double crochet in 2nd chain stitch from hook and then work 1 double crochet in every chain stitch the entire row = 15-16-17-18-19-20 double crochets. Then work rows with 1 double crochet in every double crochet - read CROCHET INFO. When piece measures approx. 8-9-9½-10-10½-11 cm, work next row as follows (= right side):
Work 1 double crochet in each of the first 14-15-16-17-18-19 double crochets, work 3 double crochets in next stitch (= 2 stitches increased), continue along the side downwards and work 15-16-17-18-19-20 double crochet evenly around edge stitch down along this side = 32-34-36-38-40-42 double crochets. Then work rows with 1 double crochet in every double crochet for approx. 8-9-9½-10-10½-11 cm – adjust after a row from right side. now work left bra cup together with right bra cup from here (do not cut the yarn) as follows:

EDGE:
Work 1 slip stitch in last stitch worked on right bra cup, 1 chain stitch, * 1 double crochet, 3 chain stitch, skip 2 double crochets *, work from *-* the rest of row, continue down along the side and work 1 double crochet around edge stitch in every row, continue along bottom edge and work 1 double crochet in each of the remaining 30-32-34-36-38-40 double crochets on right bra cup. Then work over the first 30-32-34-36-38-40 double crochet on left bra cup, continue along the side and work 1 double crochet around edge stitch in every row, continue over the remaining 30-32-34-36-38-40 double crochets with * 1 double crochet, 3 chain stitches, skip 2 double crochets *, work from *-* the entire row, finish round with 1 double crochet in last stitch and 1 slip stitch in first chain stitch at beginning of round. Cut and fasten the yarn.

FAN EDGE:
Work in the bottom edge on bra cups. Begin from wrong side and work 1 double crochet in each of the 60-64-68-72-76-80 double crochets – AT THE SAME TIME adjust number of stitches to 58-58-69-69-80-80 – read DECREASE/INCREASE = 58-58-69-69-80-80 double crochets. Continue to work as follows: Work A.1 over 12 stitches, work A.2 over 33-33-44-44-55-55 stitches (= 3-3-4-4-5-5 repetitions of 11 stitches) and finish with A.3 over the last 13 stitches. Continue until A.1 to A.3 have been worked vertically, fasten off.

STRAPS:
1 string = work a chain stitch row of approx. 115 cm. Tie a knot in each end and shape the yarn ends by cutting. Place strap double, thread loop through the top corner on one bra cup. Then pull ends through loop and tighten. Make another string and fasten it at the top corner on the other bra cup. Make 2 more strings the same way and fasten in the remaining corners in bottom edge of bra cups (not in fan edge).

Diagram

symbols = row has already been worked! Begin on next row (at the arrow)
symbols = begin here
symbols = double crochet in stitch
symbols = double crochet around chain space
symbols = 1 chain stitch
symbols = 5 chain stitches
symbols = treble crochet around chain space
symbols = treble crochet in stitch
diagram
diagram
Do you have a question? See a list of frequently asked questions (FAQ)

Knitting tension is what determines the final measurements of your work, and is usually measured per 10 x 10 cm. It is provided like so: number of stitches in width x number of rows in height - eg: 19 stitches x 26 rows = 10 x 10 cm.

The knitting tension is very individual; some people knit/crochet loosely while others work tightly. You adjust the knitting tension with the needle size, which is why the suggested needle size is only meant as a guide! You need to adjust this (up or down) to ensure that YOUR knitting tension matches the knitting tension provided in the pattern. If you work with a different knitting tension than provided you will have a different yarn consumption, and your work will have different measurements than what the pattern suggests.

The knitting tension also determines which yarns can replace each other. As long as you achieve the same knitting tension you can replace one yarn with another.

See DROPS lesson: How to measure your tension/gauge

See DROPS video: How to make a gauge tension swatch

The required amount of yarn is provided in grams, eg: 450 g. To calculate how many balls you’ll need you first need to know how many grams are in 1 ball (25g, 50g or 100g). This information is available if you click on the individual yarn quality on our pages. Divide the amount required with the amount of each ball. For example, if each ball is 50g (the most common amount), the calculation will be as follows: 450 / 50 = 9 balls.

The important thing when changing from one yarn to another is that the knitting/crochet tension remains the same. This is so that the measurements of the finished piece will be the same as on the sketch provided. It is easier to achieve the same knitting tension using yarns from the same yarn group. It is also possible to work with multiple strands of a thinner yarn to achieve the knitting tension of a thicker one. Please try our yarn converter. We recommend you to always work a test swatch.

Please NOTE: when changing yarn the garment might have a different look and feel to the garment in the photo, due to individual properties and qualities of each yarn.

See DROPS lesson: Can I use a different yarn than the one mentioned in the pattern?

All our yarns are categorised into yarn groups (from A to F) according to thickness and knitting tension – group A contains the thinnest yarns and group F the thickest. This makes it easier for you to find alternative yarns to our patterns, should you wish to switch yarn. All yarns within the same group have a similar knitting tension and can easily replace each other. However, different yarn qualities have different structures and properties which will give the finished work a unique look and feel.

Click here for an overview of the yarns in each yarn group

At the top of all our patterns you’ll find a link to our yarn calculator, which is a helpful tool should you wish to use a different yarn than suggested. By filling in the yarn quality you wish to replace, the amount (in your size) and number of strands, the calculator will present good alternative yarns with the same knitting tension. Additionally it will tell you how much you’ll require in the new qualities and whether you’ll need to work with multiple strands. Most skeins are 50g (some are 25g or 100g).

If the pattern is worked with multiple colours, every colour will have to be calculated separately. Similarly, if the pattern is worked with several strands of different yarns (for example 1 strand Alpaca and 1 strand Kid-Silk) you will have to find alternatives for each, individually.

Click here to see our yarn calculator

Since different yarns have different qualities and textures we have chosen to keep the original yarn in our patterns. However, you can easily find options among our available qualities by using our yarn calculator, or simply pick a yarn from the same yarn group.

It is possible that some retailers still have discontinued yarns in stock, or that someone has a few skeins at home that they would like to find patterns for.

The yarn calculator will provide both alternative yarn as well as required amount in the new quality.

If you think it's hard to decide what size to make, it can be a good idea to measure a garment you own already and like the size of. Then you can pick the size by comparing those measures with the ones available in the pattern's size chart.

You'll find the size chart at the bottom of the pattern.

See DROPS lesson: How to read size chart

The needle size provided in the pattern serves only as a guide, the important thing is to follow the knitting tension. And since knitting tension is very individual, you will have to adjust the needle size to ensure that YOUR tension is the same as in the pattern – maybe you’ll have to adjust 1, or even 2 needle sizes, up or down to achieve the correct tension. For this, we recommend that you work test swatches.

Should you work with a different knitting tension than the one provided, the measurements of the finished garment might deviate from the measurement sketch.

See DROPS lesson: How to measure your tension/gauge

See DROPS video: How to make a tension/gauge swatch

Working a garment top-down provides more flexibility and room for personal adjustment. For example it is easier to try the garment on while working, as well as making adjustments to length of yoke and shoulder caps.

The instructions are carefully explaining every step, in the correct order. Diagrams are adjusted to the knitting direction and are worked as usual.

The diagram depicts all rows/rounds, and every stitch seen from the right side. It is read from bottom to top, from right to left. 1 square = 1 stitch.

When working back and forth, every other row is worked from the right side and every other row is worked from the wrong side. When working from the wrong side, the diagram will have to be worked reversed: from left to right, knit stitches are purled, purl stitches are knit etc.

When working in the round every round is worked from the right side and the diagram are worked from right to left on all rounds.

See DROPS lesson: How to read knitting diagrams

The diagram depicts all rows/rounds, and every stitch seen from the right side. It is worked from bottom to top, from right to left.

When working back and forth every other row is worked from the right side: from right to left and every other row is worked from the wrong side: from left to right.

When working in the round, every row in the diagram are worked from the right side, from right to left.

When working a circular diagram you start in the middle and work your way outwards, counter clockwise, row by row.

The rows usually start with a given number of chain stitches (equivalent to the height of the following stitch), this will either be depicted in the diagram or explained in the pattern.

See DROPS lesson: How to read crochet diagrams

Instructions for working several diagrams after each other on the same row/round, will often be written like so: “work A.1, A.2, A.3 a total of 0-0-2-3-4 times". This means you work A.1 once, then A.2 is worked once, and A.3 is repeated (in width) the number of times provided for your size – in this case like so: S = 0 times, M = 0 times, L=2 times, XL= 3 times and XXL = 4 times.

The diagrams are worked as usual: begin with the first row in A.1, then work the first row in A.2 etc.

See DROPS lesson: How to read knitting diagrams

See DROPS lesson: How to read crochet diagrams

The total width of the garment (from wrist-to-wrist) will be larger in the larger sizes, despite the actual sleeves being shorter. The larger sizes have longer sleeve caps and wider shoulders, so there will be a good fit in all sizes.

The measurement sketch/schematic drawing provides information regarding the full length of the garment. If it’s a jumper or a jacket the length is measured from the highest point on the shoulder closest to the neckline, and straight down to the bottom of the garment. It is NOT measured from the tip of shoulder. Similarly, the length of yoke is measured from the highest point on the shoulder and down to where yoke is split into body and sleeves.

On a jacket measures are never taken along bands, unless specifically stated. Always measure inside band stitches when measuring the length.

See DROPS lesson: How to read a schematic drawing

Diagrams are often repeated on the round or in height. 1 repeat is the diagram the way it appears in the pattern. If it says to work 5 repeats of A.1 in the round, then you work A.1 a total of 5 times after/next to each other in the round. If it says to work 2 repeats of A.1 vertically/in height you work the entire diagram once, then begin again at the start and work the entire diagram one more time.

Chain stitches are slightly narrower than other stitches and to avoid working the cast-on edge too tight, we simply chain more stitches to begin with. The stitch count will be adjusted on the following row to fit the pattern and measurement sketch.

The rib edge is more elastic and will contract slightly compared to, for example, stocking stitch. By increasing before the rib edge, you avoid a visible difference in width between the rib edge and the rest of the body.

It’s very easy to cast off too tightly, and by making yarn overs while casting off (and simultaneously casting these off) you avoid a too tight cast off edge.

See DROPS video: How to bind off with yarn overs (yo)

To achieve an even increase (or decrease) you can increase on, for example: every 3rd and 4th row alternately, like so: work 2 rows and increase on the 3rd row, work 3 rows and increase on the 4th. Repeat this until the increase is complete.

See DROPS lesson: Increase or decrease 1 st on every 3rd and 4th row alternately

Should you prefer to work in the round instead of back and forth, you may of course adjust the pattern. You’ll need to add steeks mid-front (usually 5 stitches), and follow the instructions. When you would normally turn and work from the wrong side, simply work across the steek and continue in the round. At the end you’ll cut the piece open, pick up stitches to work bands, and cover the cut edges.

See DROPS video: How to knit steeks and cut open

Should you prefer to work back and forth instead of in the round, you may of course adjust the pattern so you work the pieces separately and then assemble them at the end. Divide the stitches for the body in 2, add 1 edge stitch in each side (for sewing) and work the front and back pieces separately.

See DROPS lesson: Can I adapt a pattern for circular needles into straight needles?

Pattern repeats can vary slightly in the different sizes, in order to get the correct proportions. If you’re not working the exact same size as the garment in the photo, yours might deviate slightly. This has been carefully developed and adjusted so that the complete impression of the garment is the same in all sizes.

Make sure to follow instructions and diagrams for your size!

If you have found a pattern you like which is available in women’s size it’s not very difficult to convert it to men’s size. The biggest difference will be the length of sleeves and body. Start working on the women size that you think would fit across the chest. The additional length will be worked right before you cast off for the armhole/sleeve cap. If the pattern is worked top-down you can add the length right after the armhole or before the first decrease on sleeve.

Regarding additional yarn amount, this will depend on how much length you add, but it is better with a skein too many than too few.

All yarns will have excess fibres (from production) that might come off as lint or shedding. Brushed yarns (ie hairier yarns) have more of these loose, excess fibres, causing more shedding.

Shedding also depends on what is worn under or over the garment, and whether this pulls at the yarn fibres. It’s therefore not possible to guarantee that there will be no shedding

Below are some tips on how to get the best result when working with hairier yarns:

1. When the garment is finished (before you wash it) shake it vigorously so the looser hairs come off. NOTE: do NOT use a lint roller, brush or any method that pulls at the yarn.

2. Place the garment in a plastic bag and put it in your freezer - the temperature will cause the fibres to become less attached to each other, and excess fibres will come off easier.

3. Leave in the freezer for a few hours before taking it out and shaking it again.

4. Wash the garment according to the instructions on the yarn label.

Pilling is a natural process that happens to even the most exclusive of fibers. It's a natural sign of wear and tear that is hard to avoid, and that is most visible in high friction areas of your garment like a sweater's arms and cuffs.

You can make your garment look as new by removing the pilling, using a fabric comb or a pill/lint remover.

Still can't find the answer you need? Then scroll down and leave your question so one of our experts can try to help you. This will be done normally within 5 to 10 working days.
In the meantime, you can read the questions and answers that others have left to this pattern or join the DROPS Workshop on Facebook to get help from fellow knitters/crocheters!

You might also like...

Post a comment to pattern DROPS 199-54

We would love to hear what you have to say about this pattern!

If you want to leave a question, please make sure you select the correct category in the form below, to speed up the answering process. Required fields are marked *.

Comments / Questions (17)

country flag Hanne wrote:

Har dere en størrelsen-guide til denne? Skulle gjerne hatt cup-størrelsen, siden man lett kan justere stroppene.

17.09.2023 - 13:17

DROPS Design answered:

Hei Hanne, Du finner en målskisse på bunnen av oppskriften. God fornøyelse!

18.09.2023 - 06:41

country flag Carole wrote:

Grazie! Sono bellissimi i vostri modelli Non capisco però una cosa, nella lavorazione delle coppe non capisco la differenza fra la lavorazione di quella di destra e quella di sinistra. Essendo lavorato a maglia bassa, ogni volta che uno fa una riga il lavoro viene girato, perciò non c’è un dritto e un rovescio. Come fa il dritto del lavoro a diventare rovescio? Grazie

23.07.2023 - 23:33

country flag Carole wrote:

È bellissimo! Non capisco però una cosa, nella lavorazione delle coppe non capisco la differenza fra la destra e la sinistra. Lavorando a mangia bassa non c’è un diritto d un rovescio, cosa significa che il dritto del lavoro che diventa rovescio? Grazie mille

23.07.2023 - 23:31

country flag Mai wrote:

Vielen Dank für die schnelle Antwort und den Tipp! Liebe Grüße Mai :)

26.06.2023 - 17:09

country flag Mai wrote:

Hallo, mir sind die Brustcups des Bikinis leider zu klein, kann ich wenn ich eigentlich S habe auch M Brustcups machen und und einen S Spitzenrand häkeln?

26.06.2023 - 12:43

DROPS Design answered:

Liebe Mai, ja sicher können Sie die Größe anpassen, seien Sie nur sicher, daß Sie dann genügend Maschen für den Spitzenrand haben (12 M für A.1 + 13 M für A.3 und 11 M für jeden A.2). Viel Spaß beim häkeln!

26.06.2023 - 13:24

country flag Trine Mathiassen wrote:

Jeg har nå hæklet Høyre skål og skal så hækle venstre, men jeg forstår ikke helt hvordan jeg skal hækle den, det står at den skal hækles på vrangen…

21.01.2023 - 15:58

DROPS Design answered:

Hei Trine. Litt usikker på du mener når du skriver at den skal hekles fra vrangen. Hvor i oppskriften står det under venstre brystcup? Har du sett hjelpevideoene til denne bikinien? mvh DROPS Design

23.01.2023 - 12:48

country flag Signe wrote:

Hei! Jeg har dysleksi og sliter veldig med å forstå oppskriften. Jeg har heklet hele bikinitoppen ved hjelp av videoene. Jeg sliter med å forstå hvordan jeg skal hekle stroppene. Det er garantert flere som meg som sliter med å forstå tekst og forstår best ved å se videoer, derfor lurte jeg på om dere kunne lage en video der dere lager stroppene.

12.06.2022 - 12:45

DROPS Design answered:

Hei Signe. Stroppene hekles som flere luftmasker etter hverandre, se denne videoen på hvordan: Hvordan hekle en luftmaske (lm) Til denne bikinien hekles det 4 stropper a ca 115 cm. mvh DROPS Design

13.06.2022 - 11:47

country flag Michaela wrote:

Hej! Det står att Paris tillhör har grupp B men när man skall beställa står det C. Om jag vill byta garn, är det då grupp B eller C jag skall ha?

11.03.2022 - 10:28

DROPS Design answered:

Hej Michaela Det står fel här, DROPS Paris tillhör garngrupp C (vi ska rätta det) så det är alltså ett garn i garngrupp C du ska använda. Mvh DROPS Design

11.03.2022 - 14:05

country flag MARTIN wrote:

Bonjour, Comment savoir quelle taille choisir ? Y-a-t-il une correspondance de taille de bonnets ? Merci.

23.03.2021 - 17:34

DROPS Design answered:

Bonjour Mme Martin, vous pouvez comparez les mesures du schéma à celles d'un bikini similaire que vous avez. Retrouvez ici plus d'infos sur les schémas. Bon crochet!

24.03.2021 - 08:50

country flag Eline wrote:

Hei, jeg har en kunst og håndverk oppgave, og jeg tenkte jeg skulle hekle denne. Jeg har egentlig aldri heklet før, så jeg lurer på om det er en video av denne oppskriften? Eller om dere kan lage en?

11.03.2021 - 20:14