
Popular categories
Looking for a yarn?


|
|||||||||||||||||||||||||||||||||||||||||||
Summer Lace |
|||||||||||||||||||||||||||||||||||||||||||
 |
 |
||||||||||||||||||||||||||||||||||||||||||
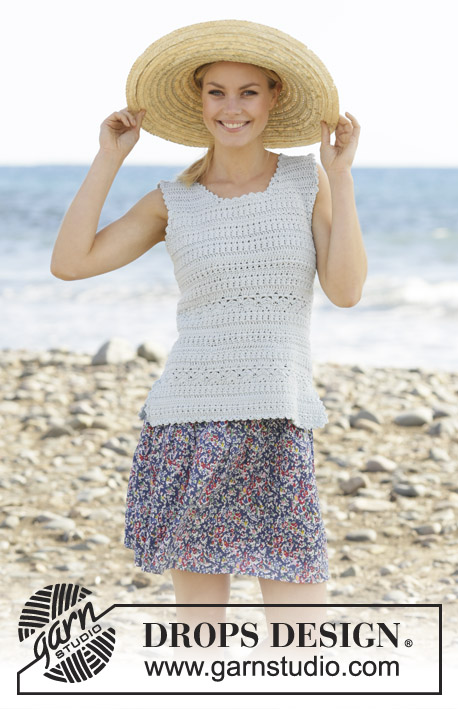
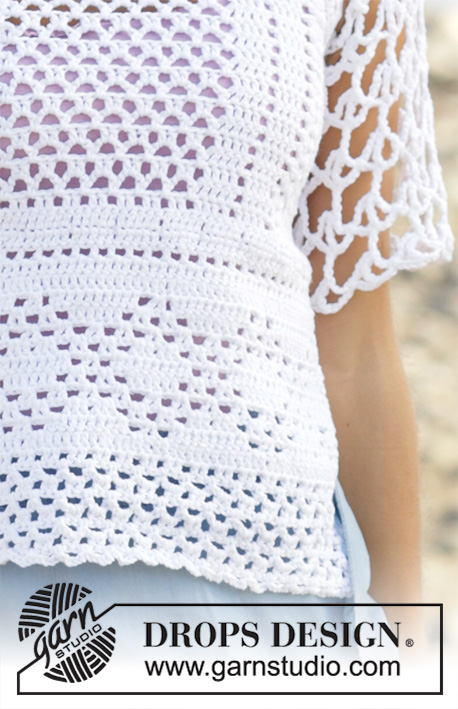
Crochet top in DROPS Cotton Light. Piece is crocheted bottom up with lace pattern. Size: S - XXXL
DROPS 199-50 |
|||||||||||||||||||||||||||||||||||||||||||
|
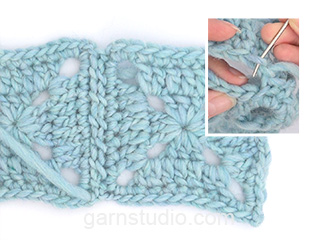
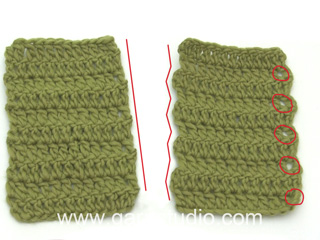
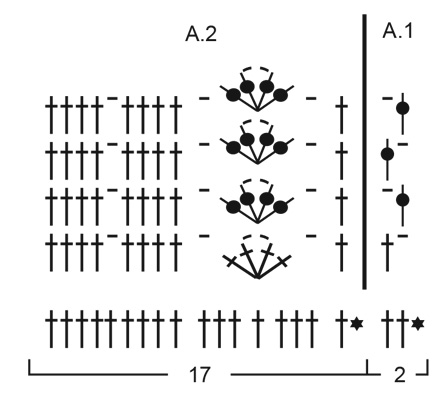
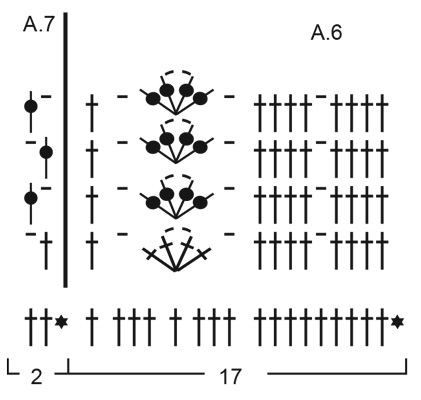
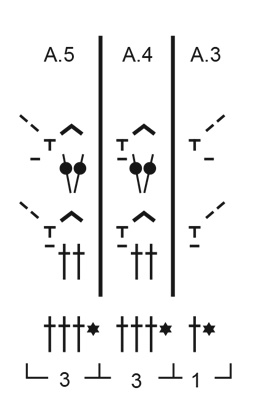
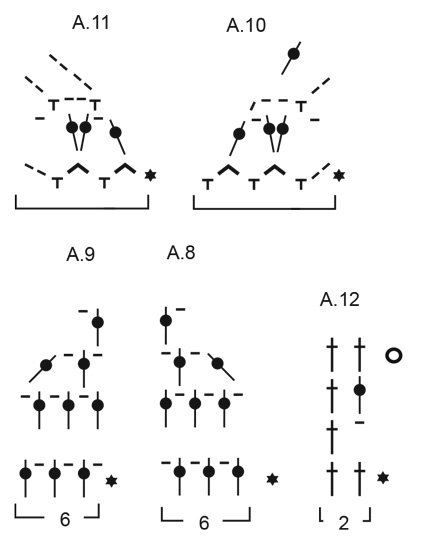
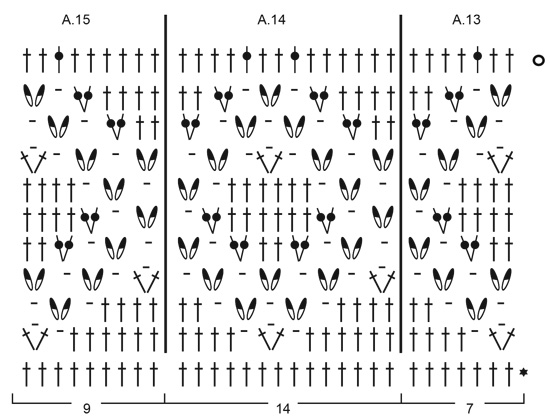
---------------------------------------------------------- EXPLANATION FOR THE PATTERN: ---------------------------------------------------------- CROCHET INFORMATION: At the beginning of every row replace first treble crochet with 3 chain stitches. PATTERN: See diagrams A.1 to A.17. DECREASE TIP: * Make 1 yarn over, insert hook in next stitch, get yarn, make 1 yarn over and pull yarn through the 2 first loops on hook *, repeat from *-* 1 more time, make 1 yarn over and pull yarn through all 3 loops on hook (= 1 treble crochet decreased). INCREASE TIP: Work 2 treble crochets in same stitch (= 1 treble crochet increased). ---------------------------------------------------------- START THE PIECE HERE: ---------------------------------------------------------- TOP - SHORT OVERVIEW OF THE PIECE: Worked back and forth in several pieces and sewn together when finished. Work from the waist, bottom up. Then work tail from waist and down. Work sleeves back and forth, top down. FRONT PIECE (top part): Piece is worked bottom up. Work 90-98-108-121-131-144 chain stitches on hook size 4 mm with Cotton Light. Turn and work 1 treble crochet in 4th chain stitch from hook (= 2 treble crochets), work 1 treble crochet in each of the next 2-4-2-3-1-2 chain stitches, * skip 1 chain stitch, 1 treble crochet in each of the next 5 chain stitches *, work from *-* 14-15-17-19-21-23 times in total = 74-81-89-100-108-119 treble crochets. Work next row as follows: Work 1 treble crochet in first stitch – read CROCHET INFORMATION, work A.1 over 8-10-14-18-22-26 stitches (= 4-5-7-9-11-13 repetitions of 2 stitches), work A.2 over 17 stitches, A.3 over next treble crochet, work A.4 over 18-21-21-24-24-27 stitches (= 6-7-7-8-8-9 repetitions of 3 stitches), work A.5 over 3 stitches, work A.6 over 17 stitches, work A.7 over 8-10-14-18-22-26 stitches (= 4-5-7-9-11-13 repetitions of 2 stitches) and finish with 1 treble crochet in last stitch. When entire diagram A.1 to A.7 has been worked vertically, repeat the last 2 rows onwards. When piece measures 13-14-15-16-17-18 cm, decrease for armholes, i.e. cut the yarn (does not apply to size S). Work first row from right side as follows: Skip 0-2-6-10-14-18 stitches for armhole, fasten yarn with 1 slip stitch (does not apply to size S) and work 3 chain stitches (= 1 treble crochet) in next stitch, work A.8 over 6 stitches, work A.1 over 2 stitches, continue pattern A.2 to A.6 as before, work A.7 over 2 stitches, work A.9 over 6 stitches and finish with 1 treble crochet in next stitch. 0-2-6-10-14-18 stitches remain on row for armhole. When A.8 and A.9 have been worked vertically, 3-4-6-8-10-12 repetitions (of 2 stitches) have been decreased in total of A.1 and A.7 in each side of piece. Continue on as before, i.e. work as follows: 1 treble crochet in first stitch, work A.1 over 2 stitches, continue pattern A.2 to A.6 as before (equals over 56-59-59-62-62 stitches), work A.7 over 2 stitches and 1 treble crochet in last stitch. Continue this pattern until piece measures 21-23-25-25-27-29 cm, adjust so that next row is from right side. Now work left shoulder as follows: Work 1 treble crochet, A.1 and A.2 as before, then work A.10. When A.10 has been worked vertically, continue with 1 treble crochet, A.1, A.2 and 1 treble crochet as before until piece measures 32-34-36-38-40-42 cm. Cut and fasten the yarn. Skip the middle 3-4-4-5-5-6 chain spaces (= neck). Begin from right side and work right shoulder as follows: Work A.11 (= over 2 chain spaces), work A.6, A.7 and 1 treble crochet as before. When A.11 has been worked vertically, continue with 1 treble crochet, A.6, A.7 and 1 treble crochet as before until piece measures 32-34-36-38-40-42 cm - adjust according to left shoulder. Cut and fasten the yarn. FRONT PIECE (bottom part): Work top down. Work 1 treble crochet in each of the same chain stitches as top part of front piece (= i.e. 74-81-89-100-108-119 chain stitches) – AT THE SAME TIME decrease 4-3-5-6-4-3 treble crochets evenly – read DECREASE TIP = 70-78-84-94-104-116 treble crochets. Work next row as follows: Work 1 treble crochet in first stitch, repeat A.12 (= 2 stitches) until 1 stitch remains, finish with 1 treble crochet in last stitch. Continue until A.12 has been worked vertically – AT THE SAME TIME on last row increase 4-10-4-8-12-14 treble crochets evenly – read INCREASE TIP = 74-88-88-102-116-130 treble crochets. Continue to work as follows: Work 1 treble crochet in first stitch, work A.13 over 7 stitches, work A.14 over the next 56-70-70-84-98-98 stitches (= 4-5-5-6-7-7 repetitions of 14 stitches), work A.15 over 9 stitches and finish with 1 treble crochet in last stitch. Continue until A.13 to A.15 have been worked vertically – AT THE SAME TIME on last row adjust number of stitches by decreasing/increasing evenly to 81-90-96-105-117-129 treble crochets. Continue to work as follows: Work 1 treble crochet in first stitch, A.3 over 1 stitch, repeat A.4 until 4 stitches remain (= 25-28-30-33-37-40 repetitions of 3 stitches), work A.5 over 3 stitches and finish with 1 treble crochet in last stitch. When entire diagram A.3 to A.5 has been worked vertically, repeat the last 2 rows onwards. When bottom part of front piece measures approx. 24 cm in all sizes (= approx. 53-55-57-59-61-63 cm from shoulder), finish after last row. Cut and fasten the yarn. BACK PIECE (top part): Piece is worked bottom up. Work the same way as on front piece until stitches have been decreased for armhole. Work until piece measures 25-27-29-31-33-35 cm, adjust so that next row is from right side. Now work right shoulder as follows: Work 1 treble crochet, A.1 and A.2 as before, then work A.10. When A.10 has been worked vertically, continue with 1 treble crochet, A.1, A.2 and 1 treble crochet as before until piece measures 32-34-36-38-40-42 cm - adjust according to front piece. Cut and fasten the yarn. Skip the middle 3-4-4-5-5-6 chain spaces (= neck). Begin from right side and work left shoulder as follows: Work A.11 (= over 2 chain spaces), work A.6, A.7 and 1 treble crochet as before. When A.11 has been worked vertically, continue with 1 treble crochet, A.6, A.7 and 1 treble crochet as before until piece measures 32-34-36-38-40-42 cm - adjust according to left shoulder. Cut and fasten the yarn. BACK PIECE (bottom part): Work the same way as on front piece (bottom part). ASSEMBLY: Sew shoulder seam and sew side seams - sew in outer loops of edge stitches to avoid a chunky seam. SLEEVE: Worked back and forth. Begin in the side under sleeve, and work evenly in rows around the entire armhole (NOTE: Do not work over the 0-4-12-20-28-36 stitches mid under sleeve on yoke, sleeve should be sewn in these stitches later) as follows: Work * 1 treble crochet around outermost row, 1 chain stitch *, work from *-* 33-33-36-39-39-44 times in total, around the entire armhole finish with 1 treble crochet – read CROCHET INFORMATION-2 = 67-67-73-79-79-85 stitches. Continue to work as follows: Work A.16 until 1 stitch remains (= 11-11-12-13-13-14 repetitions of 6 stitches) and finish with A.17 over last stitch. Repeat A.16 and A.17 vertically until sleeve measures approx. 24-24-24-28-28-28 cm – finish after last row. Cut and fasten the yarn. Work the other sleeve the same way. ASSEMBLY: Sew each side of sleeve to body, and the sew underarm seam - sew in outer loops of edge stitches to avoid a chunky seam. NECK EDGE: Begin on one shoulder and work * 1 double crochet around outermost treble crochet/row, 3 chain stitches *, work from *-* the along entire neck, and finish with 1 slip stitch in first double crochet at the beginning of round. |
|||||||||||||||||||||||||||||||||||||||||||
Diagram explanations |
|||||||||||||||||||||||||||||||||||||||||||
|
|||||||||||||||||||||||||||||||||||||||||||
|
|||||||||||||||||||||||||||||||||||||||||||
|
|||||||||||||||||||||||||||||||||||||||||||
|
|||||||||||||||||||||||||||||||||||||||||||
|
|||||||||||||||||||||||||||||||||||||||||||

|
|||||||||||||||||||||||||||||||||||||||||||
|
|||||||||||||||||||||||||||||||||||||||||||

|
|||||||||||||||||||||||||||||||||||||||||||
|
Have you made this or any other of our designs? Tag your pictures in social media with #dropsdesign so we can see them! Do you need help with this pattern?You'll find tutorial videos, a Comments/Questions area and more by visiting the pattern on garnstudio.com. © 1982-2024 DROPS Design A/S. We reserve all rights. This document, including all its sub-sections, has copyrights. Read more about what you can do with our patterns at the bottom of each pattern on our site. |
|||||||||||||||||||||||||||||||||||||||||||


With over 40 years in knitting and crochet design, DROPS Design offers one of the most extensive collections of free patterns on the internet - translated to 17 languages. As of today we count 304 catalogues and 11422 patterns - 11422 of which are translated into English (UK/cm).
We work hard to bring you the best knitting and crochet have to offer, inspiration and advice as well as great quality yarns at incredible prices! Would you like to use our patterns for other than personal use? You can read what you are allowed to do in the Copyright text at the bottom of all our patterns. Happy crafting!
Comments / Questions (18)
Hej. Har kommit till A3 och kört fast där. Kan inte hitta symbolerna där i symbolförklaringen. Vad ska man göra vid A3
14.03.2024 - 14:54DROPS Design answered:
Hej Jenny, jo A.3 består af luftmasker, for at komme op i højden :)
19.03.2024 - 11:45Hallo waarom zijn de aantal centimeter van het geschreven patroon anders dan op de het telpatroon gr marion
11.07.2023 - 18:55DROPS Design answered:
Dag Marion,
Kan je aangeven waar er precies een verschil is tussen het geschreven patroon en de maattekening? |De totale lengtes van de mouw en de panden komen bijvoorbeeld overeen.
12.07.2023 - 16:27Ik heb echt problemen met de tekst bij de mouw: er wordt gezegd dat je om het hele armsgat moet haken, maar bij “afwerking” staat ook dat je elke kant van de mouw aan het lijf moet naaien. Hoe zit dit? Dat lijkt me dubbelop,,, de mouw zit al aan het lijf gehaakt. Komt daarbij nog dat de steken midden onder de mouw moeten worden vrijgelaten (zie mijn vraag hieronder). Het is één groot raadsel voor mij. Kunt u mij helpen? Alvast bedankt!
14.04.2022 - 23:19DROPS Design answered:
Dag Edith,
Bij de beschrijving van de mouw staat in het begin dat je niet over de steken midden onder de mouw op de pas haakt en dat de mouw later aan deze steken genaaid worden. Dit is wat er bedoeld wordt me 'Naai elke kant van de mouw aan het lijf' bij onder de paragraaf afwerking. Echter als je maat S haakt gaat dit niet op omdat er 0 steken midden onder de mouw op de pas zitten.
20.04.2022 - 09:57Ik begrijp niet dat je bij de mouw 12 steken moet openlaten. Krijg je dan geen gat waar de oksel zit? Of worden die 12 steken een deel van de mouwnaad? Graag uw reactie.
14.04.2022 - 15:08DROPS Design answered:
Dag Edith,
Nee, je krijgt geen gat hoor. Deze 12 steken zijn onderdeel van het armsgat en de mouw komt hier tegenaan. Niet de mouwnaad, maar de kop van de mouw.
19.04.2022 - 08:18Jag förstår inte vänster axel. Frågor inom parentes. "Virka 1 stolpe, A.1 och A.2 som förut" (menas det som de två sista varven på A1 och A2?). När "A.10 är färdigvirkat på höjden" (Ska den virkas fram och tillbaka eller fram till nästa "A1, A2 och sen tillbaka eller ska jag virka halva arbetet och sen vända? Om jag ska virka till uppnådd höjd, vilka rader ska jag då upprepa i A10, för det räcker ju inte med 3 rader?)
17.01.2022 - 15:31DROPS Design answered:
Hei Ulrika. Ja, de 2 siste radene av A.1 og A.2. Du hekler A.10 på høyre skulder og A.11 på venstre skulder. Når du hekler A.10 og A.11 hekler du også A.1 og A.2 og når du hekler siste rad av A.10 og A.11 vil de skrå naturlig den den siden de skal og det fortsettes med 1 stav, A.1 og A.2 som før. Du hekler hver skulder hver for seg. mvh DROPS Design
18.01.2022 - 12:10Nu är jag fast igen för jag får inte raderna att stämma. Tänker jag fel då jag tänker att diagrammet ska läsas varannan rad från höger och varannan från vänster? Det blir fel på rad tre då inte mönstren är över varandra?
05.12.2021 - 10:37DROPS Design answered:
Hei Ulrika. Første rad lese fra høyre til venstre. Andre rad fra fra venstre til høyre. Tredje rad fra høyre til venstre. Fjerde rad fra fra venstre til høyre, osv. Siden du hekler med flere diagrammer er det lurt å bruke maskemarkører mellom hvert diagram, da har du en bedre oversikt og det er lettere å se om diagrammene stemmer med hverandre i høyden (noe det skal gjøre). mvh DROPS Design
07.12.2021 - 14:20Mönster i varv 2. Jag har virkat en stolpe (3 lm) i första maskan och sen ska jag Virka A1 över 8 maskor. Första varvet är redan gjort säger diagrammet (fast det tycker jag inte, jag har ju bara virkat EN stolpe). Ska jag sedan gå uppåt och då virka 1 st, 1 lm och sen stolpe om lm/ lmb * 3 i de olika luftmaskbågarna från förra varvet? Sedan varv A3 så är det symboler som är snedstreck vilka inte är förklarade vad jag kan se.
10.11.2021 - 10:27DROPS Design answered:
Hei Ulrika. Første rad som hekles er forklart i oppskriften og denne raden har også en sort stjerne tegnet inn i diagrammene. Så når du har heklet denne raden og har 74-81-89-100-108- 119 staver, skal du begynne på 2. rad og etter diagram A.1 til A.7 slik: Hekle 1 stav i første maske (=3 luftmasker), hekle A.1 over 8-10-14-18-22-26 masker, hekle A.2 over 17 masker, A.3 over neste stav, hekle A.4 over 18-21-21-24-24-27 masker, hekle A.5 over 3 masker, hekle A.6 over 17 masker, hekle A.7 over 8-10-14-18-22-26 masker og avslutt med 1 stav i siste maske. Når hele diagram A.1 til A.7 er heklet ferdig i høyden, gjentas de siste 2 radene videre. mvh DROPS Design
15.11.2021 - 08:58Miten ihmeessa taman mallin A3 ja A5 mallikertojen vinot viivat virkataan. ovat kuin ketjusilmukat, mutta vinossa, miksi niistä ei kerrota piirrosten listassa, miten menetellaan.
28.06.2021 - 09:23Hallo, ich habe eine Frage: Ich habe jetzt das Vorderteil begonnen. 1. Reihe :108 Luftmaschen 2. Reihe: 5 Stäbchen, 1 Luftmasche 3. Reihe: Frage: sind die Muster A1 - A7 in einer Reihe zu häkeln? So dass in 1 Reihe die Muster A1 - A7 vorhanden sind? Ist zwischen den 5 Stäbchen in der 1. Reihe 1 Luftmasche zu häkeln? Vielen Danke für die Hilfe Tamara Weiße
06.02.2021 - 11:56DROPS Design answered:
Liebe Frau Weiße, bei der 1. Reihe muss 1 Luftmasche übersprungen werden und nicht gehäkelt werden. Man überspringt in der ersten R in regelmäßigen Abständen 1 Lm, damit der Rand nicht zu stramm und eng wird und elastisch bleibt - in der Regel häkelt man die Lm etwas fester als später die M, um das auszugleichen, schlägt man mehr Lm an. Wenn Ihnen sehr lockere Luftmaschen anschlagen, können Sie auch nur die Anzahl der Lm anschlagen, die Sie in der 2. R für die Stb brauchen (wobei dabei zu beachten ist, dass das 1. Stb aus 3 Lm besteht). Viel Spaß beim häkeln!
08.02.2021 - 08:16Jeg har brug for uddybning af hækleinformation 2 i forhold til ærmet. Hvor mange luftmasker tager man i begyndelsen af en dobbelt stangmaskerække og hvor mange luftmasker tager man i begyndelsen af en tre dobbelt stangmaske række? På forhånd tak.
20.07.2020 - 11:29DROPS Design answered:
Hej Marianne, du erstatter begge med 3 luftmasker. God fornøjelse!
31.07.2020 - 09:49