DROPS Merino Extra Fine
100% Wool
from 3.50 £ /50g
Get the yarn to make this pattern from 7.00£.

The yarn cost is calculated from the pattern’s smallest size and the yarn’s cheapest product type. Looking for an even better price? You might find it on the DROPS Deals!

DROPS SS24

Winter Baby

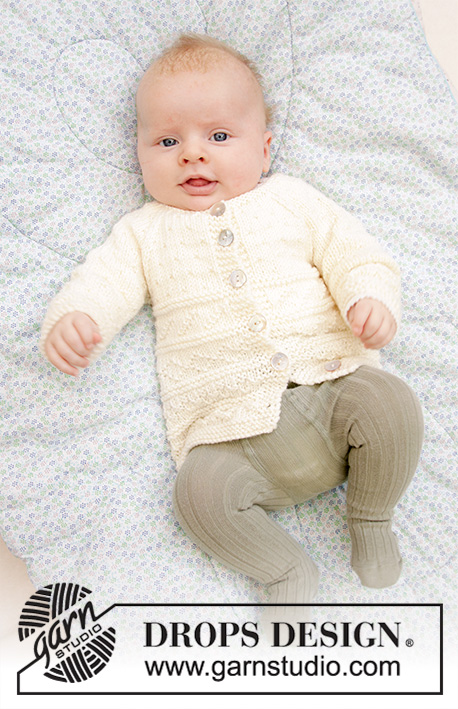
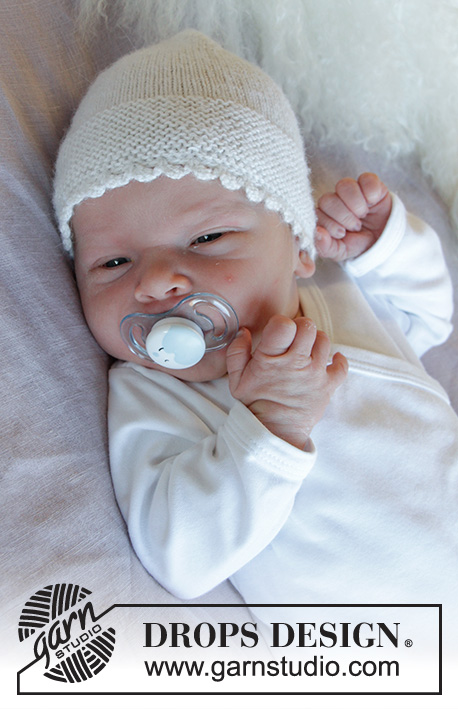
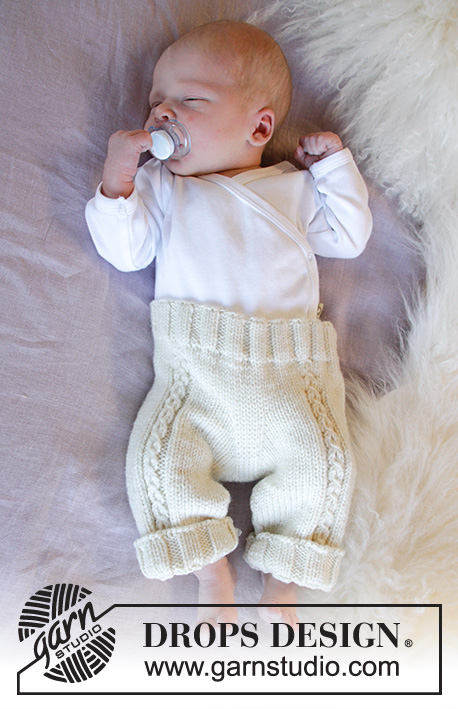
Knitted set of trousers and hat for baby in DROPS Merino Extra Fine. Size: Premature to 4 years

DROPS Baby 33-12
DROPS design: Pattern no me-071-by
Yarn group B
----------------------------------------------------------

TROUSERS:

SIZE:
Size: (<0) 0/1 - 1/3 - 6/9 - 12/18 months (2 - 3/4) years
Size equals approx. kid’s height in cm:
(40/44) 48/52 - 56/62 - 68/74 - 80/86 (92 - 98/104)

MATERIALS: 
DROPS MERINO EXTRA FINE from Garnstudio (belongs to yarn group B)
(100) 100-100-150-150 (150-200) g colour 01, off white

KNITTING TENSION:
21 stitches in width and 28 rows vertically in stocking stitch = 10 x 10 cm.

NEEDLES:
DROPS DOUBLE POINTED NEEDLES SIZE 3 mm
DROPS CIRCULAR NEEDLE SIZE 3 mm, length 60 cm.
DROPS DOUBLE POINTED NEEDLES SIZE 4 mm
DROPS CIRCULAR NEEDLE SIZE 4 mm, length 60 cm.
Needle size is only a suggestion! If you have too many stitches on 10 cm switch to larger needles. If you have too few stitches on 10 cm switch to smaller needles.
----------------------------------------------------------

HAT:
Size: (<0) 0/1 - 1/3 - 6/9 - 12/18 months (2 – 3/4) years
Fits head circumference in cm:
approx. (28/32) - 34/38 - 40/42 - 42/44 - 44/46 (48/50 – 50/52) cm

MATERIALS: 
DROPS MERINO EXTRA FINE from Garnstudio (belongs to yarn group B)
(50) 50-50-50-50 (50-100) g colour 01, off white

KNITTING TENSION:
21 stitches in width and 28 rows vertically in stocking stitch = 10 x 10 cm.

NEEDLES:
DROPS DOUBLE POINTED NEEDLES SIZE 3.5 mm
DROPS DOUBLE POINTED NEEDLES SIZE 4 mm
Needle size is only a suggestion! If you have too many stitches on 10 cm switch to larger needles. If you have too few stitches on 10 cm switch to smaller needles.

-------------------------------------------------------

Alternative Yarn – See how to change yarns here
Yarn Groups A to F – Use the same pattern and change the yarn here
Yarn usage using an alternative yarn – Use our yarn converter here

-------------------------------------------------------

DROPS Merino Extra Fine
100% Wool
from 3.50 £ /50g
Get the yarn to make this pattern from 7.00£.

The yarn cost is calculated from the pattern’s smallest size and the yarn’s cheapest product type. Looking for an even better price? You might find it on the DROPS Deals!

Pattern instructions

NOTE: This pattern is written in British English. All measurements in charts are in cm. For conversion from cm to inches - click here. There are different terms for crocheting in British and American English. If this pattern includes crochet, click for "crochet terms" here. For this pattern in American English, please click here.
----------------------------------------------------------

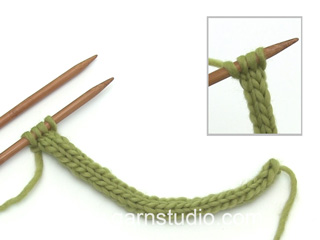
EXPLANATION FOR THE PATTERN:

----------------------------------------------------------

PATTERN (applies to pants):
See diagram A.1.

DECREASE TIP (applies to inside of legs):
Begin 3 stitches before marker and knit 2 together, knit 2 (marker is between these 2 stitches), slip 1 stitch knitwise, knit 1, pass slipped stitch over stitch worked.

INCREASE TIP (applies to pants):
Increase 1 stitch by making 1 yarn over, on next round work yarn over twisted to avoid holes.

----------------------------------------------------------

START THE PIECE HERE:

----------------------------------------------------------

TROUSERS - SHORT OVERVIEW OF THE PIECE:
Worked in the round on circular needles/double pointed needles, top down.


Cast on (84) 96-104-116-124 (136-144) stitches on circular needle size 3 mm with Merino Extra Fine. Knit 1 round. Then work rib in the round = knit 1/ purl 1. When rib measures 2½ cm, work a round with eyelet holes for tie as follows: * Knit 1, purl 1, make 1 yarn over, purl 2 together *, work from *-* the entire round (= (21) 24-26-29-31 (34-36) holes on round). Then continue rib = knit 1/purl 1 until piece measures 5 cm from cast-on edge. Switch to circular needle size 4 mm and work an elevation at the back of pants as explained below.

ELEVATION AT THE BACK:
To get a better fit work the pants higher at the back than at the front. This is done by working short rows back and forth as follows: Insert 1 marker at beginning of round = mid back. Work from right side and knit 10 past marker, turn, tighten yarn and purl 20 stitches back. Turn, tighten yarn and knit 30, turn, tighten yarn and purl 40. Turn, tighten yarn and knit 50, turn, tighten yarn and purl 60. Continue this way until (60) 60-80-80-100 (100-100) stitches have been purled. Turn piece, tighten yarn and knit until mid back.

TROUSERS:
Now work A.1 in the round over all stitches. REMEMBER THE KNITTING TENSION! When pants measures (15) 17-18-21-22 (23-24) cm from cast-on edge mid front, work next round as follows: Cast off 4 stitches (= mid back), knit (34) 40-44-50-54 (60-64) stitches, cast off 8 stitches mid front, knit (34) 40-44-50-54 (60-64) stitches and cast off the remaining 4 stitches mid back. Cut the yarn. Slip stitches in one side of piece on 1 stitch holder and work leg as explained below. NOW MEASURE THE PIECE FROM HERE!

LEG:
= (34) 40-44-50-54 (60-64) stitches. Distribute the stitches on double pointed needles size 4 mm and continue A.1 in the round. Knit the stitches that do not fit A.1. When piece measures 2 cm from division, decrease 2 stitches on inside of leg - read DECREASE TIP. Decrease like this every (1½) 1½-1½-1½-2 (2½-3½) cm (4) 5-7-8-8 (8-8) times in total = (26) 30-30-34-38 (44-48) stitches. Continue to work until leg measures (7) 9-12-15-19 (23-29) cm. Knit 1 round while increasing (6) 6-8-6-8 (8-10) stitches evenly (increase after every 5th stitch) – read INCREASE TIP = (32) 36-38-40-46 (52-58) stitches. Switch to double pointed needles size 3 mm and work rib in the round = knit 1/purl 1 for 6 cm (or desired measurements). Loosely cast off stitches with knit over knit and purl over purl. Work the other leg the same way.

ASSEMBLY:
Sew tog the opening between the legs.

TWINED STRING FOR TIE:
Cut 2 lengths of approx. 3 metres each. Twine the strands tog until they resist, fold the string double so that it twines again. Make a knot at each end. Thread tie up and down through eyelet row in pants, begin mid front and tie a bow.


----------------------------------------------------------

BEGIN PIECE FOR HAT HERE:

----------------------------------------------------------

HAT:
Worked in the round on double pointed needles from mid back.
Cast on (60) 66-72-78-84 (90-96) stitches on double pointed needles size 3.5 mm with Merino Extra Fine. Knit 1 round. Then work 4 rounds rib = knit 1/purl 1. Switch to double pointed needles size 4 mm. Knit 1 round. Insert 1 marker at beginning of round = mid back. Then work as follows:
ROUND 1: * Knit 1, make 1 yarn over, knit (8) 9-10-11-12 (13-14) stitches, slip 2 stitches knitwise, knit 1 and pass the 2 slipped stitches over stitch worked, knit (8) 9-10-11-12 (13-14) stitches, make 1 yarn over *, work from *-* 3 times in total.
ROUND 2: Knit all stitches.
Repeat round 1 and 2 until piece measures 7 cm in all sizes.
Then work the same way but without increases. I.e. continue decreases the same way until no stitches remain between decreases. On next round knit all stitches together 2 by 2. Cut the yarn and pull it through the remaining stitches, tighten together and fasten. Hat measures approx. (14) 14-15-16-17 (17-18) cm measured form one of the bottom tips.

TIE RIBBON:
Work back and forth with 2 double pointed needles size 3.5 mm. Pick up 4 stitches in the tip on one side of hat (a tip to cover the ear).
Knit 4 stitches, * do not turn piece, but push stitches over to the other side of needle, place the thread behind the 4 stitches, tighten yarn and knit the 4 stitches from the right side again *, work from *-* until tie measures approx. (14)16-18-20-22 (24-26) cm, cast off and fasten the yarn. Work the other tie the same way in the tip on the opposite side of hat.

POMPOM:
Make 2 pompoms with an approx. diameter of 3 cm. Fasten them at the top of hat.

This pattern has been corrected.

Updated online: 16.03.2020
New chart A.1.
Updated online: 19.10.2020
under LEG:
New numbers to size 0/1 months.

Diagram

symbols = knit
symbols = purl
diagram

Each of our patterns has specific tutorial videos to help you.

Do you have a question? See a list of frequently asked questions (FAQ)

Knitting tension is what determines the final measurements of your work, and is usually measured per 10 x 10 cm. It is provided like so: number of stitches in width x number of rows in height - eg: 19 stitches x 26 rows = 10 x 10 cm.

The knitting tension is very individual; some people knit/crochet loosely while others work tightly. You adjust the knitting tension with the needle size, which is why the suggested needle size is only meant as a guide! You need to adjust this (up or down) to ensure that YOUR knitting tension matches the knitting tension provided in the pattern. If you work with a different knitting tension than provided you will have a different yarn consumption, and your work will have different measurements than what the pattern suggests.

The knitting tension also determines which yarns can replace each other. As long as you achieve the same knitting tension you can replace one yarn with another.

See DROPS lesson: How to measure your tension/gauge

See DROPS video: How to make a gauge tension swatch

The required amount of yarn is provided in grams, eg: 450 g. To calculate how many balls you’ll need you first need to know how many grams are in 1 ball (25g, 50g or 100g). This information is available if you click on the individual yarn quality on our pages. Divide the amount required with the amount of each ball. For example, if each ball is 50g (the most common amount), the calculation will be as follows: 450 / 50 = 9 balls.

The important thing when changing from one yarn to another is that the knitting/crochet tension remains the same. This is so that the measurements of the finished piece will be the same as on the sketch provided. It is easier to achieve the same knitting tension using yarns from the same yarn group. It is also possible to work with multiple strands of a thinner yarn to achieve the knitting tension of a thicker one. Please try our yarn converter. We recommend you to always work a test swatch.

Please NOTE: when changing yarn the garment might have a different look and feel to the garment in the photo, due to individual properties and qualities of each yarn.

See DROPS lesson: Can I use a different yarn than the one mentioned in the pattern?

All our yarns are categorised into yarn groups (from A to F) according to thickness and knitting tension – group A contains the thinnest yarns and group F the thickest. This makes it easier for you to find alternative yarns to our patterns, should you wish to switch yarn. All yarns within the same group have a similar knitting tension and can easily replace each other. However, different yarn qualities have different structures and properties which will give the finished work a unique look and feel.

Click here for an overview of the yarns in each yarn group

At the top of all our patterns you’ll find a link to our yarn calculator, which is a helpful tool should you wish to use a different yarn than suggested. By filling in the yarn quality you wish to replace, the amount (in your size) and number of strands, the calculator will present good alternative yarns with the same knitting tension. Additionally it will tell you how much you’ll require in the new qualities and whether you’ll need to work with multiple strands. Most skeins are 50g (some are 25g or 100g).

If the pattern is worked with multiple colours, every colour will have to be calculated separately. Similarly, if the pattern is worked with several strands of different yarns (for example 1 strand Alpaca and 1 strand Kid-Silk) you will have to find alternatives for each, individually.

Click here to see our yarn calculator

Since different yarns have different qualities and textures we have chosen to keep the original yarn in our patterns. However, you can easily find options among our available qualities by using our yarn calculator, or simply pick a yarn from the same yarn group.

It is possible that some retailers still have discontinued yarns in stock, or that someone has a few skeins at home that they would like to find patterns for.

The yarn calculator will provide both alternative yarn as well as required amount in the new quality.

If you think it's hard to decide what size to make, it can be a good idea to measure a garment you own already and like the size of. Then you can pick the size by comparing those measures with the ones available in the pattern's size chart.

You'll find the size chart at the bottom of the pattern.

See DROPS lesson: How to read size chart

The needle size provided in the pattern serves only as a guide, the important thing is to follow the knitting tension. And since knitting tension is very individual, you will have to adjust the needle size to ensure that YOUR tension is the same as in the pattern – maybe you’ll have to adjust 1, or even 2 needle sizes, up or down to achieve the correct tension. For this, we recommend that you work test swatches.

Should you work with a different knitting tension than the one provided, the measurements of the finished garment might deviate from the measurement sketch.

See DROPS lesson: How to measure your tension/gauge

See DROPS video: How to make a tension/gauge swatch

Working a garment top-down provides more flexibility and room for personal adjustment. For example it is easier to try the garment on while working, as well as making adjustments to length of yoke and shoulder caps.

The instructions are carefully explaining every step, in the correct order. Diagrams are adjusted to the knitting direction and are worked as usual.

The diagram depicts all rows/rounds, and every stitch seen from the right side. It is read from bottom to top, from right to left. 1 square = 1 stitch.

When working back and forth, every other row is worked from the right side and every other row is worked from the wrong side. When working from the wrong side, the diagram will have to be worked reversed: from left to right, knit stitches are purled, purl stitches are knit etc.

When working in the round every round is worked from the right side and the diagram are worked from right to left on all rounds.

See DROPS lesson: How to read knitting diagrams

The diagram depicts all rows/rounds, and every stitch seen from the right side. It is worked from bottom to top, from right to left.

When working back and forth every other row is worked from the right side: from right to left and every other row is worked from the wrong side: from left to right.

When working in the round, every row in the diagram are worked from the right side, from right to left.

When working a circular diagram you start in the middle and work your way outwards, counter clockwise, row by row.

The rows usually start with a given number of chain stitches (equivalent to the height of the following stitch), this will either be depicted in the diagram or explained in the pattern.

See DROPS lesson: How to read crochet diagrams

Instructions for working several diagrams after each other on the same row/round, will often be written like so: “work A.1, A.2, A.3 a total of 0-0-2-3-4 times". This means you work A.1 once, then A.2 is worked once, and A.3 is repeated (in width) the number of times provided for your size – in this case like so: S = 0 times, M = 0 times, L=2 times, XL= 3 times and XXL = 4 times.

The diagrams are worked as usual: begin with the first row in A.1, then work the first row in A.2 etc.

See DROPS lesson: How to read knitting diagrams

See DROPS lesson: How to read crochet diagrams

The total width of the garment (from wrist-to-wrist) will be larger in the larger sizes, despite the actual sleeves being shorter. The larger sizes have longer sleeve caps and wider shoulders, so there will be a good fit in all sizes.

The measurement sketch/schematic drawing provides information regarding the full length of the garment. If it’s a jumper or a jacket the length is measured from the highest point on the shoulder closest to the neckline, and straight down to the bottom of the garment. It is NOT measured from the tip of shoulder. Similarly, the length of yoke is measured from the highest point on the shoulder and down to where yoke is split into body and sleeves.

On a jacket measures are never taken along bands, unless specifically stated. Always measure inside band stitches when measuring the length.

See DROPS lesson: How to read a schematic drawing

Diagrams are often repeated on the round or in height. 1 repeat is the diagram the way it appears in the pattern. If it says to work 5 repeats of A.1 in the round, then you work A.1 a total of 5 times after/next to each other in the round. If it says to work 2 repeats of A.1 vertically/in height you work the entire diagram once, then begin again at the start and work the entire diagram one more time.

Chain stitches are slightly narrower than other stitches and to avoid working the cast-on edge too tight, we simply chain more stitches to begin with. The stitch count will be adjusted on the following row to fit the pattern and measurement sketch.

The rib edge is more elastic and will contract slightly compared to, for example, stocking stitch. By increasing before the rib edge, you avoid a visible difference in width between the rib edge and the rest of the body.

It’s very easy to cast off too tightly, and by making yarn overs while casting off (and simultaneously casting these off) you avoid a too tight cast off edge.

See DROPS video: How to bind off with yarn overs (yo)

To achieve an even increase (or decrease) you can increase on, for example: every 3rd and 4th row alternately, like so: work 2 rows and increase on the 3rd row, work 3 rows and increase on the 4th. Repeat this until the increase is complete.

See DROPS lesson: Increase or decrease 1 st on every 3rd and 4th row alternately

Should you prefer to work in the round instead of back and forth, you may of course adjust the pattern. You’ll need to add steeks mid-front (usually 5 stitches), and follow the instructions. When you would normally turn and work from the wrong side, simply work across the steek and continue in the round. At the end you’ll cut the piece open, pick up stitches to work bands, and cover the cut edges.

See DROPS video: How to knit steeks and cut open

Should you prefer to work back and forth instead of in the round, you may of course adjust the pattern so you work the pieces separately and then assemble them at the end. Divide the stitches for the body in 2, add 1 edge stitch in each side (for sewing) and work the front and back pieces separately.

See DROPS lesson: Can I adapt a pattern for circular needles into straight needles?

Pattern repeats can vary slightly in the different sizes, in order to get the correct proportions. If you’re not working the exact same size as the garment in the photo, yours might deviate slightly. This has been carefully developed and adjusted so that the complete impression of the garment is the same in all sizes.

Make sure to follow instructions and diagrams for your size!

If you have found a pattern you like which is available in women’s size it’s not very difficult to convert it to men’s size. The biggest difference will be the length of sleeves and body. Start working on the women size that you think would fit across the chest. The additional length will be worked right before you cast off for the armhole/sleeve cap. If the pattern is worked top-down you can add the length right after the armhole or before the first decrease on sleeve.

Regarding additional yarn amount, this will depend on how much length you add, but it is better with a skein too many than too few.

All yarns will have excess fibres (from production) that might come off as lint or shedding. Brushed yarns (ie hairier yarns) have more of these loose, excess fibres, causing more shedding.

Shedding also depends on what is worn under or over the garment, and whether this pulls at the yarn fibres. It’s therefore not possible to guarantee that there will be no shedding

Below are some tips on how to get the best result when working with hairier yarns:

1. When the garment is finished (before you wash it) shake it vigorously so the looser hairs come off. NOTE: do NOT use a lint roller, brush or any method that pulls at the yarn.

2. Place the garment in a plastic bag and put it in your freezer - the temperature will cause the fibres to become less attached to each other, and excess fibres will come off easier.

3. Leave in the freezer for a few hours before taking it out and shaking it again.

4. Wash the garment according to the instructions on the yarn label.

Pilling is a natural process that happens to even the most exclusive of fibers. It's a natural sign of wear and tear that is hard to avoid, and that is most visible in high friction areas of your garment like a sweater's arms and cuffs.

You can make your garment look as new by removing the pilling, using a fabric comb or a pill/lint remover.

Still can't find the answer you need? Then scroll down and leave your question so one of our experts can try to help you. This will be done normally within 5 to 10 working days.
In the meantime, you can read the questions and answers that others have left to this pattern or join the DROPS Workshop on Facebook to get help from fellow knitters/crocheters!

You might also like...

Winter Baby

Hermine, Belgium

Winter Baby

Pauline Bouteiller, United States

Winter Baby

IntreccidiCeci, Italy

Winter Baby

Hilde Brustad, Norway

Winter Baby Hat | nr 2

Hermine, Belgium

b33-12 a Winter Baby Pants

paxwaldi, Germany

Post a comment to pattern DROPS Baby 33-12

We would love to hear what you have to say about this pattern!

If you want to leave a question, please make sure you select the correct category in the form below, to speed up the answering process. Required fields are marked *.

Comments / Questions (48)

country flag Jennifer wrote:

I'm looking for clarity on the pattern. If anyone can help would be appreciated! Pattern reads: ROUND 1: * Knit 1, make 1 yarn over, knit (8) 9-10-11-12 (13-14) stitches, slip 2 stitches knitwise, knit 1 and pass the 2 slipped stitches over stitch worked, knit (8) 9-10-11-12 (13-14) stitches, make 1 yarn over * When it says make 1 yarn over, is that an increase by 2 stitches (a M1 and then a YO = +2), or is it just saying make a yo (yo = +1) ? Thank you!

09.01.2021 - 06:44

DROPS Design answered:

Dear Jennifer, the yarn over is worked as increase but is part of the pattern just as shown on the picture, you need to get a hole, work: this yarn over as explained in the pattern, on next round, knit all stitches, including yarn overs. Happy knitting!

11.01.2021 - 08:02

country flag CHOQUET wrote:

Bonjour Je regarde vos modèles et achète de la laine ... Mais obligée de trouver d’autres modèles. Je ne sais tricoter qu’avec des aiguilles droites et débutantes... Dommage que tous les modèles soient à tricoter en circulaire. Laure Choquet

12.11.2020 - 16:28

DROPS Design answered:

Bonjour Mme Choquet, si la plupart de nos modèles se tricotent sur des aiguilles circulaires, il est souvent bien simple de pouvoir adapter les explications sur aiguilles droites, vous pourrez retrouver ici comment procéder - n'hésitez pas à contacter votre magasin DROPS, même par mail ou téléphone - pour toute assistance complémentaire. Bon tricot!

13.11.2020 - 08:33

country flag Teresa wrote:

Durante i primi 7 cm. Devo effettuare sia cali che aumenti. L'ultimo gettato del ferro, però, già da subito non si può fare più dopo le 9 maglie...come faccio?

09.11.2020 - 18:31

DROPS Design answered:

Buongiorno Teresa, deve lavorare 1 maglia in meno tra ogni diminuzione. Buon lavoro!

10.11.2020 - 10:25

country flag Merete Jørgensen wrote:

Jeg kan ikke forstå, at huen til dette sæt ikke skal strikkes frem og tilbage i stedet for rundt på strømpepinde. ? På billedet ser den åben ud med øreklapper/spidser over ørerne og bindebånd?? Når man strikker rundt, bliver det jo et rundt hul, som skal presses ind over babys ansigt. Har jeg helt misforstået opskriften?

20.10.2020 - 15:33

DROPS Design answered:

Hej Merete, jo men det er ud og indtagninger ifølge opskriften som danner øreklapperne, det er bare at følge opskriften :)

21.10.2020 - 11:24

country flag Helle wrote:

Jeg strikker bukser str. 0/1 md. Afstanden mellem indtagningerne på benene kan jeg ikke få til at passe med længden. For 5x1,5 cm + de 2 i starten giver for mig 9,5 cm. Men benene skulle kun være 9 cm inden rib. Regner jeg forkert?

10.10.2020 - 20:36

DROPS Design answered:

Hei Helle. Ja, her er det blitt en feil i str. 0/3 mnd. Vi har lagt til en rettelse under BEN og str. 0/3 mnd. Det skal felles på hver 1½ cm totalt 5 ganger = 30 masker. Og – les ØKETIPS = 36 masker. Takk for at du gjorde oss oppmerksom p ådenne feilen. mvh DROPS design

19.10.2020 - 20:12

country flag Andi wrote:

Ich möchte gerne die Mütze für ein Neugeborenes stricken. Nun komme ich schon vor beginn beim lesen durcheinander. Im ersten Satz steht: "die Arbeit wird in Runden ... ab der VORDEREN MITTE gestrickt" Dann werden die ersten Runden, der Mützenrand, gestrickt. Nun soll man zu runden beginn einen Markierungsfaden anbringen. Dies wird nun jedoch als HINTERE MITTE angegeben. Stricke ich somit da 1,5 Runden rechts oder beginne ich grundsätzlich an der hinteren Mitte?

06.09.2020 - 08:55

DROPS Design answered:

Liebe Andi, Anleitung wird hier korrigiert, danke für den Hinweis, Mütze wird von hintere Mitte gestrickt. Viel Spaß beim stricken!

07.09.2020 - 08:51

country flag Majbritt Andersen wrote:

Jeg har bemærket, at der på flere af de fine buksemodeller til babyer er et ulige antal huller til bindebåndet - også på denne model her. Jeg har påpeget det på en af jeres andre modeller, som straks blev rettet. Har I mulighed for at få tilpasset dette på samtlige af bukserne? Det er ærgerligt at opdage når arbejdet er fint og færdigt at bindebåndet sidder forkert pga. et ulige antal huller til bindebåndet.

01.09.2020 - 15:51

country flag Liv Eva Bates wrote:

Hei, jeg ser flere spørre om det samme med tvetydige svar. Etter 7 cm- skal det felles i hver omgang eller som i de første 7 cm felling uten økning i omgang 1 så rettsstrikk i omgang 2?

28.07.2020 - 16:04

country flag Marie Holmström wrote:

När jag börjar minska på mössan efter 7 cm , ska jag göra ett rätt varv emellan minskningarna , alltså fortsätta med varv 1 och varv2?

15.07.2020 - 19:57

DROPS Design answered:

Hej Marie, ja du fortsætter som du hele tiden har gjort, med varv 1 og 2 men du stopper med økningerne. God fornøjelse!

30.07.2020 - 14:30

country flag Uschi wrote:

Entschuldigung, ich bin gedanklich bei der Mütze. "Die 1. und 2. Runde wiederholen, bis die Arbeit eine Länge von 7 cm für alle Größen hat. Dann ebenso weiterstricken, jedoch ohne Zunahmen." Wird ebenfalls die 2 R wdh?

07.05.2020 - 15:32

DROPS Design answered:

Liebe Uschi, ja genau, die 2. Runde stricken Sie wie zuvor, dh alle Maschen rechts. so werden Sie in jede 2. Runde abnehmen. Viel Spaß beim stricken!

07.05.2020 - 16:19