
Popular categories
Looking for a yarn?


|
|||||||
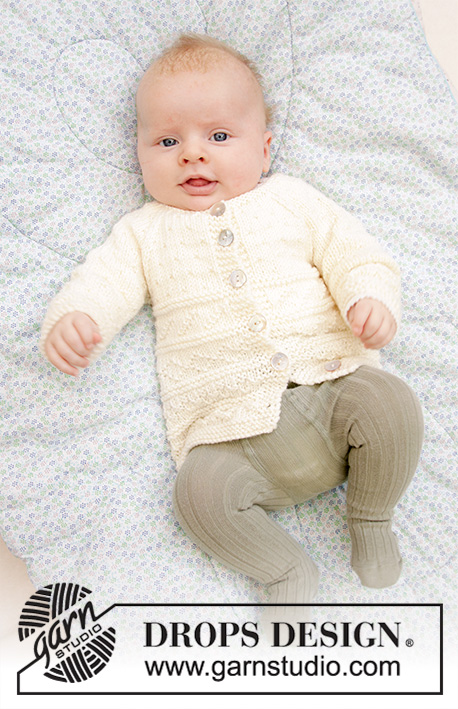
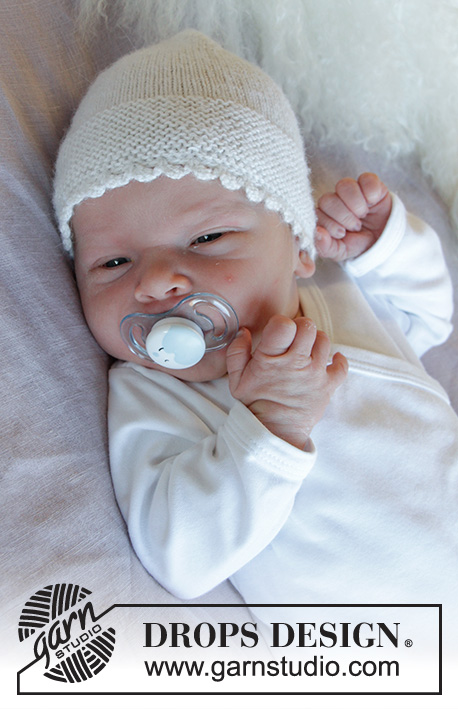
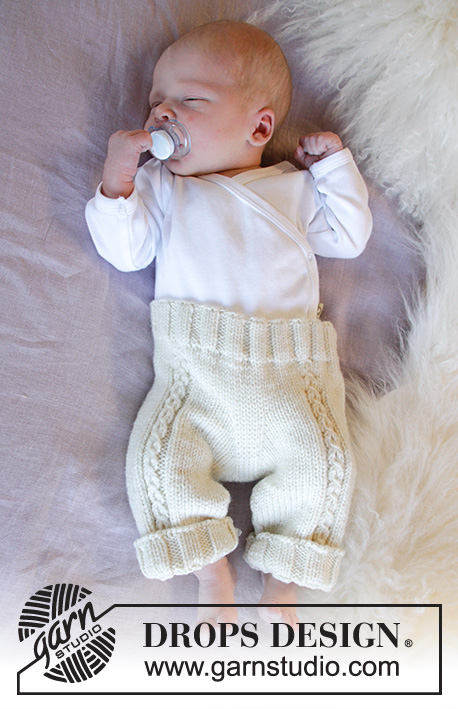
Winter Baby |
|||||||
 |
 |
||||||
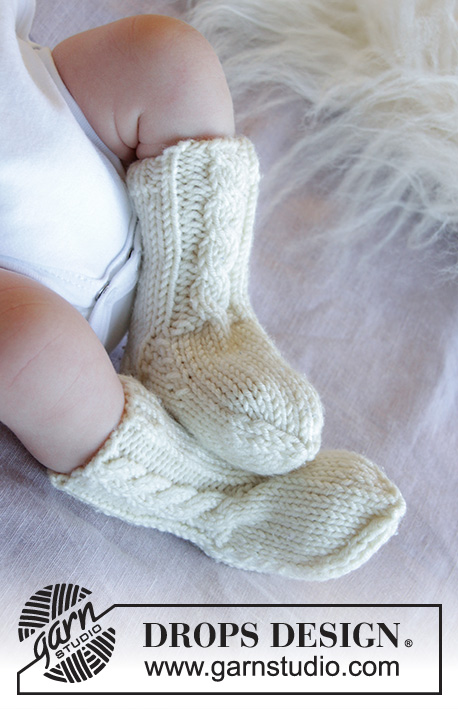
Knitted set of trousers and hat for baby in DROPS Merino Extra Fine. Size: Premature to 4 years
DROPS Baby 33-12 |
|||||||
|
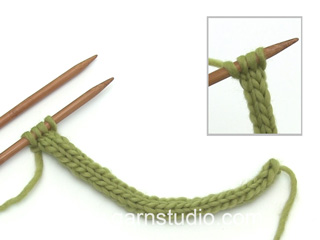
---------------------------------------------------------- EXPLANATION FOR THE PATTERN: ---------------------------------------------------------- PATTERN (applies to pants): See diagram A.1. DECREASE TIP (applies to inside of legs): Begin 3 stitches before marker and knit 2 together, knit 2 (marker is between these 2 stitches), slip 1 stitch knitwise, knit 1, pass slipped stitch over stitch worked. INCREASE TIP (applies to pants): Increase 1 stitch by making 1 yarn over, on next round work yarn over twisted to avoid holes. ---------------------------------------------------------- START THE PIECE HERE: ---------------------------------------------------------- TROUSERS - SHORT OVERVIEW OF THE PIECE: Worked in the round on circular needles/double pointed needles, top down. Cast on (84) 96-104-116-124 (136-144) stitches on circular needle size 3 mm = US 2,5 with Merino Extra Fine. Knit 1 round. Then work rib in the round = knit 1/ purl 1. When rib measures 2½ cm = 1”, work a round with eyelet holes for tie as follows: * Knit 1, purl 1, make 1 yarn over, purl 2 together *, work from *-* the entire round (= (21) 24-26-29-31 (34-36) holes on round). Then continue rib = knit 1/purl 1 until piece measures 5 cm = 2” from cast-on edge. Switch to circular needle size 4 mm = US 6 and work an elevation at the back of pants as explained below. ELEVATION AT THE BACK: To get a better fit work the pants higher at the back than at the front. This is done by working short rows back and forth as follows: Insert 1 marker at beginning of round = mid back. Work from right side and knit 10 past marker, turn, tighten yarn and purl 20 stitches back. Turn, tighten yarn and knit 30, turn, tighten yarn and purl 40. Turn, tighten yarn and knit 50, turn, tighten yarn and purl 60. Continue this way until (60) 60-80-80-100 (100-100) stitches have been purled. Turn piece, tighten yarn and knit until mid back. TROUSERS: Now work A.1 in the round over all stitches. REMEMBER THE KNITTING GAUGE! When pants measures (15) 17-18-21-22 (23-24) cm = (6”) 6 3/4”-7”-8 1/4”-8 3/4” (9”-9 1/2”) from cast-on edge mid front, work next round as follows: Bind off 4 stitches (= mid back), knit (34) 40-44-50-54 (60-64) stitches, bind off 8 stitches mid front, knit (34) 40-44-50-54 (60-64) stitches and bind off the remaining 4 stitches mid back. Cut the yarn. Slip stitches in one side of piece on 1 stitch holder and work leg as explained below. NOW MEASURE THE PIECE FROM HERE! LEG: = (34) 40-44-50-54 (60-64) stitches. Distribute the stitches on double pointed needles size 4 mm = US 6 and continue A.1 in the round. Knit the stitches that do not fit A.1. When piece measures 2 cm = 3/4” from division, decrease 2 stitches on inside of leg - read DECREASE TIP. Decrease like this every (1½) 1½-1½-1½-2 (2½-3½) cm = (1/2”) 1/2”-1/2”-1/2”-3/4” (1”-1 1/4”) (4) 6-7-8-8 (8-8) times in total = (26) 28-30-34-38 (44-48) stitches. Continue to work until leg measures (7) 9-12-15-19 (23-29) cm = (2 3/4”) 3 1/2”-4 3/4”-6”-7 1/2” (9”-11 3/8”). Knit 1 round while increasing (6) 6-8-6-8 (8-10) stitches evenly (increase after every 5th stitch) – read INCREASE TIP = (32) 34-38-40-46 (52-58) stitches. Switch to double pointed needles size 3 mm = US 2,5 and work rib in the round = knit 1/purl 1 for 6 cm = 2 3/8” (or desired measurements). Loosely bind off stitches with knit over knit and purl over purl. Work the other leg the same way. ASSEMBLY: Sew tog the opening between the legs. TWINED STRING FOR TIE: Cut 2 lengths of approx. 3 metres = 120” each. Twine the strands tog until they resist, fold the string double so that it twines again. Make a knot at each end. Thread tie up and down through eyelet row in pants, begin mid front and tie a bow. ---------------------------------------------------------- BEGIN PIECE FOR HAT HERE: ---------------------------------------------------------- HAT: Worked in the round on double pointed needles from mid back. Cast on (60) 66-72-78-84 (90-96) stitches on double pointed needles size 3.5 mm = US 4 with Merino Extra Fine. Knit 1 round. Then work 4 rounds rib = knit 1/purl 1. Switch to double pointed needles size 4 mm = US 6. Knit 1 round. Insert 1 marker at beginning of round = mid back. Then work as follows: ROUND 1: * Knit 1, make 1 yarn over, knit (8) 9-10-11-12 (13-14) stitches, slip 2 stitches knitwise, knit 1 and pass the 2 slipped stitches over stitch worked, knit (8) 9-10-11-12 (13-14) stitches, make 1 yarn over *, work from *-* 3 times in total. ROUND 2: Knit all stitches. Repeat round 1 and 2 until piece measures 7 cm = 2 3/4” in all sizes. Then work the same way but without increases. I.e. continue decreases the same way until no stitches remain between decreases. On next round knit all stitches together 2 by 2. Cut the yarn and pull it through the remaining stitches, tighten together and fasten. Hat measures approx. (14) 14-15-16-17 (17-18) cm = (5 1/2”) 5 1/2”-6”-6 1/4”-6 3/4” (6 3/4”-7”) measured form one of the bottom tips. TIE RIBBON: Work back and forth with 2 double pointed needles size 3.5 mm = US 4. Pick up 4 stitches in the tip on one side of hat (a tip to cover the ear). Knit 4 stitches, * do not turn piece, but push stitches over to the other side of needle, place the thread behind the 4 stitches, tighten yarn and knit the 4 stitches from the right side again *, work from *-* until tie measures approx. (14) 16-18-20-22 (24-26) cm = (5 1/2”) 6 1/4”-7”-8”-8 3/4” (9 1/2”-10 1/4”), bind off and fasten the yarn. Work the other tie the same way in the tip on the opposite side of hat. POMPOM: Make 2 pompoms with an approx. diameter of 3 cm = 1 1/8”. Fasten them at the top of hat. |
|||||||
Diagram explanations |
|||||||
|
|||||||

|
|||||||
|
Have you made this or any other of our designs? Tag your pictures in social media with #dropsdesign so we can see them! Do you need help with this pattern?You'll find tutorial videos, a Comments/Questions area and more by visiting the pattern on garnstudio.com. © 1982-2024 DROPS Design A/S. We reserve all rights. This document, including all its sub-sections, has copyrights. Read more about what you can do with our patterns at the bottom of each pattern on our site. |
|||||||


With over 40 years in knitting and crochet design, DROPS Design offers one of the most extensive collections of free patterns on the internet - translated to 17 languages. As of today we count 304 catalogs and 11415 patterns - 11410 of which are translated into English (US/in).
We work hard to bring you the best knitting and crochet have to offer, inspiration and advice as well as great quality yarns at incredible prices! Would you like to use our patterns for other than personal use? You can read what you are allowed to do in the Copyright text at the bottom of all our patterns. Happy crafting!
Comments / Questions (48)
Bonjour Ma question concerne le pantalon baby 33 Je ne comprends pas quant il faut rabattre 4mailles =(milieu du dos Désolée
05.09.2022 - 18:23DROPS Design answered:
Bonjour Mme Delrue, les tours commencent au milieu dos, vous rabattez les 4 premières mailles du début du tour, tricotez les (34) 40-44-50-54 (60-64) mailles suivantes (la 1ère de ces mailles est déjà sur l'aiguille), rabattez les 8 mailles suivantes (= milieu devant), tricotez les (34) 40-44-50-54 (60-64) mailles suivantes (la 1ère de ces mailles est déjà sur l'aiguille) et rabattez les 4 dernières mailles, coupez le fil et passez le dans la dernière maille. Tricotez maintenant les mailles de l'une des jambes et mettez celles de l'autre en attente. Bon tricot!
06.09.2022 - 09:04Stricke die babymütze. Nach 7cm soll weiter gestrickt ohne zunehmen aber abnehmen wie zuvor. Verstehe ich nicht wie viel mal auf einer Runde. Bitte geben Sie mir eine Rückmeldung.
11.08.2022 - 18:56Hallöchen, ich strick die Babymütze. Ich verstehe nicht, nach 7 cm weiterstricken ohne zunahme und und dann abnehmen wie zuvor. Bitte erklären Sie mir da. Danke Annelies Rennert
11.08.2022 - 18:53DROPS Design answered:
Liebe Frau Rennert, nach 7 cm stricken Sie wie zuvor, aber nun ohne die Zunahmen (= die Umschläge sind jetzt nicht mehr gestrickt); mit nur den Abanhmen wie zuvor (und diese Abnahmen wie zuvor über einander stricken). So wird die Maschenanzahl bei jeder 2. Runde abnehmen. Viel Spaß beim stricken!
12.08.2022 - 09:43Skjønner ikke , etter 7 cm fortsett som før på lue uten å øke. Hva er økningen er Det et kast , jeg skjønner ikke hvordan jeg fortsetter på luen etter 7 cm . ?
07.12.2021 - 22:04DROPS Design answered:
Hej Berit, ja du har øget med kast på hver 2. pind. Nu fortsætter du uden kast :)
08.12.2021 - 08:19Ohjeen mukaan tehdään 1 langankierto, eli yksi silmukka lisätään. Kavennuskohdassa kapenee 2 silmukka niin työhän kapenee koko ajan. Kuvassa näyttäisi olevan 2 langan nostoa silmukan molemmin puolin. Kuvassa on myös korvaläpät ja pintakuvio. Näyttää siltä että ohje ei täsmää kuvan kanssa.
09.10.2021 - 06:49Hola me gustaría saber si cuando en el gorro se dejan de hacer aumentos las disminuciones son en todas las vueltas o una vuelta si y otra no gracias
10.08.2021 - 20:03DROPS Design answered:
Hola Loly, los disminuciones son cada dos vueltas (una vuelta si y otra no). Buen trabajo!
10.08.2021 - 21:09Ich stricke die Größe mit der Maschenzahl 78. Bei der 1. Rd geht es mir am Schluss nicht auf. Es bleiben nach dem Umschlag 2 Maschen übrig. Bei der kleineren Größe gehts auf. Was mach ich falsch, oder stimmt die Anleitung nicht?
08.07.2021 - 16:41DROPS Design answered:
Liebe Anu, so stricken Sie: *1 Masche rechts, 1 Umschlag (= 1 Zunahme), 11 Maschen rechts, 2 Maschen zusammen wie zum Rechtsstricken abheben, 1 Masche rechts und die beiden abgehobenen Maschen überziehen (= 2 Abnahmen), 11 Maschen rechts, 1 Umschlag (= 1 Zunahme)* (= 26 Maschen insgesamt), von *bis* 3 Mal wiederholen = 26x3= 78. Setzen Sie eine Markierung zwischen jede Wiederholung, es kann Ihnen helfen, die Maschenanzahl zu kontrollieren. Viel Spaß beim stricken!
09.07.2021 - 07:10Add to tag words "earflaps". Thank you
05.07.2021 - 16:43Bonjour, Avez-vous des tutos disponible sur votre site? Merçi
15.04.2021 - 22:10DROPS Design answered:
Bonjour Mme Faille, qu'entendez-vous par tutos? Nous avons des leçons, des vidéos et des centaines de .
16.04.2021 - 14:20Hei På luen så står det at jeg skal fortsette å felle da på 1.omg så 2.omg rett til det ikke er m mellom fellingene. Hvor mange masker skal det være totalt på pinnen da? Jeg får det til å bli 3 evt 6 men lua blir isåfall mye lengre enn den skal bli. Hva gjør jeg evt feil? Kunne også vært skrevet tydeligere at di 7 cm skal måles fra lengste spissen. Mer naturlig å måle fra omg start men det skiller det jo noen cm.
29.03.2021 - 18:16DROPS Design answered:
Hei Michell. Har du sjekket strikkefastheten din i høyden, stemmer den? Stemmer at det blir 3 evnt 6 masker, slik du også får. Det står i oppskriften at man skal måle fra en av de nederste spissene. mvh DROPS design
12.04.2021 - 14:39