DROPS Merino Extra Fine
100% Wool
from 3.50 £ /50g
Get the yarn to make this pattern from 38.50£.

The yarn cost is calculated from the pattern’s smallest size and the yarn’s cheapest product type. Looking for an even better price? You might find it on the DROPS Deals!

DROPS SS24

Costa del Sol Jumper

Knitted jumper with round yoke in DROPS Merino Extra Fine. The piece is worked top down with texture, lace pattern and A-shape. Sizes S - XXXL.

DROPS 200-30
DROPS Design: Pattern no me-173
Yarn group B
-------------------------------------------------------

SIZES:
S - M - L - XL - XXL - XXXL

MATERIALS:
DROPS MERINO EXTRA FINE from Garnstudio (belongs to yarn group B)
550-600-650-700-750-850 g colour 24, light yellow

KNITTING TENSION:
21 stitches in width and 28 rows in height with stocking stitch = 10 x 10 cm.
21 stitches in width and 42 rows in height with pattern and garter stitch = 10 x 10 cm.

NEEDLES:
DROPS DOUBLE POINTED NEEDLES SIZE 4 MM.
DROPS CIRCULAR NEEDLE SIZE 4 MM: length 40 cm and 80 cm for stocking stitch/pattern.
DROPS DOUBLE POINTED NEEDLES SIZE 3.5 MM.
DROPS CIRCULAR NEEDLE SIZE 3.5 MM: length 40 and 80 cm for rib.
Needle size is only a guide. If you get too many stitches on 10 cm, change to a larger needle size. If you get too few stitches on 10 cm, change to a smaller needle size.

-------------------------------------------------------

-------------------------------------------------------

Alternative Yarn – See how to change yarns here
Yarn Groups A to F – Use the same pattern and change the yarn here
Yarn usage using an alternative yarn – Use our yarn converter here

-------------------------------------------------------

DROPS Merino Extra Fine
100% Wool
from 3.50 £ /50g
Get the yarn to make this pattern from 38.50£.

The yarn cost is calculated from the pattern’s smallest size and the yarn’s cheapest product type. Looking for an even better price? You might find it on the DROPS Deals!

Pattern instructions

NOTE: This pattern is written in British English. All measurements in charts are in cm. For conversion from cm to inches - click here. There are different terms for crocheting in British and American English. If this pattern includes crochet, click for "crochet terms" here. For this pattern in American English, please click here.
-------------------------------------------------------

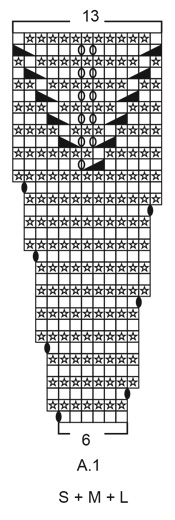
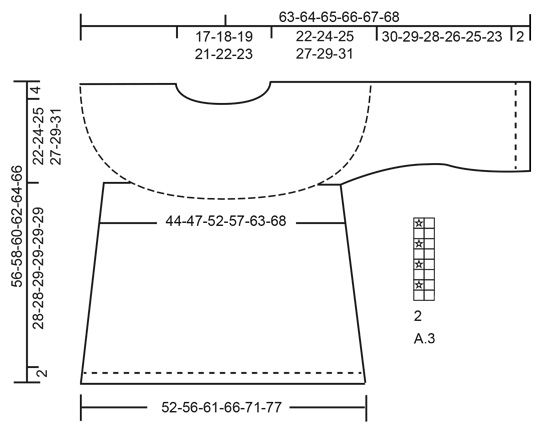
EXPLANATIONS FOR THE PATTERN:

-------------------------------------------------------

RIDGE/GARTER STITCH (worked in the round):
1 ridge in height = 2 rounds; knit 1 round and purl 1 round.

INCREASE/DECREASE TIP (evenly spaced):
To work out how to increase/decrease evenly, count the total number of stitches on the needle (e.g. 104 stitches), and divide by the number of increases/decreases to be made (e.g. 4) = 26.
In this example, increase by making 1 yarn over after each 26th stitch. On the next round work the yarn overs twisted to avoid holes..
When decreasing knit each 25th and 26th stitch together.

PATTERN: 
See diagrams A.1 to A.3. Choose diagram for your size (applies to A.1 and A.2).

INCREASE TIP (for sides of body):
Work until there are 2 stitches left before marker thread, 1 yarn over, knit 4 (marker thread sits in middle of these stitches), 1 yarn over. On the next row (wrong side) work the yarn overs twisted to avoid holes. Then work the new stitches in stocking stitch

DECREASE TIP (for sleeves): 
Decrease 1 stitch on either side of marker thread as follows: Work until there are 3 stitches left before marker thread, knit 2 together, knit 2 (marker thread sits between these stitches) slip 1 stitch as if to knit, knit 1 and pass the slipped stitch over the knitted stitch.
 

-------------------------------------------------------

START THE PIECE HERE:

-------------------------------------------------------

JUMPER - SHORT OVERVIEW OF THE PIECE:
The piece is worked in the round with circular needle from mid back and top down. The sleeves are worked in the round with short circular needle/double pointed needles, top down.

YOKE:
Cast on 104-108-112-118-122-130 stitches with circular needle size 3.5 mm and Merino Extra Fine. Work 2 RIDGES – read description above. Knit 1 round where you increase 4-6-14-2-4-8 stitches evenly spaced – read INCREASE/DECREASE TIP = 108-114-126-120-126-138 stitches. Purl 1 round.
Change to circular needle size 4 mm. Now work pattern A.1 over all stitches (= 18-19-21-20-21-23 repeats of 6 stitches). Continue this pattern and increase as shown in the diagram. REMEMBER THE KNITTING TENSION! When A.1 has been completed in height there are 234-247-273-300-315-345 stitches on the needle and the piece measures approx. 10-10-10-13-13-13 cm from the cast-on edge. Then work A.2 (= 13-13-13-15-15-15 stitches) over A.1. When A.2 has been completed in height there are 306-323-357-380-399-437 stitches on the needle. Continue with stocking stitch and on the first row after A.2 adjust the number of stitches to 303-335-355-383-407-439 stitches – remember INCREASE/DECREASE TIP. Continue working until the piece measures 22-24-25-27-29-31 cm from the cast-on edge mid front. The next round is worked as follows:
Work 42-46-50-55-60-66 stitches as before (= half back piece), place the next 68-76-78-82-84-88 stitches on 1 thread for sleeve, cast on 8-8-10-10-12-12 new stitches on needle (= in side under sleeve), work the next 83-91-99-109-119-131 stitches as before (= front piece), place the next 68-76-78-82-84-88 stitches on 1 thread for sleeve, cast on 8-8-10-10-12-12 new stitches on needle (= in side under sleeve) and work the last 42-46-50-55-60-66 stitches as before (= half back piece). Body and sleeves are finished separately. THE PIECE IS NOW MEASURED FROM HERE!

BODY:
= 183-199-219-239-263-287 stitches. Insert 1 marker thread in each side, in the middle of the 8-8-10-10-12-12 stitches cast on under each sleeve. Allow them to follow your work onwards; they will be used a little later when increasing. Work stocking stitch. When the piece measures 2 cm from the division increase 1 stitch on each side of both marker threads – read INCREASE TIP = 4 stitches increased. Increase like this every 3 cm a total of 9 times = 219-235-255-275-299-323 stitches. When the piece measures 28-28-29-29-29-29 cm from the division, knit 1 round where you increase 37-37-41-45-49-53 stitches evenly spaced = 256-272-296-320-348-376 stitches. Change to circular needle size 3.5 mm and work A.3 (= 2 stitches) over all stitches. Continue this rib for 2 cm. Loosely cast off with knit over knit and purl over purl, but to avoid the cast off edge being tight you can cast off with a size 4 mm needle. The jumper measures approx. 56-58-60-62-64-66 cm from the shoulder down.

SLEEVE:
Place the 68-76-78-82-84-88 stitches from the thread on the one side of the piece on short circular needle/double pointed needles size 4 mm and knit up 1 stitch in each of the 8-8-10-10-12-12 stitches cast on under the sleeve = 76-84-88-92-96-100 stitches. Insert a marker thread in the middle of the 8-8-10-10-12-12 stitches under the sleeve and allow it to follow your work onwards; it will be used when decreasing. Start the round by the marker thread and work stocking stitch in the round. When the piece measures 1 cm from the division, decrease 2 stitches mid under sleeve – read DECREASE TIP. Decrease like this every 4th-2nd-2nd-2nd-1st-1st round a total of 11-15-14-16-15-17 times = 54-54-60-60-66-66 stitches. Continue working until the piece measures 17-16-15-13-12-10 cm from the division.
The next round is worked as follows: * Knit 9-9-10-10-11-11, make 1 yarn over, work from *-* to end of round = 60-60-66-66-72-72 stitches. On the next round work all yarn overs twisted to avoid holes and work as follows: * Knit 9-9-10-10-11-11, 1 stitch in garter stitch *, work from *-* to end of round. Continue this pattern until the piece measures 30-29-28-26-25-23 cm from the division. Change to double pointed needles size 3.5 mm and work A.3 (= 2 stitches) over all stitches. Continue this rib for 2 cm. Loosely cast off with knit over knit and purl over purl, but to avoid the cast off edge being tight you can cast off with a size 4 mm needle. The sleeve measures approx. 32-31-30-28-27-25 cm from the division. Work the other sleeve in the same way.

Diagram

symbols = knit
symbols = purl
symbols = between 2 stitches make 1 yarn over (= hole)
symbols = between 2 stitches make 1 yarn over; on next row work yarn over twisted (= NO hole)
symbols = knit 2 together - NOTE: On the row marked with an arrow, displace the start of the round 1 stitch to the left; i.e. slip the first stitch onto the right needle without working it, then work the repeat in the round. The slipped stitch will be worked last. On the next round knit all stitches and then on the round after that return the start of the round to where it was again
symbols = slip 1 stitch as if to knit, knit 1 and pass the slipped stitch over the knitted stitch
symbols = round with displaced start
diagram
diagram
diagram
diagram
diagram

Each of our patterns has specific tutorial videos to help you.

Do you have a question? See a list of frequently asked questions (FAQ)

Knitting tension is what determines the final measurements of your work, and is usually measured per 10 x 10 cm. It is provided like so: number of stitches in width x number of rows in height - eg: 19 stitches x 26 rows = 10 x 10 cm.

The knitting tension is very individual; some people knit/crochet loosely while others work tightly. You adjust the knitting tension with the needle size, which is why the suggested needle size is only meant as a guide! You need to adjust this (up or down) to ensure that YOUR knitting tension matches the knitting tension provided in the pattern. If you work with a different knitting tension than provided you will have a different yarn consumption, and your work will have different measurements than what the pattern suggests.

The knitting tension also determines which yarns can replace each other. As long as you achieve the same knitting tension you can replace one yarn with another.

See DROPS lesson: How to measure your tension/gauge

See DROPS video: How to make a gauge tension swatch

The required amount of yarn is provided in grams, eg: 450 g. To calculate how many balls you’ll need you first need to know how many grams are in 1 ball (25g, 50g or 100g). This information is available if you click on the individual yarn quality on our pages. Divide the amount required with the amount of each ball. For example, if each ball is 50g (the most common amount), the calculation will be as follows: 450 / 50 = 9 balls.

The important thing when changing from one yarn to another is that the knitting/crochet tension remains the same. This is so that the measurements of the finished piece will be the same as on the sketch provided. It is easier to achieve the same knitting tension using yarns from the same yarn group. It is also possible to work with multiple strands of a thinner yarn to achieve the knitting tension of a thicker one. Please try our yarn converter. We recommend you to always work a test swatch.

Please NOTE: when changing yarn the garment might have a different look and feel to the garment in the photo, due to individual properties and qualities of each yarn.

See DROPS lesson: Can I use a different yarn than the one mentioned in the pattern?

All our yarns are categorised into yarn groups (from A to F) according to thickness and knitting tension – group A contains the thinnest yarns and group F the thickest. This makes it easier for you to find alternative yarns to our patterns, should you wish to switch yarn. All yarns within the same group have a similar knitting tension and can easily replace each other. However, different yarn qualities have different structures and properties which will give the finished work a unique look and feel.

Click here for an overview of the yarns in each yarn group

At the top of all our patterns you’ll find a link to our yarn calculator, which is a helpful tool should you wish to use a different yarn than suggested. By filling in the yarn quality you wish to replace, the amount (in your size) and number of strands, the calculator will present good alternative yarns with the same knitting tension. Additionally it will tell you how much you’ll require in the new qualities and whether you’ll need to work with multiple strands. Most skeins are 50g (some are 25g or 100g).

If the pattern is worked with multiple colours, every colour will have to be calculated separately. Similarly, if the pattern is worked with several strands of different yarns (for example 1 strand Alpaca and 1 strand Kid-Silk) you will have to find alternatives for each, individually.

Click here to see our yarn calculator

Since different yarns have different qualities and textures we have chosen to keep the original yarn in our patterns. However, you can easily find options among our available qualities by using our yarn calculator, or simply pick a yarn from the same yarn group.

It is possible that some retailers still have discontinued yarns in stock, or that someone has a few skeins at home that they would like to find patterns for.

The yarn calculator will provide both alternative yarn as well as required amount in the new quality.

If you think it's hard to decide what size to make, it can be a good idea to measure a garment you own already and like the size of. Then you can pick the size by comparing those measures with the ones available in the pattern's size chart.

You'll find the size chart at the bottom of the pattern.

See DROPS lesson: How to read size chart

The needle size provided in the pattern serves only as a guide, the important thing is to follow the knitting tension. And since knitting tension is very individual, you will have to adjust the needle size to ensure that YOUR tension is the same as in the pattern – maybe you’ll have to adjust 1, or even 2 needle sizes, up or down to achieve the correct tension. For this, we recommend that you work test swatches.

Should you work with a different knitting tension than the one provided, the measurements of the finished garment might deviate from the measurement sketch.

See DROPS lesson: How to measure your tension/gauge

See DROPS video: How to make a tension/gauge swatch

Working a garment top-down provides more flexibility and room for personal adjustment. For example it is easier to try the garment on while working, as well as making adjustments to length of yoke and shoulder caps.

The instructions are carefully explaining every step, in the correct order. Diagrams are adjusted to the knitting direction and are worked as usual.

The diagram depicts all rows/rounds, and every stitch seen from the right side. It is read from bottom to top, from right to left. 1 square = 1 stitch.

When working back and forth, every other row is worked from the right side and every other row is worked from the wrong side. When working from the wrong side, the diagram will have to be worked reversed: from left to right, knit stitches are purled, purl stitches are knit etc.

When working in the round every round is worked from the right side and the diagram are worked from right to left on all rounds.

See DROPS lesson: How to read knitting diagrams

The diagram depicts all rows/rounds, and every stitch seen from the right side. It is worked from bottom to top, from right to left.

When working back and forth every other row is worked from the right side: from right to left and every other row is worked from the wrong side: from left to right.

When working in the round, every row in the diagram are worked from the right side, from right to left.

When working a circular diagram you start in the middle and work your way outwards, counter clockwise, row by row.

The rows usually start with a given number of chain stitches (equivalent to the height of the following stitch), this will either be depicted in the diagram or explained in the pattern.

See DROPS lesson: How to read crochet diagrams

Instructions for working several diagrams after each other on the same row/round, will often be written like so: “work A.1, A.2, A.3 a total of 0-0-2-3-4 times". This means you work A.1 once, then A.2 is worked once, and A.3 is repeated (in width) the number of times provided for your size – in this case like so: S = 0 times, M = 0 times, L=2 times, XL= 3 times and XXL = 4 times.

The diagrams are worked as usual: begin with the first row in A.1, then work the first row in A.2 etc.

See DROPS lesson: How to read knitting diagrams

See DROPS lesson: How to read crochet diagrams

The total width of the garment (from wrist-to-wrist) will be larger in the larger sizes, despite the actual sleeves being shorter. The larger sizes have longer sleeve caps and wider shoulders, so there will be a good fit in all sizes.

The measurement sketch/schematic drawing provides information regarding the full length of the garment. If it’s a jumper or a jacket the length is measured from the highest point on the shoulder closest to the neckline, and straight down to the bottom of the garment. It is NOT measured from the tip of shoulder. Similarly, the length of yoke is measured from the highest point on the shoulder and down to where yoke is split into body and sleeves.

On a jacket measures are never taken along bands, unless specifically stated. Always measure inside band stitches when measuring the length.

See DROPS lesson: How to read a schematic drawing

Diagrams are often repeated on the round or in height. 1 repeat is the diagram the way it appears in the pattern. If it says to work 5 repeats of A.1 in the round, then you work A.1 a total of 5 times after/next to each other in the round. If it says to work 2 repeats of A.1 vertically/in height you work the entire diagram once, then begin again at the start and work the entire diagram one more time.

Chain stitches are slightly narrower than other stitches and to avoid working the cast-on edge too tight, we simply chain more stitches to begin with. The stitch count will be adjusted on the following row to fit the pattern and measurement sketch.

The rib edge is more elastic and will contract slightly compared to, for example, stocking stitch. By increasing before the rib edge, you avoid a visible difference in width between the rib edge and the rest of the body.

It’s very easy to cast off too tightly, and by making yarn overs while casting off (and simultaneously casting these off) you avoid a too tight cast off edge.

See DROPS video: How to bind off with yarn overs (yo)

To achieve an even increase (or decrease) you can increase on, for example: every 3rd and 4th row alternately, like so: work 2 rows and increase on the 3rd row, work 3 rows and increase on the 4th. Repeat this until the increase is complete.

See DROPS lesson: Increase or decrease 1 st on every 3rd and 4th row alternately

Should you prefer to work in the round instead of back and forth, you may of course adjust the pattern. You’ll need to add steeks mid-front (usually 5 stitches), and follow the instructions. When you would normally turn and work from the wrong side, simply work across the steek and continue in the round. At the end you’ll cut the piece open, pick up stitches to work bands, and cover the cut edges.

See DROPS video: How to knit steeks and cut open

Should you prefer to work back and forth instead of in the round, you may of course adjust the pattern so you work the pieces separately and then assemble them at the end. Divide the stitches for the body in 2, add 1 edge stitch in each side (for sewing) and work the front and back pieces separately.

See DROPS lesson: Can I adapt a pattern for circular needles into straight needles?

Pattern repeats can vary slightly in the different sizes, in order to get the correct proportions. If you’re not working the exact same size as the garment in the photo, yours might deviate slightly. This has been carefully developed and adjusted so that the complete impression of the garment is the same in all sizes.

Make sure to follow instructions and diagrams for your size!

If you have found a pattern you like which is available in women’s size it’s not very difficult to convert it to men’s size. The biggest difference will be the length of sleeves and body. Start working on the women size that you think would fit across the chest. The additional length will be worked right before you cast off for the armhole/sleeve cap. If the pattern is worked top-down you can add the length right after the armhole or before the first decrease on sleeve.

Regarding additional yarn amount, this will depend on how much length you add, but it is better with a skein too many than too few.

All yarns will have excess fibres (from production) that might come off as lint or shedding. Brushed yarns (ie hairier yarns) have more of these loose, excess fibres, causing more shedding.

Shedding also depends on what is worn under or over the garment, and whether this pulls at the yarn fibres. It’s therefore not possible to guarantee that there will be no shedding

Below are some tips on how to get the best result when working with hairier yarns:

1. When the garment is finished (before you wash it) shake it vigorously so the looser hairs come off. NOTE: do NOT use a lint roller, brush or any method that pulls at the yarn.

2. Place the garment in a plastic bag and put it in your freezer - the temperature will cause the fibres to become less attached to each other, and excess fibres will come off easier.

3. Leave in the freezer for a few hours before taking it out and shaking it again.

4. Wash the garment according to the instructions on the yarn label.

Pilling is a natural process that happens to even the most exclusive of fibers. It's a natural sign of wear and tear that is hard to avoid, and that is most visible in high friction areas of your garment like a sweater's arms and cuffs.

You can make your garment look as new by removing the pilling, using a fabric comb or a pill/lint remover.

Still can't find the answer you need? Then scroll down and leave your question so one of our experts can try to help you. This will be done normally within 5 to 10 working days.
In the meantime, you can read the questions and answers that others have left to this pattern or join the DROPS Workshop on Facebook to get help from fellow knitters/crocheters!

You might also like...

Post a comment to pattern DROPS 200-30

We would love to hear what you have to say about this pattern!

If you want to leave a question, please make sure you select the correct category in the form below, to speed up the answering process. Required fields are marked *.

Comments / Questions (11)

country flag Stefanie wrote:

Hallo zusammen, wie arbeite ich die Runde mit verschobenen Rundenbeginn im Muster A.2 (S+M+L) der Anleitung Costa del Sol Jumper? Für die Antwort bedanke ich mich bereits im Voraus.

05.10.2023 - 19:00

DROPS Design answered:

Liebe Stefanie, die erste Masche der Runde wie zum rechts abheben, dann das 1. Rapport stricken, die letzte Masche vom 1. Rapport zusammen mit der 1. Maschen vom 2. Rapport stricken (= das ist jetzt die letzte Masche vom 1. Rapport), 1 Umschlag (= 1. Masche vom 2. Rapport), stricken Sie so weiter bis Ende der Runde = der letzte Umschlag wird dann die 1. Masche vom 1. Rapport sein. Viel Spaß beim stricken!

06.10.2023 - 09:03

country flag Marie-Christine Barbe wrote:

Bonsoir et merci infiniment pour votre réponse rapide Cordialement

25.04.2022 - 20:30

country flag Marie-Christine Barbe wrote:

Bonjour, Après le rang décalé, faut-il tricoter un rang à l’endroit comme indiqué dans l’explication du diagramme ou reprendre le rang suivant à l’envers en recalant le dessin Merci d’avance

25.04.2022 - 09:07

DROPS Design answered:

Bonjour Mme Barbe, après le tour avec la flèche, tricotez les mailles comme dans le diagramme = à l'envers - le tour commence de nouveau comme avant. Bon tricot!

25.04.2022 - 11:58

country flag Nadine Kaczorek wrote:

Bonjour, merci pour vos réponses et conseils. J'ai terminé mon pull, il est magnifique. Est-il possible de lire les questions des autres personnes quand elles ne sont pas dans notre langue ? Bonne journée

18.02.2020 - 07:45

DROPS Design answered:

Bonjour Mme Kaczorek et merci. Vous pouvez utiliser un traducteur en ligne, ils ne sont pas fiables à 100% mais vous aurez une idée de ce qui se dit. Bon tricot!

18.02.2020 - 10:29

country flag Nadine Kaczorek wrote:

Bonjour, je suis au niveau du diagramme A3 sur 2 mailles, hélas je ne trouve pas le dessin du diagramme dans vos explications. Pouvez vous m'aider. Merci d'avance

14.02.2020 - 18:30

DROPS Design answered:

Bonjour Mme Kaczorek, Vous trouverez A.3 sous la manche du schéma, tout en bas de page. Bon tricot!

17.02.2020 - 07:57

country flag Nadine Kaczorek wrote:

Bonjour, merci de votre réponse. Mais pour le diagramme A2, à la fin vous faites 4 mailles ensembles avec 2 jetés, nous n'avons plus 17 mailles mais 15. Est-ce normal ?

10.02.2020 - 10:27

DROPS Design answered:

Bonjour Mme Kaczorek, les augmentations de A.2 se font au 1er rang (= 6 m end, 1 jeté, 1 m end, 1 jeté, 6 m end) et au 27ème rang (= le motif commence alors par 1 m end, 1 jeté, et se termine par 1 jeté = on augmente 2 m par motif), à chacun des autres rangs de A.2, chacun des jetés fait sera compensé par 1 diminution. Vous devez donc bien avoir 17 m comme le montre le diagramme (à l'avant-dernier rang, on diminue 2 m on fait 2 jetés = le nombre de mailles reste le même). Bon tricot!

10.02.2020 - 10:47

country flag Nadine Kaczorek wrote:

Bonjour, je viens de finir les diagrammes a1 et a2 pour la taille L. Je n'obtiens pas le nombre de mailles indiqué dans vos explications. J'en ai 336 avant de faire le rang d'ajustement au lieu de 357. Cela viendra-t-il des 4 mailles ensembles avec les 2 jetés de fin de dessin a2 ? Merci d'avance

09.02.2020 - 16:08

DROPS Design answered:

Bonjour Mme Kaczorek, quand A.2 est terminé, vous devez avoir 17 mailles dans chaque diagramme, soit 13 fois A.2 (= 17 m) = 357 mailles. Bon tricot!

10.02.2020 - 09:34

country flag Marie Larsen wrote:

Hvad menes med ,, forskudt start,,

12.11.2019 - 13:44

DROPS Design answered:

Hej Marie, Hvor er du i opskriften?

14.11.2019 - 12:33

country flag Tatyana Pilnikov wrote:

There is mistake in diagram 2, sizes XL+XXL+XXXL. The next round after first arrow. The last stitch must be knit, not purl. In the diagram of smaller sizes there is not this mistake.

06.09.2019 - 16:53

country flag Toril Thoresen wrote:

I bolen leser jeg at jeg skal følge mønster A3(= 2 masker) over alle masker. Hva menes her? Hvor er mønster A3?

10.08.2019 - 18:22

DROPS Design answered:

Hej. Vi menar att du ska sticka A3 hela pinnen ut. Du hittar A3 vid sidan av måleskissen. Lycka till!

20.08.2019 - 09:59