
Popular categories
Looking for a yarn?


|
||||||||||||||||||||||
Costa del Sol |
||||||||||||||||||||||
 |
 |
|||||||||||||||||||||
Knitted jacket with round yoke in DROPS Merino Extra Fine. The piece is worked top down with texture, lace pattern and A-shape. Sizes S - XXXL.
DROPS 200-31 |
||||||||||||||||||||||
|
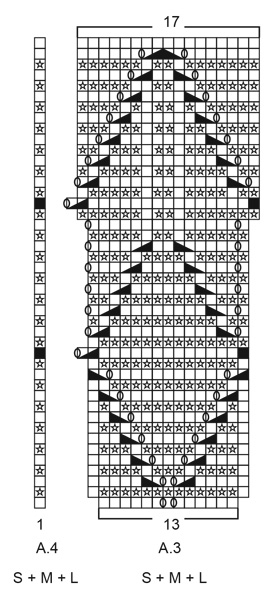
------------------------------------------------------- EXPLANATIONS FOR THE PATTERN: ------------------------------------------------------- RIDGE/GARTER STITCH (worked back and forth): Knit all rows. 1 ridge in height = Knit 2 rows. RIDGE/GARTER STITCH (worked in the round): 1 ridge in height = 2 rounds; knit 1 round and purl 1 round. INCREASE/DECREASE TIP (evenly spaced): To work out how to increase/decrease evenly, count the total number of stitches on the needle (e.g. 115 stitches), minus bands (e.g. 10 stitches) and divide the remaining stitches by the number of increases/decreases to be made (e.g. 3) = 35. In this example increase by making 1 yarn over after each 35th stitch. On the next row (wrong side) work the yarn overs twisted to avoid holes.. When decreasing knit each 34th and 35th stitch together. Do not increase/decrease over the bands PATTERN: See diagrams A.1 to A.5. Choose diagram for your size (applies to A.1 to A.4). The diagrams show all rows in pattern seen from right side. BUTTONHOLES: Work buttonholes on right band (when garment is worn). Work from the right side when there are 3 stitches left on row as follows: Make 1 yarn over, knit 2 together and knit last stitch. On the next row knit the yarn over to leave a hole. Work first buttonhole when you have worked approx. 1½-2 cm from the cast-on edge. Then the remaining 5-5-5-6-6-6 buttonholes with approx. 8½-9-9-8-8½-9 cm between each one. INCREASE TIP (for sides of body): All increases worked from right side! Work until there are 2 stitches left before marker thread, 1 yarn over, knit 4 (marker thread sits in middle of these stitches), 1 yarn over. On the next row (wrong side) purl the yarn overs twisted to avoid holes. Then work the new stitches in stocking stitch. DECREASE TIP (for sleeves): Decrease 1 stitch on either side of marker thread as follows: Work until there are 3 stitches left before marker thread, knit 2 together, knit 2 (marker thread sits between these stitches) slip 1 stitch as if to knit, knit 1 and pass the slipped stitch over the knitted stitch. ------------------------------------------------------- START THE PIECE HERE: ------------------------------------------------------- JACKET - SHORT OVERVIEW OF THE PIECE: The piece is worked back and forth with circular needle, top down. The sleeves are worked in the round with short circular needle/double pointed needles. YOKE: Cast on 115-119-123-129-133-141 stitches (including 5 band stitches on each side towards mid front) with circular needle size 3.5 mm and Merino Extra Fine. Work 2 RIDGES – read description above. Knit 1 row from the right side where you increase 4-6-14-2-4-8 stitches evenly spaced – read INCREASE/DECREASE TIP = 119-125-137-131-137-149 stitches. Knit 1 row from the wrong side. Change to circular needle size 4 mm. Now work pattern as follows from the right side: 5 band stitches in garter stitch, work A.1 until there are 6 stitches left (= 18-19-21-20-21-23 repeats of 6 stitches), work A.2 (= 1 stitch) and finish with 5 band stitches in garter stitch. Continue this pattern and increase as shown in diagram. REMEMBER THE KNITTING TENSION and BUTTONHOLES on right band – read description above. When A.1 and A.2 have been completed in height there are 245-258-284-311-326-356 stitches on the needle and the piece measures approx. 10-10-10-13-13-13 cm from the cast-on edge. Then work A.3 over A.1 and A.4 over A.2, band stitches continued in garter stitch. When A.3 and A.4 have been completed in height there are 317-334-368-391-410-448 stitches on the needle. Then work stocking stitch with 5 band stitches in garter stitch towards mid front and on the first row after A.3 and A.4 adjust the number of stitches to 314-346-366-394-418-450 stitches – remember INCREASE/DECREASE TIP. Continue working until the piece measures 22-24-25-27-29-31 cm from the cast-on edge mid front. The next row from the wrong side is worked as follows: Work 47-51-55-60-65-71 stitches as before (= front piece), place the next 68-76-78-82-84-88 stitches on 1 thread for sleeve, cast on 8-8-10-10-12-12 new stitches on needle (= in side under sleeve), work the next 84-92-100-110-120-132 stitches as before (= back piece), place the next 68-76-78-82-84-88 on 1 thread for sleeve, cast on 8-8-10-10-12-12 new stitches on needle (= in side under sleeve) and work the last 47-51-55-60-65-71 stitches as before (= front piece). Body and sleeves are finished separately. PIECE IS NOW MEASURED FROM HERE! BODY: = 194-210-230-250-274-298 stitches. Insert 1 marker thread in each side, in the middle of the 8-8-10-10-12-12 stitches cast on under each sleeve. Allow them to follow your work onwards, they will be used a little later when increasing. Work stocking stitch, band stitches continued as before. When the piece measures 2 cm from the division increase 1 stitch on either side of both marker threads – read INCREASE TIP = 4 stitches increased. Increase like this every 3 cm a total of 9 times = 230-246-266-286-310-334 stitches. When the piece measures 28-28-29-29-29-29 cm from the division, purl 1 row from the wrong side (band stitches continued as before) where you increase 37-39-43-45-49-53 stitches evenly spaced = 267-285-309-331-359-387 stitches. Change to circular needle size 3.5 mm and work the next row as follows from the right side: 5 band stitches in garter stitch, work A.5 (= 2 stitches) until there are 6 stitches left on row, knit 1 and 5 band stitches in garter stitch. Continue this rib for 2 cm. Loosely cast off with knit over knit and purl over purl, but to avoid the cast off edge being tight you can cast off with a size 4 mm needle. Jacket measures approx. 56-58-60-62-64-66 cm from the shoulder down. SLEEVE: Place the 68-76-78-82-84-88 stitches from the thread on the one side of the piece on short circular needle/double pointed needles size 4 mm and knit up 1 stitch in each of the 8-8-10-10-12-12 stitches cast on under the sleeve = 76-84-88-92-96-100 stitches. Insert a marker thread in the middle of the 8-8-10-10-12-12 stitches under the sleeve and allow it to follow your work onwards; it will be used when decreasing. Start the round by the marker thread and work stocking stitch in the round. When the piece measures 1 cm from the division, decrease 2 stitches mid under sleeve – read DECREASE TIP. Decrease like this every 4th-2nd-2nd-2nd-1st-1st round a total of 11-15-14-16-15-17 times = 54-54-60-60-66-66 stitches. Continue working until the piece measures 17-16-15-13-12-10 cm from the division. The next round is worked as follows: *Knit 9-9-10-10-11-11 , make 1 yarn over, work from *-* to end of round = 60-60-66-66-72-72 stitches. On the next round work all yarn overs twisted to avoid holes and work as follows: * Knit 9-9-10-10-11-11, 1 stitch in GARTER STITCH – read description above *, work from *-* to end of round. Continue this pattern until the piece measures 30-29-28-26-25-23 cm from the division. Change to double pointed needles size 3.5 mm and work A.5 (= 2 stitches) over all stitches. Continue this rib for 2 cm. Loosely cast off with knit over knit and purl over purl, but to avoid the cast off edge being tight you can cast off with a size 4 mm needle. The sleeve measures approx. 32-31-30-28-27-25 cm from the division. Work the other sleeve in the same way. ASSEMBLY: Sew buttons onto left band. |
||||||||||||||||||||||
Diagram explanations |
||||||||||||||||||||||
|
||||||||||||||||||||||

|
||||||||||||||||||||||

|
||||||||||||||||||||||

|
||||||||||||||||||||||
|
||||||||||||||||||||||

|
||||||||||||||||||||||
|
Have you made this or any other of our designs? Tag your pictures in social media with #dropsdesign so we can see them! Do you need help with this pattern?You'll find tutorial videos, a Comments/Questions area and more by visiting the pattern on garnstudio.com. © 1982-2024 DROPS Design A/S. We reserve all rights. This document, including all its sub-sections, has copyrights. Read more about what you can do with our patterns at the bottom of each pattern on our site. |
||||||||||||||||||||||


With over 40 years in knitting and crochet design, DROPS Design offers one of the most extensive collections of free patterns on the internet - translated to 17 languages. As of today we count 304 catalogues and 11422 patterns - 11422 of which are translated into English (UK/cm).
We work hard to bring you the best knitting and crochet have to offer, inspiration and advice as well as great quality yarns at incredible prices! Would you like to use our patterns for other than personal use? You can read what you are allowed to do in the Copyright text at the bottom of all our patterns. Happy crafting!
Comments / Questions (15)
De telpatronen laten alle naalden in patroon aan de goede kant zien. wil dat zeggen dat een regel 2nld zijn.
05.09.2019 - 17:59DROPS Design answered:
Dag Will,
Nee, zowel de heengaande als de teruggaande naald is te zien in het telpatroon.
De eerste naald en alle andere oneven naaalden in het telpatroon zijn aan de goede kant. Alle even naalden in het telpatroon zijn aan de verkeerde kant.
08.09.2019 - 17:33U schrijft, patronen zijn enkel aan de goede kant te zien. Betekent het dan dat 1 tegel patroon 2 naalden zijn? In dat geval wordt het patroon veel te groot in lente.
11.06.2019 - 14:34Magnifique . sûr je me le ferai
22.12.2018 - 18:13Aan de onderkant van de mouw hetzelfde motief , verkleind .
13.12.2018 - 13:12Ananas
12.12.2018 - 10:16