
Popular categories
Looking for a yarn?


|
||||||||||||||||||||||||||||||||||
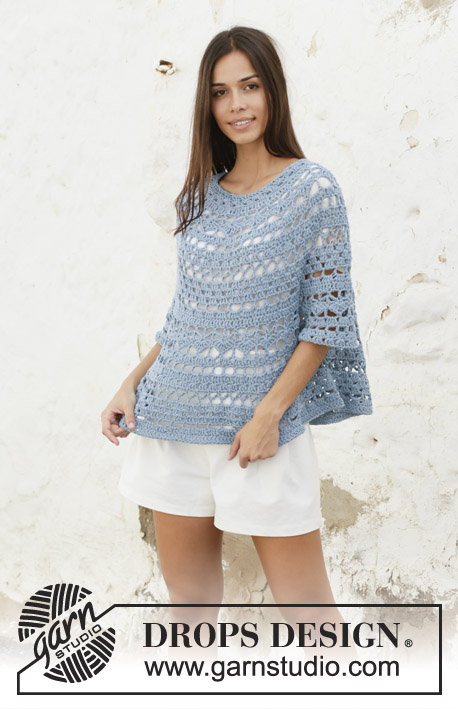
Mermaid Shell |
||||||||||||||||||||||||||||||||||
 |
 |
|||||||||||||||||||||||||||||||||
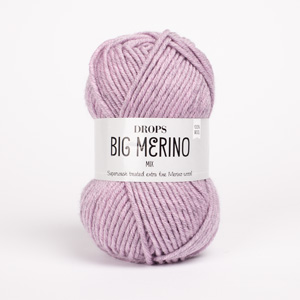
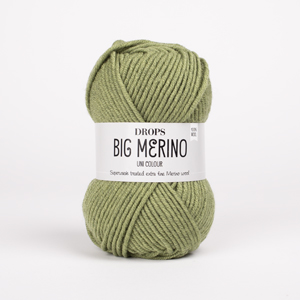
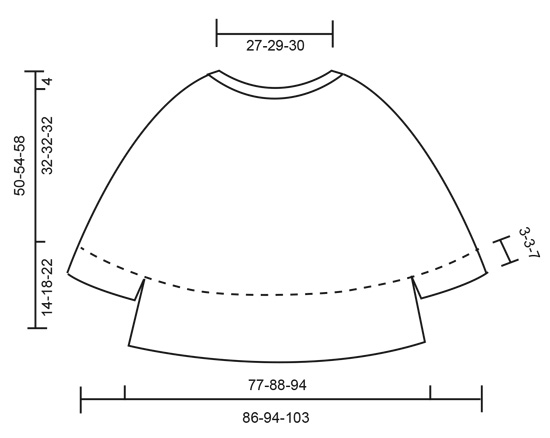
Crocheted poncho jumper in DROPS Big Merino. Piece is crocheted top down with lace pattern. Size: S - XXXL
DROPS 199-35 |
||||||||||||||||||||||||||||||||||
|
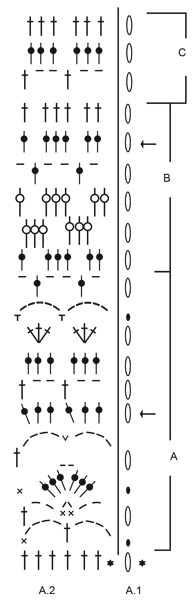
---------------------------------------------------------- EXPLANATION FOR THE PATTERN: ---------------------------------------------------------- PATTERN: See diagrams A.1 to A.4. CROCHET INFORMATION: Diagram A.1 shows how rounds begin and end, and are worked in addition to A.2. Diagram A.3 shows how rounds begin and end, and are worked in addition to A.4. INCREASE TIP (evenly): To calculate how to increase evenly, use the total number of stitches (e.g. 96 stitches) and divide this by number of increases to be done (e.g. 48) = 2. I.e. in this example increase by working 2 treble crochets in same stitch in every other treble crochet. ---------------------------------------------------------- START THE PIECE HERE: ---------------------------------------------------------- PONCHO JUMPER - SHORT OVERVIEW OF THE PIECE: Work in the round top down. Work sleeves in the round, top down. Work neck edge in the round at the end. YOKE: Work 112-119-126 chain stitches on hook size 5 mm with Big Merino and form a ring with 1 slip stitch in first chain stitch. Work 3 chain stitches, 1 treble crochet in each of the first 6 chain stitches, * skip 1 chain stitch, work 1 treble crochet in each of the next 6 chain stitches *, work from *-* 15-16-17 times in total, finish with 1 slip stitch in 3rd chain stitch at beginning of round = 96-102-108 treble crochets + 3 chain stitches. Then work pattern as follows: Read CROCHET INFO, work A.2A 16-17-18 times in total on round – on round marked with arrow increase 48-54-60 treble crochets evenly – read INCREASE TIP = 144-156-168 treble crochets. REMEMBER THE CROCHET TENSION! Then repeat A.2A 24-26-28 times in width. When A.2A is done, work A.2B over A.2A – on round marked with arrow increase 48-54-60 treble crochets evenly = 192-210-228 treble crochets. Then repeat A.2B 32-35-38 times in width. When A.2B is done, work the first 6 rounds in A.2A over A.2B – on round marked with arrow increase 48-54-60 treble crochets evenly = 240-264-288 treble crochets. Then repeat A.2A 40-44-48 times in width. Continue until 6th round in A.2A (= round after round with arrow) = 80-88-96 chain spaces. The piece measures approx. 32 cm in all sizes. Insert 4 markers in piece as follows (without working): Insert first marker after the first 13-15-16 chain spaces (= half back piece), insert second marker after the next 14-14-16 chain spaces (= sleeve), insert third marker after the next 26-30-32 chain spaces (= front piece), and insert fourth marker after the next 14-14-16 chain spaces (= sleeve), 13-15-16 chain spaces remain on round after last marker (= half back piece). Now divide body and sleeves at the markers, and finish each part separately. NOW MEASURE THE PIECE FROM HERE! BODY: = 52-60-64 chain spaces. Continue until A.2A has been worked over these stitches AT THE SAME TIME on first round increase 24 treble crochets evenly (then repeat A.2A 30-34-36 times in width) = 180-204-216 treble crochets. When A.2A is done, work A.2B over A.2A – on round marked with arrow increase 36-42-48 treble crochets evenly = 216-246-264 treble crochets (then repeat A.2B 36-41-44 times in width). When A.2B has been done, work A.2C over A.2B 0-1-2 times in total vertically. Cut and fasten the yarn. Body measures approx. 14-18-22 cm from division. SLEEVE: = 14-14-16 chain spaces. Begin mid under sleeve and then work as follows: Remember CROCHET INFO, continue with 7th round in A.2A over these stitches (= 7-7-8 times in width), and work until 8th round. Then repeat rounds 6 to 8 0-0-1 more time. Cut and fasten the yarn. Sleeve measures approx. 3-3-7 cm from division. Work the other sleeve the same way. NECK EDGE: Work around the neck as follows - NOTE: Work in chain stitches where treble crochets were worked but do not work in the chain stitches that were skipped: Begin mid back, fasten strand to piece with 1 slip stitch in a treble crochet, work 1 chain stitch, 1 double crochet in next treble crochet, 3 chain stitches, skip 3-1-3 treble crochets, 1 double crochet in next treble crochet, * 3 chain stitches, skip 3 treble crochets, 1 double crochet in next treble crochet *, work from *-* 22-24-25 times in total, work 3 chain stitches, skip 3 treble crochets and finish with 1 slip stitch in 1st chain stitch at beginning of round = 24-26-27 chain spaces. Then work A.4 in the round – remember CROCHET INFO. When A.4 is done, fasten off. |
||||||||||||||||||||||||||||||||||
Diagram explanations |
||||||||||||||||||||||||||||||||||
|
||||||||||||||||||||||||||||||||||
|
||||||||||||||||||||||||||||||||||

|
||||||||||||||||||||||||||||||||||
|
||||||||||||||||||||||||||||||||||
|
Have you made this or any other of our designs? Tag your pictures in social media with #dropsdesign so we can see them! Do you need help with this pattern?You'll find tutorial videos, a Comments/Questions area and more by visiting the pattern on garnstudio.com. © 1982-2024 DROPS Design A/S. We reserve all rights. This document, including all its sub-sections, has copyrights. Read more about what you can do with our patterns at the bottom of each pattern on our site. |
||||||||||||||||||||||||||||||||||


With over 40 years in knitting and crochet design, DROPS Design offers one of the most extensive collections of free patterns on the internet - translated to 17 languages. As of today we count 304 catalogues and 11422 patterns - 11422 of which are translated into English (UK/cm).
We work hard to bring you the best knitting and crochet have to offer, inspiration and advice as well as great quality yarns at incredible prices! Would you like to use our patterns for other than personal use? You can read what you are allowed to do in the Copyright text at the bottom of all our patterns. Happy crafting!
Comments / Questions (32)
Buongiorno, esiste un modello analogo a maglia?
22.05.2020 - 11:25DROPS Design answered:
Buongiorno Eleonora. Purtroppo non esiste il corrispondente ai ferri. A questo link trova la selezione dei poncho ai ferri. Ci auguriamo possa trovarne uno che incontri il suo gusto. Buon lavoro!
22.05.2020 - 11:58Hello, I have worked all the way to where the markers should be placed. It says the whole work should mesure 32 cm. I only get 28, but when I did the "Maschenprobe" it was 12 cm instead of 10. What do you recomend should I do now? Add a couple of rows?
20.04.2020 - 14:03DROPS Design answered:
Dear Nadine, you can maybe continue as before for 4 more cm, ie until your piece measure 32 cm but ou might require more yarn then - or then try again with another crochet hook size to get the correct tension in height (try to avoid getting longer stitches). read more about tension here. Happy crocheting!
20.04.2020 - 14:11Diagrammet er umulig at følge efter udtagning, da de ekstra masker ikke fremgår af diagrammet 😕 Hvorfor ikke sikre forståelsen ved at opgradere og medtage udtagningerne i diagrammet? En skriftlig beskrivelse + et udvidet diagram ville være det optimale for at kunne læse opskriften. Jeg opgiver at hækle denne poncho, da diagrammet desværre er for svær for mig 😪
11.04.2020 - 15:34Hola ! Quisiera que me expliquen qué significa cuando se deben repetir A.2A 24 veces a lo ancho? Gracias y espero su respuesta
08.03.2020 - 20:43DROPS Design answered:
Hola Maria Teresa. Una repetición de A.2a es de 6 puntos. Para la talla S (= 144 puntos) tenemos repetir A.2a 24 veces a lo largo de la vuelta ( 6 puntos x 24 veces = 144 puntos).
10.03.2020 - 23:48Thank you
19.12.2019 - 12:28What I am understanding from the instructions is that after finishing all the rows in A2B I work on A2A for six rounds- on the 5th round I will increases to equal 240- or 264 or 288 , depending on the size, and then complete the 6th round working on all the stitches including those that I increased in the 5th row. After that I measure the yoke and it should be 12.5 inches. After that I then will place the marker per your directions to separate the body and the sleeves. Is this correct?
18.12.2019 - 17:05DROPS Design answered:
Dear Mrs Urso, yes it seems correct. After you have placed the markers, you just work next piece separately, first body and then sleeeves. Happy crocheting!
19.12.2019 - 07:41Buongiorno, sarebbe fattibile questo modello in cotone? Se si, quale suggerite?
10.12.2019 - 17:37DROPS Design answered:
Buongiorno Consuelo. Può usare il Paris (gruppo filato C come Big Merino) oppure il Safran, usato doppio. Per ogni ulteriore consiglio sulla scelta del filato e sulle quantità da ordinare, può rivolgersi al suo rivenditore Drops di fiducia. Buon lavoro!
16.12.2019 - 11:22There is another Mermaid Shell that I printed of this pattern that has double crochet for some symbols in the diagram where the other says treble crochet I am nearly completing the yoke with the double crochets and now I just discovered that it seems that the instructions had an error. Please confirm if the pattern I am following is not correct. Thank you.
29.11.2019 - 10:00DROPS Design answered:
- see answer below - remember crochet terminology is different in US and in Uk English. Happy crocheting!
29.11.2019 - 10:33This pattern was also found with treble crochet in the diagram which one is correct?
29.11.2019 - 09:47DROPS Design answered:
Dear Mrs Urso, make sure you are following the required English terminology, editing language if necessary by clicking on the scroll down menu under the foto. Happy crocheting!
29.11.2019 - 10:32Regarding your explanation “ after you have increased to 192-210-228 stitches, you have now enough stitches to repeat A.2B (= 6 stitches) a total of 32-35-38 times in width (= 32-35-38 repeats of A.2B in the round). “ does this mean that I repeat the entire A.2B from the beginning? Or just continue on the next row indicated in the chart?
26.11.2019 - 17:48DROPS Design answered:
Dear Mrs Urso, just continue A.2B as before, ie work next row in diagram and continue diagram to the end (until it has been worked 1 time in height), but now you will repeat the diagram more times in width. Happy crocheting!
27.11.2019 - 07:44