
Popular categories
Looking for a yarn?


|
||||||||||||||||||||||||||||
Sweet Jasmine |
||||||||||||||||||||||||||||
 |
 |
|||||||||||||||||||||||||||
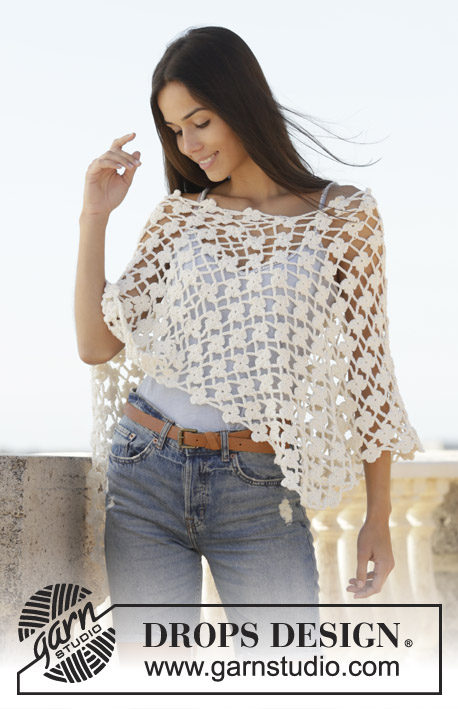
Crocheted poncho in DROPS Merino Extra Fine. The piece is worked with flower pattern. Sizes S - XXXL.
DROPS 200-38 |
||||||||||||||||||||||||||||
|
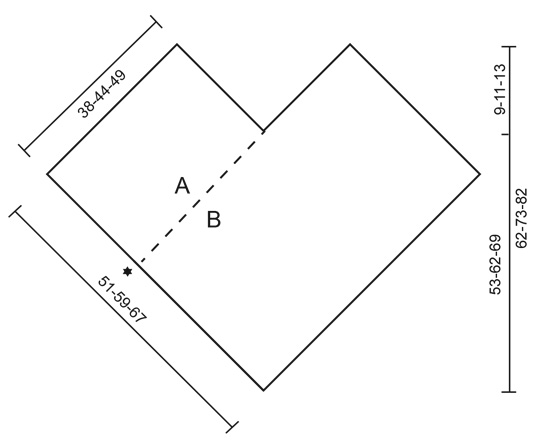
------------------------------------------------------- EXPLANATIONS FOR THE PATTERN: ------------------------------------------------------- PATTERN: See diagrams A.1 to A.5 (A.5 shows how to crochet the 2 sections together). ------------------------------------------------------- START THE PIECE HERE: ------------------------------------------------------- PONCHO - SHORT OVERVIEW OF THE PIECE: The piece is worked back and forth in 2 sections which are worked together to finish. There are 2 different patterns for the poncho: One with diagrams and one with further explanation to the diagrams. PONCHO (pattern with diagrams): Start with hook size 4.5 mm and Merino Extra Fine and work pattern as follows: Work A.1, A.2 a total of 5-6-7 times, A.3. Continue back and forth like this. REMEMBER THE CROCHET TENSION! When A.1 to A.3 have been completed in height, repeat rows 3 to 6 until the piece measures approx. 64-74-84 cm – adjust so you finish after row 4. Do not cut the strand! Continue from EDGE ALONG SIDE (further down the pattern)! PONCHO (pattern with explanations to the diagrams): Start with hook size 4 .5 mm and Merino Extra Fine and work pattern as follows: ROW 1: Work A.1 as follows: 7 chain stitches, 1 slip stitch in 4th chain stitch from hook (= chain-stitch ring), 3 chain stitches, turn the piece. Around the chain-stitch ring work (2 treble crochets, 3 chain stitches, 1 slip stitch, 3 chain stitches, 2 treble crochets). Work A.2 as follows: * 11 chain stitches, 1 slip stitch in 4th chain stitch from hook (=chain-stitch ring), 3 chain stitches, turn the piece. Around chain-stitch ring work (2 treble crochets, 3 chain stitches, 1 slip stitch, 3 chain stitches, 2 treble crochets) *, work from *-* a total of 5-6-7 times. Work A.3 as follows: 11 chain stitches, 1 slip stitch in 4th chain stitch from hook (=chain-stitch ring), 3 chain stitches, turn the piece. Around the chain-stitch ring work (2 treble crochets, 3 chain stitches, 1 slip stitch, 3 chain stitches, 2 treble crochets, 3 chain stitches, 1 slip stitch). REMEMBER THE CROCHET TENSION! ROW 2: Work A.3 as follows: 3 chain stitches, around first chain-stitch ring work (2 treble crochets, 3 chain stitches, 1 slip stitch, 3 chain stitches, 2 treble crochets). Work 1 slip stitch around first chain-space in A.3 on row below, 8 chain stitches. Work A.2 as follows: * 1 slip stitch in last chain stitch on same chain-space, 3 chain stitches. Around next chain-stitch ring work (1 slip stitch, 3 chain stitches, 2 treble crochets, 3 chain stitches, 1 slip stitch, 3 chain stitches, 2 treble crochets). Work 1 slip stitch around next chain-space on row below, 8 chain stitches *, work from *-* a total of 5-6-7 times. Work A.1 as follows: 1 slip stitch in last chain stitch on same chain-space, 3 chain stitches. Around next chain-stitch ring work (1 slip stitch, 3 chain stitches, 2 treble crochets, 3 chain stitches, 1 slip stitch, 3 chain stitches, 2 treble crochets). Work 1 slip stitch in last chain stitch on row below. ROW 3: Work A.1 as follows: 11 chain stitches, 1 slip stitch in 4th chain stitch from hook (=chain-stitch ring), 3 chain stitches, turn the piece. Around the chain-stitch ring work 2 treble crochets. Work 3 chain stitches, skip 1 chain-space on row below, 1 slip stitch around next chain-space, 4 chain stitches. Work A.2 as follows: * 6 chain stitches, 1 slip stitch in 4th chain stitch from hook (= chain-stitch ring), 3 chain stitches, turn the piece. Around the chain-stitch ring work 2 treble crochets, skip 2 chain-spaces on row below, 1 slip stitch around next chain-space, 3 chain stitches. Around the same chain-stitch ring work (1 slip stitch, 3 chain stitches, 2 treble crochets). Work 3 chain stitches, skip 1 chain-space on row below, 1 slip stitch around the same chain-space, 4 chain stitches *, work from *-* a total of 5-6-7 times. Work A.3 as follows: 6 chain stitches, 1 slip stitch in 4th chain stitch from hook (= chain-stitch ring), 3 chain stitches, turn the piece. Around the chain-stitch ring work 2 treble crochets, skip 2 chain-spaces on row below, 1 slip stitch around the next chain-space, 3 chain stitches. Around the same chain-stitch ring work (1 slip stitch, 3 chain stitches, 2 treble crochets, 3 chain stitches). Skip 1 chain-space on the row below, 1 slip stitch around the next chain-space. ROW 4: Work A.3 as follows: 9 chain stitches, skip 2 chain stitches on row below, 1 slip stitch in next chain stitch, 3 chain stitches. Around first chain-stitch ring work (1 slip stitch, 3 chain stitches, 2 treble crochets, 3 chain stitches, 1 slip stitch, 3 chain stitches, 2 treble crochets). Work A.2 as follows: * 1 slip stitch around next chain-space on row below, 8 chain stitches, skip 1 slip stitch + 2 chain stitches on row below, 1 slip stitch in next chain stitch, 3 chain stitches. Around next chain-stitch ring work (1 slip stitch, 3 chain stitches, 2 treble crochets, 3 chain stitches, 1 slip stitch, 3 chain stitches, 2 treble crochets) *, work from *-* a total of 5-6-7 times. Work A.1 as follows: 1 slip stitch around next chain-space on row below, 8 chain stitches, skip 1 slip stitch + 2 chain stitches on row below, 1 slip stitch in next chain stitch, 3 chain stitches. Around the last chain-stitch ring work (1 slip stitch, 3 chain stitches, 2 treble crochets). ROW 5: Work A.1 as follows: 10 chain stitches, 1 slip stitch in 4th chain stitch from hook (=chain-stitch ring), 3 chain stitches, turn the piece. Around the chain-stitch ring work 2 treble crochets, skip 2 chain-spaces on row below, 1 slip stitch around next chain-space, 3 chain stitches. Around the same chain-stitch ring work (1 slip stitch, 3 chain stitches, 2 treble crochets). Work A.2 as follows: * 3 chain stitches, skip 1 chain-space from row below, 1 slip stitch around next chain-space, 10 chain stitches, 1 slip stitch in 4th chain stitch from hook (=chain-stitch ring), 3 chain stitches, turn the piece. Around the chain-stitch ring work 2 treble crochets, skip 2 chain-spaces on row below, 1 slip stitch around next chain-space, 3 chain stitches. Around the same chain-stitch ring work (1 slip stitch, 3 chain stitches, 2 treble crochets) *, work from *-* a total of 5-6-7 times. Work A.3 as follows: 3 chain stitches, skip 1 chain-space on row below, 1 slip stitch around next chain-space, 10 chain stitches, 1 slip stitch in 4th chain stitch from the hook (=chain-stitch ring), 3 chain stitches, turn the piece. Around the chain-stitch ring work 2 treble crochets, skip 2 chain-spaces on row below, 1 slip stitch around next chain-space, 3 chain stitches. Around the same chain-stitch ring work (1 slip stitch, 3 chain stitches, 2 treble crochets, 3 chain stitches, 1 slip stitch). ROW 6: Work A.3 as follows: 3 chain stitches, around the first chain-stitch ring work (2 treble crochets, 3 chain stitches, 1 slip stitch, 3 chain stitches, 2 treble crochets). Work 1 slip stitch around the next chain-space on row below, 8 chain stitches. Work A.2 as follows: * skip 1 slip stitch + 2 chain stitches on row below, 1 slip stitch in next chain stitch, 3 chain stitches. Around the next chain-stitch ring work (1 slip stitch, 3 chain stitches, 2 treble crochets, 3 chain stitches, 1 slip stitch, 3 chain stitches, 2 treble crochets). Work 1 slip stitch around the next chain-space on row below, 8 chain stitches *, work from *-* a total of 5-6-7 times. Work A.1 as follows: Skip 1 slip stitch + 2 chain stitches on row below, 1 slip stitch in next chain stitch, 3 chain stitches. Around the last chain-stitch ring work (1 slip stitch, 3 chain stitches, 2 treble crochets, 3 chain stitches, 1 slip stitch, 3 chain stitches, 2 treble crochets), 1 slip stitch around the next chain-space. Repeat rows 3 to 6 until the piece measures approx. 64-74-84 cm – adjust so that you finish after row 4. Do not cut the strand! Continue with EDGE ALONG SIDE – read description below! EDGE ALONG SIDE: From here you continue working along the one side of the piece so there is a complete flower along the side with A.1. Work pattern according to diagram A.4 as follows: * Work 3 chain stitches. Around the chain-stitch ring work (1 slip stitch, 3 chain stitches, 2 treble crochets, 3 chain stitches, 1 slip stitch, 3 chain stitches, 2 treble crochets), 1 slip stitch around the next chain-space, 7 chain stitches, skip 1 slip stitch, work 1 slip stitch around the next chain-space *, work from *-* down the side. Finish with 1 slip stitch in first stitch worked on piece (= first chain stitch in A.1). Cut and fasten the strand. Work the second section in the same way. ASSEMBLY: Lay the short side (A) on the one section towards the bottom of the other section (B) - see illustration with black star – lay the sides so the flowers on the one section lie between the flowers on the other section. Work the 2 sections together as shown in A.5 and described below: NOTE: When working slip stitches in the petals, work in the spaces between 2 treble crochets. Fasten the strand with 1 slip stitch in the first petal on section B, * work 3 chain stitches, 1 slip stitch in the next petal on section A, work 3 chain stitches, 1 slip stitch in the next petal on section B, 3 chain stitches, 1 slip stitch in the next petal on section A, 3 chain stitches, 1 slip stitch around the next chain-space in section B, 3 chain stitches, 1 slip stitch around the chain-space in section A, 3 chain stitches, 1 slip stitch in next petal on section B *, work from *-* along the whole side. Cut and fasten strand. Repeat on back of poncho so the front and back are the same. |
||||||||||||||||||||||||||||
Diagram explanations |
||||||||||||||||||||||||||||
|
||||||||||||||||||||||||||||

|
||||||||||||||||||||||||||||

|
||||||||||||||||||||||||||||

|
||||||||||||||||||||||||||||
|
||||||||||||||||||||||||||||
|
Have you made this or any other of our designs? Tag your pictures in social media with #dropsdesign so we can see them! Do you need help with this pattern?You'll find tutorial videos, a Comments/Questions area and more by visiting the pattern on garnstudio.com. © 1982-2024 DROPS Design A/S. We reserve all rights. This document, including all its sub-sections, has copyrights. Read more about what you can do with our patterns at the bottom of each pattern on our site. |
||||||||||||||||||||||||||||


With over 40 years in knitting and crochet design, DROPS Design offers one of the most extensive collections of free patterns on the internet - translated to 17 languages. As of today we count 304 catalogues and 11422 patterns - 11422 of which are translated into English (UK/cm).
We work hard to bring you the best knitting and crochet have to offer, inspiration and advice as well as great quality yarns at incredible prices! Would you like to use our patterns for other than personal use? You can read what you are allowed to do in the Copyright text at the bottom of all our patterns. Happy crafting!
Comments / Questions (38)
Les 2 pieces du poncho que l'on tricote ont-elles les mêmes dimensions. Merci pour votre aide. Je parle français.
11.05.2021 - 21:29DROPS Design answered:
Bonjour Francine, tout à fait, vous devez réaliser 2 pièces (rectangles) complètement identiques et les assembler ensuite entre elles comme indiqué sous ASSEMBLAGE. Bon crochet!
12.05.2021 - 07:52Pour le patron Drops 200-38 , j'aurais besoin d'un vidéo pour les rangs 5 et 6. Je ne comprends pas le diagramme, ni le vidéo. Je parle français .
08.02.2021 - 23:42DROPS Design answered:
Bonjour Mme Fortin, cette vidéo montre les rangs 1 à 4 des diagrammes, continuez ensuite en suivant les diagrammes, comme vous l'avez fait auparavant. Le rang 5 va commencer différemment du rang 1 (=10 ml au lieu de 7) mais va se crocheter ensuite de la même façon ensuite: on fait le bas des pétales que l'on crochète avec 1 mc au rang précédent. Le rang 6 se crochète comme le rang 2. Autrement dit, vous allez répéter ces rangs jusqu'à la longueur souhaitée. Bon crochet!
09.02.2021 - 08:42Gibt es für dieses Muster auch ein Dreieckstuch oder Schal? Das Muster ist sooo hübsch. Es wäre schön, wenn Sie eine Anleitung für ein (flaches) Dreieckstuch hätten.
24.07.2020 - 09:15DROPS Design answered:
Liebe Edith, leider haben wir kein Dreieckstuch mit diesem Muster (ich kann es als Anregung aber ans Design-Team weitergeben). Für einen Schal können Sie einfach wie folgt vorgehen (1 Rapport des Blumenmusters hat dabei eine Breite von ca. 5,5 cm, machen Sie am besten vorher eine Maschenprobe, um die Breite des Schals festlegen zu können): A.1 1 x, A.2 so oft wie gewünscht und A.3 1 x. Dann häkeln Sie bis zur gewünschten Länge. Zuletzt häkeln Sie noch den Rand an der Seite von A.1. Fertig ist der Schal. :-) Gutes Gelingen!
27.07.2020 - 10:21Bitte, ich habe Teil A fertig gestellt auf 67 cm Länge, 49 cm breit. Wo finde ich Teil B in der Anleitung? Die Blume an der Seite wird mit einer Reihe fertig und dann?
15.05.2020 - 11:22DROPS Design answered:
Liebe Frau Lübbers, das Poncho besteht aus 2 gleichen Teilen die zusammengehäkelt sind. Wenn Sie das 1. Teil gehäkelt haben, häkeln Sie ein 2. Teil wie zuvor und die 2 Teile wie unter FERTIGSTELLEN zusammenhäkeln. Viel Spaß beim häkeln!
15.05.2020 - 12:08Hola una consulta...ya tengo las dos partes iguales pero cómo las uno? No quiero equivocarme En el patrón se ve dos partes pero que no son iguales... espero su ayuda
10.04.2020 - 04:05DROPS Design answered:
Hola Pamela. Son las dos partes iguales. Sigue las instrucciones de apartado "Terminación" y el dibujo bajo el patrón para ver cómo colocar las dos partes.
12.04.2020 - 18:13Graciass por su respuesta... necesito su ayuda en lo sgte: Repetir las filas 3-6 hasta que la labor mida aprox 64-74-84 cm ...asumo que 64 cm es small verdad? Esa medida es la total de pecho y espalda o tengo que hacer dos iguales? En esta parte BORDE A LO LARGO DEL LADO: qué significa esto: Trabajar la 2ª sección de la misma manera.?? Graciass graciass graciass Saludos
31.03.2020 - 14:27DROPS Design answered:
Hola Pamela. Para la talla S una sección (parte) mide 64 cm. El poncho se trabaja en dos partes iguales y se cosen al finalizar según el dibujo que tienes debajo del patrón.
31.03.2020 - 23:17Hola soy Pamela de Perú estoy haciendo la capa en hilo de algodón doble y con ganchillo 4 Quisiera saber si tienes alguna dirección en Youtube dónde está toda la realización del proyecto... espero que si me ayudarías bastante!!! Saludos
28.03.2020 - 17:48DROPS Design answered:
Hola Pamela. Este vídeo te puede ayudar a realizar el proyecto:
29.03.2020 - 23:16Moet a en b 2 x gehaakt worden? en a en b apart aan elkaar gehaakt?
29.02.2020 - 19:57DROPS Design answered:
Dag Carla,
Je haakt 2 identieke rechthoeken en op het einde haak je deze aan elkaar. De korte kant van de rechthoek wordt A genoemd en de lange kant wordt B genoemd. Op de voorkant wordt de korte kant van het eerste deel tegen de lange kant van het tweede deel vast gemaakt en op de achterkant wordt de korte kant van het tweede deel tegen de lange kant van het eerste deel vast gemaakt.
04.03.2020 - 15:31Dzień dobry, jaka powinna być długość pierwszego rzędu ? Czy robimy dwa prostokąty i łączymy je razem ?
12.02.2020 - 14:12DROPS Design answered:
Witaj Anito! Długość 1-szego rzędu w zależności od rozmiaru wynosi 38-44-49 cm. Robimy 2 prostokąty i łączymy je razem. Powodzenia!
12.02.2020 - 19:45Gewijzigd online: 27.05.2019 Correctie - TOER 6: Haak A.3 als volgt: 3 lossen, haak om De beschrijving klopt wel neem ik aan ? Dit gaat over de teltekening ?
06.11.2019 - 18:01DROPS Design answered:
Dag Veerle,
Als er een correctie op het patroon is, dan is deze correctie al doorgevoerd op het online patroon. Als je voor de datum van de correctie een afdruk hebt gemaakt, dan is de correctie dus nog niet verwerkt in je afdruk.
10.11.2019 - 21:40