
Popular categories
Looking for a yarn?


|
||||||||||||||||||||||
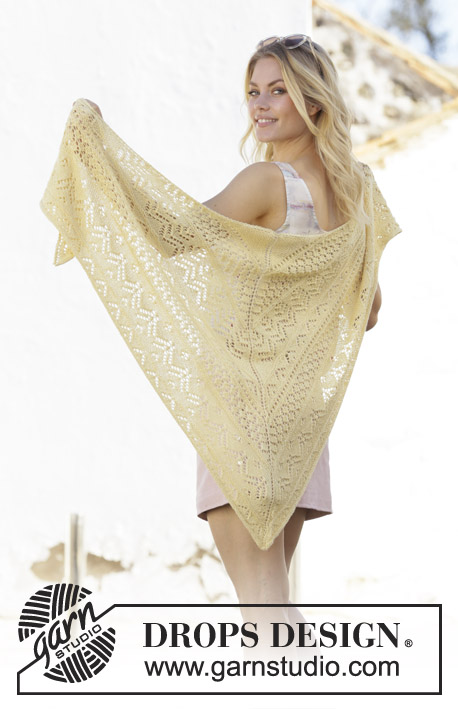
Lemon Heart |
||||||||||||||||||||||
 |
 |
|||||||||||||||||||||
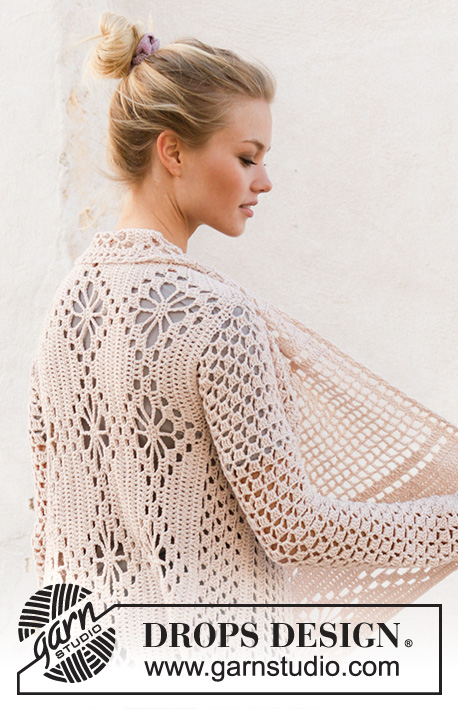
Knitted shawl in DROPS BabyAlpaca Silk. The piece is worked top down with lace pattern and garter stitch.
DROPS 200-19 |
||||||||||||||||||||||
|
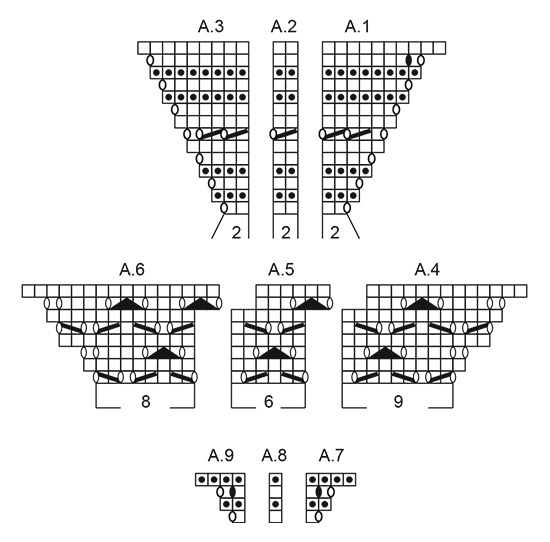
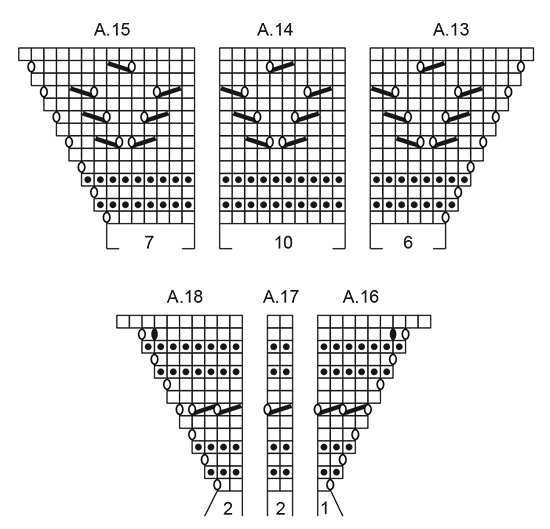
------------------------------------------------------- EXPLANATIONS FOR THE PATTERN: ------------------------------------------------------- RIDGE/GARTER STITCH (worked back and forth): Knit all rows. 1 ridge in height = Knit 2 rows. INCREASE TIP: Increase by making yarn overs, which are knitted on next row to leave holes. PATTERN: See diagrams A.1 to A.21. The diagrams show all the rows in the pattern seen from the right side. ------------------------------------------------------- START THE PIECE HERE: ------------------------------------------------------- SHAWL - SHORT OVERVIEW OF THE PIECE: The piece is worked back and forth on circular needle to allow room for all the stitches. It is worked top down with lace pattern and increases. SHAWL: Cast on 9 stitches with circular needle size 3 mm and BabyAlpaca Silk. Work 1 RIDGE - see description above. Insert a marker in the middle stitch. Then work garter stitch - AT THE SAME TIME as you increase 4 stitches on each row from the right side as follows - READ INCREASE TIP: Increase 1 stitch inside 2 edge stitches in each side and 1 stitch on each side of the mid-stitch. Increase like this until there are 57 stitches on needle (i.e. 28 stitches on each side of mid-stitch). REMEMBER THE KNITTING TENSION! Then work the 2 edge stitches in each side in garter stitch and the mid-stitch in stocking stitch. Work diagrams A.1-A.3 as follows: Work 2 edge stitches in garter stitch, A.1 over 2 stitches, A.2 until there are 2 stitches left before mid-stitch, A.3 over 2 stitches and mid-stitch in stocking stitch. Work A.1 over 2 stitches, A.2 until there are 4 stitches left on row, A.3 over 2 stitches and 2 edge stitches in garter stitch. When the diagrams have been worked 1 time in height there are 87 stitches on needle. Work diagrams A.4-A.6 as follows: Work 2 edge stitches in garter stitch, A.4 over 9 stitches, A.5 until there are 8 stitches left before mid-stitch (4 times in width), work A.6 over 8 stitches, mid-stitch in stocking stitch, A.4 over 9 stitches, A.5 until there are 10 stitches left on row (4 times in width). Work A.6 over 8 stitches and 2 edge stitches in garter stitch. When the diagrams have been worked 1 time in height there are 111 stitches on needle. Work the diagrams 2 more times in height as follows: Work 2 edge stitches in garter stitch, A.4 over 9 stitches, work A.5 six times in width, A.6 over 8 stitches, mid-stitch in stocking stitch, A.4 over 9 stitches, A.5 is worked 6 times in width, A.6 over 8 stitches and 2 edge stitches in garter stitch. When the diagrams have been worked 1 time in height there are 135 stitches on needle. Work 2 edge stitches in garter stitch, A.4 over 9 stitches, A.5 is worked 8 times in width, A.6 over 8 stitches, mid-stitch in stocking stitch, A.4 over 9 stitches, A.5 is worked 8 times in width, A.6 over 8 stitches and 2 edge stitches in garter stitch. When the diagrams have been worked 1 time in height there are 159 stitches on needle. Work diagrams A.7-A.9 as follows: Work 2 edge stitches in garter stitch, A.7 over 1 stitch, A.8 until there is 1 stitch left before mid-stitch, A.9 over 1 stitch, mid-stitch in stocking stitch. Work A.7 over 1 stitch, A.8 until there are 3 stitches left on row, work A.9 over 1 stitch and 2 edge stitches in garter stitch. When the diagrams have been worked 1 time in height there are 171 stitches on needle. Work diagrams A.10-A.12 as follows: Work 2 edge stitches in garter stitch, A.10 over 6stitches, A.11 until there are 7 stitches left before mid-stitch (7 times in width), work A.12 over 7 stitches and mid-stitch in stocking stitch. Work A.10 over 6 stitches, A.11 until there are 9 stitches left on row (7 times in width), work A.12 over 7 stitches and 2 edge stitches in garter stitch. When the diagrams have been worked 1 time in height there are 231 stitches on needle. Work diagrams A.13-A.15 as follows: Work 2 edge stitches in garter stitch, A.13 over 6 stitches, A.14 until there are 7 stitches left before mid-stitch (10 times in width), work A.15 over 7 stitches and mid-stitch in stocking stitch. Work A.13 over 6 stitches, A.14 until there are 9 stitches on needle (10 times in width), A.15 over 7 stitches and 2 edge stitches in garter stitch. When the diagrams have been worked 1 time in height there are 259 stitches on needle. Work diagrams A.16 to A.18 as follows: Work 2 edge stitches in garter stitch, A.16 over 1 stitch, A.17 until there are 2 stitches left before mid-stitch, A.18 over 2 stitches and mid-stitch in stocking stitch. Work A.16 over 1 stitch, A.17 until there are 4 stitches left on row, A.18 over 2 stitches and 2 edge stitches in garter stitch. When the diagrams have been worked 1 time in height there are 291 stitches on needle. Work diagrams A.4 to A.6 as follows: Work 2 edge stitches in garter stitch, A.4 over 9 stitches, A.5 until there are 8 stitches left before mid-stitch (21 times in width), A.6 over 8 stitches and mid-stitch in stocking stitch. Work A.4 over 9 stitches, A.5 until there are 10 stitches left on row (21 times in width), A.6 over 8 stitches and 2 edge stitches in garter stitch. When the diagrams have been worked 1 time in height there are 315 stitches on needle. Work the diagrams 1 more time in height as follows: Work 2 edge stitches in garter stitch , A.4 over 9 stitches, A.5 until there are 8 stitches left before mid-stitch (23 times in width), A.6 over 8 stitches, mid-stitch in stocking stitch, A.4 over 9 stitches, A.5 until there are 10 stitches left on row (23 times in width), A.6 over 8 stitches and 2 edge stitches in garter stitch. There are 339 stitches on needle. Work diagrams A.19 to A.20 as follows: Work 2 edge stitches in garter stitch, A.19 over 5 stitches, A.20 until there are 6 stitches left before mid-stitch (13 times in width), A.21 over 6 stitches and mid-stitch in stocking stitch. Work A.19 over 5 stitches, A.20 until there are 8 stitches left on row (13 times in width), A.21 over 6 stitches and 2 edge stitches in garter stitch. When the diagrams have been worked 1 time in height there are 411 stitches on needle. Work diagrams A.13 to A.15 as follows: Work 2 edge stitches in garter stitch, A.13 over 6 stitches, A.14 until there are 7 stitches left before mid-stitch (19 times in width), A.15 over 6 stitches and mid-stitch in stocking stitch. Work A.13 over 6 stitches, A.14 until there are 9 stitches on needle (19 times in width), A.15 over 7 stitches and 2 edge stitches in garter stitch. When the diagrams have been worked 1 time in height there are 439 stitches on needle. Now continue working as follows: * Work 2 edge stitches in garter stitch, 1 yarn over, knit to mid-stitch, 1 yarn over, mid-stitch in stocking stitch, 1 yarn over, knit until there are 2 stitches left on row, 1 yarn over and 2 edge stitches in garter stitch. Knit 1 row from the wrong side *. Work from *-* 1 more time. On the next row from the right side cast off loosely. To make the cast-off edge elastic, make 1 yarn over after each 5th stitch, which is then cast off as a normal stitch. Cut and fasten strand. |
||||||||||||||||||||||
Diagram explanations |
||||||||||||||||||||||
|
||||||||||||||||||||||
|
||||||||||||||||||||||

|
||||||||||||||||||||||
|
||||||||||||||||||||||

|
||||||||||||||||||||||

|
||||||||||||||||||||||
|
Have you made this or any other of our designs? Tag your pictures in social media with #dropsdesign so we can see them! Do you need help with this pattern?You'll find tutorial videos, a Comments/Questions area and more by visiting the pattern on garnstudio.com. © 1982-2024 DROPS Design A/S. We reserve all rights. This document, including all its sub-sections, has copyrights. Read more about what you can do with our patterns at the bottom of each pattern on our site. |
||||||||||||||||||||||


With over 40 years in knitting and crochet design, DROPS Design offers one of the most extensive collections of free patterns on the internet - translated to 17 languages. As of today we count 304 catalogues and 11422 patterns - 11422 of which are translated into English (UK/cm).
We work hard to bring you the best knitting and crochet have to offer, inspiration and advice as well as great quality yarns at incredible prices! Would you like to use our patterns for other than personal use? You can read what you are allowed to do in the Copyright text at the bottom of all our patterns. Happy crafting!
Comments / Questions (40)
Hallo nochmal, habe mich durch die Anleitung gearbeitet und stelle nun fest, dass das Tuch für mich nicht groß genug wird. Nun meine Frage, was muss man beachten, wenn man die vorhandenen Mustersätze anstrickt?
26.06.2020 - 15:13DROPS Design answered:
Liebe Frau Schneider, leider können wir nicht jede Anleitung nach jeder individuellen Wunsch umrechnen/anpassen, gerne hilft Ihnen aber Ihr DROPS Laden - auch telefonisch oder per E-Mail. Viel Spaß beim stricken!
26.06.2020 - 15:53Hallo, wird bei dem Tuch 200-19 Lemon Heart die Mittelmasche über die gesamte Arbeit als Krausrippe gestrickt? LG Sabine
03.06.2020 - 09:12DROPS Design answered:
Liebe Frau Schneider, die Mittelmasche wird stets glatt rechts gestrickt. Viel Spaß beim stricken!
03.06.2020 - 11:33Hiermit möchte ich mich mal bei dem tollen Team von Drops bedanken. Ich habe schon so viele Sachen von Euch nachgestrickt und gehäkelt und die Teile sind wunderschön geworden. Auch die schnelle Antworten auf meine Fragen waren immer sehr Hilfreich! 5 Sterne für Euch. Mit freundlichen Grüßen Eure Doris
14.05.2020 - 07:48Liebes Drops Design Team, muss in jeder Hinreihe vom Diagramm A4 bis A6 vor der Mittelmasche A6 und nach der Mittelmasche A4 gestrickt werden ?
13.05.2020 - 16:27DROPS Design answered:
Liebe Doris, ja genau, Diagramme werden beiseitig von der Mittelmasche gestrickt (A.4, 4xA.5, A.6) mit 2 Maschen kraus rechts beidseitig. Viel Spaß beim stricken!
14.05.2020 - 07:30Hallo,wenn ich das Diagramm von A.4 bis A.6 einmal in der Höhe gestrickt habe, habe ich nur 107 Maschen auf der Nadel und nicht 111?
13.05.2020 - 12:54DROPS Design answered:
Liebe Doris, haben Sie 13 M in jedem A.4, 16 M in jedem A.6 und 6 Maschen in jedem A.5 (= 24 Maschen in A.5?), so sollten die Maschen aussehen: 2 M kraus re, 13 M A.4, 24 M A.5, 16 M A.6, 1 Mitt-Masche, 13 M A.4, 24 M A.5, 16 M A.6, 2 M kraus re= 2+13+24+16+1+13+24+16+2= 111 Maschen. Viel Spaß beim stricken!
13.05.2020 - 13:31Je ne comprends pas les explications et les diagrammes du châle 200-19 qui n'ont pas l'air de correspondre au modèle . Le diagramme central ? Je ne comprends à quoi il correspond, on ne parle pas de la maille centrale ? Si je pouvais avoir une photo du modèle ça m'aiderai peut être... Merci
11.02.2020 - 17:49DROPS Design answered:
Bonjour Mme Pailhories, ce châle se tricote de haut en bas, on va augmenter de chaque côté et au milieu (de chaque côté de la maille centrale) pour donner la forme souhaitée. Vous tricotez ainsi les diagrammes décrits 2 fois: à droite du milieu du châle et à gauche du milieu du châle. Laissez-vous guider par les explications, il prendra forme progressivement. Bon tricot!
12.02.2020 - 08:01Wie stricke ich den Rand?
11.02.2020 - 17:19DROPS Design answered:
Liebe Frau Grahl, dieses Video zeigt, wie man mit Umschläge abkettet. Viel Spaß beim stricken!
12.02.2020 - 07:57Oh! Il n'y a pas de problèmes entre ce qui est imprimé et ce que je lis ici... J'ai fait une erreur! Excusez-moi... Je ne comprends quand même pas ce que vous voulez dire par tricoter A1 au-dessus des 2 mailles suivantes... Merci!
30.12.2019 - 14:06DROPS Design answered:
Bonjour Josiane, vous tricotez ainsi: 2 m point mousse, les 2 m suivantes en suivant A.1, vous répétez ensuite A.2 jusqu'à ce qu'il reste 2 m avant la m centrale, tricotez A.3 (= 2 mailles), puis A.1 (= 2 mailles), répétez A.2 jusqu'à ce qu'il reste 4 m et terminez par A.3 (= 2 m) et 2 m point mousse. Bon tricot!
02.01.2020 - 13:42Bonjour, les indications sont différentes entre celles que j'ai imprimées et celles que je lis ici. Lesquelles suivre?!! Et je ne comprends pas ceci (peu importe quelles indications je suis!): Tricoter A.1 au-dessus des 2 mailles suivantes, Est-ce que je glisse 2 mailles et continue de tricoter ensuite? Que dois-je faire avec les 2 mailles? Merci, et désolée... je ne suis pas très bonne!
29.12.2019 - 14:42Hi, I don’t quiet get the first increase rule. After 9 CO, 2 round of all K, then YO K4 YO K1 YO K4 YO?
24.12.2019 - 05:33DROPS Design answered:
Dear Libby, you will increase every other row (= every row from RS) as follows: knit 2, yo, work until middle stitch: yo, knit middle stitch, yo, knit until 2 sts remain, YO, knit 2. Continue like this until there are 57 sts on needle. Happy knitting!
02.01.2020 - 10:46