DROPS Paris
DROPS Paris
100% Cotton
from 1.10 £ /50g
Get the yarn to make this pattern from 7.70£.

The yarn cost is calculated from the pattern’s smallest size and the yarn’s cheapest product type. Looking for an even better price? You might find it on the DROPS Deals!

DROPS SS24

Sorbet Sunday

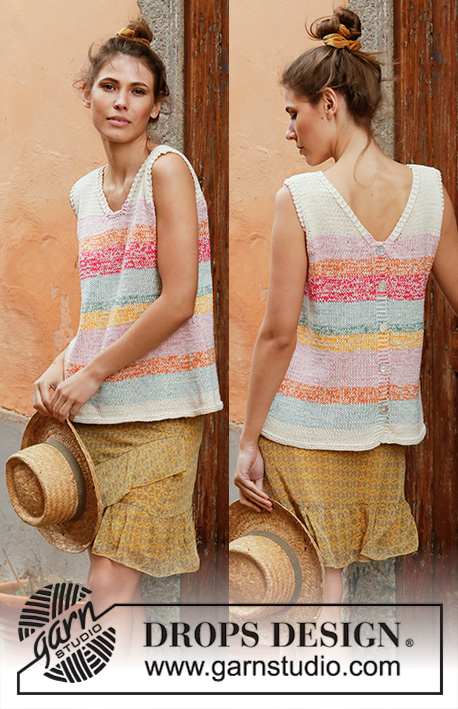
Crocheted top in DROPS Paris. Piece is crocheted with stripes. Size: S - XXXL

DROPS 202-30
DROPS design: Pattern w-754
Yarn group C or A + A
----------------------------------------------------------

SIZE:
S - M - L - XL - XXL - XXXL

MATERIALS:
DROPS PARIS from Garnstudio (belongs to yarn group C)
100-100-150-150-150-150 g colour 65, rust
100-100-150-150-150-150 g colour 63, desert rose
100-100-100-100-100-100 g colour 64, amethyst
50-50-50-50-50-50 g colour no 17, off white

CROCHET TENSION:
14 treble crochets in width and 8.5 rows vertically = 10 x 10 cm.

CROCHET HOOK:
DROPS CROCHET HOOK size 5 mm
Hook size is only a suggestion! If you have too many stitches on 10 cm switch to larger hook. If you have too few stitches on 10 cm switch to smaller hook.

----------------------------------------------------------

-------------------------------------------------------

Alternative Yarn – See how to change yarns here
Yarn Groups A to F – Use the same pattern and change the yarn here
Yarn usage using an alternative yarn – Use our yarn converter here

-------------------------------------------------------

DROPS Paris
DROPS Paris
100% Cotton
from 1.10 £ /50g
Get the yarn to make this pattern from 7.70£.

The yarn cost is calculated from the pattern’s smallest size and the yarn’s cheapest product type. Looking for an even better price? You might find it on the DROPS Deals!

Pattern instructions

NOTE: This pattern is written in British English. All measurements in charts are in cm. For conversion from cm to inches - click here. There are different terms for crocheting in British and American English. If this pattern includes crochet, click for "crochet terms" here. For this pattern in American English, please click here.
----------------------------------------------------------

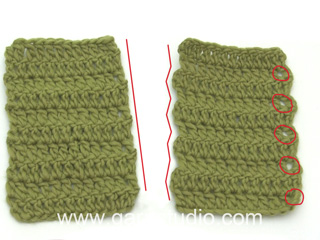
EXPLANATION FOR THE PATTERN:

----------------------------------------------------------

CROCHET INFORMATION:
At the beginning of every row replace first treble crochet with 3 chain stitches.

STRIPES:
13-14-15-15-15-16 cm (including first row) with rust.
Work 13-14-15-15-15-16 cm with desert rose.
Work 5-5-5-5-6-6 cm with off white.
Then work with amethyst until finished measurements.

INCREASE TIP (applies to sides):
Increase 1 treble by working 2 trebles in same treble crochet.

DECREASE TIP-1 (applies to armholes):
At the beginning of row: Replace number of treble crochets to decrease with 1 slip stitch.
At end of row: Do not work over stitches to be decreased.

DECREASE TIP-2 (applies to neck):
* Make 1 yarn over, insert hook in next stitch, get yarn, make 1 yarn over and pull yarn through the 2 first loops on hook *, repeat from *-* 1 more time, make 1 yarn over and pull yarn through all 3 loops on hook (= 1 treble crochet decreased).

DECREASE TIP-3 (applies to neck):
Work 1 treble crochet in each of the next 2 stitches but wait with last yarn over and pull through on both these treble crochets, work 1 treble crochet in the next stitch and pull last yarn over through all 4 loops on hook (= 2 treble crochets decreased).

----------------------------------------------------------

START THE PIECE HERE:

----------------------------------------------------------

TOP - SHORT OVERVIEW OF THE PIECE:
Work piece back and forth in parts, bottom up and sewn together when finished.

BACK PIECE:
Work 59-66-73-80-92-101 chain stitches on hook size 5 mm with rust. Turn and work 1 treble crochet in 4th chain stitch from hook (= 2 treble crochets), work 1 treble crochet in each of the next 6-6-6-6-4-6 chain stitches, * skip 1 chain stitch, work 1 treble crochet in each of the next 6 chain stitches *, work from *-* the entire row = 50-56-62-68-78-86 treble crochets.
Then work 1 treble crochet in every treble crochet and stripes - read CROCHET INFO and STRIPES above. When piece measures 8 cm, increase 1 treble crochet in each side - read INCREASE TIP. Increase like this every 8-8-9-9-10-10 cm 3 times in total = 56-62-68-74-84-92 treble crochets. REMEMBER THE CROCHET TENSION! Fasten off when piece measures 28-29-30-31-32-33 cm.
Now work over the middle 50-56-60-66-74-80 treble crochets (= 3-3-4-4-5-6 treble crochets in each side for armholes). Then cast off for armholes in each side on every row as follows: Decrease 3 treble crochets 1 time, 2 treble crochets 1-1-2-3-4-5 times and 1 treble crochet 0-2-1-2-3-3 times = 40-42-44-44-46-48 treble crochets – read DECREASE TIP-1. Continue to work until piece measures 42-44-46-48-50-52 cm.
Now work shoulder over the first 8-9-9-9-9-10 treble crochets (= 24-24-26-26-28-28 treble crochets for neck). Decrease 1 treble crochet on first row towards neck - read DECREASE TIP-2 = 7-8-8-8-8-9 treble crochets. Continue to work until piece measures 46-48-50-52-54-56 cm. Cut and fasten the yarn. Work the other shoulder the same way over the last 8-9-9-9-9-10 treble crochets towards the neck).

FRONT PIECE:
Begin to work the same way as on back piece. Fasten off when piece measures 35-37-38-40-41-43 cm.
Now work shoulder over the first 13-14-14-14-14-15 treble crochets (= 14-14-16-16-18-18 treble crochets for neck). Decrease 2 treble crochets on every row towards the neck 3 times in total - read DECREASE TIP-3 = 7-8-8-8-8-9 treble crochets. Continue to work until piece measures 46-48-50-52-54-56 cm. Cut and fasten the yarn. Work the other shoulder the same way over the last 13-14-14-14-14-15 treble crochets towards the neck).

ASSEMBLY:
Sew the shoulder seams together edge to edge with neat little stitches. Sew side seams the same way.

EDGE:
Work 1 double crochet in each of the same chain stitches as treble crochets were worked in at the bottom of body.

Diagram

diagram measurements
Do you have a question? See a list of frequently asked questions (FAQ)

Knitting tension is what determines the final measurements of your work, and is usually measured per 10 x 10 cm. It is provided like so: number of stitches in width x number of rows in height - eg: 19 stitches x 26 rows = 10 x 10 cm.

The knitting tension is very individual; some people knit/crochet loosely while others work tightly. You adjust the knitting tension with the needle size, which is why the suggested needle size is only meant as a guide! You need to adjust this (up or down) to ensure that YOUR knitting tension matches the knitting tension provided in the pattern. If you work with a different knitting tension than provided you will have a different yarn consumption, and your work will have different measurements than what the pattern suggests.

The knitting tension also determines which yarns can replace each other. As long as you achieve the same knitting tension you can replace one yarn with another.

See DROPS lesson: How to measure your tension/gauge

See DROPS video: How to make a gauge tension swatch

The required amount of yarn is provided in grams, eg: 450 g. To calculate how many balls you’ll need you first need to know how many grams are in 1 ball (25g, 50g or 100g). This information is available if you click on the individual yarn quality on our pages. Divide the amount required with the amount of each ball. For example, if each ball is 50g (the most common amount), the calculation will be as follows: 450 / 50 = 9 balls.

The important thing when changing from one yarn to another is that the knitting/crochet tension remains the same. This is so that the measurements of the finished piece will be the same as on the sketch provided. It is easier to achieve the same knitting tension using yarns from the same yarn group. It is also possible to work with multiple strands of a thinner yarn to achieve the knitting tension of a thicker one. Please try our yarn converter. We recommend you to always work a test swatch.

Please NOTE: when changing yarn the garment might have a different look and feel to the garment in the photo, due to individual properties and qualities of each yarn.

See DROPS lesson: Can I use a different yarn than the one mentioned in the pattern?

All our yarns are categorised into yarn groups (from A to F) according to thickness and knitting tension – group A contains the thinnest yarns and group F the thickest. This makes it easier for you to find alternative yarns to our patterns, should you wish to switch yarn. All yarns within the same group have a similar knitting tension and can easily replace each other. However, different yarn qualities have different structures and properties which will give the finished work a unique look and feel.

Click here for an overview of the yarns in each yarn group

At the top of all our patterns you’ll find a link to our yarn calculator, which is a helpful tool should you wish to use a different yarn than suggested. By filling in the yarn quality you wish to replace, the amount (in your size) and number of strands, the calculator will present good alternative yarns with the same knitting tension. Additionally it will tell you how much you’ll require in the new qualities and whether you’ll need to work with multiple strands. Most skeins are 50g (some are 25g or 100g).

If the pattern is worked with multiple colours, every colour will have to be calculated separately. Similarly, if the pattern is worked with several strands of different yarns (for example 1 strand Alpaca and 1 strand Kid-Silk) you will have to find alternatives for each, individually.

Click here to see our yarn calculator

Since different yarns have different qualities and textures we have chosen to keep the original yarn in our patterns. However, you can easily find options among our available qualities by using our yarn calculator, or simply pick a yarn from the same yarn group.

It is possible that some retailers still have discontinued yarns in stock, or that someone has a few skeins at home that they would like to find patterns for.

The yarn calculator will provide both alternative yarn as well as required amount in the new quality.

If you think it's hard to decide what size to make, it can be a good idea to measure a garment you own already and like the size of. Then you can pick the size by comparing those measures with the ones available in the pattern's size chart.

You'll find the size chart at the bottom of the pattern.

See DROPS lesson: How to read size chart

The needle size provided in the pattern serves only as a guide, the important thing is to follow the knitting tension. And since knitting tension is very individual, you will have to adjust the needle size to ensure that YOUR tension is the same as in the pattern – maybe you’ll have to adjust 1, or even 2 needle sizes, up or down to achieve the correct tension. For this, we recommend that you work test swatches.

Should you work with a different knitting tension than the one provided, the measurements of the finished garment might deviate from the measurement sketch.

See DROPS lesson: How to measure your tension/gauge

See DROPS video: How to make a tension/gauge swatch

Working a garment top-down provides more flexibility and room for personal adjustment. For example it is easier to try the garment on while working, as well as making adjustments to length of yoke and shoulder caps.

The instructions are carefully explaining every step, in the correct order. Diagrams are adjusted to the knitting direction and are worked as usual.

The diagram depicts all rows/rounds, and every stitch seen from the right side. It is read from bottom to top, from right to left. 1 square = 1 stitch.

When working back and forth, every other row is worked from the right side and every other row is worked from the wrong side. When working from the wrong side, the diagram will have to be worked reversed: from left to right, knit stitches are purled, purl stitches are knit etc.

When working in the round every round is worked from the right side and the diagram are worked from right to left on all rounds.

See DROPS lesson: How to read knitting diagrams

The diagram depicts all rows/rounds, and every stitch seen from the right side. It is worked from bottom to top, from right to left.

When working back and forth every other row is worked from the right side: from right to left and every other row is worked from the wrong side: from left to right.

When working in the round, every row in the diagram are worked from the right side, from right to left.

When working a circular diagram you start in the middle and work your way outwards, counter clockwise, row by row.

The rows usually start with a given number of chain stitches (equivalent to the height of the following stitch), this will either be depicted in the diagram or explained in the pattern.

See DROPS lesson: How to read crochet diagrams

Instructions for working several diagrams after each other on the same row/round, will often be written like so: “work A.1, A.2, A.3 a total of 0-0-2-3-4 times". This means you work A.1 once, then A.2 is worked once, and A.3 is repeated (in width) the number of times provided for your size – in this case like so: S = 0 times, M = 0 times, L=2 times, XL= 3 times and XXL = 4 times.

The diagrams are worked as usual: begin with the first row in A.1, then work the first row in A.2 etc.

See DROPS lesson: How to read knitting diagrams

See DROPS lesson: How to read crochet diagrams

The total width of the garment (from wrist-to-wrist) will be larger in the larger sizes, despite the actual sleeves being shorter. The larger sizes have longer sleeve caps and wider shoulders, so there will be a good fit in all sizes.

The measurement sketch/schematic drawing provides information regarding the full length of the garment. If it’s a jumper or a jacket the length is measured from the highest point on the shoulder closest to the neckline, and straight down to the bottom of the garment. It is NOT measured from the tip of shoulder. Similarly, the length of yoke is measured from the highest point on the shoulder and down to where yoke is split into body and sleeves.

On a jacket measures are never taken along bands, unless specifically stated. Always measure inside band stitches when measuring the length.

See DROPS lesson: How to read a schematic drawing

Diagrams are often repeated on the round or in height. 1 repeat is the diagram the way it appears in the pattern. If it says to work 5 repeats of A.1 in the round, then you work A.1 a total of 5 times after/next to each other in the round. If it says to work 2 repeats of A.1 vertically/in height you work the entire diagram once, then begin again at the start and work the entire diagram one more time.

Chain stitches are slightly narrower than other stitches and to avoid working the cast-on edge too tight, we simply chain more stitches to begin with. The stitch count will be adjusted on the following row to fit the pattern and measurement sketch.

The rib edge is more elastic and will contract slightly compared to, for example, stocking stitch. By increasing before the rib edge, you avoid a visible difference in width between the rib edge and the rest of the body.

It’s very easy to cast off too tightly, and by making yarn overs while casting off (and simultaneously casting these off) you avoid a too tight cast off edge.

See DROPS video: How to bind off with yarn overs (yo)

To achieve an even increase (or decrease) you can increase on, for example: every 3rd and 4th row alternately, like so: work 2 rows and increase on the 3rd row, work 3 rows and increase on the 4th. Repeat this until the increase is complete.

See DROPS lesson: Increase or decrease 1 st on every 3rd and 4th row alternately

Should you prefer to work in the round instead of back and forth, you may of course adjust the pattern. You’ll need to add steeks mid-front (usually 5 stitches), and follow the instructions. When you would normally turn and work from the wrong side, simply work across the steek and continue in the round. At the end you’ll cut the piece open, pick up stitches to work bands, and cover the cut edges.

See DROPS video: How to knit steeks and cut open

Should you prefer to work back and forth instead of in the round, you may of course adjust the pattern so you work the pieces separately and then assemble them at the end. Divide the stitches for the body in 2, add 1 edge stitch in each side (for sewing) and work the front and back pieces separately.

See DROPS lesson: Can I adapt a pattern for circular needles into straight needles?

Pattern repeats can vary slightly in the different sizes, in order to get the correct proportions. If you’re not working the exact same size as the garment in the photo, yours might deviate slightly. This has been carefully developed and adjusted so that the complete impression of the garment is the same in all sizes.

Make sure to follow instructions and diagrams for your size!

If you have found a pattern you like which is available in women’s size it’s not very difficult to convert it to men’s size. The biggest difference will be the length of sleeves and body. Start working on the women size that you think would fit across the chest. The additional length will be worked right before you cast off for the armhole/sleeve cap. If the pattern is worked top-down you can add the length right after the armhole or before the first decrease on sleeve.

Regarding additional yarn amount, this will depend on how much length you add, but it is better with a skein too many than too few.

All yarns will have excess fibres (from production) that might come off as lint or shedding. Brushed yarns (ie hairier yarns) have more of these loose, excess fibres, causing more shedding.

Shedding also depends on what is worn under or over the garment, and whether this pulls at the yarn fibres. It’s therefore not possible to guarantee that there will be no shedding

Below are some tips on how to get the best result when working with hairier yarns:

1. When the garment is finished (before you wash it) shake it vigorously so the looser hairs come off. NOTE: do NOT use a lint roller, brush or any method that pulls at the yarn.

2. Place the garment in a plastic bag and put it in your freezer - the temperature will cause the fibres to become less attached to each other, and excess fibres will come off easier.

3. Leave in the freezer for a few hours before taking it out and shaking it again.

4. Wash the garment according to the instructions on the yarn label.

Pilling is a natural process that happens to even the most exclusive of fibers. It's a natural sign of wear and tear that is hard to avoid, and that is most visible in high friction areas of your garment like a sweater's arms and cuffs.

You can make your garment look as new by removing the pilling, using a fabric comb or a pill/lint remover.

Still can't find the answer you need? Then scroll down and leave your question so one of our experts can try to help you. This will be done normally within 5 to 10 working days.
In the meantime, you can read the questions and answers that others have left to this pattern or join the DROPS Workshop on Facebook to get help from fellow knitters/crocheters!

You might also like...

Post a comment to pattern DROPS 202-30

We would love to hear what you have to say about this pattern!

If you want to leave a question, please make sure you select the correct category in the form below, to speed up the answering process. Required fields are marked *.

Comments / Questions (39)

country flag Ilaria wrote:

Bello schema! Come faccio a cucire insieme le due parti sui lati? Grazie.

17.06.2021 - 11:59

DROPS Design answered:

Buonasera Ilaria, deve unire le parti cucendole, sfruttando il filo più esterno dell'ultima maglia in modo da rendere la cucitura invisibile. Buon lavoro!

17.06.2021 - 22:30

country flag Kay wrote:

Diagram 52 is 20 12 inches long?

27.04.2021 - 17:48

DROPS Design answered:

Dear Kay, can you please rephrase you question? It might hhelp toknow that the measurements on the schematic drawings are given in cm's. Happy Crafting!

27.04.2021 - 21:40

country flag Raffaella wrote:

Avrei bisogno di capire meglio come effettuare le seguenti diminuzioni , come segue le diminuzioni di una sola maglia e poi di 4?/5 maglie? Devo diminuire nel mezzo ? poi sarebbe stato meglio avere anche una foto del retro della canottiera sorbet sunday. \r\n“Diminuire per gli scalfi da ciascun lato ad ogni riga, come segue: Diminuire 3 maglie alte 1 volta, 2 maglie alte 1-1-2-3-4-5 volte e 1 maglia alta 0-2-1-2-3-3 volte “\r\nGrazie sono alle prime armi . Raffaella

27.04.2021 - 14:28

DROPS Design answered:

Buonasera Raffaella, quale taglia sta lavorando? Ad esempio per la taglia S deve diminuire a entrambi i lati su ogni riga, 3 maglie alte, 2 maglie alte 1 volta. Buon lavoro!

27.04.2021 - 20:50

country flag Jean Wright wrote:

I can't seem to download or print this pattern. Can you help wih this?

04.03.2021 - 19:25

DROPS Design answered:

Dear Mrs Wright, we successfully could print the pattern - look at the printers settings to check that old settings cannot be the problem - try to clean cache/cookies and try again, this should work. Hope this will help. Happy crocheting!

05.03.2021 - 07:07

country flag Hanne Aasbak wrote:

Hei. Jeg hekler i str M, og jeg skjønte ikke fellemetoden. Skal jeg felle alt med engang? Eller skal jeg felle 3 staver 1 gang, ut omg, og på neste omg 2 staver 1 gang osv...? Videre felles det av til ermehull i hver side på hver rad, slik: Fell 3 staver 1 gang, 2 staver 1-1-2-3-4-5 ganger og 1 stav 0-2-1-2-3-3 ganger = 40-42-44-44-46-48 staver – les FELLETIPS-1. Hekle videre til arbeidet måler 42-44-46-48-50-52 cm.

20.06.2020 - 00:55

DROPS Design answered:

Hei Hanne. Nei, du skal ikke felle alt på engang. Du skal felle i HVER side slik: Fell 3 staver 1 gang, fell 2 staver 1 gang og fell 1 stav 2 ganger = 42 staver. God Fornøyelse!

22.06.2020 - 13:13

country flag Lærke wrote:

Hej, jeg er rimelig ny i hækling, så det kan godt være det er et lidt dumt spørgsmål. Men jeg kan simpelthen ikke få det til at gå op i helt i starten af bagstykket. Det er dette stykket jeg ikke helt forstår.: "hækl 1 stangmaske i hver af de næste 6-6-6-6-4-6 luftmasker, * spring over 1 luftmaske, hækl 1 stangmaske i hver af de næste 6 luftmasker *, hækl fra *-* rækken ud" :)

15.06.2020 - 18:04

DROPS Design answered:

Hej Lærke, du hækler 1 stangmaske i de næste 6 luftmasker, hopper en luftmaske over og hækler 1 stangmaske i de næste 6 lm, hopper en lm over osv. God fornøjelse!

16.06.2020 - 07:56

country flag Kerstin Bäckström wrote:

Hej. Jag har en fråga angående detta mönster. Jag skulle vilja virka linnet lite längre än vad det är, men vet inte riktigt hur jag ska tänka för att göra det. Mvh Kerstin

30.05.2020 - 09:25

DROPS Design answered:

Hej Kerstin, du kan göra ett ekstra varv mellan ökningarna, så blir det jämnt fördelat. Lycka till :)

05.06.2020 - 09:29

country flag Maria wrote:

Mi spiace disturbarvi ancora, ma io già inizio con 3 cat. E chiudo con 1 m. bss sulla terza cat. Ma la chiusura (cioè le 3 cat. una riga sopra l'altra) viene spostata verso destra. Risulta cioè una diagonale verso destra, anziché una linea verticale diritta. Non riesco a capire il perché e a risolvere il problema. Aiuto! Grazie

01.05.2020 - 10:47

DROPS Design answered:

Buongiorno Maria. Verifichi che il numero delle maglie sia uguale su tutti i giri. Può anche cercare in rete video che spiegano come lavorare in tondo rendendo quasi invisibile l'inizio del giro. Potrebbe anche essere il filato che tende a dare questo effetto diagonale. Non dovesse trovare una soluzione che la soddisfa, può contattare il suo rivenditore Drops di fiducia o considerare di seguire le indicazioni originali del testo. Buon lavoro!

01.05.2020 - 15:08

country flag Maria wrote:

Grazie per la risposta. Però lavorando in tondo, ogni chiusura di giro mi viene spostata verso destra e non diritta. Si può evitarlo? Grazie.

30.04.2020 - 21:41

DROPS Design answered:

Buongiorno Maria. Provi a iniziare ogni giro con 3 catenelle e a chiudere ogni giro con 1 maglia bassissima nella terza catenella. Buon lavoro!

01.05.2020 - 09:23

country flag Maria wrote:

Non mi piacciono molto le cuciture. Non potrei lavorare in tondo fino agli scalfi e poi continuare separatamente il davanti e il dietro? Grazie mille.

30.04.2020 - 11:40

DROPS Design answered:

Buongiorno Maria. Sì, può lavorare in tondo fino agli scalfi e poi procedere separatamente per il davanti e il dietro. Buon lavoro!

30.04.2020 - 15:41