DROPS Safran uni colour 100% Cotton |
1.30 £ /50g |
Order |
Clicking the ORDER button will redirect you to Wool Warehouse Direct Ltd website
The yarn cost is calculated from the pattern’s smallest size and the yarn’s cheapest product type. Looking for an even better price? You might find it on the DROPS Deals!
-------------------------------------------------------
Alternative Yarn – See how to change yarns here
Yarn Groups A to F – Use the same pattern and change the yarn here
Yarn usage using an alternative yarn – Use our yarn converter here
-------------------------------------------------------
DROPS Safran uni colour 100% Cotton 1.30 £ /50g Order |
Clicking the ORDER button will redirect you to Wool Warehouse Direct Ltd website
The yarn cost is calculated from the pattern’s smallest size and the yarn’s cheapest product type. Looking for an even better price? You might find it on the DROPS Deals!
= knit | |
= between 2 stitches make 1 yarn over. On the next row knit the yarn over to leave a hole | |
= between 2 stitches make 1 yarn over. On the next row knit the yarn over twisted to avoid a hole | |
= knit 2 together | |
= slip 1 stitch as if to knit, knit 1 and pass the slipped stitch over the knitted stitch | |
= slip 1 stitch as if to knit, knit 2 together and pass the slipped stitch over the knitted together stitches |
Each of our patterns has specific tutorial videos to help you.
These step-by-step tutorials might also help you:
Why is the knitting/crochet tension so important?
Knitting tension is what determines the final measurements of your work, and is usually measured per 10 x 10 cm. It is provided like so: number of stitches in width x number of rows in height - eg: 19 stitches x 26 rows = 10 x 10 cm.
The knitting tension is very individual; some people knit/crochet loosely while others work tightly. You adjust the knitting tension with the needle size, which is why the suggested needle size is only meant as a guide! You need to adjust this (up or down) to ensure that YOUR knitting tension matches the knitting tension provided in the pattern. If you work with a different knitting tension than provided you will have a different yarn consumption, and your work will have different measurements than what the pattern suggests.
The knitting tension also determines which yarns can replace each other. As long as you achieve the same knitting tension you can replace one yarn with another.
See DROPS lesson: How to measure your tension/gauge
See DROPS video: How to make a gauge tension swatch
How do I know how many balls of yarn I need?
The required amount of yarn is provided in grams, eg: 450 g. To calculate how many balls you’ll need you first need to know how many grams are in 1 ball (25g, 50g or 100g). This information is available if you click on the individual yarn quality on our pages. Divide the amount required with the amount of each ball. For example, if each ball is 50g (the most common amount), the calculation will be as follows: 450 / 50 = 9 balls.
Can I use a different yarn than what the pattern suggests?
The important thing when changing from one yarn to another is that the knitting/crochet tension remains the same. This is so that the measurements of the finished piece will be the same as on the sketch provided. It is easier to achieve the same knitting tension using yarns from the same yarn group. It is also possible to work with multiple strands of a thinner yarn to achieve the knitting tension of a thicker one. Please try our yarn converter. We recommend you to always work a test swatch.
Please NOTE: when changing yarn the garment might have a different look and feel to the garment in the photo, due to individual properties and qualities of each yarn.
See DROPS lesson: Can I use a different yarn than the one mentioned in the pattern?
What are the yarn groups?
All our yarns are categorised into yarn groups (from A to F) according to thickness and knitting tension – group A contains the thinnest yarns and group F the thickest. This makes it easier for you to find alternative yarns to our patterns, should you wish to switch yarn. All yarns within the same group have a similar knitting tension and can easily replace each other. However, different yarn qualities have different structures and properties which will give the finished work a unique look and feel.
How do I use the yarn calculator?
At the top of all our patterns you’ll find a link to our yarn calculator, which is a helpful tool should you wish to use a different yarn than suggested. By filling in the yarn quality you wish to replace, the amount (in your size) and number of strands, the calculator will present good alternative yarns with the same knitting tension. Additionally it will tell you how much you’ll require in the new qualities and whether you’ll need to work with multiple strands. Most skeins are 50g (some are 25g or 100g).
If the pattern is worked with multiple colours, every colour will have to be calculated separately. Similarly, if the pattern is worked with several strands of different yarns (for example 1 strand Alpaca and 1 strand Kid-Silk) you will have to find alternatives for each, individually.
Why do you show discontinued yarns in the patterns?
Since different yarns have different qualities and textures we have chosen to keep the original yarn in our patterns. However, you can easily find options among our available qualities by using our yarn calculator, or simply pick a yarn from the same yarn group.
It is possible that some retailers still have discontinued yarns in stock, or that someone has a few skeins at home that they would like to find patterns for.
The yarn calculator will provide both alternative yarn as well as required amount in the new quality.
What size should I knit?
If you think it's hard to decide what size to make, it can be a good idea to measure a garment you own already and like the size of. Then you can pick the size by comparing those measures with the ones available in the pattern's size chart.
You'll find the size chart at the bottom of the pattern.
See DROPS lesson: How to read size chart
Why do I get the wrong knitting tension with the suggested needle size?
The needle size provided in the pattern serves only as a guide, the important thing is to follow the knitting tension. And since knitting tension is very individual, you will have to adjust the needle size to ensure that YOUR tension is the same as in the pattern – maybe you’ll have to adjust 1, or even 2 needle sizes, up or down to achieve the correct tension. For this, we recommend that you work test swatches.
Should you work with a different knitting tension than the one provided, the measurements of the finished garment might deviate from the measurement sketch.
See DROPS lesson: How to measure your tension/gauge
See DROPS video: How to make a tension/gauge swatch
Why is the pattern worked top-down?
Working a garment top-down provides more flexibility and room for personal adjustment. For example it is easier to try the garment on while working, as well as making adjustments to length of yoke and shoulder caps.
The instructions are carefully explaining every step, in the correct order. Diagrams are adjusted to the knitting direction and are worked as usual.
How do I work according to a knitting diagram?
The diagram depicts all rows/rounds, and every stitch seen from the right side. It is read from bottom to top, from right to left. 1 square = 1 stitch.
When working back and forth, every other row is worked from the right side and every other row is worked from the wrong side. When working from the wrong side, the diagram will have to be worked reversed: from left to right, knit stitches are purled, purl stitches are knit etc.
When working in the round every round is worked from the right side and the diagram are worked from right to left on all rounds.
See DROPS lesson: How to read knitting diagrams
How do I work according to a crochet diagram?
The diagram depicts all rows/rounds, and every stitch seen from the right side. It is worked from bottom to top, from right to left.
When working back and forth every other row is worked from the right side: from right to left and every other row is worked from the wrong side: from left to right.
When working in the round, every row in the diagram are worked from the right side, from right to left.
When working a circular diagram you start in the middle and work your way outwards, counter clockwise, row by row.
The rows usually start with a given number of chain stitches (equivalent to the height of the following stitch), this will either be depicted in the diagram or explained in the pattern.
See DROPS lesson: How to read crochet diagrams
How do I work several diagrams simultaneously on the same row/round?
Instructions for working several diagrams after each other on the same row/round, will often be written like so: “work A.1, A.2, A.3 a total of 0-0-2-3-4 times". This means you work A.1 once, then A.2 is worked once, and A.3 is repeated (in width) the number of times provided for your size – in this case like so: S = 0 times, M = 0 times, L=2 times, XL= 3 times and XXL = 4 times.
The diagrams are worked as usual: begin with the first row in A.1, then work the first row in A.2 etc.
See DROPS lesson: How to read knitting diagrams
See DROPS lesson: How to read crochet diagrams
Why are the sleeves shorter in larger sizes?
The total width of the garment (from wrist-to-wrist) will be larger in the larger sizes, despite the actual sleeves being shorter. The larger sizes have longer sleeve caps and wider shoulders, so there will be a good fit in all sizes.
Where on the garment is the length measured?
The measurement sketch/schematic drawing provides information regarding the full length of the garment. If it’s a jumper or a jacket the length is measured from the highest point on the shoulder closest to the neckline, and straight down to the bottom of the garment. It is NOT measured from the tip of shoulder. Similarly, the length of yoke is measured from the highest point on the shoulder and down to where yoke is split into body and sleeves.
On a jacket measures are never taken along bands, unless specifically stated. Always measure inside band stitches when measuring the length.
See DROPS lesson: How to read a schematic drawing
What is a repeat?
Diagrams are often repeated on the round or in height. 1 repeat is the diagram the way it appears in the pattern. If it says to work 5 repeats of A.1 in the round, then you work A.1 a total of 5 times after/next to each other in the round. If it says to work 2 repeats of A.1 vertically/in height you work the entire diagram once, then begin again at the start and work the entire diagram one more time.
Why does the piece start with more chain stitches than it’s worked with?
Chain stitches are slightly narrower than other stitches and to avoid working the cast-on edge too tight, we simply chain more stitches to begin with. The stitch count will be adjusted on the following row to fit the pattern and measurement sketch.
Why increase before the rib edge when the piece is worked top-down?
The rib edge is more elastic and will contract slightly compared to, for example, stocking stitch. By increasing before the rib edge, you avoid a visible difference in width between the rib edge and the rest of the body.
Why increase in the cast-off edge?
It’s very easy to cast off too tightly, and by making yarn overs while casting off (and simultaneously casting these off) you avoid a too tight cast off edge.
See DROPS video: How to bind off with yarn overs (yo)
How do I increase/decrease on every 3rd and 4th row/round alternately?
To achieve an even increase (or decrease) you can increase on, for example: every 3rd and 4th row alternately, like so: work 2 rows and increase on the 3rd row, work 3 rows and increase on the 4th. Repeat this until the increase is complete.
See DROPS lesson: Increase or decrease 1 st on every 3rd and 4th row alternately
How can I work a jacket in the round instead of back and forth?
Should you prefer to work in the round instead of back and forth, you may of course adjust the pattern. You’ll need to add steeks mid-front (usually 5 stitches), and follow the instructions. When you would normally turn and work from the wrong side, simply work across the steek and continue in the round. At the end you’ll cut the piece open, pick up stitches to work bands, and cover the cut edges.
See DROPS video: How to knit steeks and cut open
Can I work a jumper back and forth instead of in the round?
Should you prefer to work back and forth instead of in the round, you may of course adjust the pattern so you work the pieces separately and then assemble them at the end. Divide the stitches for the body in 2, add 1 edge stitch in each side (for sewing) and work the front and back pieces separately.
See DROPS lesson: Can I adapt a pattern for circular needles into straight needles?
Why is the pattern slightly different than what I see in the photo?
Pattern repeats can vary slightly in the different sizes, in order to get the correct proportions. If you’re not working the exact same size as the garment in the photo, yours might deviate slightly. This has been carefully developed and adjusted so that the complete impression of the garment is the same in all sizes.
Make sure to follow instructions and diagrams for your size!
How do I make a women’s size garment into a men’s size one?
If you have found a pattern you like which is available in women’s size it’s not very difficult to convert it to men’s size. The biggest difference will be the length of sleeves and body. Start working on the women size that you think would fit across the chest. The additional length will be worked right before you cast off for the armhole/sleeve cap. If the pattern is worked top-down you can add the length right after the armhole or before the first decrease on sleeve.
Regarding additional yarn amount, this will depend on how much length you add, but it is better with a skein too many than too few.
How do I prevent a hairy garment from shedding?
All yarns will have excess fibres (from production) that might come off as lint or shedding. Brushed yarns (ie hairier yarns) have more of these loose, excess fibres, causing more shedding.
Shedding also depends on what is worn under or over the garment, and whether this pulls at the yarn fibres. It’s therefore not possible to guarantee that there will be no shedding
Below are some tips on how to get the best result when working with hairier yarns:
1. When the garment is finished (before you wash it) shake it vigorously so the looser hairs come off. NOTE: do NOT use a lint roller, brush or any method that pulls at the yarn.
2. Place the garment in a plastic bag and put it in your freezer - the temperature will cause the fibres to become less attached to each other, and excess fibres will come off easier.
3. Leave in the freezer for a few hours before taking it out and shaking it again.
4. Wash the garment according to the instructions on the yarn label.
Why does my garment pill?
Pilling is a natural process that happens to even the most exclusive of fibers. It's a natural sign of wear and tear that is hard to avoid, and that is most visible in high friction areas of your garment like a sweater's arms and cuffs.
You can make your garment look as new by removing the pilling, using a fabric comb or a pill/lint remover.
Spring Melt Top |
|||||||||||||||||||
|
|
||||||||||||||||||
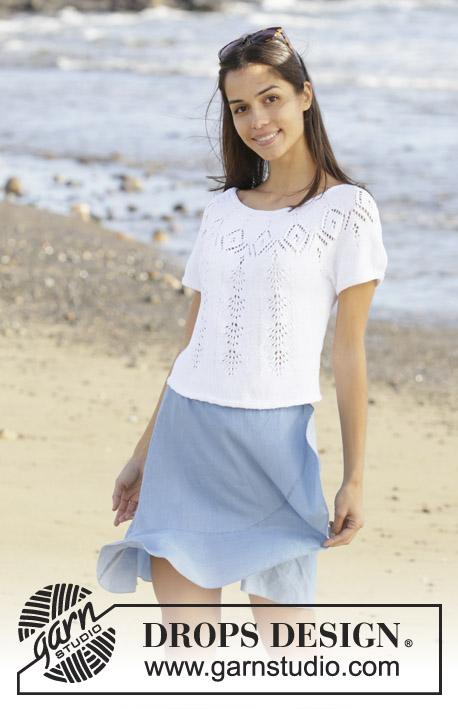
Knitted top with round yoke in DROPS Safran. The piece is worked top down with lace pattern and short sleeves. Sizes S - XXXL.
DROPS 199-42 |
|||||||||||||||||||
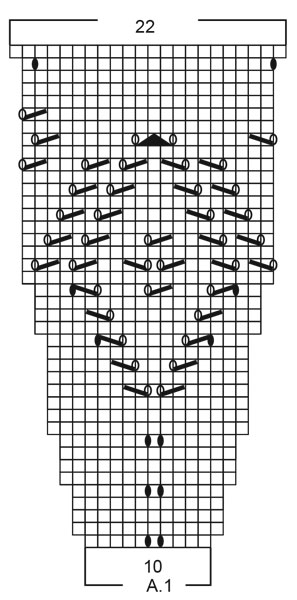
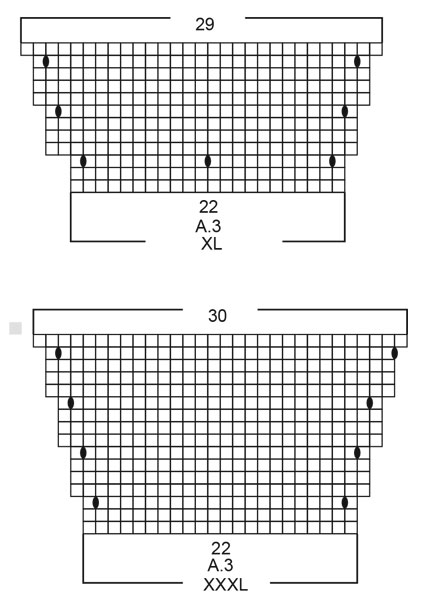
------------------------------------------------------- EXPLANATIONS FOR THE PATTERN: ------------------------------------------------------- RIDGE/GARTER STITCH (worked in the round): 1 ridge in height = 2 rounds; knit 1 round and purl 1 round. PATTERN: See diagrams A.1 to A.4. Choose diagram for your size (applies to A.3). The diagrams show all rows in the pattern seen from the right side. INCREASE/DECREASE TIP (evenly spaced): To work out how to increase/decrease evenly, count the total number of stitches on the needle (e.g. 144 stitches) and divide by the number of increases/decreases to be made (e.g. 4) = 36. In this example increase by making 1 yarn over after each 36th stitch. On the next round work the yarn overs twisted to avoid holes. When decreasing knit approx. each 35th and 36th stitch together. DECREASE TIP: Decrease 1 stitch on each side of the marker thread as follows: Work until there are 3 stitches left, knit 2 together, knit 2 (marker thread sits between these stitches), slip 1 stitch as if to knit, knit 1 and pass the slipped stitch over the knitted stitch. ------------------------------------------------------- START THE PIECE HERE: ------------------------------------------------------- TOP - SHORT OVERVIEW OF THE PIECE: The piece is worked in the round with circular needle, top down. The sleeves are worked in the round with short circular needle/double pointed needles. NOTE! There are different numbers of repeats of A.1 on the yoke in the different sizes. In sizes S, XL and XXXL there is an even number of repeats of A.1 and the pattern is the same on front and back pieces. In sizes M, L and XXL there is an odd number of repeats and the pattern therefore is displaced by half a repeat on the back piece and the pattern differs on the front and back pieces. TOP: YOKE: Cast on 144-148-153-161-168-173 stitches with circular needle size 2.5 mm and Safran. Work 2 RIDGES – read description above. Change to circular needle size 3 mm. Then knit 1 round where the number of stitches is adjusted to 140-150-150-160-170-180 stitches (i.e. in sizes S, L and XL decrease 4-3-1 stitches and in sizes M, XXL and XXXL increase 2-2-7 stitches) – read INCREASE/DECREASE TIP. Knit 1 round. Now work pattern as follows: Work A.1 (= 10 stitches) a total of 14-15-15-16-17-18 times on the round. Continue like this. REMEMBER THE KNITTING TENSION! When A.1 has been completed there are 308-330-330-352-374-396 stitches on the round and the piece measures approx. 14 cm from the cast-on edge. Now continue with pattern in the different sizes as follows: Sizes S, XL and XXXL: Knit 11. Insert a marker thread here. This will now be the start of the round! Next round worked as follows: Work A.2 (= 22 stitches), A.3 over the next 88-110-132 stitches (= 4-5-6 repeats in width), A.2 over the next 66 stitches (= 3 repeats), A.3 over the next 88-110-132 stitches (= 4-5-6 repeats in width), A.2 over the remaining 44 stitches (= 2 repeats). Continue in the round like this. When A.2 has been completed work A.4 over each repeat of A.2; i.e. work 3 repeats of A.4 on both front and back pieces. When A.3 has been completed there are 328-434-504 stitches on the needle. Continue with stocking stitch and A.4 until the piece measures 15-21-25 cm. Sizes M, L and XXL: The next round is worked as follows: Work A.2 (= 22 stitches) over the first 44 stitches, A.3 over the next 88-88-110 stitches (=4-4-5 repeats), work the first 11 stitches in A.3, A.2 over the next 66 stitches (= 3 repeats), work the last 11 stitches in A.3, A.3 over the next 88-88-110 stitches (= 4-4-5 repeats), A.2 over the remaining 22 stitches. Continue like this. When A.2 has been completed work A.4 over each repeat of A.2, i.e. work 3 repeats of A.4 on both front and back pieces. When A.3 has been completed there are 360-396-452 stitches on the round. Continue with stocking stitch and A.4 until the piece measures 17-19-23 cm. All sizes: The next round is worked as follows (from the right side): Work pattern with A.4 as before over the first 24-48-48-24-48-24 stitches, knit the next 92-108-126-145-154-180 stitches and increase at the same time 6-5-9-4-15-12 stitches evenly spaced, work pattern with A.4 as before over the next 72 stitches, knit the next 92-108-126-145-154-180 stitches and increase at the same time 6-5-9-4-15-12 stitches evenly spaced, work pattern with A.4 as before over the remaining 48-24-24-48-24-48 stitches = 340-370-414-442-482-528 stitches. Work the last row on the yoke as follows: Work pattern as before over the first 37-65-71-52-82-65 stitches, place the next 72-79-89-93-101-110 stitches on a thread for sleeve and cast on 8-8-10-10-12-12 new stitches on the needle, work the next 98-106-118-128-140-154 stitches with pattern as before, place the next 72-79-89-93-101-110 stitches on a thread for sleeve and cast on 8-8-10-10-12-12 new stitches on the needle, work the remaining 61-41-47-76-58-89 stitches with pattern as before. BODY: = 212-228-256-276-304-332 stitches. Insert a marker thread in the middle of the 8-8-10-10-12-12 new stitches cast on under the sleeve on each side (= 4-4-5-5-6-6 new stitches on each side of the marker thread). Continue in the round with stocking stitch and 3 repeats of A.4 on front and back pieces. When the piece measures 4 cm decrease 1 stitch on each side of both marker threads – read DECREASE TIP. Decrease like this every 2 cm a total of 5 times = 192-208-236-256-284-312 stitches. When the piece measures 17 cm – adjust so that you finish after a complete repeat of A.4 in height (there are now approx. 6 cm left to finished length), continue with stocking stitch: when the piece measures 22 cm change to circular needle size 2.5 mm. Work 2 ridges over all stitches. Cast off, but to avoid the cast-off edge being tight make 1 yarn over after each 6th stitch. Yarn overs cast off as normal stitches. SLEEVE: Place the 72-79-89-93-101-110 stitches from the thread on the one side of the piece on short circular needle/double pointed needles size 3 mm and knit up 1 stitch in each of the 8-8-10-10-12-12 new stitches cast on under the sleeve = 80-87-99-103-113-122 stitches. Work stocking stitch in the round for 3 cm. Now decrease stitches mid top of sleeve as follows: Work the first 30-33-35-37-41-45 stitches, knit 2 and 2 stitches together over the next 20-20-28-28-30-32 stitches (= 10-10-14-14-15-16 stitches decreased), knit the next 30-34-36-38-42-45 stitches = 70-77-85-89-98-106 stitches. Work 2 rounds stocking stitch. Change to double pointed needles size 2.5 mm and work 3 ridges. Cast off. Work the other sleeve in the same way. |
|||||||||||||||||||
Diagram explanations |
|||||||||||||||||||
|
|||||||||||||||||||
Have you made this or any other of our designs? Tag your pictures in social media with #dropsdesign so we can see them! Do you need help with this pattern?You'll find tutorial videos, a Comments/Questions area and more by visiting the pattern on garnstudio.com. © 1982-2024 DROPS Design A/S. We reserve all rights. This document, including all its sub-sections, has copyrights. Read more about what you can do with our patterns at the bottom of each pattern on our site. |
With over 40 years in knitting and crochet design, DROPS Design offers one of the most extensive collections of free patterns on the internet - translated to 17 languages. As of today we count 304 catalogues and 11422 patterns - 11422 of which are translated into English (UK/cm).
We work hard to bring you the best knitting and crochet have to offer, inspiration and advice as well as great quality yarns at incredible prices! Would you like to use our patterns for other than personal use? You can read what you are allowed to do in the Copyright text at the bottom of all our patterns. Happy crafting!
Comments / Questions (40)
Marie Darchy wrote:
Bonjour, je suis entrain de faire ce modèle, mais je ne souhaite pas faire le motif A4, je voulais savoir si c était possible, car je me demandais s il ne servait pas de mise en forme du tee-shirt. Je vous remercie pour votre réponse.
30.04.2022 - 13:46DROPS Design answered:
Bonjour Mme Darchy, A.4 correspond au point de vagues et ne modifie pas la forme du top, toutefois, le nombre de mailles du top est calculé sur la base du point de vagues (il faut plus de mailles au point de vagues qu'en jersey pour la même largeur); sur les côtés, vous augmentez comme dans A.2/A.3. Bon tricot!
02.05.2022 - 08:15Anne Synøve Andersen wrote:
Hei igjen. Opplever at det blir feil i mønsteret, det går ikke opp. Har for mange masker igjen på pinnen når jeg er nesten en runde rundt. Når dere skriver siste 11 masker.. Det tallet må da øke ettersom diagrammet for A.3 øker. Eller? Da burde det stått forklart i oppskriften. At etterhvert blir det 12 masker eller 13. Oppover i A.3.
29.04.2022 - 14:17DROPS Design answered:
Hei Anne Synøve. Man må både lese oppskriften og se på diagrammet som tilhører den størrelsen man strikker etter. Når du skal strikke 4. omgang av A.3 strikkes det 12 masker og ved 8. omgang 13 masker og 12. omgang 14 masker. For å gjøre det lettere for en selv, er bruk at maskemarkører mellom hvert diagram en god ide. Da vil du se hvordan omgangen på diagrammene stemmer over hverandre på hver omgang. mvh DROPS Design
02.05.2022 - 11:40Anne Synøve Andersen wrote:
"strikk de første 11 maskene i A.3" - jeg sliter med at jeg nå jobber med L, og er på A3+A4 rundene. Så etter jeg har begynt med A4 så kommer det igjen at jeg skal strikke de første 11 maskene i A3. Betyr det da de ALLER første maskene i A3, som bare er rett.. eller er det de første på den linja jeg er på.. om dere forstår.
25.04.2022 - 21:26DROPS Design answered:
Hei Anne Synøve, Du skal strikke de første 11 maskene på den raden du er på. God fornøyelse!
26.04.2022 - 06:58Anne Larsen wrote:
Strikker str S. Kan det passe at bærestykket måler 15 cm, når jeg tager fra til ærmer? Min top vil da ende med at måle ca 39 cm( 15 cm bærestykke, 17 cm under ærme, derudove 6 cm glatstrik, ca 1 cm retstrik
06.04.2021 - 16:27DROPS Design answered:
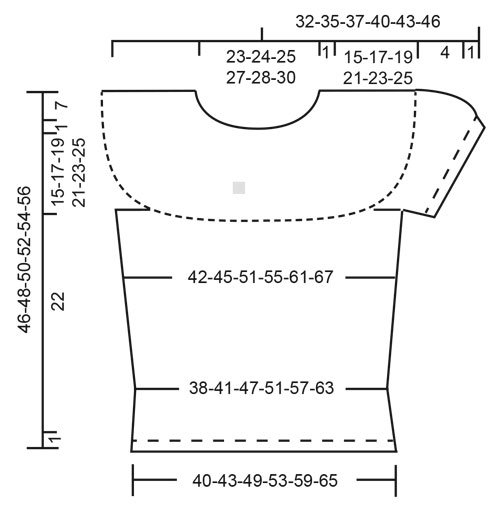
Hei Anne. Om du ser på målskissen vil toppen måle fra skulderen og ned måle 46 cm. Bærestykket midt foran fra halskanten vil måle 15 cm, fra bærestykket og ned (ikke med rib) 22 cm og rib kanten 1 cm. mvh DROPS design
19.04.2021 - 15:10Muriel wrote:
Bonjour, merci de votre explication. Super je peux continuer mon tricot.
06.04.2021 - 12:08Muriel wrote:
Je réalise le modèle en taille S. Une fois les motifs A1, j’arrive bien à 308 mailles, au tour suivant je tricote A2-A3-A2-A3-A2, ensuite je vais tricoter au dessus des motifs A2, le motif A4. Mais dois-je continuer à tricoter A3 et si oui, combien de fois pour arriver à 328 mailles ? Merci de votre réponse.
01.04.2021 - 05:25DROPS Design answered:
Bonjour Muriel, tricotez les 308 m ainsi : A.2, puis 4x A.3, puis 3xA.2 puis 4xA.3 et 2x A.2=22+ (4*22) + (3*22) + (4*22) + (2*22)=308 m. Vous augmentez 2 m dans chaque A.2 et 1 m dans chaque A.3 = 328 m. Bon tricot!
06.04.2021 - 11:25Héliane Terache wrote:
Bonjour, Je souhaite réaliser un pull en coton drops safran mais l'échantillon qui correspond aux normes de 24 mailles pour 10 cm (aig. 3) me donne un travail trop lâche, sans tenue. Celui réalisé avec des aig. 2,75 est + conforme à mon souhait mes comporte 26 mailles pour 10 cm. Comment puis-je adapter les explications du modèle (nombre de mailles à monter, à diminuer, à augmenter... )pour ma taille ? Merci d'avance.
25.03.2021 - 13:59DROPS Design answered:
Bonjour Mme Terache, 24 m x 32 rangs est l'échantillon classique pour DROPS Safran; nous ne sommes malheureusement pas en mesure de pouvoir adapter chacun de nos modèles à chaque demande; Vous trouverez ici quelques informations complémentaires sur l'échantillon. Bon tricot!
25.03.2021 - 15:59Kasia wrote:
Przerobiłam karczek i pierwsze okrążenie jak podano: A2, 4xA3, 3xA2, 4xA3, 2xA2. I dalej nie rozumiem co mam zrobić. Ponad A2 ma być A4, a ponad A3? Nie pasuje mi liczba oczek i wzór się rozjeżdża. Dziękuję i pozdrawiam
21.01.2021 - 10:59DROPS Design answered:
Witaj Kasiu, napisz jaki rozmiar wykonujesz, w jakim miejscu jesteś i ile masz oczek, spróbujemy pomóc. Pozdrawiamy!
21.01.2021 - 13:17Manou35 wrote:
Je suis en train de réaliser le top en taille M j'ai bien compris la répartition des augmentations mais le A3 ne commence qu'au 3éme rang , or si je respecte exactement les augmentations proposées dans A2 et A3 je n'ai pas les 30 mailles supplémentaires
15.08.2020 - 19:09DROPS Design answered:
Bonjour Manou35, quand vous avez tricotez les 2 rangs de A.2 vous tricotez maintenant A.4 au-dessus de A.2, ainsi, au rang après le 2ème rang de A.2/A.3 vous tricotez le 1er rang de A.4 au-dessus de A.2 et le 3ème rang de A.3 au-dessus du 2ème rang de A.3 - de même au rang suivant: 2ème rang de A.4 et en même temps 4ème rang de A.3. Continuez ensuite A.4 et les mailles de A.3 en jersey. Bon tricot!
17.08.2020 - 08:29Bente wrote:
I'm now on the Body and have put the markers in between the 8 new stitches. Do I start the pattern from the 1st marker point and then again from the 2nd marker?
01.08.2020 - 12:58DROPS Design answered:
Dear Bente, on body, work A.4 as before, ie continue the A.4 worked on yoke, and work the new stitches mid under each sleeve in stocking stitch - the markers mid under each sleeve will be used for the decreases on the sides. Happy kntiting!
03.08.2020 - 07:44