DROPS Paris
DROPS Paris
100% Cotton
from 1.10 £ /50g
Get the yarn to make this pattern from 17.60£.

The yarn cost is calculated from the pattern’s smallest size and the yarn’s cheapest product type. Looking for an even better price? You might find it on the DROPS Deals!

DROPS SS24

Sonora Sunrise Sweater

Knitted jumper with raglan in DROPS Paris. Piece is knitted top down with stripes. Size: S - XXXL

DROPS 201-33
DROPS design: Pattern w-756
Yarn group C or A + A
----------------------------------------------------------

SIZE:
S - M - L - XL - XXL - XXXL

MATERIALS:
DROPS PARIS from Garnstudio (belongs to yarn group C)
250-250-250-300-300-350 g colour no 30, denim blue
150-150-200-200-200-250 g colour 32, light lavender
150-150-200-200-200-250 g colour 27, peach
100-100-100-150-150-150 g colour 58, powder pink
100-150-150-150-150-150 g colour no 59, old pink
50-50-50-50-50-50 g colour 41, mustard

KNITTING TENSION:
16 stitches in width and 20 rows vertically in stocking stitch = 10 x 10 cm.

NEEDLES:
DROPS DOUBLE POINTED NEEDLES SIZE 5.5 mm
DROPS CIRCULAR NEEDLE SIZE 5.5 mm : Length 40 and 80 cm for stocking stitch.
DROPS DOUBLE POINTED NEEDLES SIZE 4.5 mm
DROPS CIRCULAR NEEDLE SIZE 4.5 mm : Length 40 and 80 cm for rib.
Needle size is only a suggestion! If you have too many stitches on 10 cm switch to larger needles. If you have too few stitches on 10 cm switch to smaller needles.

-------------------------------------------------------

Alternative Yarn – See how to change yarns here
Yarn Groups A to F – Use the same pattern and change the yarn here
Yarn usage using an alternative yarn – Use our yarn converter here

-------------------------------------------------------

DROPS Paris
DROPS Paris
100% Cotton
from 1.10 £ /50g
Get the yarn to make this pattern from 17.60£.

The yarn cost is calculated from the pattern’s smallest size and the yarn’s cheapest product type. Looking for an even better price? You might find it on the DROPS Deals!

Pattern instructions

NOTE: This pattern is written in British English. All measurements in charts are in cm. For conversion from cm to inches - click here. There are different terms for crocheting in British and American English. If this pattern includes crochet, click for "crochet terms" here. For this pattern in American English, please click here.
----------------------------------------------------------

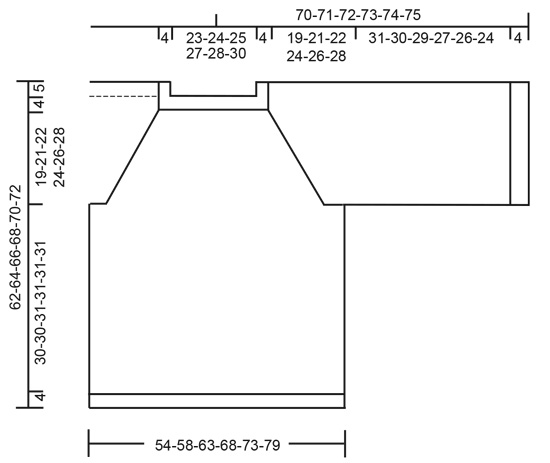
EXPLANATION FOR THE PATTERN:

----------------------------------------------------------

INCREASE TIP (evenly):
To calculate how to increase evenly, use the total number of stitches on row (e.g. 92 stitches) and divide stitches by number of increases to be done (e.g. 12) = 7.7. In this example increase by making 1 yarn over after approx. every 8th stitch. On next round work yarn over twisted to avoid hole.

STRIPES:
14-14-14½-14½-15-15 cm with powder pink.
9-9½-10-10½-11-11 cm with old pink.
2-2-2-2-2-2 cm with mustard.
9-9½-10-10½-11-11 cm with peach.
9-9½-10-10½-11-11 cm with light lavender.
Then work with denim blue until finished measurements.

RAGLAN:
Increase for raglan in every transition between sleeves and body as follows: Work until 1 stitch remains before marker thread, make 1 yarn over, knit 2 (marker thread is in the middle of these 2 stitches), make 1 yarn over = 2 stitches increased. On next round knit the yarn overs to make holes. Then work the new stitches in stocking stitch. Increase 8 stitches in total on every increase round.

----------------------------------------------------------

START THE PIECE HERE:

----------------------------------------------------------

JUMPER - SHORT OVERVIEW OF THE PIECE:
Work yoke and body in the round on circular needle from mid back, top down. Work sleeves in the round on double pointed needles/a short circular needle, top down. Work entire garment in stocking stitch with stripes and edges in rib.

YOKE:
Cast on 92-96-100-104-108-116 stitches on a short circular needle size 4.5 mm with powder pink. Knit 1 round. Then work rib (= knit 2/purl 2) for 4 cm. Switch to circular needle size 5.5 mm, knit 1 round while increasing 12-16-20-20-16-16 stitches evenly - read INCREASE TIP = 104-112-120-124-124-132 stitches.
Work next round while at the same time inserting 4 marker threads as follows: Knit 18-20-22-23-23-25 stitches (= half back piece), insert first marker thread here, knit 16 stitches (= sleeve), insert second marker thread here, knit 36-40-44-46-46-50 stitches (= front piece), insert third marker thread here, knit 16 stitches (= sleeve), insert fourth marker thread here and knit the remaining 18-20-22-23-23-25 stitches on round (= half back piece).
Then work in stocking stitch and STRIPES - read explanation above, AT THE SAME TIME on first round increase for RAGLAN in every transition between body and sleeves – read explanation above. Continue increase for raglan every other round until increase has been done 19-21-22-24-26-28 times in total on each side of the 4 marker threads. REMEMBER THE KNITTING TENSION!
After last increase there are 256-280-296-316-332-356 stitches on row and piece measures approx. 23-25-26-28-30-32 cm from cast-on edge mid back. If this measurements are not correct, continue to work without increases until piece has correct measurement. Work next round as follows:
Work 39-42-45-49-52-57 stitches as before (= half back piece), slip the next 50-56-58-60-62-64 stitches on 1 stitch holder for sleeve, cast on 8-8-10-10-12-12 new stitches on row (= in the side under sleeve), work 78-84-90-98-104-114 stitches as before (= front piece), slip the next 50-56-58-60-62-64 stitches on 1 stitch holder for sleeve, cast on 8-8-10-10-12-12 new stitches on row (= in the side under sleeve) and work the 39-42-45-49-52-57 stitches as before (= half back piece). Then finish body and sleeves separately. NOW MEASURE THE PIECE FROM HERE!

BODY:
= 172-184-200-216-232-252 stitches. Continue in stocking stitch and stripes. When piece measures 30-30-31-31-31-31 cm from division, knit 1 round while increasing 32-36-40-40-44-48 stitches evenly - remember INCREASE TIP = 204-220-240-256-276-300 stitches. Switch to circular needle size 4.5 mm and work rib = knit 2/purl 2 for 4 cm. Loosely cast off stitches with knit over knit and purl over purl. To avoid a tight cast-off edge you may use circular needle size 5.5 mm. Jumper measures approx. 62-64-66-68-70-72 cm from shoulder and down.

SLEEVE:
Slip the 50-56-58-60-62-64 stitches from stitch holder in one side of piece double pointed needles or a short circular needle size 5.5 mm and pick in addition up 1 stitch in each of the 8-8-10-10-12-12 new stitches cast on in the side under sleeve = 58-64-68-70-74-76 stitches. Insert 1 marker thread in the middle of the 8-8-10-10-12-12 stitches under sleeve and begin round here. Work in stocking stitch and continue with stripes as on body. When piece measures 31-30-29-27-26-24 cm from division (shorter measurements in the larger sizes because of longer yoke), knit 1 round while increasing 10-12-12-14-14-12 stitches evenly = 68-76-80-84-88-88 stitches. Switch to double pointed needles size 4.5 mm and work rib in the round = knit 2/purl 2 for 4 cm. Loosely cast off stitches with knit over knit and purl over purl. To avoid a tight cast-off edge you may use double pointed needles size 5.5 mm. Sleeve measures approx. 35-34-33-31-30-28 cm from division. Work the other sleeve the same way.

This pattern has been corrected.

Updated online: 06.05.2019
Correction - YOKE: .. insert fourth marker thread here and knit the remaining 18-20-22-23-23-25 stitches on round (= half back piece).

Diagram

diagram measurements

Each of our patterns has specific tutorial videos to help you.

Do you have a question? See a list of frequently asked questions (FAQ)

Knitting tension is what determines the final measurements of your work, and is usually measured per 10 x 10 cm. It is provided like so: number of stitches in width x number of rows in height - eg: 19 stitches x 26 rows = 10 x 10 cm.

The knitting tension is very individual; some people knit/crochet loosely while others work tightly. You adjust the knitting tension with the needle size, which is why the suggested needle size is only meant as a guide! You need to adjust this (up or down) to ensure that YOUR knitting tension matches the knitting tension provided in the pattern. If you work with a different knitting tension than provided you will have a different yarn consumption, and your work will have different measurements than what the pattern suggests.

The knitting tension also determines which yarns can replace each other. As long as you achieve the same knitting tension you can replace one yarn with another.

See DROPS lesson: How to measure your tension/gauge

See DROPS video: How to make a gauge tension swatch

The required amount of yarn is provided in grams, eg: 450 g. To calculate how many balls you’ll need you first need to know how many grams are in 1 ball (25g, 50g or 100g). This information is available if you click on the individual yarn quality on our pages. Divide the amount required with the amount of each ball. For example, if each ball is 50g (the most common amount), the calculation will be as follows: 450 / 50 = 9 balls.

The important thing when changing from one yarn to another is that the knitting/crochet tension remains the same. This is so that the measurements of the finished piece will be the same as on the sketch provided. It is easier to achieve the same knitting tension using yarns from the same yarn group. It is also possible to work with multiple strands of a thinner yarn to achieve the knitting tension of a thicker one. Please try our yarn converter. We recommend you to always work a test swatch.

Please NOTE: when changing yarn the garment might have a different look and feel to the garment in the photo, due to individual properties and qualities of each yarn.

See DROPS lesson: Can I use a different yarn than the one mentioned in the pattern?

All our yarns are categorised into yarn groups (from A to F) according to thickness and knitting tension – group A contains the thinnest yarns and group F the thickest. This makes it easier for you to find alternative yarns to our patterns, should you wish to switch yarn. All yarns within the same group have a similar knitting tension and can easily replace each other. However, different yarn qualities have different structures and properties which will give the finished work a unique look and feel.

Click here for an overview of the yarns in each yarn group

At the top of all our patterns you’ll find a link to our yarn calculator, which is a helpful tool should you wish to use a different yarn than suggested. By filling in the yarn quality you wish to replace, the amount (in your size) and number of strands, the calculator will present good alternative yarns with the same knitting tension. Additionally it will tell you how much you’ll require in the new qualities and whether you’ll need to work with multiple strands. Most skeins are 50g (some are 25g or 100g).

If the pattern is worked with multiple colours, every colour will have to be calculated separately. Similarly, if the pattern is worked with several strands of different yarns (for example 1 strand Alpaca and 1 strand Kid-Silk) you will have to find alternatives for each, individually.

Click here to see our yarn calculator

Since different yarns have different qualities and textures we have chosen to keep the original yarn in our patterns. However, you can easily find options among our available qualities by using our yarn calculator, or simply pick a yarn from the same yarn group.

It is possible that some retailers still have discontinued yarns in stock, or that someone has a few skeins at home that they would like to find patterns for.

The yarn calculator will provide both alternative yarn as well as required amount in the new quality.

If you think it's hard to decide what size to make, it can be a good idea to measure a garment you own already and like the size of. Then you can pick the size by comparing those measures with the ones available in the pattern's size chart.

You'll find the size chart at the bottom of the pattern.

See DROPS lesson: How to read size chart

The needle size provided in the pattern serves only as a guide, the important thing is to follow the knitting tension. And since knitting tension is very individual, you will have to adjust the needle size to ensure that YOUR tension is the same as in the pattern – maybe you’ll have to adjust 1, or even 2 needle sizes, up or down to achieve the correct tension. For this, we recommend that you work test swatches.

Should you work with a different knitting tension than the one provided, the measurements of the finished garment might deviate from the measurement sketch.

See DROPS lesson: How to measure your tension/gauge

See DROPS video: How to make a tension/gauge swatch

Working a garment top-down provides more flexibility and room for personal adjustment. For example it is easier to try the garment on while working, as well as making adjustments to length of yoke and shoulder caps.

The instructions are carefully explaining every step, in the correct order. Diagrams are adjusted to the knitting direction and are worked as usual.

The diagram depicts all rows/rounds, and every stitch seen from the right side. It is read from bottom to top, from right to left. 1 square = 1 stitch.

When working back and forth, every other row is worked from the right side and every other row is worked from the wrong side. When working from the wrong side, the diagram will have to be worked reversed: from left to right, knit stitches are purled, purl stitches are knit etc.

When working in the round every round is worked from the right side and the diagram are worked from right to left on all rounds.

See DROPS lesson: How to read knitting diagrams

The diagram depicts all rows/rounds, and every stitch seen from the right side. It is worked from bottom to top, from right to left.

When working back and forth every other row is worked from the right side: from right to left and every other row is worked from the wrong side: from left to right.

When working in the round, every row in the diagram are worked from the right side, from right to left.

When working a circular diagram you start in the middle and work your way outwards, counter clockwise, row by row.

The rows usually start with a given number of chain stitches (equivalent to the height of the following stitch), this will either be depicted in the diagram or explained in the pattern.

See DROPS lesson: How to read crochet diagrams

Instructions for working several diagrams after each other on the same row/round, will often be written like so: “work A.1, A.2, A.3 a total of 0-0-2-3-4 times". This means you work A.1 once, then A.2 is worked once, and A.3 is repeated (in width) the number of times provided for your size – in this case like so: S = 0 times, M = 0 times, L=2 times, XL= 3 times and XXL = 4 times.

The diagrams are worked as usual: begin with the first row in A.1, then work the first row in A.2 etc.

See DROPS lesson: How to read knitting diagrams

See DROPS lesson: How to read crochet diagrams

The total width of the garment (from wrist-to-wrist) will be larger in the larger sizes, despite the actual sleeves being shorter. The larger sizes have longer sleeve caps and wider shoulders, so there will be a good fit in all sizes.

The measurement sketch/schematic drawing provides information regarding the full length of the garment. If it’s a jumper or a jacket the length is measured from the highest point on the shoulder closest to the neckline, and straight down to the bottom of the garment. It is NOT measured from the tip of shoulder. Similarly, the length of yoke is measured from the highest point on the shoulder and down to where yoke is split into body and sleeves.

On a jacket measures are never taken along bands, unless specifically stated. Always measure inside band stitches when measuring the length.

See DROPS lesson: How to read a schematic drawing

Diagrams are often repeated on the round or in height. 1 repeat is the diagram the way it appears in the pattern. If it says to work 5 repeats of A.1 in the round, then you work A.1 a total of 5 times after/next to each other in the round. If it says to work 2 repeats of A.1 vertically/in height you work the entire diagram once, then begin again at the start and work the entire diagram one more time.

Chain stitches are slightly narrower than other stitches and to avoid working the cast-on edge too tight, we simply chain more stitches to begin with. The stitch count will be adjusted on the following row to fit the pattern and measurement sketch.

The rib edge is more elastic and will contract slightly compared to, for example, stocking stitch. By increasing before the rib edge, you avoid a visible difference in width between the rib edge and the rest of the body.

It’s very easy to cast off too tightly, and by making yarn overs while casting off (and simultaneously casting these off) you avoid a too tight cast off edge.

See DROPS video: How to bind off with yarn overs (yo)

To achieve an even increase (or decrease) you can increase on, for example: every 3rd and 4th row alternately, like so: work 2 rows and increase on the 3rd row, work 3 rows and increase on the 4th. Repeat this until the increase is complete.

See DROPS lesson: Increase or decrease 1 st on every 3rd and 4th row alternately

Should you prefer to work in the round instead of back and forth, you may of course adjust the pattern. You’ll need to add steeks mid-front (usually 5 stitches), and follow the instructions. When you would normally turn and work from the wrong side, simply work across the steek and continue in the round. At the end you’ll cut the piece open, pick up stitches to work bands, and cover the cut edges.

See DROPS video: How to knit steeks and cut open

Should you prefer to work back and forth instead of in the round, you may of course adjust the pattern so you work the pieces separately and then assemble them at the end. Divide the stitches for the body in 2, add 1 edge stitch in each side (for sewing) and work the front and back pieces separately.

See DROPS lesson: Can I adapt a pattern for circular needles into straight needles?

Pattern repeats can vary slightly in the different sizes, in order to get the correct proportions. If you’re not working the exact same size as the garment in the photo, yours might deviate slightly. This has been carefully developed and adjusted so that the complete impression of the garment is the same in all sizes.

Make sure to follow instructions and diagrams for your size!

If you have found a pattern you like which is available in women’s size it’s not very difficult to convert it to men’s size. The biggest difference will be the length of sleeves and body. Start working on the women size that you think would fit across the chest. The additional length will be worked right before you cast off for the armhole/sleeve cap. If the pattern is worked top-down you can add the length right after the armhole or before the first decrease on sleeve.

Regarding additional yarn amount, this will depend on how much length you add, but it is better with a skein too many than too few.

All yarns will have excess fibres (from production) that might come off as lint or shedding. Brushed yarns (ie hairier yarns) have more of these loose, excess fibres, causing more shedding.

Shedding also depends on what is worn under or over the garment, and whether this pulls at the yarn fibres. It’s therefore not possible to guarantee that there will be no shedding

Below are some tips on how to get the best result when working with hairier yarns:

1. When the garment is finished (before you wash it) shake it vigorously so the looser hairs come off. NOTE: do NOT use a lint roller, brush or any method that pulls at the yarn.

2. Place the garment in a plastic bag and put it in your freezer - the temperature will cause the fibres to become less attached to each other, and excess fibres will come off easier.

3. Leave in the freezer for a few hours before taking it out and shaking it again.

4. Wash the garment according to the instructions on the yarn label.

Pilling is a natural process that happens to even the most exclusive of fibers. It's a natural sign of wear and tear that is hard to avoid, and that is most visible in high friction areas of your garment like a sweater's arms and cuffs.

You can make your garment look as new by removing the pilling, using a fabric comb or a pill/lint remover.

Still can't find the answer you need? Then scroll down and leave your question so one of our experts can try to help you. This will be done normally within 5 to 10 working days.
In the meantime, you can read the questions and answers that others have left to this pattern or join the DROPS Workshop on Facebook to get help from fellow knitters/crocheters!

You might also like...

Sonora Sunrise Sweater

Carola, Belgium

Sonora Sunrise Sweater

Daniela, Slovakia

Post a comment to pattern DROPS 201-33

We would love to hear what you have to say about this pattern!

If you want to leave a question, please make sure you select the correct category in the form below, to speed up the answering process. Required fields are marked *.

Comments / Questions (29)

country flag Marita wrote:

Fin fargekombinasjon, men det er paa bilde. Negativ overrasket da jeg fikk garnet. Det var ikke like fint i fargene. Viktig med god fargegjengivelse paa bildene for dem som kjöper deres garn via nett-butikk.

15.03.2020 - 14:03

country flag Margaret Carroll wrote:

Do you have any patterns that start at the bottom? All the ones that start from the top seem to have really baggy necklines, and look sloppy. Hope I haven’t upset anyone!

11.11.2019 - 00:37

DROPS Design answered:

Dear Mrs Carroll, you will find all our raglan jumpers here, you will have to filter the search and check the bottom up ones. Happy knitting!

11.11.2019 - 11:43

country flag Maria Carola wrote:

Buona sera sono alla divisione corpo/maniche è possibile che vi sia un errore nel conteggio maglie? Il modello indica 56 maglie per ciascuna manica e a me risultano 58 (tra i due marcapunti) e 84 per davanti e dietro e io ne ho 82 (tra i due marcapunti). Grazie per la risposta! Carola

19.07.2019 - 19:15

DROPS Design answered:

Buongiorno Maria Carola. Alla fine degli aumenti, le maglie tra i marcapunti sono corretti come ha indicato lei. Quando si separano il davanti e dietro dalle maniche, una maglia da ciascun lato delle maniche viene aggiunta al davanti / dietro, per un risultato più pulito. Quindi è corretto che indichi 2 m in meno per le maniche e 2 in più sul davanti e dietro. Buon lavoro!

19.07.2019 - 21:24

country flag Maria Carola wrote:

Buonasera vorrei sapere se nei 14 cm della prima striscia da lavorare con il rosa cipria sono compresi anche i 4 cm lavorati a coste per il collo. Grazie per l’aiuto! Maria Carola

12.07.2019 - 23:44

DROPS Design answered:

Buonasera Maria Carola, consideri le coste come parte della prima striscia. Buon lavoro!

19.08.2019 - 18:14

country flag Kristine wrote:

Hvis man ønsker at strikke den i en enkelt farve, hvor meget garn skal man så bruge?

06.07.2019 - 00:48

DROPS Design answered:

Hej Kristine, hvis du kigger på DROPS 191-10 så har du en Paris bluse som er ensfarvet, find de mål som modsvarer den du vil strikke, så kan du bruge garnforbruget fra den. Tag hellere en nøgle ekstra end et for lidt ;)

09.07.2019 - 10:30

country flag Deb Adams wrote:

I notice that the yarn colours are different between this pattern and the current Drops Paris colour# (eg, 30 is Denim Blue in pattern, 30 is Grey Blue in wool warehouse). The colours also look different/brighter in the photo above compared to the current yarn especially number 32, Light Lavender in pattern, compared to number 32, Light Blue Purple at the store, which looks almost grey. Do I just order the yarn numbers as listed? Or have the colours changed since then?

29.05.2019 - 11:50

DROPS Design answered:

Dear Mrs Adams, the colours may look different because of the difference of light between shadecard and when the picture has been taken. The colours are the right ones, ie 30 and 32, store might have forgotten to edit the colour name. Happy knitting!

29.05.2019 - 13:53

country flag Rox wrote:

Om de andere naald wordt daar mee bedoeld: elke toer weer? of zit daar een toer tussen?

09.05.2019 - 15:33

DROPS Design answered:

Dag Rox,

Om de andere wordt mee bedoeld: de ene naald wel en de andere naald niet.

09.05.2019 - 19:30

country flag Berit wrote:

Strikker str L, etter halsens vrangbord , opplegg 100 masker økes til 120 masker. Merketråene settes først gang etter 22 masker som er halve bakstykket, men etter siste merketråd skal det gjenstå 27 masker som er den andre halvdel av bakstykket. Det stemmer ikke med 120 masker , men det gjenstår 22 masker som tilsvarer andre halvdel av bakstykket, tilsammen 44 masker, da tilsvarer det de 120 som var utgangspunktet for denne omgangen. Er det en trykkfeil i oppskriften ?

04.05.2019 - 13:04

DROPS Design answered:

Hei Berit. Det har du helt rett i, du skal ha igjen 22 masker slik at det er like mange masker på for- og bakstykket. Vi skal få rettet dette i oppskriften. Takk for beskjed og god fornøyelse

06.05.2019 - 08:48

country flag Susi Riemenschneider wrote:

Toller Pullover mit tollen Farben. Ich warte sehnsüchtig auf die Anleitung.

27.02.2019 - 21:30

country flag Iréne Lidström wrote:

När kommer mönster på denna fina tröja? Måste snart söka ngt annat.

25.02.2019 - 11:31