
Popular categories
Looking for a yarn?


|
|||||||||||||||||||||||||||||||||||||||||||
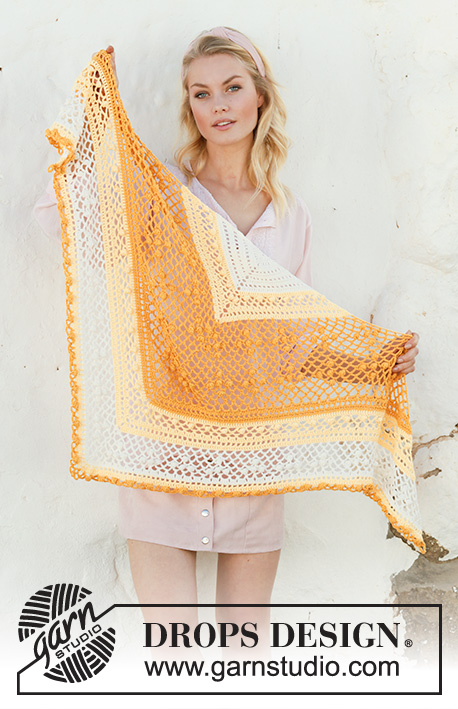
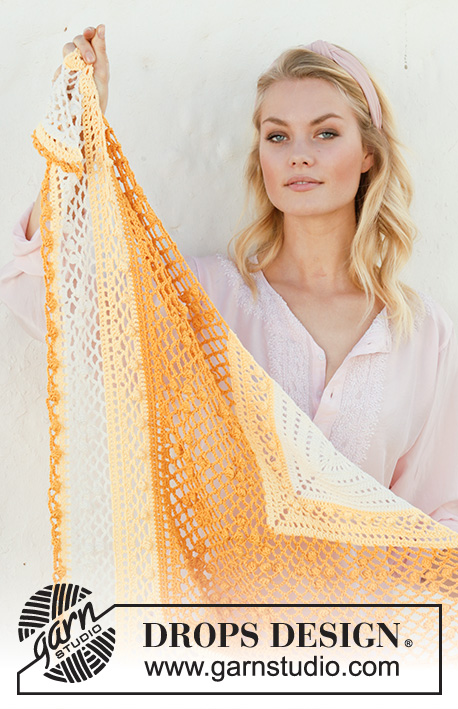
Slice of Summer |
|||||||||||||||||||||||||||||||||||||||||||
 |
 |
||||||||||||||||||||||||||||||||||||||||||
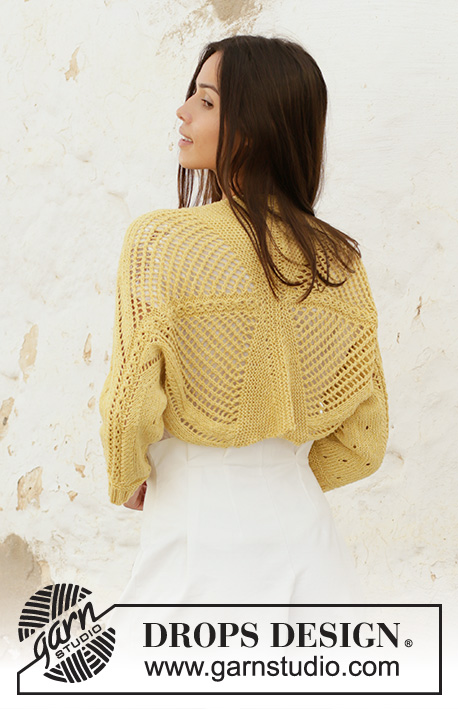
Crocheted shawl in DROPS Safran. Piece is crocheted top down with bobbles, lace pattern and stripes.
DROPS 200-21 |
|||||||||||||||||||||||||||||||||||||||||||
|
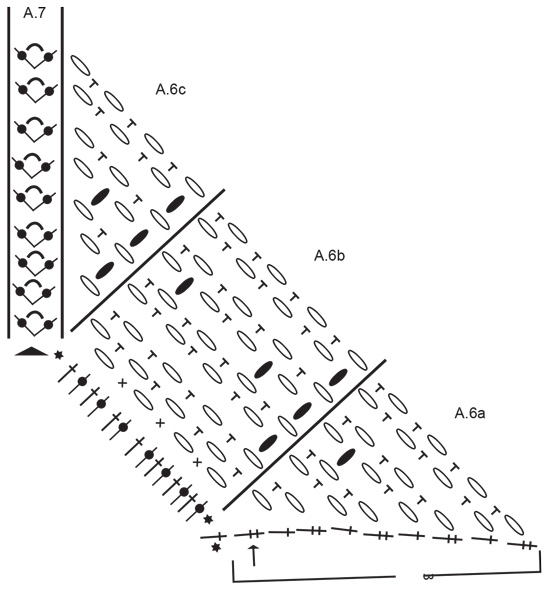
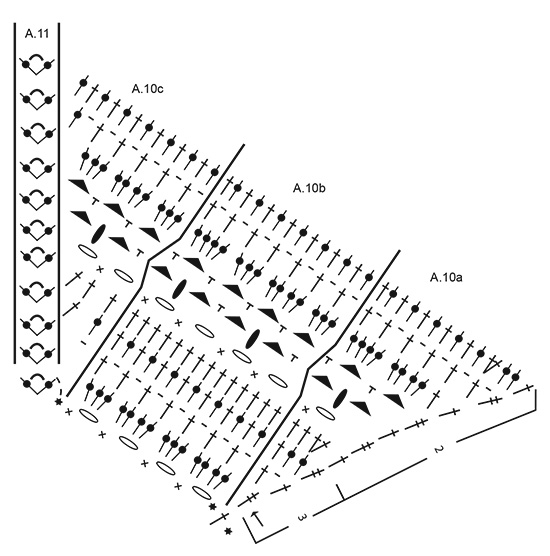
---------------------------------------------------------- EXPLANATION FOR THE PATTERN: ---------------------------------------------------------- PATTERN: See diagrams A.1 to A.13. Diagram A.1 shows the entire beginning of piece. Diagrams A.3, A.5, A.7, A.9, A.11 and A.13 show the middle of shawl. Chain space in the middle of these diagrams = middle space. Diagrams A.2, A.4, A.6, A.8, A.10 and A.12 show half the shawl. Therefore read the diagrams from right to left the first time a row is worked, then work in the middle of shawl, then read diagrams from left to right the second time a row is worked. STRIPES: See number in diagram. 1 = off white 2 = yellow 3 = strong yellow CROCHET INFORMATION: Replace first treble crochet at beginning of row with 3 chain stitches. Replace first double treble crochet at beginning of row with 4 chain stitches. COLOUR CHANGE (worked back and forth): When changing colour work as follows: Work last treble crochet/double treble crochet with first colour but wait with last pull through, switch to next colour and work last pull through, then work next treble crochet/double treble crochet. ---------------------------------------------------------- START THE PIECE HERE: ---------------------------------------------------------- SHAWL - SHORT OVERVIEW OF THE PIECE: Piece is worked back and forth, top down. Read PATTERN and STRIPES. SHAWL: Work from A.1 to A.12 - read CROCHET INFO and COLOUR CHANGE, as follows: WORK A.1 AS FOLLOWS: Work 4 chain stitches on hook size 3.5 mm with Safran and form a ring with 1 slip stitch in first stitch. Work back and forth according to diagram A.1. When A.1 has been worked, there are 11 stitches on each side of middle space (= 22 stitches in + middle space in total). REMEMBER THE CROCHET TENSION! WORK A.2 AND A.3 AS FOLLOWS: First row = wrong side. Work A.2a over first treble crochet, work A.2b over the next 10 stitches, work A.2c, work A.3 over middle space, work A.2c, work A.2b over the next 10 stitches and finish with A.2a over last treble crochet. When entire A.2 and A.3 have been worked vertically, there are 37 treble crochets on each side of middle space (= 74 treble crochets in + middle space in total). WORK A.4 AND A.5 AS FOLLOWS: First row = wrong side. Work A.4a over first treble crochet, work A.4b over the next 36 stitches (= 3 times in width), work A.4c, work A.5 over middle space, work A.4c, work A.4b over the next 36 treble crochets (= 3 times in width) and finish with A.4a over last treble crochet. When entire A.4 and A.5 have been worked vertically, there are 71 treble crochets on each side of middle space (= 142 treble crochets in + middle space in total). WORK A.6 AND A.7 AS FOLLOWS: First row = wrong side. Work A.6a over first treble crochet, work A.6b over the next 70 treble crochets (= 5 times in width), work A.6c, work A.7 over middle space, work A.6c, work A.6b over the next 70 treble crochets (= 5 times in width) and finish with A.6a over last treble crochet. When entire A.6 and A.7 have been worked vertically, there are 28 chain spaces on each side of middle space (= 56 chain spaces in + middle space in total). WORK A.8 AND A.9 AS FOLLOWS: First row = right side. Work A.8a over first double treble crochet, work A.8b over the next 28 chain spaces (= 7 times in width), work A.8c, work A.9 over middle space, work A.8c, work A.8b over the next 28 chain spaces (= 7 times in width) and finish with A.8a over last double treble crochet. When entire A.8 and A.9 have been worked vertically, there are 37 chain spaces on each side of middle space (= 74 chain spaces in + middle space in total). WORK A.10 AND A.11 AS FOLLOWS: First row = wrong side. Work A.10a over first treble crochet, work A.10b over the next 36 chain spaces (= 9 times in width), work A.10c, work A.11 over middle space, work A.10c, work A.10b over the next 36 chain spaces (= 9 times in width) and finish with A.10a over last treble crochet. When entire A.10 and A.11 have been worked vertically, there are 155 treble crochets on each side of middle space (= 310 treble crochets in + middle space in total). WORK A.12 AND A.13 AS FOLLOWS: First row = wrong side. Work A.12a over first treble crochet, work A.12b over the next 154 treble crochets (= 11 times in width), work A.12c, work A.13 over middle space, work A.12c, work A.12b over the next 154 treble crochets (= 11 times in width) and finish with A.12a over last treble crochet. When entire A.12 and A.13 have been worked vertically, there are 54 chain spaces on each side of middle space (= 108 chain spaces in + middle space in total). Cut and fasten the yarn. Shawl measures approx. 70 cm measured along middle space. |
|||||||||||||||||||||||||||||||||||||||||||
Diagram explanations |
|||||||||||||||||||||||||||||||||||||||||||
|
|||||||||||||||||||||||||||||||||||||||||||

|
|||||||||||||||||||||||||||||||||||||||||||

|
|||||||||||||||||||||||||||||||||||||||||||
|
|||||||||||||||||||||||||||||||||||||||||||

|
|||||||||||||||||||||||||||||||||||||||||||
|
|||||||||||||||||||||||||||||||||||||||||||

|
|||||||||||||||||||||||||||||||||||||||||||
|
Have you made this or any other of our designs? Tag your pictures in social media with #dropsdesign so we can see them! Do you need help with this pattern?You'll find tutorial videos, a Comments/Questions area and more by visiting the pattern on garnstudio.com. © 1982-2024 DROPS Design A/S. We reserve all rights. This document, including all its sub-sections, has copyrights. Read more about what you can do with our patterns at the bottom of each pattern on our site. |
|||||||||||||||||||||||||||||||||||||||||||


With over 40 years in knitting and crochet design, DROPS Design offers one of the most extensive collections of free patterns on the internet - translated to 17 languages. As of today we count 304 catalogues and 11422 patterns - 11422 of which are translated into English (UK/cm).
We work hard to bring you the best knitting and crochet have to offer, inspiration and advice as well as great quality yarns at incredible prices! Would you like to use our patterns for other than personal use? You can read what you are allowed to do in the Copyright text at the bottom of all our patterns. Happy crafting!
Comments / Questions (28)
شكرا ... هل يترسل الباترون بعد شراء الصوف
08.12.2020 - 16:31Bonjour, J'ai réalisé ce modèle jusqu'au diagramme A.5.J'ai bien mes 71 brides. Et là je suis bloquée !! Je ne comprends pas le démarrage du diagramme A.6a à A.6c. Je comprends qu'il faut 1 DB sur la 1ère B du rg précédent, après c'est confus. Y a t-il des ml à faire et si oui combien ? Où se fait la 1ère MS que l'on voit avant le début de A.6.b ? Il manque peut-être qq chose. Dans l'attente de votre réponse. Cordialement.
17.09.2020 - 18:40DROPS Design answered:
Bonjour Ghislaine - 92, remplacez la 1ère double-bride par 4 ml (cf INFO CROCHET) ( au 1er rang de A.6a, vous crochetez simplement 4 ml) puis vous répétez A.6b: (1 ms dans la b suivante, 6 ml, sautez 2 ml), répétez de *à* et crochetez A.7 dans l'arceau de A.5 - crochetez ensuite l'autre côté en miroir du 1er et terminez par 1 double-bride (= A.6a). Bon crochet!
18.09.2020 - 08:16Je voudrais savoir a quoi correspont les chiffres sur le cote du diagramme ex 3 faut il faire 3 fois le dessin
29.06.2020 - 10:28DROPS Design answered:
Bonjour Mme Wagrez, chaque chiffre correspond à la couleur de la rayure - cf dernier symbole de la légende. Bon crochet!
29.06.2020 - 14:00Mam problem na samym początku, po zrobieniu 18 słupków w początkowy pierścień wychodzi bardziej kształt serca niż typowego trójkąta, jak na chustę przystało. Robię coś źle? Czy później samo się to zmieni. Po 3 rzędach nadal wygląda jak serce.
04.06.2020 - 19:06DROPS Design answered:
Witaj Magdaleno, wszystko jest ok, później się wyrówna. Powodzenia!
04.06.2020 - 19:28Hoi hoi, Net als Judith kom ik echt met geen mogelijkheid op 20 boogjes, ik blijf op 18 uitkomen. Ik volg letterlijk de diagram, maar ik kom niet uit *zucht* Ik geef niet gauw op, maar ik vrees dat ik dit project echt niet af ga maken. Wat een *peep* patroon ;-) De meest moeilijke projecten haak ik zo uit mijn naalden, maar deze pfff nee drama! Erg jammer, want de shawl zelf is echt heel mooi :)
22.05.2020 - 00:05DROPS Design answered:
Dag Natasja,
Voordat je aan A.6 begint heb je 71 stokjes aan één kant. In het eerste stokje haak je A.6a, in de volgende 70 stokjes haak je 5 herhalingen van A.6b. In A.6 b zitten 4 boogjes van 6 lossen. Als je deze 5 keer hebt herhaald zit je op 20 boogjes.
18.11.2020 - 23:56I\'m starting A.4a, when I get to A.5, I\'m confused. In the first row, do I do 2 DC with a chain 5 between into the chain 3 of the previous row? Again in A.5, second row, do I just do chain 5 into the previous row\'s chain 5? In the third row, do 2 DC, with ch 5 into previous row\'s chain 5? Then, in the 4th row just chain 5 into the chain 5 of the previous row? Then, on the second and 4th row, do I do another chain 5 into the same chain 5 to do the other side past A.5?
15.04.2020 - 15:26DROPS Design answered:
Dear Mrs Graves, on first row in A.5 you crochet 1 dc, 5 ch, 1 dc around the 3-ch-space from last row in A.3, on 2nd row you will work 5 chains over (dc,5ch,dc), and continue like this, with alternately (1dc, 5 ch, 1 dc in the ch-space from previous row) and 5 ch over (1 dc, 5 ch, 1 dc). Happy crocheting!
15.04.2020 - 16:53Comment faire pour recevoir les pelotes en Belgique ????
15.03.2020 - 11:49DROPS Design answered:
Bonjour Mme Moriamé, vous trouverez ici les magasins en Belgique ou qui livrent en Belgique. Bon crochet!
16.03.2020 - 10:02I am not great at the graph patterns and always stay clear away from them.\\r\\nI have wanted to crochet so many of your patterns but always it is in graph form.\\r\\nI would love to see it in written form please. I am wanting to make this shawl for a Breast feeding mum and baby.\\r\\nSlice of Summer.
16.02.2020 - 07:03DROPS Design answered:
Dear Mrs Daniels-Webb, we are only diagrams to this pattern, but you will find here how to read crochet diagrams. Happy crocheting!
17.02.2020 - 09:07Klopt het dat in patroon 6 tot 7 schema een fout zit? Van de vorige toer heb ik 71 stokjes aan elke kant maar ik kom niet uit met het schema. Ik kom uit op 18 boogjes ipv 20 boogjes waar je op uit moet komen bij de eerste toer van schema patroon 6
31.08.2019 - 16:43DROPS Design answered:
Dag Judith,
Met 71 stokjes aan beide kanten van het midden zou het precies uit moeten komen: A.6a gaat over 1 stokje, A.6b herhaal je 5 keer en gaat daardoor over 7 stokjes (5 x 14 stokjes)
01.09.2019 - 13:20Jag har en fråga om första varvet på diagram A.6, följs dubbelstolpen som startar varvet direkt av en fast maska? Ska det inte vara någon luftmaskbåge mellan?
13.07.2019 - 09:25DROPS Design answered:
Hei Susann. Les HEKLEINFORMASJON: på begynnelsen av oppskriften (Første dobbelstav på begynnelsen av raden erstattes med 4 luftmasker. God Fornøyelse!
26.08.2019 - 11:05