DROPS Safran
DROPS Safran
100% Cotton
from 1.55 € /50g
Get the yarn to make this pattern from 13.95€.

The yarn cost is calculated from the pattern’s smallest size and the yarn’s cheapest product type. Looking for an even better price? You might find it on the DROPS Deals!

DROPS SS24

Slice of Summer

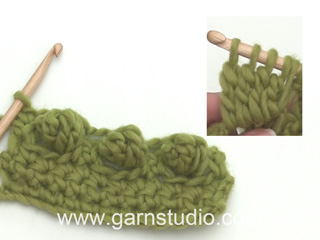
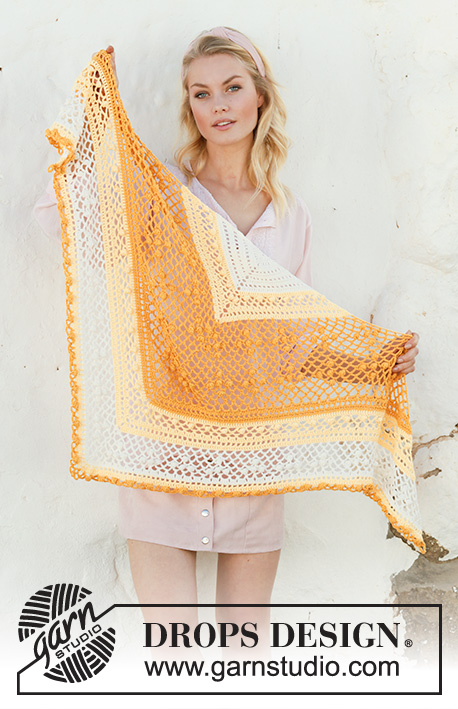
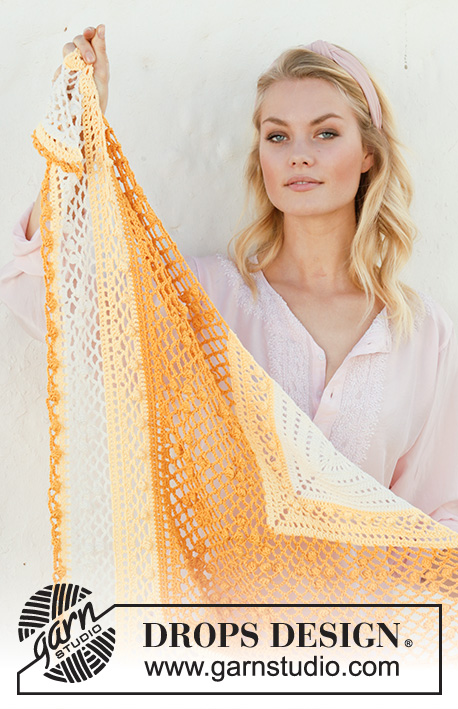
Crocheted shawl in DROPS Safran. Piece is crocheted top down with bobbles, lace pattern and stripes.

DROPS 200-21
DROPS design: Pattern e-296
Yarn group A
----------------------------------------------------------

SIZE:
Measurements: Width at top: approx. 150 cm Height in the middle: approx. 70 cm

MATERIALS:
DROPS SAFRAN from Garnstudio (belongs to yarn group A)
150 g colour 11, strong yellow
100 g colour 18, off white
100 g colour 10, yellow

CROCHET TENSION:
22 treble crochets in width and 12 rows vertically = 10 x 10 cm.

CROCHET HOOK:
DROPS CROCHET HOOK SIZE 3.5 mm
Hook size is only a suggestion! If you have too many stitches on 10 cm switch to larger hook. If you have too few stitches on 10 cm switch to smaller hook.

-------------------------------------------------------

Alternative Yarn – See how to change yarns here
Yarn Groups A to F – Use the same pattern and change the yarn here
Yarn usage using an alternative yarn – Use our yarn converter here

-------------------------------------------------------

DROPS Safran
DROPS Safran
100% Cotton
from 1.55 € /50g
Get the yarn to make this pattern from 13.95€.

The yarn cost is calculated from the pattern’s smallest size and the yarn’s cheapest product type. Looking for an even better price? You might find it on the DROPS Deals!

Pattern instructions

----------------------------------------------------------

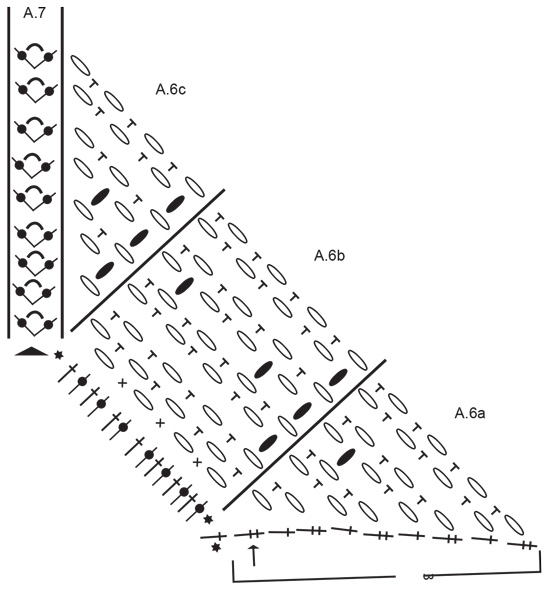
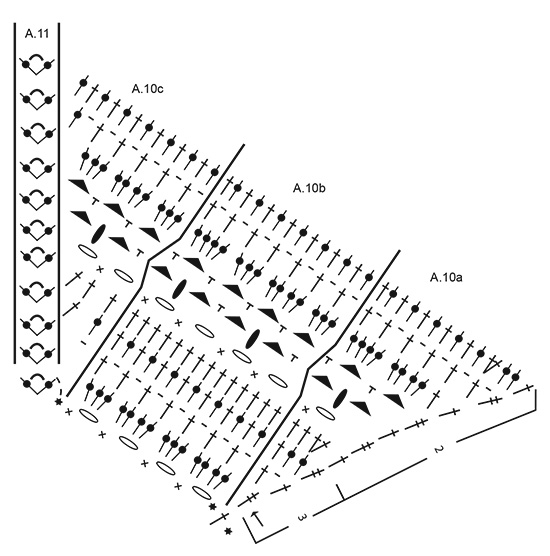
EXPLANATION FOR THE PATTERN:

----------------------------------------------------------

PATTERN: 
See diagrams A.1 to A.13.
Diagram A.1 shows the entire beginning of piece.
Diagrams A.3, A.5, A.7, A.9, A.11 and A.13 show the middle of shawl. Chain space in the middle of these diagrams = middle space.
Diagrams A.2, A.4, A.6, A.8, A.10 and A.12 show half the shawl. Therefore read the diagrams from right to left the first time a row is worked, then work in the middle of shawl, then read diagrams from left to right the second time a row is worked.

STRIPES:
See number in diagram.
1 = off white
2 = yellow
3 = strong yellow

CROCHET INFORMATION:
Replace first treble crochet at beginning of row with 3 chain stitches.
Replace first double treble crochet at beginning of row with 4 chain stitches.

COLOUR CHANGE (worked back and forth):
When changing colour work as follows: Work last treble crochet/double treble crochet with first colour but wait with last pull through, switch to next colour and work last pull through, then work next treble crochet/double treble crochet.

----------------------------------------------------------

START THE PIECE HERE:

----------------------------------------------------------

SHAWL - SHORT OVERVIEW OF THE PIECE:
Piece is worked back and forth, top down. Read PATTERN and STRIPES.

SHAWL:
Work from A.1 to A.12 - read CROCHET INFO and COLOUR CHANGE, as follows:

WORK A.1 AS FOLLOWS:
Work 4 chain stitches on hook size 3.5 mm with Safran and form a ring with 1 slip stitch in first stitch. Work back and forth according to diagram A.1. When A.1 has been worked, there are 11 stitches on each side of middle space (= 22 stitches in + middle space in total). REMEMBER THE CROCHET TENSION!

WORK A.2 AND A.3 AS FOLLOWS:
First row = wrong side.
Work A.2a over first treble crochet, work A.2b over the next 10 stitches, work A.2c, work A.3 over middle space, work A.2c, work A.2b over the next 10 stitches and finish with A.2a over last treble crochet. When entire A.2 and A.3 have been worked vertically, there are 37 treble crochets on each side of middle space (= 74 treble crochets in + middle space in total).

WORK A.4 AND A.5 AS FOLLOWS:
First row = wrong side.
Work A.4a over first treble crochet, work A.4b over the next 36 stitches (= 3 times in width), work A.4c, work A.5 over middle space, work A.4c, work A.4b over the next 36 treble crochets (= 3 times in width) and finish with A.4a over last treble crochet. When entire A.4 and A.5 have been worked vertically, there are 71 treble crochets on each side of middle space (= 142 treble crochets in + middle space in total).

WORK A.6 AND A.7 AS FOLLOWS:
First row = wrong side.
Work A.6a over first treble crochet, work A.6b over the next 70 treble crochets (= 5 times in width), work A.6c, work A.7 over middle space, work A.6c, work A.6b over the next 70 treble crochets (= 5 times in width) and finish with A.6a over last treble crochet. When entire A.6 and A.7 have been worked vertically, there are 28 chain spaces on each side of middle space (= 56 chain spaces in + middle space in total).

WORK A.8 AND A.9 AS FOLLOWS:
First row = right side.
Work A.8a over first double treble crochet, work A.8b over the next 28 chain spaces (= 7 times in width), work A.8c, work A.9 over middle space, work A.8c, work A.8b over the next 28 chain spaces (= 7 times in width) and finish with A.8a over last double treble crochet. When entire A.8 and A.9 have been worked vertically, there are 37 chain spaces on each side of middle space (= 74 chain spaces in + middle space in total).

WORK A.10 AND A.11 AS FOLLOWS:
First row = wrong side.
Work A.10a over first treble crochet, work A.10b over the next 36 chain spaces (= 9 times in width), work A.10c, work A.11 over middle space, work A.10c, work A.10b over the next 36 chain spaces (= 9 times in width) and finish with A.10a over last treble crochet. When entire A.10 and A.11 have been worked vertically, there are 155 treble crochets on each side of middle space (= 310 treble crochets in + middle space in total).

WORK A.12 AND A.13 AS FOLLOWS:
First row = wrong side.
Work A.12a over first treble crochet, work A.12b over the next 154 treble crochets (= 11 times in width), work A.12c, work A.13 over middle space, work A.12c, work A.12b over the next 154 treble crochets (= 11 times in width) and finish with A.12a over last treble crochet. When entire A.12 and A.13 have been worked vertically, there are 54 chain spaces on each side of middle space (= 108 chain spaces in + middle space in total). Cut and fasten the yarn. Shawl measures approx. 70 cm measured along middle space.

This pattern has been corrected.

Updated online: 23.04.2021
Diagram A.6b corrected: 1 double crochet on row 1 removed.

Diagram

symbols = Begin here - this chain stitch ring is explained in the pattern (4 chain stitches, 1 slip stitch). Continue at the arrow
symbols = Begin diagram here (= first row in diagram)
symbols = double treble crochet in stitch
symbols = treble crochet around chain stitch ring/chain stitch/chain space
symbols = treble crochet in stitch
symbols = 1 chain stitch
symbols = 3 chain stitches
symbols = 5 chain stitches
symbols = 6 chain stitches
symbols = 1 double crochet in stitch
symbols = double crochet around chain space
symbols = BOBLE: Work as follows around chain space below: 1 slip stitch, 4 double treble crochets but wait with last yarn over and pull through on each of these double treble crochets, 1 slip stitch, make a yarn over and pull through all 7 loops on hook
symbols = This row has already been worked. Begin on next row (i.e. at the arrow)
symbols = number shows which colour the diagram/row is worked in 1 = off white, 2 = yellow, 3 = strong yellow
diagram
diagram
diagram
diagram
diagram
diagram
Do you have a question? See a list of frequently asked questions (FAQ)

Knitting tension is what determines the final measurements of your work, and is usually measured per 10 x 10 cm. It is provided like so: number of stitches in width x number of rows in height - eg: 19 stitches x 26 rows = 10 x 10 cm.

The knitting tension is very individual; some people knit/crochet loosely while others work tightly. You adjust the knitting tension with the needle size, which is why the suggested needle size is only meant as a guide! You need to adjust this (up or down) to ensure that YOUR knitting tension matches the knitting tension provided in the pattern. If you work with a different knitting tension than provided you will have a different yarn consumption, and your work will have different measurements than what the pattern suggests.

The knitting tension also determines which yarns can replace each other. As long as you achieve the same knitting tension you can replace one yarn with another.

See DROPS lesson: How to measure your tension/gauge

See DROPS video: How to make a gauge tension swatch

The required amount of yarn is provided in grams, eg: 450 g. To calculate how many balls you’ll need you first need to know how many grams are in 1 ball (25g, 50g or 100g). This information is available if you click on the individual yarn quality on our pages. Divide the amount required with the amount of each ball. For example, if each ball is 50g (the most common amount), the calculation will be as follows: 450 / 50 = 9 balls.

The important thing when changing from one yarn to another is that the knitting/crochet tension remains the same. This is so that the measurements of the finished piece will be the same as on the sketch provided. It is easier to achieve the same knitting tension using yarns from the same yarn group. It is also possible to work with multiple strands of a thinner yarn to achieve the knitting tension of a thicker one. Please try our yarn converter. We recommend you to always work a test swatch.

Please NOTE: when changing yarn the garment might have a different look and feel to the garment in the photo, due to individual properties and qualities of each yarn.

See DROPS lesson: Can I use a different yarn than the one mentioned in the pattern?

All our yarns are categorised into yarn groups (from A to F) according to thickness and knitting tension – group A contains the thinnest yarns and group F the thickest. This makes it easier for you to find alternative yarns to our patterns, should you wish to switch yarn. All yarns within the same group have a similar knitting tension and can easily replace each other. However, different yarn qualities have different structures and properties which will give the finished work a unique look and feel.

Click here for an overview of the yarns in each yarn group

At the top of all our patterns you’ll find a link to our yarn calculator, which is a helpful tool should you wish to use a different yarn than suggested. By filling in the yarn quality you wish to replace, the amount (in your size) and number of strands, the calculator will present good alternative yarns with the same knitting tension. Additionally it will tell you how much you’ll require in the new qualities and whether you’ll need to work with multiple strands. Most skeins are 50g (some are 25g or 100g).

If the pattern is worked with multiple colours, every colour will have to be calculated separately. Similarly, if the pattern is worked with several strands of different yarns (for example 1 strand Alpaca and 1 strand Kid-Silk) you will have to find alternatives for each, individually.

Click here to see our yarn calculator

Since different yarns have different qualities and textures we have chosen to keep the original yarn in our patterns. However, you can easily find options among our available qualities by using our yarn calculator, or simply pick a yarn from the same yarn group.

It is possible that some retailers still have discontinued yarns in stock, or that someone has a few skeins at home that they would like to find patterns for.

The yarn calculator will provide both alternative yarn as well as required amount in the new quality.

If you think it's hard to decide what size to make, it can be a good idea to measure a garment you own already and like the size of. Then you can pick the size by comparing those measures with the ones available in the pattern's size chart.

You'll find the size chart at the bottom of the pattern.

See DROPS lesson: How to read size chart

The needle size provided in the pattern serves only as a guide, the important thing is to follow the knitting tension. And since knitting tension is very individual, you will have to adjust the needle size to ensure that YOUR tension is the same as in the pattern – maybe you’ll have to adjust 1, or even 2 needle sizes, up or down to achieve the correct tension. For this, we recommend that you work test swatches.

Should you work with a different knitting tension than the one provided, the measurements of the finished garment might deviate from the measurement sketch.

See DROPS lesson: How to measure your tension/gauge

See DROPS video: How to make a tension/gauge swatch

Working a garment top-down provides more flexibility and room for personal adjustment. For example it is easier to try the garment on while working, as well as making adjustments to length of yoke and shoulder caps.

The instructions are carefully explaining every step, in the correct order. Diagrams are adjusted to the knitting direction and are worked as usual.

The diagram depicts all rows/rounds, and every stitch seen from the right side. It is read from bottom to top, from right to left. 1 square = 1 stitch.

When working back and forth, every other row is worked from the right side and every other row is worked from the wrong side. When working from the wrong side, the diagram will have to be worked reversed: from left to right, knit stitches are purled, purl stitches are knit etc.

When working in the round every round is worked from the right side and the diagram are worked from right to left on all rounds.

See DROPS lesson: How to read knitting diagrams

The diagram depicts all rows/rounds, and every stitch seen from the right side. It is worked from bottom to top, from right to left.

When working back and forth every other row is worked from the right side: from right to left and every other row is worked from the wrong side: from left to right.

When working in the round, every row in the diagram are worked from the right side, from right to left.

When working a circular diagram you start in the middle and work your way outwards, counter clockwise, row by row.

The rows usually start with a given number of chain stitches (equivalent to the height of the following stitch), this will either be depicted in the diagram or explained in the pattern.

See DROPS lesson: How to read crochet diagrams

Instructions for working several diagrams after each other on the same row/round, will often be written like so: “work A.1, A.2, A.3 a total of 0-0-2-3-4 times". This means you work A.1 once, then A.2 is worked once, and A.3 is repeated (in width) the number of times provided for your size – in this case like so: S = 0 times, M = 0 times, L=2 times, XL= 3 times and XXL = 4 times.

The diagrams are worked as usual: begin with the first row in A.1, then work the first row in A.2 etc.

See DROPS lesson: How to read knitting diagrams

See DROPS lesson: How to read crochet diagrams

The total width of the garment (from wrist-to-wrist) will be larger in the larger sizes, despite the actual sleeves being shorter. The larger sizes have longer sleeve caps and wider shoulders, so there will be a good fit in all sizes.

The measurement sketch/schematic drawing provides information regarding the full length of the garment. If it’s a jumper or a jacket the length is measured from the highest point on the shoulder closest to the neckline, and straight down to the bottom of the garment. It is NOT measured from the tip of shoulder. Similarly, the length of yoke is measured from the highest point on the shoulder and down to where yoke is split into body and sleeves.

On a jacket measures are never taken along bands, unless specifically stated. Always measure inside band stitches when measuring the length.

See DROPS lesson: How to read a schematic drawing

Diagrams are often repeated on the round or in height. 1 repeat is the diagram the way it appears in the pattern. If it says to work 5 repeats of A.1 in the round, then you work A.1 a total of 5 times after/next to each other in the round. If it says to work 2 repeats of A.1 vertically/in height you work the entire diagram once, then begin again at the start and work the entire diagram one more time.

Chain stitches are slightly narrower than other stitches and to avoid working the cast-on edge too tight, we simply chain more stitches to begin with. The stitch count will be adjusted on the following row to fit the pattern and measurement sketch.

The rib edge is more elastic and will contract slightly compared to, for example, stocking stitch. By increasing before the rib edge, you avoid a visible difference in width between the rib edge and the rest of the body.

It’s very easy to cast off too tightly, and by making yarn overs while casting off (and simultaneously casting these off) you avoid a too tight cast off edge.

See DROPS video: How to bind off with yarn overs (yo)

To achieve an even increase (or decrease) you can increase on, for example: every 3rd and 4th row alternately, like so: work 2 rows and increase on the 3rd row, work 3 rows and increase on the 4th. Repeat this until the increase is complete.

See DROPS lesson: Increase or decrease 1 st on every 3rd and 4th row alternately

Should you prefer to work in the round instead of back and forth, you may of course adjust the pattern. You’ll need to add steeks mid-front (usually 5 stitches), and follow the instructions. When you would normally turn and work from the wrong side, simply work across the steek and continue in the round. At the end you’ll cut the piece open, pick up stitches to work bands, and cover the cut edges.

See DROPS video: How to knit steeks and cut open

Should you prefer to work back and forth instead of in the round, you may of course adjust the pattern so you work the pieces separately and then assemble them at the end. Divide the stitches for the body in 2, add 1 edge stitch in each side (for sewing) and work the front and back pieces separately.

See DROPS lesson: Can I adapt a pattern for circular needles into straight needles?

Pattern repeats can vary slightly in the different sizes, in order to get the correct proportions. If you’re not working the exact same size as the garment in the photo, yours might deviate slightly. This has been carefully developed and adjusted so that the complete impression of the garment is the same in all sizes.

Make sure to follow instructions and diagrams for your size!

If you have found a pattern you like which is available in women’s size it’s not very difficult to convert it to men’s size. The biggest difference will be the length of sleeves and body. Start working on the women size that you think would fit across the chest. The additional length will be worked right before you cast off for the armhole/sleeve cap. If the pattern is worked top-down you can add the length right after the armhole or before the first decrease on sleeve.

Regarding additional yarn amount, this will depend on how much length you add, but it is better with a skein too many than too few.

All yarns will have excess fibres (from production) that might come off as lint or shedding. Brushed yarns (ie hairier yarns) have more of these loose, excess fibres, causing more shedding.

Shedding also depends on what is worn under or over the garment, and whether this pulls at the yarn fibres. It’s therefore not possible to guarantee that there will be no shedding

Below are some tips on how to get the best result when working with hairier yarns:

1. When the garment is finished (before you wash it) shake it vigorously so the looser hairs come off. NOTE: do NOT use a lint roller, brush or any method that pulls at the yarn.

2. Place the garment in a plastic bag and put it in your freezer - the temperature will cause the fibres to become less attached to each other, and excess fibres will come off easier.

3. Leave in the freezer for a few hours before taking it out and shaking it again.

4. Wash the garment according to the instructions on the yarn label.

Pilling is a natural process that happens to even the most exclusive of fibers. It's a natural sign of wear and tear that is hard to avoid, and that is most visible in high friction areas of your garment like a sweater's arms and cuffs.

You can make your garment look as new by removing the pilling, using a fabric comb or a pill/lint remover.

Still can't find the answer you need? Then scroll down and leave your question so one of our experts can try to help you. This will be done normally within 5 to 10 working days.
In the meantime, you can read the questions and answers that others have left to this pattern or join the DROPS Workshop on Facebook to get help from fellow knitters/crocheters!

You might also like...

Post a comment to pattern DROPS 200-21

We would love to hear what you have to say about this pattern!

If you want to leave a question, please make sure you select the correct category in the form below, to speed up the answering process. Required fields are marked *.

Comments / Questions (28)

country flag Cccc wrote:

Would it be possible to get a clearer picture of the completed shawl spread out? I’m stuck on A.6b as i can’t seem to get the middle bobbles into a “x” shape like you have without having to make 6 bobbles in a row. I think a full view of the shawl would be great help.

04.09.2023 - 19:20

DROPS Design answered:

Dear Cccc, the bottom bobble will be worked on the 4th row: 1 boble at the beg of each A.6b (you repeat A.6b a total of 5 times) + 1 at the beg of A.6c (before middle of shawl) => you should have now 6 bobles, then on the other side of piece, 1 boble at the end of A.6c then at the end of each beg of each A.6b (5times = 5 bobles) => 6 bobbles on this first bobble-row - do not hesitate to add marker between each repeat, this can help to get the correct number of repeats. Happy crocheting!

05.09.2023 - 11:57

country flag Sophie wrote:

Bonjour Je ne comprends pas le début. Ils disent qu’on doit avoir 22 mailles en tout mais je n’en ai que 14. Pourquoi ? Merci

12.07.2023 - 18:53

DROPS Design answered:

Bonjour Sophie, les mailles en l'air sont aussi comptees comme les mailles. Vous avez le nombre correct de mailles: 22 mailles au total + l’arceau (celui au milieu du chal). Bon crochet!

21.07.2023 - 10:58

country flag M G wrote:

Thank you for answering my question.

21.06.2023 - 14:38

country flag M G wrote:

A question.\r\n If I use lace weight yarn, how many meters or yards is needed to make this pattern?

21.06.2023 - 01:46

DROPS Design answered:

Dear M G, please find all informations about DROPS Safran here - and how to get the yarn in the US here. Happy crocheting!

21.06.2023 - 08:10

country flag Dimpy Gala wrote:

A6.b : 70 dc divide by 14 double crochet = 17.5 not 20 .. your maths is wrong. In the photo of the model I counted bows and they are 16 ….by taking out just 1 dc * 5 = 1 bow cannot add 4 bows ….please advise

09.04.2023 - 18:03

DROPS Design answered:

Dear Dimpy, the pattern is correct, 70/14 = 5. So you work 5 times A.6b. All increases are indicated in the charts, so you don't need to add anything that isn't in the charts. Happy crochetting!

10.04.2023 - 17:05

country flag Edyta wrote:

Aby osiągnąć 20 łuków w 1-szym rzędzie schematu A.6, trzeba omijać kolejno 3, 3, 2, 2 oczka - i to powtórzyć 4 razy, a ostatnie, piąte powtórzenie to 3, 3, 2, 3 - i teraz w łuk - słupek, 3 oczka łańcuszka i słupek, a dalej lustrzane odbicie. Żeby to osiągnąć musiałam pruć trzy razy - mimo tego, że przeczytałam wszystkie komentarze... Kilka Waszych wzorów już robiłam - bez problemów. Niestety Wasz opis tego miejsca jest bardzo niezrozumiały :)

19.02.2022 - 20:08

country flag Bożena wrote:

Nie wiem jak robić schemat A 6, jak zacząć i co ile oczek robić oczko ścisłe? Ile łuków powinno powstać w pierwszym rzędzie?

28.05.2021 - 14:43

DROPS Design answered:

Witaj Bożeno, wykonujesz 1-szy rząd schematu. Oczko ścisłe jest przerabiane w słupek, omijasz 3 kolejne słupki (a 1 raz 2, patrz schemat A.6b) i przerabiasz 1 oczko ścisłe w następny słupek. Po zakończeniu 1-szego rzędu będziesz miała 20 łuków z każdej strony łuku na środku (= w sumie 40 łuków + łuk na środku, czyli łącznie 41 łuków). Pozdrawiamy!

01.06.2021 - 22:25

country flag Lynda Hoekstra wrote:

Er staan geen foto’s, werktekening, symbolen van de steken etc. Overal staan lege hokjes, met het woord foto/symbool erin. Werkt de website alleen op een desktop misschien?

01.04.2021 - 10:07

country flag Slice OF Summer wrote:

Mitä tässä ohjeissa tarkoitta mallikerta.

13.03.2021 - 14:13

country flag Karen wrote:

No comprendo la explicación del punto mota. ¿los puntos bajísimos se enganchan a una cadena o al arco?

09.12.2020 - 05:16

DROPS Design answered:

Hola Karen, tienes que trabajar alrededor del arco abajo. La explicación del punto mota encontreras AQUI. Buen trabajo!

09.12.2020 - 09:06