DROPS Alpaca
DROPS Alpaca
100% Alpaca
from 4.85 $ /50g
DROPS Kid-Silk
DROPS Kid-Silk
75% Mohair, 25% Silk
from 6.75 $ /25g
Get the yarn to make this pattern from 34.80$.

The yarn cost is calculated from the pattern’s smallest size and the yarn’s cheapest product type. Looking for an even better price? You might find it on the DROPS Deals!

DROPS SS24

Sweet Angel

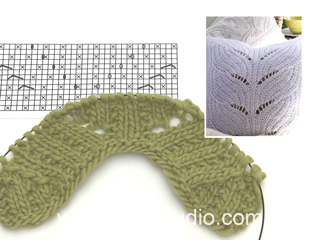
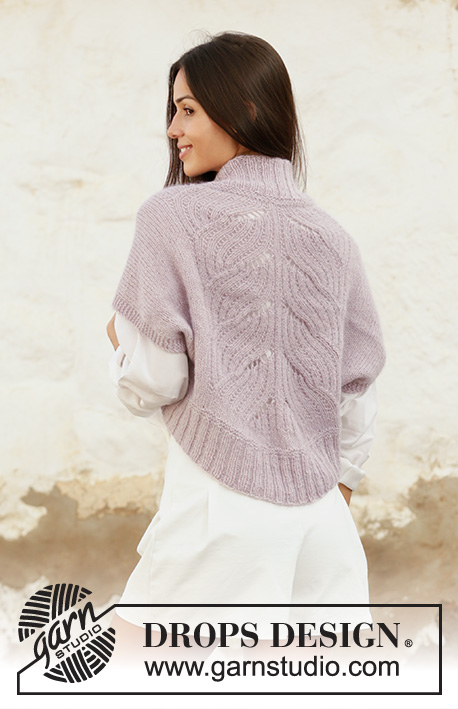
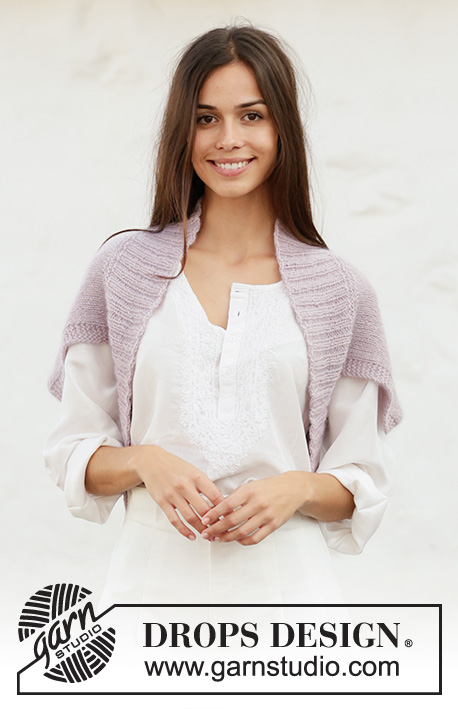
Knitted shoulder piece with displacements in DROPS Alpaca and DROPS Kid-Silk. Sizes S - XXXL.

DROPS 201-27
DROPS Design: Pattern no z-841
Yarn group A + A or C
-------------------------------------------------------

SIZES:
S/M – L/XL - XXL – XXXL

Finished measurements:
Chest measurements: 67-72-80-89 cm = 26⅜"-28⅜"-31½"-35"
Full length: 64-69-72-74 cm = 25¼"-27⅛"-28⅜"-29⅛"

All measurements in charts are in cm.

MATERIALS:
DROPS ALPACA from Garnstudio (belongs to yarn group A)
150-200-200-200 g color 4010, light lavender
And use:
DROPS KID-SILK from Garnstudio (belongs to yarn group A)
75-75-75-100 g color 09, light lavender

KNITTING GAUGE:
17 stitches in width and 22 rows in height with stockinette stitch and 1 strand of each quality = 10 x 10 cm = 4" x 4".

NEEDLES:
DROPS CIRCULAR NEEDLE SIZE 5 MM = US 8: Length 80 cm = 32" for stockinette stitch.
DROPS CIRCULAR NEEDLE SIZE 4 MM = US 6: Length 80 cm = 32" for rib.
Needle size is only a guide. If you get too many stitches on 10 cm = 4", change to a larger needle size. If you get too few stitches on 10 cm = 4", change to a smaller needle size

-------------------------------------------------------

Alternative Yarn – See how to change yarns here
Yarn Groups A to F – Use the same pattern and change the yarn here
Yarn usage using an alternative yarn – Use our yarn converter here

-------------------------------------------------------

DROPS Alpaca
DROPS Alpaca
100% Alpaca
from 4.85 $ /50g
DROPS Kid-Silk
DROPS Kid-Silk
75% Mohair, 25% Silk
from 6.75 $ /25g
Get the yarn to make this pattern from 34.80$.

The yarn cost is calculated from the pattern’s smallest size and the yarn’s cheapest product type. Looking for an even better price? You might find it on the DROPS Deals!

Pattern instructions

NOTE: This pattern is written in American English. All measurements in charts are in cm. For conversion from inches to cm - click here. There are different terms for crocheting in American and British English. If this pattern includes crochet, click for "crochet terms" here. For this pattern in British English, please click here.
-------------------------------------------------------

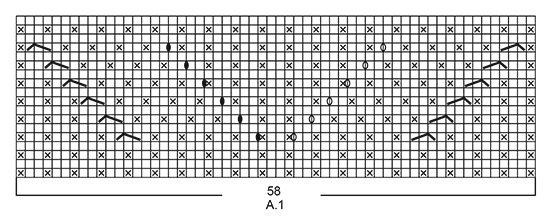
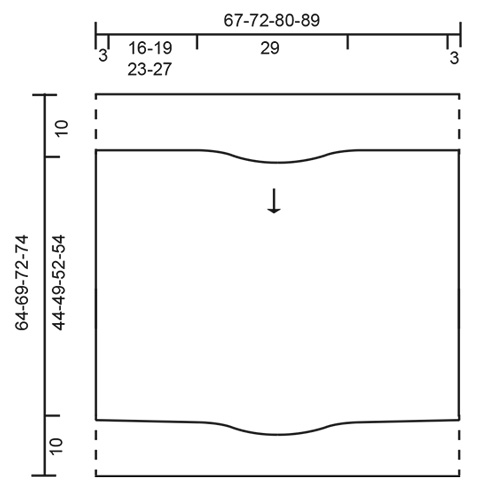
EXPLANATIONS FOR PATTERN:

-------------------------------------------------------

RIDGE/GARTER STITCH (worked in the round):
1 ridge in height = 2 rounds; Knit 1 round and purl 1 round.

RIDGE/GARTER STITCH (worked back and forth):
Knit all rows.
1 ridge in height = Knit 2 rows.

PATTERN:
See diagram A.1. The diagram shows all rows in pattern seen from the right side.

INCREASE TIP (evenly spaced):
To work out how to increase evenly, count the total number of stitches on the needle (e.g. 122 stitches) and divide by the number of increases to be made (e.g. 24) = 5.1.
In this example, increase by making 1 yarn over after approx. each 5th stitch. On the next round work the yarn overs twisted to avoid holes

-------------------------------------------------------

START THE PIECE HERE:

-------------------------------------------------------

SHOULDER PIECE - SHORT OVERVIEW OF THE PIECE:
The piece is worked back and forth with circular needle. An edge is worked in the round to finish, with circular needle.

SHOULDER PIECE:
Cast on 122-132-146-160 stitches with circular needle size 5 mm = US 8 and 1 strand Alpaca + 1 strand Kid-Silk (= 2 strands). Work 1 RIDGE – read description above, back and forth over all stitches on the needle, then purl 1 row. Now work pattern as follows: 5 stitches in garter stitch, 27-32-39-46 stitches in stockinette stitch, A.1 (= 58 stitches), 27-32-39-46 stitches stockinette stitch and 5 stitches in garter stitch. REMEMBER THE KNITTING GAUGE! Continue back and forth like this until A.1 has been completed a total of 5-5-6-6 times in height. The piece measures approx. 42-42-50-50 cm = 16½"-16½"-19¾"-19¾". Continue with stockinette stitch (as shown in the picture) or work texture as before over the middle 58 stitches on the row, 5 stitches in garter stitch on each side and stockinette stitch over the remaining stitches on the row. When the piece measures 43-48-51-53 cm = 17"-19"-20"-21" work 1 ridge over all stitches.

EDGE:
Now work an edge around the piece with 1 strand Alpaca and 1 strand Kid-Silk (= 2 strands) and circular needle size 4 mm = US 6 from the right side as follows: Knit the 122-132-146-160 stitches on the row and at the same time increase 24-30-34-36 stitches evenly placed – read INCREASE TIP (= 146-162-180-196 stitches), fold the piece and lay wrong side to wrong side, knit up 146-162-180-196 stitches along the cast-on edge = 292-324-360-392 stitches around opening on shoulder piece. Work 2 RIDGES – read description above, in the round over all stitches. Then work rib (knit 2, purl 2) until the rib measures 10 cm = 4". Bind off with knit over knit and purl over purl, but to avoid the bind-off edge being tight, make 1 yarn over after each 4th stitch; yarn overs bind off as normal stitches.

This pattern has been corrected.

Updated online: 15.07.2019
Correction: ALPACA color 4010, light lavender, and use KID-SILK color 09, light lavender

Diagram

All measurements in charts are in cm.

symbols = knit from right side, purl from wrong side
symbols = purl from right side
symbols = between 2 stitches make 2 yarn overs; on the next row (wrong side) purl the first yarn over (i.e. the yarn over towards the middle of the diagram) twisted. The other yarn over (i.e. the yarn over towards the side) is purled (= 2 stitches increase). Then work the new stitches into the pattern.
symbols = between 2 stitches make 2 yarn overs; on the next row (wrong side) purl the first yarn over (i.e. the yarn over towards the side), the other yarn over (i.e. the yarn over towards the middle of the diagram) is purled twisted (= 2 stitches increased). Then work the new stitches into the pattern
symbols = knit 3 together (= 2 stitches decreased)
symbols = slip 1 stitch as if to knit, knit 2 together and pass the slipped stitch over (= 2 stitches decreased)
symbols = sketch shows how the garment will look after assembly
diagram
diagram
diagram
Do you have a question? See a list of frequently asked questions (FAQ)

Knitting tension is what determines the final measurements of your work, and is usually measured per 10 x 10 cm. It is provided like so: number of stitches in width x number of rows in height - eg: 19 stitches x 26 rows = 10 x 10 cm.

The knitting tension is very individual; some people knit/crochet loosely while others work tightly. You adjust the knitting tension with the needle size, which is why the suggested needle size only serve as a guide! You need to adjust this (up or down) to ensure that YOUR knitting tension matches the knitting tension provided in the pattern. If you work with a different knitting tension than provided you will have a different yarn consumption, and your work will have different measurements than what the pattern suggests.

The knitting tension also determines which yarns can replace each other. As long as you achieve the same knitting tension you can replace one yarn with another.

See DROPS lesson: How to measure your tension/gauge

See DROPS video: How to make a gauge tension swatch

The required amount of yarn is provided in grams, eg: 450 g. To calculate how many balls you’ll need you first need to know how many grams are in 1 ball (25g, 50g or 100g). This information is available if you click on the individual yarn quality on our pages. Divide the amount required with the amount of each ball. For example, if each ball is 50g (the most common amount), the calculation will be as follows: 450 / 50 = 9 balls.

The important thing when changing from one yarn to another is that the knitting/crochet tension remains the same. This is so that the measurements of the finished piece will be the same as on the sketch provided. It is easier to achieve the same knitting tension using yarns from the same yarn group. It is also possible to work with multiple strands of a thinner yarn to achieve the knitting tension of a thicker one. Please try our yarn converter. We recommend you to always work a test swatch.

Please NOTE: when changing yarn the garment might have a different look and feel to the garment in the photo, due to individual properties and qualities of each yarn.

See DROPS lesson: Can I use a different yarn than the one mentioned in the pattern?

All our yarns are categorised into yarn groups (from A to F) according to thickness and knitting tension – group A contains the thinnest yarns and group F the thickest. This makes it easier for you to find alternative yarns to our patterns, should you wish to switch yarn. All yarns within the same group have a similar knitting tension and can easily replace each other. However, different yarn qualities have different structures and properties which will give the finished work a unique look and feel.

Click here for an overview of the yarns in each yarn group

At the top of all our patterns you’ll find a link to our yarn converter, which is a helpful tool should you wish to use a different yarn than suggested. By filling in the yarn quality you wish to replace, the amount (in your size) and number of strands, the converter will present good alternative yarns with the same knitting tension. Additionally it will tell you how much you’ll require in the new qualities and whether you’ll need to work with multiple strands. Most skeins are 50g (some are 25g or 100g).

If the pattern is worked with multiple colours, every colour will have to be converted separately. Similarly, if the pattern is worked with several strands of different yarns (for example 1 strand Alpaca and 1 strand Kid-Silk) you will have to find alternatives for each, individually.

Click here to see our yarn converter

Since different yarns have different qualities and textures we have chosen to keep the original yarn in our patterns. However, you can easily find options among our available qualities by using our yarn converter, or simply pick a yarn from the same yarn group.

It is possible that some retailers still have discontinued yarns in stock, or that someone has a few skeins at home that they would like to find patterns for.

The yarn converter will provide both alternative yarn as well as required amount in the new quality.

If you think it's hard to decide what size to make, it can be a good idea to measure a garment you own already and like the size of. Then you can pick the size by comparing those measures with the ones available in the pattern's size chart.

You'll find the size chart at the bottom of the pattern.

See DROPS lesson: How to read size chart

The needle size provided in the pattern serves only as a guide, the important thing is to follow the knitting tension. And since knitting tension is very individual, you will have to adjust the needle size to ensure that YOUR tension is the same as in the pattern – maybe you’ll have to adjust 1, or even 2 needle sizes, up or down to achieve the correct tension. For this, we recommend that you work test swatches.

Should you work with a different knitting tension than the one provided, the measurements of the finished garment might deviate from the measurement sketch.

See DROPS lesson: How to measure your tension/gauge

See DROPS video: How to make a gauge tension swatch

Working a garment top-down provides more flexibility and room for personal adjustment. For example it is easier to try the garment on while working, as well as making adjustments to length of yoke and shoulder caps.

The instructions are carefully explaining every step, in the correct order. Diagrams are adjusted to the knitting direction and are worked as usual.

The diagram depicts all rows/rounds, and every stitch seen from the right side. It is read from bottom to top, from right to left. 1 square = 1 stitch.

When working back and forth, every other row is worked from the right side and every other row is worked from the wrong side. When working from the wrong side, the diagram will have to be worked reversed: from left to right, knit stitches are purled, purl stitches are knit etc.

When working in the round every round is worked from the right side and the diagram are worked from right to left on all rounds.

See DROPS lesson: How to read knitting diagrams

The diagram depicts all rows/rounds, and every stitch seen from the right side. It is worked from bottom to top, from right to left.

When working back and forth every other row is worked from the right side: from right to left and every other row is worked from the wrong side: from left to right.

When working in the round, every row in the diagram are worked from the right side, from right to left.

When working a circular diagram you start in the middle and work your way outwards, counter clockwise, row by row.

The rows usually start with a given number of chain stitches (equivalent to the height of the following stitch), this will either be depicted in the diagram or explained in the pattern.

See DROPS lesson: How to read crochet diagrams

Instructions for working several diagrams after each other on the same row/round, will often be written like so: “work A.1, A.2, A.3 a total of 0-0-2-3-4 times". This means you work A.1 once, then A.2 is worked once, and A.3 is repeated (in width) the number of times provided for your size – in this case like so: S = 0 times, M = 0 times, L=2 times, XL= 3 times and XXL = 4 times.

The diagrams are worked as usual: begin with the first row in A.1, then work the first row in A.2 etc.

See DROPS lesson: How to read knitting diagrams

See DROPS lesson: How to read crochet diagrams

The total width of the garment (from wrist-to-wrist) will be larger in the larger sizes, despite the actual sleeves being shorter. The larger sizes have longer sleeve caps and wider shoulders, so there will be a good fit in all sizes.

The measurement sketch/schematic drawing provides information regarding the full length of the garment. If it’s a jumper or a jacket the length is measured from the highest point on the shoulder (usually closest to the neckline), and straight down to the bottom of the garment. It is NOT measured from the tip of shoulder. Similarly, the length of yoke is measured from the highest point on the shoulder and down to where yoke is split into body and sleeves.

See DROPS lesson: How to read a schematic drawing

Diagrams are often repeated on the round or in height. 1 repeat is the diagram the way it appears in the pattern. If it says to work 5 repeats of A.1 in the round, then you work A.1 a total of 5 times after/next to each other in the round. If it says to work 2 repeats of A.1 vertically/in height you work the entire diagram once, then begin again at the start and work the entire diagram one more time.

Chain stitches are slightly narrower than other stitches and to avoid working the cast-on edge too tight, we simply chain more stitches to begin with. The stitch count will be adjusted on the following row to fit the pattern and measurement sketch.

The rib edge is more elastic and will contract slightly compared to, for example, stocking stitch. By increasing before the rib edge, you avoid a visible difference in width between the rib edge and the rest of the body.

It’s very easy to cast off too tightly, and by making yarn overs while casting off (and simultaneously casting these off) you avoid a too tight cast off edge.

See DROPS video: How to bind off with yarn overs (yo)

To achieve an even increase (or decrease) you can increase on, for example: every 3rd and 4th row alternately, like so: work 2 rows and increase on the 3rd row, work 3 rows and increase on the 4th. Repeat this until the increase is complete.

See DROPS lesson: Increase or decrease 1 st on every 3rd and 4th row alternately

Should you prefer to work in the round instead of back and forth, you may of course adjust the pattern. You’ll need to add steeks mid-front (usually 5 stitches), and follow the instructions. When you would normally turn and work from the wrong side, simply work across the steek and continue in the round. At the end you’ll cut the piece open, pick up stitches to work bands, and cover the cut edges.

See DROPS video: How to knit steeks and cut open

Should you prefer to work back and forth instead of in the round, you may of course adjust the pattern so you work the pieces separately and then assemble them at the end. Divide the stitches for the body in 2, add 1 edge stitch in each side (for sewing) and work the front and back pieces separately.

See DROPS lesson: Can I adapt a pattern for circular needles into straight needles?

Pattern repeats can vary slightly in the different sizes, in order to get the correct proportions. If you’re not working the exact same size as the garment in the photo, yours might deviate slightly. This has been carefully developed and adjusted so that the complete impression of the garment is the same in all sizes.

Make sure to follow instructions and diagrams for your size!

If you have found a pattern you like which is available in women’s size it’s not very difficult to convert it to men’s size. The biggest difference will be the length of sleeves and body. Start working on the women size that you think would fit across the chest. The additional length will be worked right before you cast off for the armhole/sleeve cap. If the pattern is worked top-down you can add the length right after the armhole or before the first decrease on sleeve.

Regarding additional yarn amount, this will depend on how much length you add, but it is better with a skein too many than too few.

All yarns will have excess fibres (from production) that might come off as lint or shedding. Brushed yarns (ie hairier yarns) have more of these loose, excess fibres, causing more shedding.

Shedding also depends on what is worn under or over the garment, and whether this pulls at the yarn fibres. It’s therefore not possible to guarantee that there will be no shedding

Below are some tips on how to get the best result when working with hairier yarns:

1. When the garment is finished (before you wash it) shake it vigorously so the looser hairs come off. NOTE: do NOT use a lint roller, brush or any method that pulls at the yarn.

2. Place the garment in a plastic bag and put it in your freezer - the temperature will cause the fibres to become less attached to each other, and excess fibres will come off easier.

3. Leave in the freezer for a few hours before taking it out and shaking it again.

4. Wash the garment according to the instructions on the yarn label.

Pilling is a natural process that happens to even the most exclusive of fibers. It's a natural sign of wear and tear that is hard to avoid, and that is most visible in high friction areas of your garment like a sweater's arms and cuffs.

You can make your garment look as new by removing the pilling, using a fabric comb or a pill/lint remover.

Still can't find the answer you need? Then scroll down and leave your question so one of our experts can try to help you. This will be done normally within 5 to 10 working days.
In the meantime, you can read the questions and answers that others have left to this pattern or join the DROPS Workshop on Facebook to get help from fellow knitters/crocheters!

You might also like...

Post a comment to pattern DROPS 201-27

We would love to hear what you have to say about this pattern!

If you want to leave a question, please make sure you select the correct category in the form below, to speed up the answering process. Required fields are marked *.

Comments / Questions (39)

country flag Hester Martin wrote:

This is beautifull

25.04.2020 - 16:10

country flag Gaby wrote:

Hallo, ich möchte gerne diesen Bolero stricken (Sweet Angel by DROPS Design Gestrickter Bolero mit Verschiebungen in DROPS Alpaca und DROPS Kid-Silk)., bin mir aber bei den Farben nicht so sicher, welcher Blauton am besten passt. Farbtyp Sommer. Trage viel in rosa, helles pink, hell- und dunkelblau. Welche Farbe würden Sie mir empfehlen. Auf dem Bild sieht man das nicht so richtig. Viele Grüße!

16.03.2020 - 21:22

DROPS Design answered:

Liebe Gaby, gerne bekommen Sie individuelle Hilfe direkt von Ihrem DROPS Laden - auch telefonisch oder per E-Mail. Viel Spaß beim stricken!

17.03.2020 - 09:55

country flag Aissela Laudo wrote:

Avete un video di come si confeziona questo modello?ho aumentato le prime 24 maglie del bordo, ma poi non capisco come continuare

06.03.2020 - 16:50

country flag Basina wrote:

Can this pattern be worked with alpaca only, no kid-silk yarn? What effect will ot have ?

05.03.2020 - 16:07

country flag Alessia Laudo wrote:

Scrivete "Lavorare 1 COSTA – poi lavorare 1 ferro rovescio. Ora lavorare il motivo " ma il motivo partirebbe allora da un ferro pari cioè rovescio ( 1° primo ferro della costa, 2° secondo ferro costa,3° ferro a rovescio). Ma lo schema A1 parte con riga sul diritto. Sbaglio? Come devo fare? Grazie!

15.02.2020 - 20:04

DROPS Design answered:

Buongiorno Alessia. Provi a lavorare due coste a legaccio, così la prima riga del diagramma viene lavorata sul diritto. Buon lavoro!

17.02.2020 - 14:37

country flag Alessia Laudo wrote:

Scrivete "Lavorare 1 COSTA – poi lavorare 1 ferro rovescio. Ora lavorare il motivo " ma il motivo partirebbe allora da un ferro pari cioè rovescio ( 1° primo ferro della costa, 2° secondo ferro costa,3° ferro a rovescio). Ma lo schema A1 parte con riga sul diritto. Sbaglio? Come devo fare? Grazie!

15.02.2020 - 20:03

country flag Claude Perrin wrote:

Bonjour, j'ai déjà fait le modèle sweet angel plusieurs fois pour mes filles et j'aimerais en faire un pour moi. J'aime beaucoup la laine kid's silk en marine et j'aimerais savoir quelle laine alpaca il faut que je prenne pour avoir la même teinte. Merci pour votre réponse et vos explications de tricot gratuites !. Cordialement

21.12.2019 - 11:53

DROPS Design answered:

Bonjour Mme Perrin, et merci pour votre fidélité. Pour toute aide au choix d'une couleur, nous vous invitons à contacter votre magasin DROPS, même par mail ou téléphone. Bon tricot!

02.01.2020 - 09:26

country flag Ebon wrote:

Hi, The pattern says knit one ridge then one row in purl then start into the pattern. If you look at the photo of the back of the piece it looks like there are several rows of stockinette stitch before the pattern starts. Should the pattern start right after the purl row?

26.11.2019 - 03:32

DROPS Design answered:

Hi Ebon! Yes, the pattern starts after the purl row. It might be a bit tricky to see, but the pattern starts immediately after the purl row. Happy knitting!

26.11.2019 - 08:28

country flag Eva Schmidt wrote:

Kan ikke få mønster til at passe på 7 række ,i start af mønster. vrangmaskerne de skal være forskudt , før omslag. Og efter omslag, sidst i mønster. Mine er over hinanden på . Det vil sige de er lige over hinanden hele vejen igennem mønsteret. ???

29.07.2019 - 09:13

DROPS Design answered:

Hej Eva, på 7. pind har du 4 retmasker efter 3.vrangmaske (i og med du strikker 3.4.5 retmaske sammen til én maske). Du kommer ikke til at kunne se de forskudte masker (da de trækkes på skrå) men det som er vigtigt er at de yderste og inderste vrangmasker er over hinanden hele tiden. Prøv evt at lave en prøve, med kun denne ene rapport 2 gange efter hinanden, så vil du kunne se helheden. God fornøjelse!

29.07.2019 - 14:13

country flag Bleyl Edeltraud wrote:

Im Mustersatz Reihe 7, nach 3 M re zus.,weiter wie vorgegeben und li .M sind nicht versetzt, weiteres Muster nicht realisierbar.(laut Schrift alles ok. HILFE Danke!

18.06.2019 - 21:57

DROPS Design answered:

Liebe Frau Bleyl, bei der 7. Reihe und den 3 M re zusammen stricken Sie die nächsten 13 Maschen wie zuvor = li über li und re über re (= 1 M re, 1 M li, 2 M re, 1 M li, 2 M re, 1 M li, 2 M re, 1 M li, 1 M re und 1 M re (anstatt li), dann 2 Umschläge usw. Diese Bündchen werden nach und nach versetzt, gleichfalls im 2. Teil vom Diagram, nach doppeltem Umschlag stricken Sie 2 M re (= 1 M re anstatt li + 1 M re wie zuvor), 1 M li, 2 M re, 1 M li, 2 M re, 1 M li, 2 M re, 1 M li, 1 M re, dann die Abnahme. Viel Spaß beim stricken!

19.06.2019 - 07:20