
Popular categories
Looking for a yarn?


|
|||||||||||||||||||||||||||||||||||||
Sandy Shores |
|||||||||||||||||||||||||||||||||||||
|
|
|||||||||||||||||||||||||||||||||||||
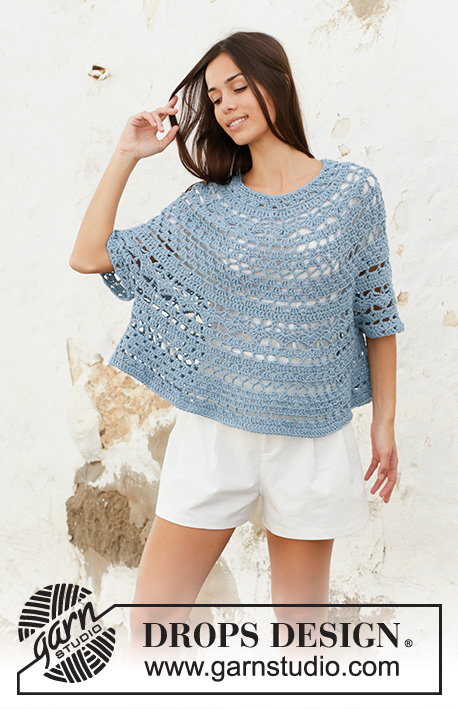
Crocheted dress with round yoke in DROPS Cotton Merino. Piece is crocheted top down with lace pattern, buttons and pockets. Size: S - XXXL
DROPS 199-17 |
|||||||||||||||||||||||||||||||||||||
|
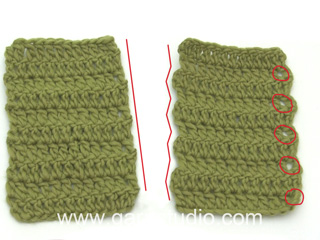
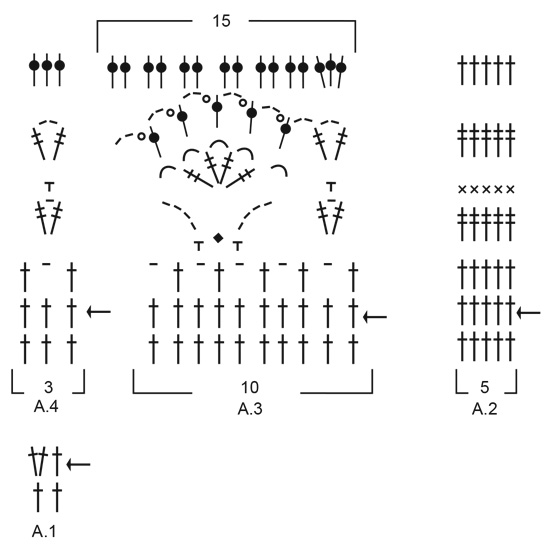
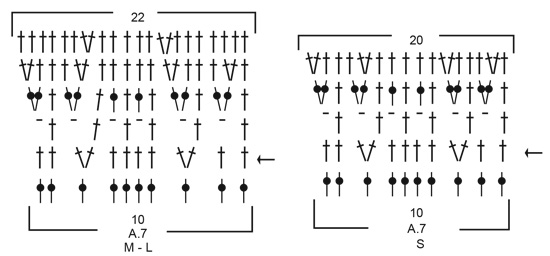
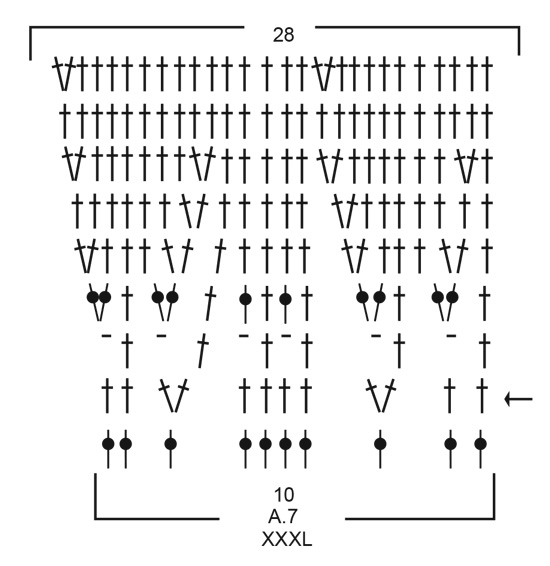
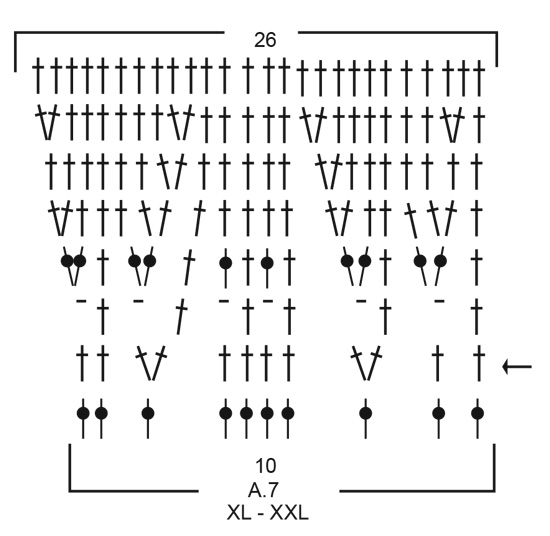
---------------------------------------------------------- EXPLANATION FOR THE PATTERN: ---------------------------------------------------------- PATTERN: See diagrams A.1 to A.11. Choose diagram for your size (applies to A.7). Begin to work on row with arrow in diagrams. CROCHET INFORMATION: On every row with double crochets replace first double crochet on row with 3 chain stitches. On every row with treble crochets replace first treble crochet on row with 4 chain stitches. On every row with single crochet replace first single crochet with 1 chain stitch. INCREASE TIP-1 (evenly): To calculate how to increase evenly, count the stitches to be increased (e.g. 133 stitches) and divide this number by stitches of increases to be done (e.g. 7) = 19. In this example increase by working 2 double crochets in every 19th stitch. INCREASE TIP-2: Increase 1 double by working 2 doublesin one stitch. BAND: Then work 1 double crochet in each of the 5 stitches for band, but on rows with treble crochets in A.8, work treble crochets in band instead of double crochets – remember CROCHET INFORMATION. DECREASE TIP: * Make 1 yarn over, insert hook in next stitch, get yarn, make 1 yarn over and pull yarn through the 2 first loops on hook *, repeat from *-* 1 more time, make 1 yarn over and pull yarn through all 3 loops on hook (= 1 double crochet decreased). BUTTONHOLES: Work buttonholes on right band (when garment is worn). Work buttonholes by replacing 4th double crochet from edge with 1 chain stitch. On next row work 1 double crochet around chain stitch. Work first buttonhole at end of 1st row on yoke. Then work the next 9 buttonholes approx. 7½-7½-8-8-8½-8½ cm = 2⅞"-2⅞"-3⅛"-3⅛"-3¼"-3¼" apart – adjust so that buttonholes are on a row with double crochets and not on a row with treble crochets or single crochets). ---------------------------------------------------------- START THE PIECE HERE: ---------------------------------------------------------- DRESS WITH BUTTONS - SHORT OVERVIEW OF THE PIECE: Piece is worked back and forth, top down. Work sleeves back and forth and fasten under sleeve with 1 slip stitch at the end of round. DRESS: YOKE: Work 138-142-147-153-159-166 chain stitches on hook size 4 mm = US 6 with Cotton Merino. Turn and work as follows. ROW 1 (right side): Remember BUTTONHOLES at the end of this row - read explanation above. Work 1 double crochet in 4th chain stitch from hook, * skip 1 chain stitch, work 1 double crochet in each of the next 5 chain stitches *, work from *-* 22-22-23-24-25-26 times in total, work 1 double crochet in each of the remaining 2-6-5-5-5-6 chain stitches on row = 114-118-122-127-132-138 double crochets. ROW 2: Work 1 double crochet in each of the first 15-16-17-18-17-17 double crochets - read CROCHET INFORMATION, A.1 (= 2 double crochets increased to 3) over the next 14-14-14-14-16-18 double crochets (= 7-7-7-7-8-9 double crochets increased), work 1 double crochet in each of the next 4 double crochets, A.1 over the next 14-14-14-14-16-18 double crochets (= 7-7-7-7-8-9 double crochets increased), work 1 double crochet in each of the next 20-22-25-27-26-24 double crochets, A.1 over the next 14-14-14-14-16-18 double crochets (= 7-7-7-7-8-9 double crochets increased), work 1 double crochet in each of the next 4 double crochets, A.1 over the next 14-14-14-14-16-18 double crochets (= 7-7-7-7-8-9 double crochets increased), work 1 double crochet in each of the remaining 15-16-17-18-17-17 double crochets = 142-146-150-155-164-174 double crochets. REMEMBER THE CROCHET GAUGE! Sizes S and M are done, continue from next section below. In size L, XL, XXL and XXXL work as follows: Work 1 double crochet in each of the next 28-27-29-32 double crochets, A.1 over the next 6-8-8-8 double crochets (= 3-4-4-4 double crochets increased), work 1 double crochet in each of the next 12 double crochets, A.1 over the next 6-8-8-8 double crochets (= 3-4-4-4 double crochets increased), work 1 double crochet in each of the next 46-45-50-54 double crochets, A.1 over the next 6-8-8-8 double crochets (= 3-4-4-4 double crochets increased), work 1 double crochet in each of the next 12 double crochets, A.1 over the next 6-8-8-8 double crochets (= 3-4-4-4 double crochets increased), work 1 double crochet in each of the remaining 28-27-29-32 double crochets = 162-171-180-190 double crochets. Last row worked is from right side. Cut the yarn so that next row is also from the right side (= 2 rows from right side after each other). This is done so that bobbles on pattern later in piece is on the right side). All sizes: Now work pattern as follows (from right side): Work A.2 (= band), A.3 until 8 double crochets remain on row, at the same time increase 1-7-1-2-3-3 double crochets evenly – read INCREASE TIP-1, A.4 over the next 3 double crochets, finish with A.2 over the remaining 5 double crochets on row (= band). There are now 143-153-163-173-183-193 double crochets on row and there is room for 13-14-15-16-17-18 repetitions A.3 in width between A.2/A.4. Continue until diagrams have been worked vertically but on last row in diagram increase 1-0-1-0-1-0 double crochets on row – read INCREASE TIP-2 = 209-223-239-253-269-283 double crochets on row. Now work as follows: Work 1 double crochet in each of the first 5 double crochets (= band), work A.5 over the next stitch, A.6 over the next 28-32-34-38-40-44 double crochets, A.7 (choose diagram for your size) over the next 10 double crochets, A.6 over the next 22-22-24-26-26-28 double crochets, A.7 (choose diagram for your size) over the next 10 double crochets, A.6 over the next 58-64-72-74-86-88 double crochets, A.7 (choose diagram for your size) over the next 10 double crochets, A.6 over the next 22-22-24-26-26-28 double crochets, A.7 (choose diagram for your size) over the next 10 double crochets, A.6 over the next 28-32-34-38-40-44 double crochets, 1 double crochet in each of the next 5 double crochets. Continue back and forth like this until diagrams have been worked vertically. There are now 249-271-287-317-333-355 doubles on row. Now work with 1 double crochet in every double crochet until piece measures 14-16-18-20-22-24 cm = 5½"-6¼"-7"-8"-8¾"-9½" (It remains 1 row on yoke + 1 row with double crochets for neck edge at the end), AT THE SAME TIME on last row increase 6-15-23-16-20-27 double crochets evenly = 255-286-310-333-353-382 double crochets. Work next row as follows: Work 1 double crochet in each of the first 38-41-44-49-54-58 double crochets (= half front piece), work 8-8-10-10-12-14 loose chain stitches, skip the next 57-65-72-76-79-83 double crochets (= sleeve), work 1 double crochet in each of the next 65-73-77-87-95-105 double crochets (= back piece), work 8-8-10-10-12-14 loose chain stitches, skip 57-65-72-76-79-83 double crochets (= sleeve), work 1 double crochet in each of the remaining 38-41-44-49-54-58 double crochets (= half front piece). Yoke now measures approx. 15-17-19-21-23-25 cm = 6"-6¾"-7½"-8¼"-9"-9¾" from neck edge and down along band. BODY: Work 1 double crochet in every double crochet and 1 double crochet in each of the 8-8-10-10-12-14 new chain stitches under each sleeve = 157-171-185-205-227-249 double crochets. Now work pattern back and forth as follows: Work 1 double crochet in each of the first 5 double crochets (= band), work A.8 until 6 stitches remain, work first stitch in A.8, 1 double crochets in each of the remaining 5 double crochets (= band). Continue back and forth like this, at the same time work BAND – read explanation above, and on rows with white stars decrease stitches evenly – read DECREASE TIP, as follows: Star-1: Decrease 6-6-6-6-6-6 stitches evenly = 151-165-179-199-221-243 stitches. Star-2: Decrease 4-4-4-6-6-6 double crochets evenly = 147-161-175-193-215-237 stitches. On row with black star increase 6-6-6-6-6-6 double crochets evenly (but not over the 5 double crochets in band in each side) = 153-167-181-199-221-243 stitches. Increase like this approx. every 2 cm = ¾" 10-10-10-10-11-12 times in total = 207-221-235-253-281-309 stitches. When A.8 has been worked vertically, continue with double crochets until piece measures 52 cm = 20½". Work 1 row while increasing 4-2-4-2-6-2 double crochets evenly = 211-223-239-255-287-311 double crochets. Now work an edge as follows: A.9 (= band), A.10 until 6 double crochets remain on row, A.11 over next double crochet, finish with A.9 (= band). Continue back and forth like this until diagrams have been worked vertically. Cut and fasten the yarn. Piece measures approx. 80-82-84-86-88-90 cm = 31½"-32¼"-33"-33⅞"-34⅝"-35½" from shoulder and down. SLEEVE: Work in the round but turn on every round and work back and forth on round the make the texture the same the entire way. At beginning of round replace first double crochet with 3 chain stitches, finish round with 1 slip stitch in 3rd chain stitch at beginning of round Begin by working mid under sleeve. Begin in 5th-5th-6th-6th-7th-8th chain stitch of the 8-8-10-10-12-14 chain stitches worked under sleeve. Remember CROCHET INFORMATION. ROUND 1: Work 1 double crochet in each of the first 4-4-5-5-6-7 chain stitches, work 1 double crochet in each of the double crochets over sleeve (= 57-65-72-76-79-83 double crochets), work 1 double crochet in each of the 4-4-5-5-6-7 chain stitches = 65-73-82-86-91-97 double crochets. ROUND 2: Work 1 double crochet in every double crochet. ROUND 3: Work 1 double crochet in each of the first 22-22-21-23-23-24 double crochets, work 2 and 2 double crochets together – remember DECREASE TIP, over the next 22-30-42-42-46-50 double crochets (= 11-15-21-21-23-25 double crochets decreased), work 1 double crochet in each of the remaining double crochets on round = 54-58-61-65-68-72 double crochets. ROUND 4: Work 1 double crochet in every double crochet. Cut and fasten the yarn. Work the other sleeve the same way. POCKETS: Work 29 chain stitches on hook size 4 mm = US 6 with Cotton Merino. Work 1 double crochet in 4th chain stitch from hook (= 2 double crochets), work 1 double crochet in next chain stitch, * skip 1 chain stitch, work 1 double crochet in each of the next 5 chain stitches *, repeat from *-* the entire row = 23 double crochets. Continue to work back and forth like this until pocket measures approx. 13 cm = 5⅛". Cut and fasten the yarn. Work another pocket the same way. Place pocket approx. 8-9-10-11-12-13 cm = 3⅛"-3½"-4"-4⅜"-4¾"-5½" from edge on band and with upper edge on pocket approx. 24 cm = 9½" from division. Fasten pockets with small invisible stitches. Repeat in the other side. NECK EDGE: Begin in first stitch from right side and work a row with double crochets as follows: Work 1 double crochet in each chain stitch, but skip chain stitches skipped on first row on yoke = 114-118-122-127-132-138 double crochets. Cut and fasten the yarn. ASSEMBLY: Sew the buttons on to left band. |
|||||||||||||||||||||||||||||||||||||
Diagram explanations |
|||||||||||||||||||||||||||||||||||||
|
|||||||||||||||||||||||||||||||||||||
|
|||||||||||||||||||||||||||||||||||||

|
|||||||||||||||||||||||||||||||||||||
|
|||||||||||||||||||||||||||||||||||||
|
|||||||||||||||||||||||||||||||||||||
|
|||||||||||||||||||||||||||||||||||||

|
|||||||||||||||||||||||||||||||||||||

|
|||||||||||||||||||||||||||||||||||||

|
|||||||||||||||||||||||||||||||||||||
|
Have you made this or any other of our designs? Tag your pictures in social media with #dropsdesign so we can see them! Do you need help with this pattern?You'll find tutorial videos, a Comments/Questions area and more by visiting the pattern on garnstudio.com. © 1982-2024 DROPS Design A/S. We reserve all rights. This document, including all its sub-sections, has copyrights. Read more about what you can do with our patterns at the bottom of each pattern on our site. |
|||||||||||||||||||||||||||||||||||||


With over 40 years in knitting and crochet design, DROPS Design offers one of the most extensive collections of free patterns on the internet - translated to 17 languages. As of today we count 304 catalogs and 11422 patterns - 11417 of which are translated into English (US/in).
We work hard to bring you the best knitting and crochet have to offer, inspiration and advice as well as great quality yarns at incredible prices! Would you like to use our patterns for other than personal use? You can read what you are allowed to do in the Copyright text at the bottom of all our patterns. Happy crafting!
Comments / Questions (17)
Hi I don't understand where the 5th bobble should be crocheted (row 5 on A3) because it says to do it on a treble but there are only 4 of them? Also the names in English deviate from the norm, double crochet instead of single, etc. Thank you anyways this pattern is so beautiful :)
10.01.2023 - 18:19DROPS Design answered:
Dear Mrs Marjamäki, make sure first you are reading appropariate English since UK- and US- get different crochet terminology (click on the scroll down menu below the picture to edit language). The bobles on this row are worked around the treble (UK)/double crochet (US) you just workedbefore (= 1 treble/dc around the ch-space, 1 boble around this treble). Happy crocheting!
11.01.2023 - 09:23Hallo, er staat geschreven dat de pas in hoogte 14 cm meer. Het is mij niet duidelijk of dit met halsrand en laatste toer is of zonder deze beide?
27.01.2021 - 13:31DROPS Design answered:
Dag Brigitte,
Als er een hoogte wordt aangegeven is dit altijd vanaf de opzetnaald, tenzij anders omschreven. In dit geval dus ook vanaf het opzetten en tot waar er aangegeven wordt dat het werk 14 cm meet. Dus als er staat 'het werk meet 14 cm, dan zou het werk op dat moment in het patroon 14 cm moeten meten.
31.01.2021 - 19:57Jag håller på att virka själva mönstret till detta plagg. Svårt mönster att riktigt förstå. En viktig fråga är: när jag har virkat varv från rätsidan (höger sida på mönstret) och skall börja att virka tillbaka (baksidan) vänster sida på mönstret, skall jag då fortsätta att virka från höger igen på mönstret (rätsidan) eller skall jag börja virka från vänster mot höger? Avvaktar svar snarast. Vänligen Lena Hammarsund
03.12.2020 - 18:38DROPS Design answered:
Hej Lena, her ser du tydeligt hvordan du gør: Hur man läser virkdiagram :)
09.12.2020 - 14:50Förstår ej hur jag gör under ärmen. När jag virkat dom första 4 stolparna under ärmen så kommer jag inte vidare till den första av dom 65 stolparna utan att det blir ett stort hål. (alltså ett hål mellan 4 stolpen under ärmen o den första av dom 65 stolparna.. ) Jag kan skicka en bild hur det ser ut om det behövs. TACK!
15.12.2019 - 17:10DROPS Design answered:
Hej Ingegerd, Vi kan inte se var du är i mönstret, men se vår video hur du delar vid ärmerna:
How to crochet the body under round yoke from Garnstudio Drops design on Vimeo.
17.12.2019 - 13:34On A.3 row 4, what does the symbol between the sc stand for?
17.08.2019 - 19:41DROPS Design answered:
Dear Willa, this symbol is the 3rd from diagram key = 6 chain stitches. Happy crocheting!
19.08.2019 - 09:49Comment gère ton les espacement dans A3.A2 une maille dans chaque maille mais dans A3 elles sont espacées et on ne voit pas de ma en l'air. merci
23.05.2019 - 22:43DROPS Design answered:
Bonjour Mme Loup, vous trouverez ici comment lire des diagrammes - dans A.3 on crochète des mailles en l'air (soit 1 = 1er symbole au 1er rang par ex), soit plusieurs (avec le même symbole) soit représentées par le 2ème et le 3ème symbole de la légende. Bon crochet!
24.05.2019 - 07:48Bonjour, je voulais juste signaler que ce modèle est dans les tricots mais c'est du crochet !
29.04.2019 - 17:53DROPS Design answered:
Bonjour Fabienne et merci pour votre retour, l'icône va être modifiée. Bon crochet!
30.04.2019 - 10:19Var finns mönstret för A10? saknar det i beskrivningen.
21.04.2019 - 16:26DROPS Design answered:
Hej. Nu finns samtliga diagram till mönstret (A.1 - A.11) längst ner på sidan. Mvh DROPS Design
23.04.2019 - 10:14Where are the diagrams A.9, A.10 and A.11? They all are necessary to finish the dress.
15.04.2019 - 10:28DROPS Design answered:
Witaj Joanno! Dziękuję za zwrócenie uwagi. Zostało to już zgłoszone, a korekta zostanie naniesiona po świętach, najwcześniej 23 kwietnia. Pozdrawiamy!
15.04.2019 - 18:39Hvor finder jeg mønster a9 -a11 Mvh Maja
12.04.2019 - 07:26DROPS Design answered:
Hei Maja. Nå skal alle diagrammene være tilgjengelige. Beklager det, og god fornøyelse videre.
23.04.2019 - 13:16