DROPS Muskat
DROPS Muskat
100% Cotton
from 1.85 £ /50g
Get the yarn to make this pattern from 18.50£.

The yarn cost is calculated from the pattern’s smallest size and the yarn’s cheapest product type. Looking for an even better price? You might find it on the DROPS Deals!

DROPS SS24

Sea Shell

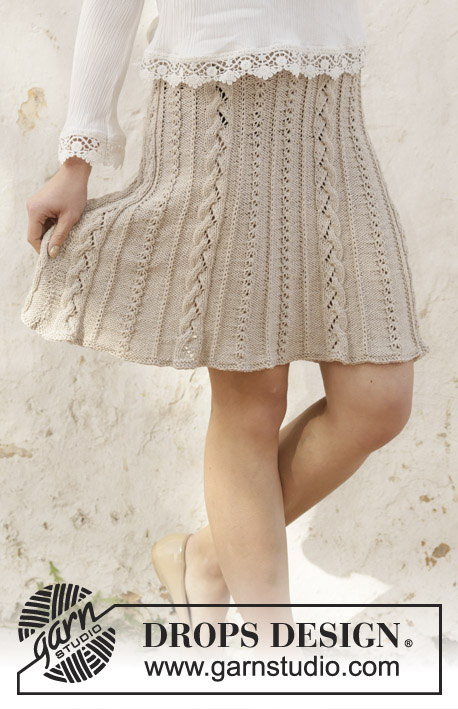
Crocheted skirt with puff stitches and fan edge. Piece is crocheted top down in DROPS Muskat. Size: S - XXXL

DROPS 202-41
DROPS design: Pattern r-739
Yarn group B
----------------------------------------------------------

SIZE:
S - M - L - XL - XXL - XXXL

MATERIALS:
DROPS MUSKAT from Garnstudio (belongs to yarn group B)
500-550-600-700-750-800 g colour 03, mint green

CROCHET TENSION:
18 treble crochets in width and 9 rows vertically = 10 x 10 cm.
A.X measures approx. 3 cm in width.

CROCHET HOOK:
DROPS CROCHET HOOK SIZE 4 mm
Hook size is only a suggestion! If you have too many stitches on 10 cm switch to larger hook. If you have too few stitches on 10 cm switch to smaller hook.

DROPS MOTHER-OF-PEARL BUTTON, loop (white), NO 523: 5 pieces for all sizes

----------------------------------------------------------

-------------------------------------------------------

Alternative Yarn – See how to change yarns here
Yarn Groups A to F – Use the same pattern and change the yarn here
Yarn usage using an alternative yarn – Use our yarn converter here

-------------------------------------------------------

DROPS Muskat
DROPS Muskat
100% Cotton
from 1.85 £ /50g
Get the yarn to make this pattern from 18.50£.

The yarn cost is calculated from the pattern’s smallest size and the yarn’s cheapest product type. Looking for an even better price? You might find it on the DROPS Deals!

Pattern instructions

NOTE: This pattern is written in British English. All measurements in charts are in cm. For conversion from cm to inches - click here. There are different terms for crocheting in British and American English. If this pattern includes crochet, click for "crochet terms" here. For this pattern in American English, please click here.
----------------------------------------------------------

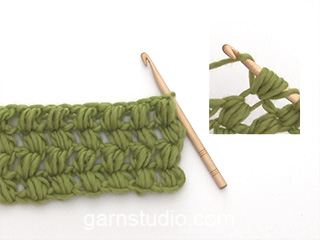
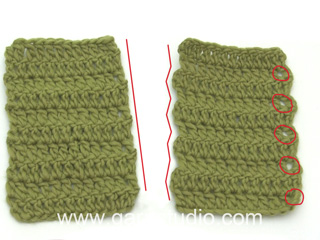
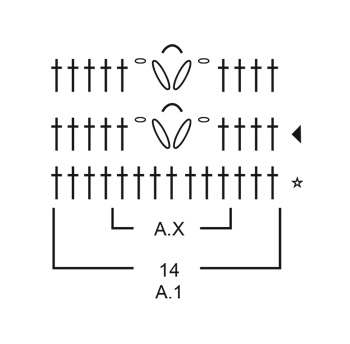
EXPLANATION FOR THE PATTERN:

----------------------------------------------------------

CROCHET INFORMATION:
On every row with double crochets replace first double crochet with 1 chain stitch. Finish row with 1 double crochet in chain stitch from beginning of previous row.
At beginning of every row with treble crochets replace first treble crochet with 3 chain stitches. Finish row with 1 treble crochet in 3rd chain stitch from beginning of previous row.

PATTERN: 
See diagrams A.1 and A.2.
A.X shows puff stitches. When increases begin, increase outside A.X.

INCREASE TIP-1 (evenly):
To calculate how to increase evenly, use the total number of stitches on row (e.g. 130 stitches) and divide stitches by number of increases to be done (e.g. 10) = 13. In this example increase by working 2 treble crochets in every 13th double crochet.

INCREASE TIP-2:
Increase 1 treble crochet in every repetition of A.1 by working 2 treble crochets in same treble crochet, but to make the increase nice and less visible do as follows: On first increase in each repetition of A.1 increase in last treble crochet before A.X. On next increase in each repetition of A.1 increase in first treble crochet after A.X. I.e. increase alternately before and after A.X down the skirt.

----------------------------------------------------------

START THE PIECE HERE:

----------------------------------------------------------

SKIRT - SHORT OVERVIEW OF THE PIECE:
Piece is worked back and forth, top down until finished measurements. Sew side seam. Finally work an edge at the top of skirt and a button hem along the opening at the top of skirt.

SKIRT:
Work 156-173-190-212-238-264 chain stitches on hook size 4 mm with Muskat. Work first row as follows: 1 double crochet in 2nd chain stitch from hook, 1 double crochet in each of the next 4-3-2-0-2-4 chain stitches, * skip 1 chain stitch, 1 double crochet in each of the next 5 chain stitches *, work from *-* the entire row = 130-144-158-176-198-220 double crochets.
Read CROCHET INFORMATION!
Work 1 row with treble crochets (work 1 treble crochet in every double crochet) and increase 10-10-10-20-12-18 treble crochets evenly - read INCREASE TIP-1 = 140-154-168-196-210-238 treble crochets.
Work A.1 back and forth (= 10-11-12-14-15-17 repetitions of 14 stitches). Continue pattern like this. AT THE SAME TIME when piece measures 3 cm, increase 1 treble crochet in every repetition - read INCREASE TIP-2. Increase like this alternately before and after A.X every 3 cm 4 times in total and then every 8-8-9-10-10-10 cm 2 times in total = 200-220-240-280-300-340 stitches on row and 20 stitches in every repetition (i.e. there are more treble crochets on each side of A.X when increasing).
Work until piece measures approx. 36-38-40-42-44-46 cm (or desired length, approx. 10 cm remain until finished measurements). Adjust so that next row is from right side.
Work A.2 back and forth (= 10-11-12-14-15-17 repetitions of 20 stitches). When A.2 has been worked, piece measures approx. 46-48-50-52-54-56 cm on the shortest. Fasten off.

ASSEMBLY:
Sew skirt together in the side - begin at the bottom and sew edge to edge in outer loop of edge stitch to get a flat seam but stop when approx. 10 cm remain at the top of skirt (work buttonhole straps and button hem here later). Cut and fasten the yarn.

EDGE AT THE TOP OF SKIRT:
Work 1 double crochet in every chain stitch where double crochets were worked in first row on skirt = 130-144-158-176-198-220 double crochet. Work 2 rows more with double crochets back and forth. Edge measures approx. 2 cm. Cut and fasten the yarn.

BUTTONHOLE LOOPS:
Along the opening on front piece work buttonhole loops as follows (begin at the bottom): 2 double crochets around a row with treble crochets, 3 chain stitches, skip 1 cm, * work 2 double crochets around next treble crochet row, 3 chain stitches, skip approx. 1 cm *, work from *-* 3 more times and finish with 1 double crochets around each of the last 2 double crochet rows at the top of skirt(= 5 straps for buttonholes). Turn and work as follows: 1 double crochet in every double crochet and 3 double crochet around every chain space. Cut and fasten the yarn.

BUTTON FOLDING EDGE:
Along the other side of opening work 5 rows with double crochets back and forth (on 1st row work 2 double crochet around every treble crochet row and 1 double crochet around every double crochet row), fasten off. Sew the buttons on to the button folding edge.

Diagram

symbols = shows row/round before working this diagram - this row/round has already been worked
symbols = begin here
symbols = 1 chain stitch
symbols = 2 chain stitches
symbols = 3 chain stitches
symbols = 4 chain stitches
symbols = 6 chain stitches
symbols = double crochet around chain space
symbols = treble crochet in treble crochet
symbols = treble crochet around chain stitch/chain space
symbols = 1 PUFF STITCH: * make 1 yarn over, insert hook under chain space/through stitch, make 1 yarn over and pull both yarn overs as long as you can (approx. 2 cm) *, work from *-* 1 more time, make 1 yarn over and pull yarn over through all 5 loops on hook
symbols = work 4 treble crochets together into 1 treble crochet as follows: Work 1 treble crochet in first treble crochet but wait with last pull through (= 2 loops on hook), work 1 treble crochet in each of the next 2 treble crochets the same way, then work 1 treble crochet in next treble crochet but on last pull through, pull yarn through all 5 loops on hook
symbols = work the last chain space in repetition at the end of all repetitions, except on last repetition on row, i.e. finish row with 1 double crochet, 4 chain stitches and 1 double crochet around last chain space
diagram
diagram
diagram
Do you have a question? See a list of frequently asked questions (FAQ)

Knitting tension is what determines the final measurements of your work, and is usually measured per 10 x 10 cm. It is provided like so: number of stitches in width x number of rows in height - eg: 19 stitches x 26 rows = 10 x 10 cm.

The knitting tension is very individual; some people knit/crochet loosely while others work tightly. You adjust the knitting tension with the needle size, which is why the suggested needle size is only meant as a guide! You need to adjust this (up or down) to ensure that YOUR knitting tension matches the knitting tension provided in the pattern. If you work with a different knitting tension than provided you will have a different yarn consumption, and your work will have different measurements than what the pattern suggests.

The knitting tension also determines which yarns can replace each other. As long as you achieve the same knitting tension you can replace one yarn with another.

See DROPS lesson: How to measure your tension/gauge

See DROPS video: How to make a gauge tension swatch

The required amount of yarn is provided in grams, eg: 450 g. To calculate how many balls you’ll need you first need to know how many grams are in 1 ball (25g, 50g or 100g). This information is available if you click on the individual yarn quality on our pages. Divide the amount required with the amount of each ball. For example, if each ball is 50g (the most common amount), the calculation will be as follows: 450 / 50 = 9 balls.

The important thing when changing from one yarn to another is that the knitting/crochet tension remains the same. This is so that the measurements of the finished piece will be the same as on the sketch provided. It is easier to achieve the same knitting tension using yarns from the same yarn group. It is also possible to work with multiple strands of a thinner yarn to achieve the knitting tension of a thicker one. Please try our yarn converter. We recommend you to always work a test swatch.

Please NOTE: when changing yarn the garment might have a different look and feel to the garment in the photo, due to individual properties and qualities of each yarn.

See DROPS lesson: Can I use a different yarn than the one mentioned in the pattern?

All our yarns are categorised into yarn groups (from A to F) according to thickness and knitting tension – group A contains the thinnest yarns and group F the thickest. This makes it easier for you to find alternative yarns to our patterns, should you wish to switch yarn. All yarns within the same group have a similar knitting tension and can easily replace each other. However, different yarn qualities have different structures and properties which will give the finished work a unique look and feel.

Click here for an overview of the yarns in each yarn group

At the top of all our patterns you’ll find a link to our yarn calculator, which is a helpful tool should you wish to use a different yarn than suggested. By filling in the yarn quality you wish to replace, the amount (in your size) and number of strands, the calculator will present good alternative yarns with the same knitting tension. Additionally it will tell you how much you’ll require in the new qualities and whether you’ll need to work with multiple strands. Most skeins are 50g (some are 25g or 100g).

If the pattern is worked with multiple colours, every colour will have to be calculated separately. Similarly, if the pattern is worked with several strands of different yarns (for example 1 strand Alpaca and 1 strand Kid-Silk) you will have to find alternatives for each, individually.

Click here to see our yarn calculator

Since different yarns have different qualities and textures we have chosen to keep the original yarn in our patterns. However, you can easily find options among our available qualities by using our yarn calculator, or simply pick a yarn from the same yarn group.

It is possible that some retailers still have discontinued yarns in stock, or that someone has a few skeins at home that they would like to find patterns for.

The yarn calculator will provide both alternative yarn as well as required amount in the new quality.

If you think it's hard to decide what size to make, it can be a good idea to measure a garment you own already and like the size of. Then you can pick the size by comparing those measures with the ones available in the pattern's size chart.

You'll find the size chart at the bottom of the pattern.

See DROPS lesson: How to read size chart

The needle size provided in the pattern serves only as a guide, the important thing is to follow the knitting tension. And since knitting tension is very individual, you will have to adjust the needle size to ensure that YOUR tension is the same as in the pattern – maybe you’ll have to adjust 1, or even 2 needle sizes, up or down to achieve the correct tension. For this, we recommend that you work test swatches.

Should you work with a different knitting tension than the one provided, the measurements of the finished garment might deviate from the measurement sketch.

See DROPS lesson: How to measure your tension/gauge

See DROPS video: How to make a tension/gauge swatch

Working a garment top-down provides more flexibility and room for personal adjustment. For example it is easier to try the garment on while working, as well as making adjustments to length of yoke and shoulder caps.

The instructions are carefully explaining every step, in the correct order. Diagrams are adjusted to the knitting direction and are worked as usual.

The diagram depicts all rows/rounds, and every stitch seen from the right side. It is read from bottom to top, from right to left. 1 square = 1 stitch.

When working back and forth, every other row is worked from the right side and every other row is worked from the wrong side. When working from the wrong side, the diagram will have to be worked reversed: from left to right, knit stitches are purled, purl stitches are knit etc.

When working in the round every round is worked from the right side and the diagram are worked from right to left on all rounds.

See DROPS lesson: How to read knitting diagrams

The diagram depicts all rows/rounds, and every stitch seen from the right side. It is worked from bottom to top, from right to left.

When working back and forth every other row is worked from the right side: from right to left and every other row is worked from the wrong side: from left to right.

When working in the round, every row in the diagram are worked from the right side, from right to left.

When working a circular diagram you start in the middle and work your way outwards, counter clockwise, row by row.

The rows usually start with a given number of chain stitches (equivalent to the height of the following stitch), this will either be depicted in the diagram or explained in the pattern.

See DROPS lesson: How to read crochet diagrams

Instructions for working several diagrams after each other on the same row/round, will often be written like so: “work A.1, A.2, A.3 a total of 0-0-2-3-4 times". This means you work A.1 once, then A.2 is worked once, and A.3 is repeated (in width) the number of times provided for your size – in this case like so: S = 0 times, M = 0 times, L=2 times, XL= 3 times and XXL = 4 times.

The diagrams are worked as usual: begin with the first row in A.1, then work the first row in A.2 etc.

See DROPS lesson: How to read knitting diagrams

See DROPS lesson: How to read crochet diagrams

The total width of the garment (from wrist-to-wrist) will be larger in the larger sizes, despite the actual sleeves being shorter. The larger sizes have longer sleeve caps and wider shoulders, so there will be a good fit in all sizes.

The measurement sketch/schematic drawing provides information regarding the full length of the garment. If it’s a jumper or a jacket the length is measured from the highest point on the shoulder closest to the neckline, and straight down to the bottom of the garment. It is NOT measured from the tip of shoulder. Similarly, the length of yoke is measured from the highest point on the shoulder and down to where yoke is split into body and sleeves.

On a jacket measures are never taken along bands, unless specifically stated. Always measure inside band stitches when measuring the length.

See DROPS lesson: How to read a schematic drawing

Diagrams are often repeated on the round or in height. 1 repeat is the diagram the way it appears in the pattern. If it says to work 5 repeats of A.1 in the round, then you work A.1 a total of 5 times after/next to each other in the round. If it says to work 2 repeats of A.1 vertically/in height you work the entire diagram once, then begin again at the start and work the entire diagram one more time.

Chain stitches are slightly narrower than other stitches and to avoid working the cast-on edge too tight, we simply chain more stitches to begin with. The stitch count will be adjusted on the following row to fit the pattern and measurement sketch.

The rib edge is more elastic and will contract slightly compared to, for example, stocking stitch. By increasing before the rib edge, you avoid a visible difference in width between the rib edge and the rest of the body.

It’s very easy to cast off too tightly, and by making yarn overs while casting off (and simultaneously casting these off) you avoid a too tight cast off edge.

See DROPS video: How to bind off with yarn overs (yo)

To achieve an even increase (or decrease) you can increase on, for example: every 3rd and 4th row alternately, like so: work 2 rows and increase on the 3rd row, work 3 rows and increase on the 4th. Repeat this until the increase is complete.

See DROPS lesson: Increase or decrease 1 st on every 3rd and 4th row alternately

Should you prefer to work in the round instead of back and forth, you may of course adjust the pattern. You’ll need to add steeks mid-front (usually 5 stitches), and follow the instructions. When you would normally turn and work from the wrong side, simply work across the steek and continue in the round. At the end you’ll cut the piece open, pick up stitches to work bands, and cover the cut edges.

See DROPS video: How to knit steeks and cut open

Should you prefer to work back and forth instead of in the round, you may of course adjust the pattern so you work the pieces separately and then assemble them at the end. Divide the stitches for the body in 2, add 1 edge stitch in each side (for sewing) and work the front and back pieces separately.

See DROPS lesson: Can I adapt a pattern for circular needles into straight needles?

Pattern repeats can vary slightly in the different sizes, in order to get the correct proportions. If you’re not working the exact same size as the garment in the photo, yours might deviate slightly. This has been carefully developed and adjusted so that the complete impression of the garment is the same in all sizes.

Make sure to follow instructions and diagrams for your size!

If you have found a pattern you like which is available in women’s size it’s not very difficult to convert it to men’s size. The biggest difference will be the length of sleeves and body. Start working on the women size that you think would fit across the chest. The additional length will be worked right before you cast off for the armhole/sleeve cap. If the pattern is worked top-down you can add the length right after the armhole or before the first decrease on sleeve.

Regarding additional yarn amount, this will depend on how much length you add, but it is better with a skein too many than too few.

All yarns will have excess fibres (from production) that might come off as lint or shedding. Brushed yarns (ie hairier yarns) have more of these loose, excess fibres, causing more shedding.

Shedding also depends on what is worn under or over the garment, and whether this pulls at the yarn fibres. It’s therefore not possible to guarantee that there will be no shedding

Below are some tips on how to get the best result when working with hairier yarns:

1. When the garment is finished (before you wash it) shake it vigorously so the looser hairs come off. NOTE: do NOT use a lint roller, brush or any method that pulls at the yarn.

2. Place the garment in a plastic bag and put it in your freezer - the temperature will cause the fibres to become less attached to each other, and excess fibres will come off easier.

3. Leave in the freezer for a few hours before taking it out and shaking it again.

4. Wash the garment according to the instructions on the yarn label.

Pilling is a natural process that happens to even the most exclusive of fibers. It's a natural sign of wear and tear that is hard to avoid, and that is most visible in high friction areas of your garment like a sweater's arms and cuffs.

You can make your garment look as new by removing the pilling, using a fabric comb or a pill/lint remover.

Still can't find the answer you need? Then scroll down and leave your question so one of our experts can try to help you. This will be done normally within 5 to 10 working days.
In the meantime, you can read the questions and answers that others have left to this pattern or join the DROPS Workshop on Facebook to get help from fellow knitters/crocheters!

You might also like...

Post a comment to pattern DROPS 202-41

We would love to hear what you have to say about this pattern!

If you want to leave a question, please make sure you select the correct category in the form below, to speed up the answering process. Required fields are marked *.

Comments / Questions (8)

country flag Zdenka wrote:

Hello, I just started this pattern and I do it in size L. The pattern says to do 12 repetition of 14 stitches but on my 168 stitches the repetitions is more then 12. It came out 15 repetition. I can't find out what I am doing wrong.....?

17.05.2022 - 02:56

DROPS Design answered:

Dear Zdenka, A.1 is worked over 14 sts (= 1 dc (US-crochet terminology) in the next 4 sts, skip 2 sts, 1 ch, in the next st work 1 puff st + 2 ch + 1 puff st, 1 ch, skip 2 sts, 1 dc in the next 5 sts (= 4+2+1+2+5=14 sts worked). Happy crocheting!

17.05.2022 - 09:13

country flag Jeanine Tondu wrote:

Bonjour j'adore vos modeles mais houlala les explications pourtant experte impossible de faire un de vos medeles bien dommage....

14.05.2020 - 14:31

DROPS Design answered:

Bonjour Mme Tondu, Les modèles DROPS sont réalisés par des milliers de personnes dans le monde entier. Nous comprenons toutefois qu’en fonction du pays, les explications puissent être formulées différemment. Nous faisons naturellement en sorte que nos modèles soient compréhensibles. Vous pouvez volontiers poser votre question ici, et pour toute assistance individuelle, vous adresser à votre magasin DROPS, même par mail ou téléphone. Bon crochet!

14.05.2020 - 14:54

country flag Ágnes wrote:

Szuper ! ☺Nagyon jól használható minta és méretleirások. Gratulálok, nagyon profi. További sikeres jó munkát kívánok.

19.05.2019 - 12:13

country flag Fatma Şahin wrote:

It's a beautiful skirt. I will try.

29.04.2019 - 23:01

country flag Insisto Martinez Salas wrote:

Me gusta su página por todas las cosas hermosas que puede uno hacer y me encanta que den pratrones gratis excelente y felicidades

24.04.2019 - 14:36

country flag Elsje Fokkelman wrote:

Me encanta

16.12.2018 - 08:14

country flag Pilar Gonzalez wrote:

Muy juvenil

15.12.2018 - 22:16

country flag Anneli wrote:

Ilus värv ja ilus seelik.

14.12.2018 - 12:08