DROPS Brushed Alpaca Silk
77% Alpaca, 23% Silk
from 3.95 $ /25g
Get the yarn to make this pattern from 27.65$.

The yarn cost is calculated from the pattern’s smallest size and the yarn’s cheapest product type. Looking for an even better price? You might find it on the DROPS Deals!

DROPS SS24

Strawberry Swing

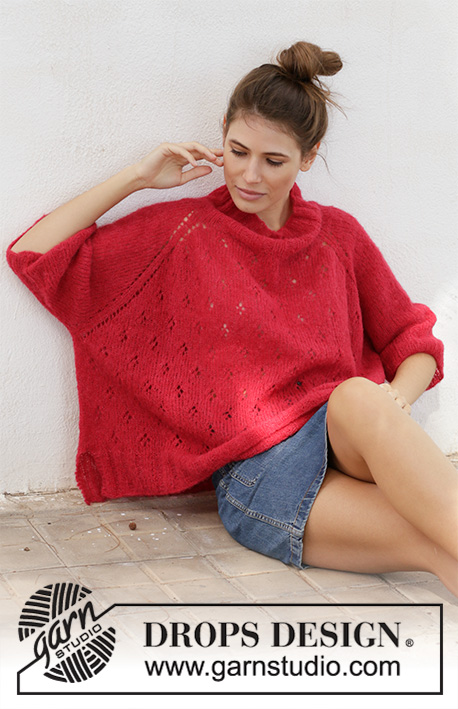
Knitted poncho sweater with raglan in DROPS Brushed Alpaca Silk. Piece is knitted top down with lace pattern. Size: S - XXXL

DROPS 202-19
DROPS design: Pattern as-109
Yarn group C or A + A
----------------------------------------------------------

SIZE:
S - M - L - XL - XXL – XXXL

Finished measurements:
Chest measurements: 154-162-170-180-190-198 cm = 60⅛"-63¾"-66¾"-70¾"-75"-78¾"
Full length: 56-58-60-62-64-66 cm = 22"-22¾"-23⅝"-24⅜"-25¼"-26"

All measurements in charts are in cm.

MATERIALS:
DROPS BRUSHED ALPACA SILK from Garnstudio (belongs to yarn group C)
175-200-225-225-250-275 g color no 07, red

KNITTING GAUGE:
17 stitches in width and 22 rows vertically in stockinette stitch = 10 x 10 cm = 4" x 4".

NEEDLES:
DROPS DOUBLE POINTED NEEDLES SIZE 5 mm = US 8
DROPS CIRCULAR NEEDLE SIZE 5 mm = US 8, length 40 and 80 cm = 16" and 32" for stockinette stitch.
DROPS DOUBLE POINTED NEEDLES SIZE 4 mm = US 6
DROPS CIRCULAR NEEDLE SIZE 4 mm = US 6, length 40 and 60 or 80 cm = 16" and 24" or 32" for rib.
Needle size is only a suggestion! If you have too many stitches on 10 cm = 4" switch to larger needles. If you have too few stitches on 10 cm = 4" switch to smaller needles.

-------------------------------------------------------

Alternative Yarn – See how to change yarns here
Yarn Groups A to F – Use the same pattern and change the yarn here
Yarn usage using an alternative yarn – Use our yarn converter here

-------------------------------------------------------

DROPS Brushed Alpaca Silk
77% Alpaca, 23% Silk
from 3.95 $ /25g
Get the yarn to make this pattern from 27.65$.

The yarn cost is calculated from the pattern’s smallest size and the yarn’s cheapest product type. Looking for an even better price? You might find it on the DROPS Deals!

Pattern instructions

NOTE: This pattern is written in American English. All measurements in charts are in cm. For conversion from inches to cm - click here. There are different terms for crocheting in American and British English. If this pattern includes crochet, click for "crochet terms" here. For this pattern in British English, please click here.
----------------------------------------------------------

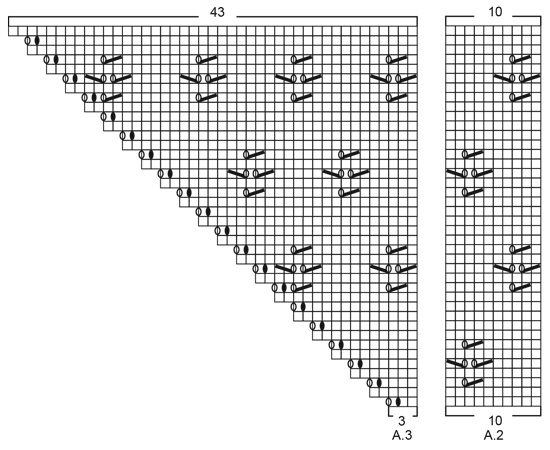
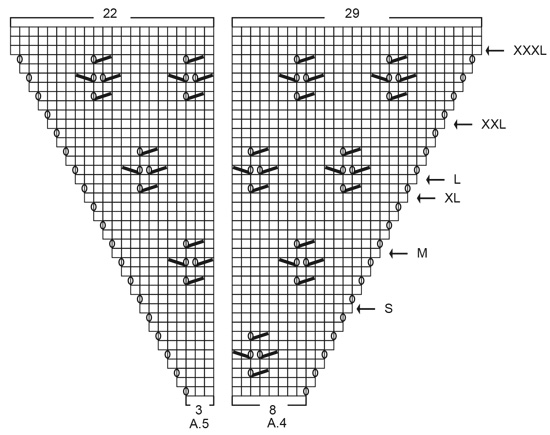
EXPLANATION FOR THE PATTERN:

----------------------------------------------------------

INCREASE/DECREASE TIP (evenly):
To calculate how to increase/decrease evenly, use the total number of stitches on row (e.g. 102 stitches) and divide stitches by number of increases/decreases to be done (e.g. 8) = 12.8.
In this example increase by making 1 yarn over after approx. every 13th stitch. On next round work yarn overs twisted to avoid holes.
If decreasing knit approx. every 12th and 13th stitch together.

PATTERN:
See diagrams A.1 to A.7. Find your size in diagrams (applies to A.4 and A.5).

GARTER STITCH (back and forth):
Knit all rows.
1 ridge vertically = knit 2 rows.

----------------------------------------------------------

START THE PIECE HERE:

----------------------------------------------------------

PONCHO SWEATER - SHORT OVERVIEW OF THE PIECE:
Worked top down. Work neck and yoke in the round. Work body in the round down to vent, then work front piece and back piece back and forth on circular needle. Work sleeves in the round on double pointed needles/a short circular needle.

NECK:
Cast on 102-108-108-114-120-126 stitches on circular needle size 4 mm = US 6 with Brushed Alpaca Silk. Knit 1 round. Then work rib (= knit 3/purl 3) for 11 cm = 4⅜". Knit 1 round while increasing 8-2-2-16-10-4 stitches evenly - read INCREASE/DECREASE TIP = 110-110-110-130-130-130 stitches. Switch to circular needle size 5 mm = US 8 and work yoke as explained below. NOW MEASURE THE PIECE FROM HERE!

YOKE:
Work first round as follows: Work A.1 (= 8 stitches), work A.2 over the next 30-30-30-40-40-40 stitches (= 3-3-3-4-4-4 repetitions of 10 stitches), work A.3 (= 3 stitches), work 2 stitches in stockinette stitch (= raglan line), make 1 yarn over, work 10 stitches in stockinette stitch (= sleeve), make 1 yarn over, work 2 stitches in stockinette stitch (= raglan line), work A.1 (= 8 stitches), work A.2 over the next 30-30-30-40-40-40 stitches (= 3-3-3-4-4-4 repetitions of 10 stitches), work A.3 (= 3 stitches), work 2 stitches in stockinette stitch (= raglan line), make 1 yarn over, work 10 stitches in stockinette stitch (= sleeve), make 1 yarn over, work 2 stitches in stockinette stitch (= raglan line). There are now 122-122-122-142-142-142 stitches on needle.
Continue pattern like this. I.e. on front and back piece increase in each side as shown in A.1 and A.3. On sleeves increase in each side with yarn over on each side of stitches in stockinette stitch. Raglan line is always on 2 stitches in stockinette stitch. Increase like this every other round 25-29-30-32-34-35 times in total, on next round knit yarn overs on sleeves (= holes) and work the increased stitches in stockinette stitch. REMEMBER THE KNITTING GAUGE!
When A.1 to A.3 have been worked 1 time vertically, there are 350-350-350-370-370-370 stitches on needle.
Then work as follows over the 121-121-121-131-131-131 stitches in A.1 to A.3: Work A.4 (= 8 stitches), work A.2 over the next 110-110-110-120-120-120 stitches (= 11-11-11-12-12-12 repetitions of 10 stitches) and work A.5 (= 3 stitches). Continue sleeves as before but when increase is done finish sleeves without increase. To continue the eyelet row along raglan line after increases on sleeves are done, work A.6 (= 2 stitches) over the first 2 stitches after raglan linen and A.7 over the last 2 stitches before raglan line towards sleeve. When you have worked up to round marked with arrow in your size, there are 390-418-438-462-486-506 stitches on needle and piece measures approx. 23-26-29-28-32-35 cm = 9"-10¼"-11⅜"-11"-12½"-13¾". Continue with pattern and stockinette stitch as before but without increases until piece measures 26-28-30-31-33-35 cm = 10¼"-11"-11¾"-12¼"-13"-13¾". To continue the eyelet row along raglan line after all increases are done work A.6 and A.7 the same way as on sleeve.
Work next round as follows: Work 131-137-145-153-161-169 stitches as before (= back piece), slip the next 64-72-74-78-82-84 stitches on 1 stitch holder for sleeve, work 131-137-145-153-161-169 stitches as before (front piece), slip the last 64-72-74-78-82-84 stitches on 1 stitch holder for sleeve. Finish body and sleeves separately. NOW MEASURE THE PIECE FROM HERE.

BODY:
= 262-274-290-306-322-338 stitches. Insert 1 marker thread at the beginning of round, insert 1 marker thread after 131-137-145-153-161-169 stitches. Marker threads mark the sides.
Work 0-3-2-1-0-4 stitches in stockinette stitch, repeat A.2 until 1-4-3-2-1-5 stitches remain before marker thread (= 13-13-14-15-16-16 repetitions of 10 stitches) – adjust to continue pattern on correct row, work 1-7-5-3-1-9 stitches in stockinette stitch (marker thread is between these stitches), repeat A.2 until 1-4-3-2-1-5 stitches remain at beginning of round (= 13-13-14-15-16-16 repetitions of 10 stitches) and work the remaining 1-4-3-2-1-5 stitches in stockinette stitch.
Continue pattern like this until piece measures 18-18-18-19-19-19 cm = 7"-7"-7"-7½"-7½"-7½" from division – adjust to finish after a round between 2 lace patterns vertically. Now divide the piece at the markers and finish front and back piece separately.

BACK PIECE:
= 131-137-145-153-161-169 stitches. Knit 1 row from right side while decreasing 2-2-2-0-2-4 stitches evenly - read INCREASE/DECREASE TIP = 129-135-147-153-159-165 stitches. Switch to circular needle size 4 mm = US 6. Work next row from wrong side as follows: 3 stitches in GARTER STITCH - read explanation above - * purl 3, knit 3 *, repeat from *-* until 6 stitches remain on needle, finish with purl 3 and 3 stitches in garter stitch. Continue rib like this for 8 cm = 3⅛". Bind off with knit over knit and purl over purl (to avoid a tight bind-off edge use circular needle size 5 mm = US 8).

FRONT PIECE:
Work as on back piece.

SLEEVE:
Slip the 64-72-74-78-82-84 stitches from stitch holder in one side of piece on a short circular needle/double pointed needles size 5 mm = US 8. Continue in stockinette stitch until piece measures 12-10-9-8-6-5 cm = 4¾"-4"-3½"-3⅛"-2⅜"-2" from division (shorter measurements in the larger sizes because of wider shoulders and longer sleeve cap). Knit 1 round while increasing 2-0-4-0-2-0 stitches evenly = 66-72-78-78-84-84 stitches. Switch to double pointed needles size 4 mm = US 6. Work rib = knit 3/purl 3 for 8 cm = 3⅛". Bind off with knit over knit and purl over purl (to avoid a tight bind-off edge use needle size 5 mm = US 8). Work the other sleeve the same way.

This pattern has been corrected.

Updated online: 08.04.2019
Correction - BODY: repeat A.2 until 1-4-3-2-1-5 stitches remain at beginning of round (= 13-13-14-15-16-16 repetitions of 10 stitches)

Diagram

All measurements in charts are in cm.

symbols = knit from the right side, purl from the wrong side
symbols = between 2 stitches make 1 yarn over (= hole)
symbols = between 2 stitches make 1 yarn over, on next round work yarn over twisted to avoid holes
symbols = knit 2 together
symbols = slip 1 stitch knitwise, knit 1, pass slipped stitch over stitch worked
symbols = last increase on front piece and back piece
diagram
diagram
diagram
diagram
diagram

Each of our patterns has specific tutorial videos to help you.

Do you have a question? See a list of frequently asked questions (FAQ)

Knitting tension is what determines the final measurements of your work, and is usually measured per 10 x 10 cm. It is provided like so: number of stitches in width x number of rows in height - eg: 19 stitches x 26 rows = 10 x 10 cm.

The knitting tension is very individual; some people knit/crochet loosely while others work tightly. You adjust the knitting tension with the needle size, which is why the suggested needle size only serve as a guide! You need to adjust this (up or down) to ensure that YOUR knitting tension matches the knitting tension provided in the pattern. If you work with a different knitting tension than provided you will have a different yarn consumption, and your work will have different measurements than what the pattern suggests.

The knitting tension also determines which yarns can replace each other. As long as you achieve the same knitting tension you can replace one yarn with another.

See DROPS lesson: How to measure your tension/gauge

See DROPS video: How to make a gauge tension swatch

The required amount of yarn is provided in grams, eg: 450 g. To calculate how many balls you’ll need you first need to know how many grams are in 1 ball (25g, 50g or 100g). This information is available if you click on the individual yarn quality on our pages. Divide the amount required with the amount of each ball. For example, if each ball is 50g (the most common amount), the calculation will be as follows: 450 / 50 = 9 balls.

The important thing when changing from one yarn to another is that the knitting/crochet tension remains the same. This is so that the measurements of the finished piece will be the same as on the sketch provided. It is easier to achieve the same knitting tension using yarns from the same yarn group. It is also possible to work with multiple strands of a thinner yarn to achieve the knitting tension of a thicker one. Please try our yarn converter. We recommend you to always work a test swatch.

Please NOTE: when changing yarn the garment might have a different look and feel to the garment in the photo, due to individual properties and qualities of each yarn.

See DROPS lesson: Can I use a different yarn than the one mentioned in the pattern?

All our yarns are categorised into yarn groups (from A to F) according to thickness and knitting tension – group A contains the thinnest yarns and group F the thickest. This makes it easier for you to find alternative yarns to our patterns, should you wish to switch yarn. All yarns within the same group have a similar knitting tension and can easily replace each other. However, different yarn qualities have different structures and properties which will give the finished work a unique look and feel.

Click here for an overview of the yarns in each yarn group

At the top of all our patterns you’ll find a link to our yarn converter, which is a helpful tool should you wish to use a different yarn than suggested. By filling in the yarn quality you wish to replace, the amount (in your size) and number of strands, the converter will present good alternative yarns with the same knitting tension. Additionally it will tell you how much you’ll require in the new qualities and whether you’ll need to work with multiple strands. Most skeins are 50g (some are 25g or 100g).

If the pattern is worked with multiple colours, every colour will have to be converted separately. Similarly, if the pattern is worked with several strands of different yarns (for example 1 strand Alpaca and 1 strand Kid-Silk) you will have to find alternatives for each, individually.

Click here to see our yarn converter

Since different yarns have different qualities and textures we have chosen to keep the original yarn in our patterns. However, you can easily find options among our available qualities by using our yarn converter, or simply pick a yarn from the same yarn group.

It is possible that some retailers still have discontinued yarns in stock, or that someone has a few skeins at home that they would like to find patterns for.

The yarn converter will provide both alternative yarn as well as required amount in the new quality.

If you think it's hard to decide what size to make, it can be a good idea to measure a garment you own already and like the size of. Then you can pick the size by comparing those measures with the ones available in the pattern's size chart.

You'll find the size chart at the bottom of the pattern.

See DROPS lesson: How to read size chart

The needle size provided in the pattern serves only as a guide, the important thing is to follow the knitting tension. And since knitting tension is very individual, you will have to adjust the needle size to ensure that YOUR tension is the same as in the pattern – maybe you’ll have to adjust 1, or even 2 needle sizes, up or down to achieve the correct tension. For this, we recommend that you work test swatches.

Should you work with a different knitting tension than the one provided, the measurements of the finished garment might deviate from the measurement sketch.

See DROPS lesson: How to measure your tension/gauge

See DROPS video: How to make a gauge tension swatch

Working a garment top-down provides more flexibility and room for personal adjustment. For example it is easier to try the garment on while working, as well as making adjustments to length of yoke and shoulder caps.

The instructions are carefully explaining every step, in the correct order. Diagrams are adjusted to the knitting direction and are worked as usual.

The diagram depicts all rows/rounds, and every stitch seen from the right side. It is read from bottom to top, from right to left. 1 square = 1 stitch.

When working back and forth, every other row is worked from the right side and every other row is worked from the wrong side. When working from the wrong side, the diagram will have to be worked reversed: from left to right, knit stitches are purled, purl stitches are knit etc.

When working in the round every round is worked from the right side and the diagram are worked from right to left on all rounds.

See DROPS lesson: How to read knitting diagrams

The diagram depicts all rows/rounds, and every stitch seen from the right side. It is worked from bottom to top, from right to left.

When working back and forth every other row is worked from the right side: from right to left and every other row is worked from the wrong side: from left to right.

When working in the round, every row in the diagram are worked from the right side, from right to left.

When working a circular diagram you start in the middle and work your way outwards, counter clockwise, row by row.

The rows usually start with a given number of chain stitches (equivalent to the height of the following stitch), this will either be depicted in the diagram or explained in the pattern.

See DROPS lesson: How to read crochet diagrams

Instructions for working several diagrams after each other on the same row/round, will often be written like so: “work A.1, A.2, A.3 a total of 0-0-2-3-4 times". This means you work A.1 once, then A.2 is worked once, and A.3 is repeated (in width) the number of times provided for your size – in this case like so: S = 0 times, M = 0 times, L=2 times, XL= 3 times and XXL = 4 times.

The diagrams are worked as usual: begin with the first row in A.1, then work the first row in A.2 etc.

See DROPS lesson: How to read knitting diagrams

See DROPS lesson: How to read crochet diagrams

The total width of the garment (from wrist-to-wrist) will be larger in the larger sizes, despite the actual sleeves being shorter. The larger sizes have longer sleeve caps and wider shoulders, so there will be a good fit in all sizes.

The measurement sketch/schematic drawing provides information regarding the full length of the garment. If it’s a jumper or a jacket the length is measured from the highest point on the shoulder (usually closest to the neckline), and straight down to the bottom of the garment. It is NOT measured from the tip of shoulder. Similarly, the length of yoke is measured from the highest point on the shoulder and down to where yoke is split into body and sleeves.

See DROPS lesson: How to read a schematic drawing

Diagrams are often repeated on the round or in height. 1 repeat is the diagram the way it appears in the pattern. If it says to work 5 repeats of A.1 in the round, then you work A.1 a total of 5 times after/next to each other in the round. If it says to work 2 repeats of A.1 vertically/in height you work the entire diagram once, then begin again at the start and work the entire diagram one more time.

Chain stitches are slightly narrower than other stitches and to avoid working the cast-on edge too tight, we simply chain more stitches to begin with. The stitch count will be adjusted on the following row to fit the pattern and measurement sketch.

The rib edge is more elastic and will contract slightly compared to, for example, stocking stitch. By increasing before the rib edge, you avoid a visible difference in width between the rib edge and the rest of the body.

It’s very easy to cast off too tightly, and by making yarn overs while casting off (and simultaneously casting these off) you avoid a too tight cast off edge.

See DROPS video: How to bind off with yarn overs (yo)

To achieve an even increase (or decrease) you can increase on, for example: every 3rd and 4th row alternately, like so: work 2 rows and increase on the 3rd row, work 3 rows and increase on the 4th. Repeat this until the increase is complete.

See DROPS lesson: Increase or decrease 1 st on every 3rd and 4th row alternately

Should you prefer to work in the round instead of back and forth, you may of course adjust the pattern. You’ll need to add steeks mid-front (usually 5 stitches), and follow the instructions. When you would normally turn and work from the wrong side, simply work across the steek and continue in the round. At the end you’ll cut the piece open, pick up stitches to work bands, and cover the cut edges.

See DROPS video: How to knit steeks and cut open

Should you prefer to work back and forth instead of in the round, you may of course adjust the pattern so you work the pieces separately and then assemble them at the end. Divide the stitches for the body in 2, add 1 edge stitch in each side (for sewing) and work the front and back pieces separately.

See DROPS lesson: Can I adapt a pattern for circular needles into straight needles?

Pattern repeats can vary slightly in the different sizes, in order to get the correct proportions. If you’re not working the exact same size as the garment in the photo, yours might deviate slightly. This has been carefully developed and adjusted so that the complete impression of the garment is the same in all sizes.

Make sure to follow instructions and diagrams for your size!

If you have found a pattern you like which is available in women’s size it’s not very difficult to convert it to men’s size. The biggest difference will be the length of sleeves and body. Start working on the women size that you think would fit across the chest. The additional length will be worked right before you cast off for the armhole/sleeve cap. If the pattern is worked top-down you can add the length right after the armhole or before the first decrease on sleeve.

Regarding additional yarn amount, this will depend on how much length you add, but it is better with a skein too many than too few.

All yarns will have excess fibres (from production) that might come off as lint or shedding. Brushed yarns (ie hairier yarns) have more of these loose, excess fibres, causing more shedding.

Shedding also depends on what is worn under or over the garment, and whether this pulls at the yarn fibres. It’s therefore not possible to guarantee that there will be no shedding

Below are some tips on how to get the best result when working with hairier yarns:

1. When the garment is finished (before you wash it) shake it vigorously so the looser hairs come off. NOTE: do NOT use a lint roller, brush or any method that pulls at the yarn.

2. Place the garment in a plastic bag and put it in your freezer - the temperature will cause the fibres to become less attached to each other, and excess fibres will come off easier.

3. Leave in the freezer for a few hours before taking it out and shaking it again.

4. Wash the garment according to the instructions on the yarn label.

Pilling is a natural process that happens to even the most exclusive of fibers. It's a natural sign of wear and tear that is hard to avoid, and that is most visible in high friction areas of your garment like a sweater's arms and cuffs.

You can make your garment look as new by removing the pilling, using a fabric comb or a pill/lint remover.

Still can't find the answer you need? Then scroll down and leave your question so one of our experts can try to help you. This will be done normally within 5 to 10 working days.
In the meantime, you can read the questions and answers that others have left to this pattern or join the DROPS Workshop on Facebook to get help from fellow knitters/crocheters!

You might also like...

Strawberry Swing

Anne, Norway

Strawberry Swing

Joe, France

Post a comment to pattern DROPS 202-19

We would love to hear what you have to say about this pattern!

If you want to leave a question, please make sure you select the correct category in the form below, to speed up the answering process. Required fields are marked *.

Comments / Questions (63)

country flag Annette wrote:

Ich scheitere leider schon in der 1. Runde der Passe. Es ist mir ein Rätsel wie ich von 110 angeschlagenen Maschen in dieser ersten Reihe auf 122 Maschen kommen soll. Was übersehe ich?

08.12.2021 - 21:18

DROPS Design answered:

Liebe Annette, es wird bei der 1. Runde der Passe in A.1 und A.3 (Vorder- und Rückenteil = 2 Zunahmen x 4 = 8) je 2 Maschen zugenommen + 4 Umschläge (Ärmel) = 12 Maschen insgesamt werden zugenommen + 110 = 122 Maschen. Diese Lektion erklärt, wie man Diagramme strickt, und kann Ihnen sicher damit helfen. Viel Spaß beim stricken!

09.12.2021 - 07:29

country flag Muriel wrote:

Bonjour, je n'arrive pas à démarrer l'empiècement de ce modèle. Je n'arrive pas à visualiser et à faire le lien entre explications schéma et texte. Je tricote la taille L. Voici ce que je comprends: A1 (7 m, 1j,1m,1j) 30m, (devant) A3(2m,1j,1m,1j), 2m,1j, 10m,1j,2m (manche) A1(7m, 1j,1m,1j) 30m, (dos) 2 m, 1j,10m, 1j,2m (manche) Je n'ai pas le bon nombre de mailles. Pourriez vous m'aider à démarrer le 1er tour, sous forme d'explication. Merci

29.10.2021 - 11:28

DROPS Design answered:

Bonjour Muriel, Un diagramme A.3 a ete omis: A1 (7 m, 1j,1m,1j = 10 m) ; 30 m (devant) ; A3 (2m,1j,1m,1j =5 m) ; 2m, 1j, 10 m, 1j, 2m (manche) A1(7m, 1j,1m,1j) ; 30m, (dos) ; A.3 ; 2 m, 1j, 10m; 1j,2m (manche) : 10+30+5+3+10+3+10+30+5+3+10+3=122 mailles. Bon tricot!

29.10.2021 - 13:54

country flag Stela wrote:

I followed all instructions correctly. I’m confused by the arrow line which doesn’t correspond to switching to A6 and A7. So what does that line represent? ( I understand the purpose of A6 and A 7 - to continue the eyelet. ) Thanks!

26.07.2021 - 15:50

DROPS Design answered:

Dear Stela, when you have increased 29 times on sleeve you work A.6 and A.7, and after you have worked A.1-A.3 on front and back piece, work A.4 and A.5 to the arrow, then continue in pattern as before but without increasing on body until piece measures 28 cm from after neck. The arrow in A.4/A.5 applies to body, not to sleeve. Happy knitting!

27.07.2021 - 09:36

country flag Stela wrote:

Per instructions, I should stop increases after the round marked with arrow. At the same, earlier instructions say there should be a total of 29 increases for M. I am at the arrow line now, with 28 eyelets counting vertically, not 29. I’m at 26 cm. I understand I need to switch to A6 and A7, but find understand when. 3rd paragraph of yoke is really confusing. Thank you!

26.07.2021 - 04:37

DROPS Design answered:

Dear Stella, you increase for sleeves a total of 29 times on every other round, but on front and back piece you first increase as shown in A.1 and A.3 (40 sts in each diagram) then work A.4/A.5 to the arrow (8 sts increased in each diagram). To keep the eyelets as before on sleeve work the first 2 sts on each sleeve as in A.6 and the last 2 sts on each sleeve as in A.7 (= the eyelet will continue as before on raglan line but thanks to the decrease after/before the yarn over, the number of sts on sleeve won't increase anymore). Happy knitting!

26.07.2021 - 09:18

country flag Manuela wrote:

Buongiorno, è la prima volta che provo a lavorare con i circolari, questo è un modello facile? posso allungare la manica? Grazie mille

11.03.2021 - 14:36

DROPS Design answered:

Buongiorno Manuela, è un modello che richiede un po' di attenzione, ma se dovesse aver bisogno di aiuto può scriverci. Per le maniche, può variare la lunghezza come preferisce. Buon lavoro!

11.03.2021 - 23:04

country flag Diana wrote:

Buongiorno, mi piacerebbe realizzare questo maglione, ma ammetto che dall\' alto verso il basso mi mette in difficoltà. Potrei avere lo schema, ma dal basso verso l \'alto e con la lavorazione dei singoli pezzi (davanti/dietro).\r\nGrazie mille Maria malerba

24.02.2021 - 09:32

DROPS Design answered:

Buongiorno Diana, se ci spiega quale difficoltà riscontra nella lavorazione possiamo aiutarla in modo più preciso. Questo modello è stato progettato con questa costruzione e in questa sede non ci è possibile fornirle un'assistenza così personalizzata. Buon lavoro!

24.02.2021 - 14:55

country flag Pia Wettergen wrote:

Strikkes med enkelt eller dobbelt tråd?

03.08.2020 - 09:30

DROPS Design answered:

Hej Pia, enkel tråd :)

03.08.2020 - 14:32

country flag Irina Paglialunga wrote:

Liebes Team, ich stricke gerade Passe und bin an der Stelle angekommen wo ich A1 bis A3 ein mal in der Höhe gestrickt habe es ne habe 350 Maschen auf der Nadel . Jetzt soll ich A 1 , A 2 A3 ( endet mit Umschlag) A4 begibt mit Umschlag (?) das kann doch nicht sein . Bitte um Hilfe. Danke

03.07.2020 - 13:20

DROPS Design answered:

Liebe Frau Paglialunga, über die 121-131 M (siehe Größe) von A.1-A.3 (= Vorder- und Rückenteil) stricken Sie jetzt die Zunahmen weiter, dh: A.4 (anstatt A.1), A.2 wiederholen und mit A.5 (anstatt A.3) enden. So nehmen Sie beim Vorder- und Rückenteil noch extra Maschen, aber bei den Ärmeln wird es nicht mehr zugenommen, einfach A.6 (vor A.4) und A.7 (nach A.5) stricken. Viel Spaß beim stricken!

03.07.2020 - 14:49

country flag Maria wrote:

Dzień dobry. Robię sweter w rozmiarze S. Doszłam do strzałki we wzorze fantazyjnym A.4 i od razu mam liczbę oczek na przód/tył i rękawy (64-131). Pytanie, czy teraz powinnam robić kawałek prosto uwzględniając A.6 i A.7 i jeśli tak, to na jaką wysokość wzoru fantazyjnego i którego wzoru fantazyjnego powinnam użyć na przód/tył. A.2 od pierwszego rzędu mi się nie rozlicza. A.4 ma przesunięcie. Czy od razu podzielić i ominąć A.6 i a.7? Dziękuje za pomoc i pozdrawiam.

16.05.2020 - 23:24

DROPS Design answered:

Witaj Mario! Dalej przerabiać ściegiem fantazyjnym i dżersejem jak wcześniej, ale bez dodawania oczek, aż długość robótki wynosi 26 cm (mierząc od końca wykończenia dekoltu, nie od okrążenia nabierania oczek, a ostatniego przerobionego okrążenia na wykończenie dekoltu, w dół). To znaczy przerabiasz schematy takie jak dotychczas, ale uwzględniając A.6 i A.7, aż otrzymasz długość 26 cm. Na tyle i przodzie powtarzasz schemat A.2. Dopiero później dzielisz robótkę na tył i przód i na rękawy. Powodzenia!

18.05.2020 - 11:59

country flag Marzena Allan wrote:

Thank you for the lovely pattern. Is this correct that A.4 for size XL finishes before size L?

29.03.2020 - 18:18

DROPS Design answered:

Dear Mrs Allan, yes that's correct, you have increased the correct number of sts in size XL at this row, and you will continue working yoke 1 cm more than size L to get the correct width. Happy knitting!

30.03.2020 - 11:14