DROPS Air
DROPS Air
65% Alpaca, 28% Polyamide, 7% Wool
from 5.30 € /50g
Get the yarn to make this pattern from 37.10€.

The yarn cost is calculated from the pattern’s smallest size and the yarn’s cheapest product type. Looking for an even better price? You might find it on the DROPS Deals!

DROPS SS24

Simply Susan

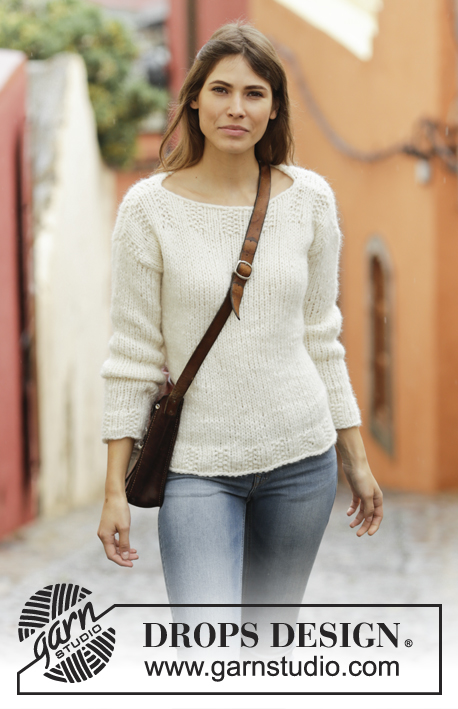
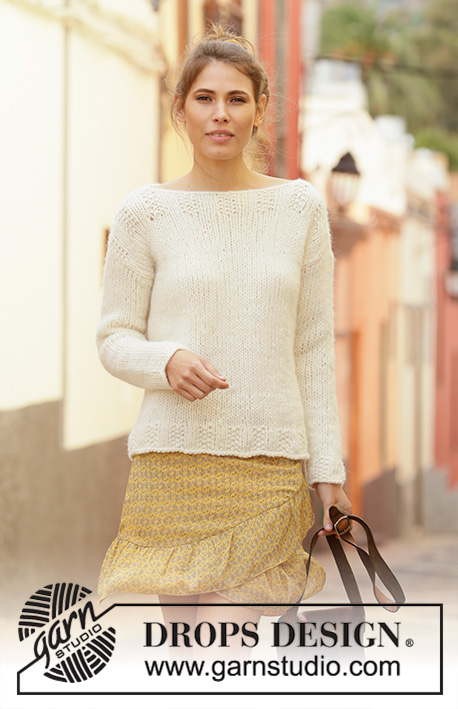
Knitted jumper in 2 strands DROPS Air. Piece is knitted in stocking stitch and moss stitch. Size: S - XXXL

DROPS 199-29
DROPS design: Pattern ai-207
Yarn group C + C or E
----------------------------------------------------------

SIZE:
S - M - L - XL - XXL - XXXL

MATERIALS:
DROPS AIR from Garnstudio (belongs to yarn group C)
350-400-450-500-550-600 g colour 01, off white

KNITTING TENSION:
11 stitches in width and 15 rows vertically in stocking stitch and 2 strands = 10 x 10 cm.

NEEDLES:
DROPS DOUBLE POINTED NEEDLES SIZE 8 mm
DROPS CIRCULAR NEEDLE SIZE 8 mm, length 80 cm for stocking stitch.
DROPS DOUBLE POINTED NEEDLES SIZE 7 mm
DROPS CIRCULAR NEEDLE SIZE 7 mm, length 80 cm for rib.
Needle size is only a suggestion! If you have too many stitches on 10 cm switch to larger needles. If you have too few stitches on 10 cm switch to smaller needles.

----------------------------------------------------------

-------------------------------------------------------

Alternative Yarn – See how to change yarns here
Yarn Groups A to F – Use the same pattern and change the yarn here
Yarn usage using an alternative yarn – Use our yarn converter here

-------------------------------------------------------

DROPS Air
DROPS Air
65% Alpaca, 28% Polyamide, 7% Wool
from 5.30 € /50g
Get the yarn to make this pattern from 37.10€.

The yarn cost is calculated from the pattern’s smallest size and the yarn’s cheapest product type. Looking for an even better price? You might find it on the DROPS Deals!

Pattern instructions

NOTE: This pattern is written in British English. All measurements in charts are in cm. For conversion from cm to inches - click here. There are different terms for crocheting in British and American English. If this pattern includes crochet, click for "crochet terms" here. For this pattern in American English, please click here.
----------------------------------------------------------

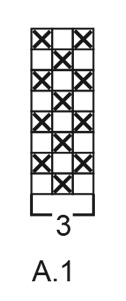
EXPLANATION FOR THE PATTERN:

----------------------------------------------------------

PATTERN: 
See diagram A.1.

DECREASE/INCREASE TIP (evenly):
To calculate how to decrease/increase evenly, use the total number of stitches on row (e.g. 114 stitches) and divide stitches by number of decreased/increases to be done (e.g. 20) = 5.7. In this example decrease by working approx. every 5th and 6th stitch together. When increasing make 1 yarn over (in this example) after approx. every 6th stitch. On next round/row work yarn over twisted to avoid hole.

INCREASE TIP (applies to sleeves):
Work until 1 stitch remains before marker thread, 1 yarn over, knit 2 (marker thread is in the middle of these 2 stitches), 1 yarn over. On next round knit yarn overs twisted to avoid holes. Then work the new stitches in stocking stitch

----------------------------------------------------------

START THE PIECE HERE:

----------------------------------------------------------

JUMPER - SHORT OVERVIEW OF THE PIECE:
Worked in the round on circular needle up to armhole, then work front and back piece back and forth separately. Sleeves are worked in the round on double pointed needles and sewn into armholes when finished.

BODY:
Cast on 114-126-138-144-162-180 stitches on circular needle size 7 mm with 2 strands Air. Knit 1 round. Then work rib as follows: * Knit 3, A.1 (= 3 stitches) *, repeat from *-* the entire round. Work rib like this for 6 cm. Switch to circular needle size 8 mm, knit 1 round while decreasing 20-20-24-22-24-30 stitches evenly - read INCREASE/DECREASE TIP = 94-106-114-122-138-150 stitches. Insert 1 marker thread at the beginning of round and 1 marker thread after the next 47-53-57-61-69-75 stitches, there are now 47-53-57-61-69-75 stitches until the beginning of round. Marker threads mark the sides, move the marker threads upwards when working. Work in stocking stitch. REMEMBER THE KNITTING TENSION! When piece measures 37-38-39-40-41-42 cm, divide the piece at the markers and finish each part separately.

FRONT PIECE:
= 47-53-57-61-69-75 stitches. Begin in the side and work back and forth in stocking stitch. When piece measures 47-49-51-53-55-57 cm, work next row from wrong side as follows: Work 38-41-44-46-51-54 stitches as before, and slip the last 29-29-31-31-33-33 stitches worked on 1 stitch holder for neck, work the remaining 9-12-13-15-18-21 stitches as before.
Work 1 row from right side over the first 9-12-13-15-18-21 stitches as before, turn, tighten yarn and work 1 row from wrong side. Cut the yarn. Slip stitches on 1 stitch holder.
Work 1 row from right side over the last 9-12-13-15-18-21 stitches on needle as before, turn, tighten yarn and work 1 row from wrong side. Cut the yarn.
Slip all stitches on to circular needle size 8 mm = 47-53-57-61-69-75 stitches. Work 1 row in stocking stitch while increasing 4-4-0-2-0-0 stitches evenly - remember DECREASE/INCREASE TIP = 51-57-57-63-69-75 stitches.
Switch to circular needle size 7 mm. Work rib as follows from right side: * A.1 (= 3 stitches), 3 stitches in stocking stitch *, work from *-* until 3 stitches remain, finish with A.1 (= 3 stitches). Continue with rib for 7 cm. Cast off stitches with knit over knit and purl over purl - make sure to avoid a tight cast-off edge (cast of on a larger needle size if needed). Piece measures approx. 54-56-58-60-62-64 cm.

BACK PIECE:
Work as front piece.

SLEEVE:
Cast on 24-24-24-30-30-30 stitches on double pointed needles size 7 mm with 2 strands Air. * Knit 3, A.1 (= 3 stitches) *, repeat from *-* the entire round. Work rib like this for 6 cm. Knit 1 round while increasing 0-2-2-0-0-0 stitches evenly = 24-26-26-30-30-30 stitches. Insert 1 marker at beginning of round and move the marker thread upwards when working. Use marker thread later when increasing mid under sleeve. Switch to double pointed needles size 8 mm. Then work in stocking stitch. When piece measures 9 cm, increase 1 stitch on each side of marker thread mid under sleeve - read INCREASE TIP. Increase like this every 6½-6½-5½-6-5-4 cm 7-7-8-7-8-9 times in total = 38-40-42-44-46-48 stitches. Continue until piece measures 52-50-50-48-46-44 cm (shorter measurements in the larger sizes because of wider shoulders). Cast off but make sure to avoid a tight cast-off edge (switch to a larger needle size if needed). Work the other sleeve the same way.

ASSEMBLY:
Sew shoulder seams, leave approx. 26-27-28-29-30-31 cm for neck. Sew in sleeves.

Diagram

symbols = knit from the right side, purl from the wrong side
symbols = purl from the right side, knit from the wrong side
diagram
diagram

Each of our patterns has specific tutorial videos to help you.

Do you have a question? See a list of frequently asked questions (FAQ)

Knitting tension is what determines the final measurements of your work, and is usually measured per 10 x 10 cm. It is provided like so: number of stitches in width x number of rows in height - eg: 19 stitches x 26 rows = 10 x 10 cm.

The knitting tension is very individual; some people knit/crochet loosely while others work tightly. You adjust the knitting tension with the needle size, which is why the suggested needle size is only meant as a guide! You need to adjust this (up or down) to ensure that YOUR knitting tension matches the knitting tension provided in the pattern. If you work with a different knitting tension than provided you will have a different yarn consumption, and your work will have different measurements than what the pattern suggests.

The knitting tension also determines which yarns can replace each other. As long as you achieve the same knitting tension you can replace one yarn with another.

See DROPS lesson: How to measure your tension/gauge

See DROPS video: How to make a gauge tension swatch

The required amount of yarn is provided in grams, eg: 450 g. To calculate how many balls you’ll need you first need to know how many grams are in 1 ball (25g, 50g or 100g). This information is available if you click on the individual yarn quality on our pages. Divide the amount required with the amount of each ball. For example, if each ball is 50g (the most common amount), the calculation will be as follows: 450 / 50 = 9 balls.

The important thing when changing from one yarn to another is that the knitting/crochet tension remains the same. This is so that the measurements of the finished piece will be the same as on the sketch provided. It is easier to achieve the same knitting tension using yarns from the same yarn group. It is also possible to work with multiple strands of a thinner yarn to achieve the knitting tension of a thicker one. Please try our yarn converter. We recommend you to always work a test swatch.

Please NOTE: when changing yarn the garment might have a different look and feel to the garment in the photo, due to individual properties and qualities of each yarn.

See DROPS lesson: Can I use a different yarn than the one mentioned in the pattern?

All our yarns are categorised into yarn groups (from A to F) according to thickness and knitting tension – group A contains the thinnest yarns and group F the thickest. This makes it easier for you to find alternative yarns to our patterns, should you wish to switch yarn. All yarns within the same group have a similar knitting tension and can easily replace each other. However, different yarn qualities have different structures and properties which will give the finished work a unique look and feel.

Click here for an overview of the yarns in each yarn group

At the top of all our patterns you’ll find a link to our yarn calculator, which is a helpful tool should you wish to use a different yarn than suggested. By filling in the yarn quality you wish to replace, the amount (in your size) and number of strands, the calculator will present good alternative yarns with the same knitting tension. Additionally it will tell you how much you’ll require in the new qualities and whether you’ll need to work with multiple strands. Most skeins are 50g (some are 25g or 100g).

If the pattern is worked with multiple colours, every colour will have to be calculated separately. Similarly, if the pattern is worked with several strands of different yarns (for example 1 strand Alpaca and 1 strand Kid-Silk) you will have to find alternatives for each, individually.

Click here to see our yarn calculator

Since different yarns have different qualities and textures we have chosen to keep the original yarn in our patterns. However, you can easily find options among our available qualities by using our yarn calculator, or simply pick a yarn from the same yarn group.

It is possible that some retailers still have discontinued yarns in stock, or that someone has a few skeins at home that they would like to find patterns for.

The yarn calculator will provide both alternative yarn as well as required amount in the new quality.

If you think it's hard to decide what size to make, it can be a good idea to measure a garment you own already and like the size of. Then you can pick the size by comparing those measures with the ones available in the pattern's size chart.

You'll find the size chart at the bottom of the pattern.

See DROPS lesson: How to read size chart

The needle size provided in the pattern serves only as a guide, the important thing is to follow the knitting tension. And since knitting tension is very individual, you will have to adjust the needle size to ensure that YOUR tension is the same as in the pattern – maybe you’ll have to adjust 1, or even 2 needle sizes, up or down to achieve the correct tension. For this, we recommend that you work test swatches.

Should you work with a different knitting tension than the one provided, the measurements of the finished garment might deviate from the measurement sketch.

See DROPS lesson: How to measure your tension/gauge

See DROPS video: How to make a tension/gauge swatch

Working a garment top-down provides more flexibility and room for personal adjustment. For example it is easier to try the garment on while working, as well as making adjustments to length of yoke and shoulder caps.

The instructions are carefully explaining every step, in the correct order. Diagrams are adjusted to the knitting direction and are worked as usual.

The diagram depicts all rows/rounds, and every stitch seen from the right side. It is read from bottom to top, from right to left. 1 square = 1 stitch.

When working back and forth, every other row is worked from the right side and every other row is worked from the wrong side. When working from the wrong side, the diagram will have to be worked reversed: from left to right, knit stitches are purled, purl stitches are knit etc.

When working in the round every round is worked from the right side and the diagram are worked from right to left on all rounds.

See DROPS lesson: How to read knitting diagrams

The diagram depicts all rows/rounds, and every stitch seen from the right side. It is worked from bottom to top, from right to left.

When working back and forth every other row is worked from the right side: from right to left and every other row is worked from the wrong side: from left to right.

When working in the round, every row in the diagram are worked from the right side, from right to left.

When working a circular diagram you start in the middle and work your way outwards, counter clockwise, row by row.

The rows usually start with a given number of chain stitches (equivalent to the height of the following stitch), this will either be depicted in the diagram or explained in the pattern.

See DROPS lesson: How to read crochet diagrams

Instructions for working several diagrams after each other on the same row/round, will often be written like so: “work A.1, A.2, A.3 a total of 0-0-2-3-4 times". This means you work A.1 once, then A.2 is worked once, and A.3 is repeated (in width) the number of times provided for your size – in this case like so: S = 0 times, M = 0 times, L=2 times, XL= 3 times and XXL = 4 times.

The diagrams are worked as usual: begin with the first row in A.1, then work the first row in A.2 etc.

See DROPS lesson: How to read knitting diagrams

See DROPS lesson: How to read crochet diagrams

The total width of the garment (from wrist-to-wrist) will be larger in the larger sizes, despite the actual sleeves being shorter. The larger sizes have longer sleeve caps and wider shoulders, so there will be a good fit in all sizes.

The measurement sketch/schematic drawing provides information regarding the full length of the garment. If it’s a jumper or a jacket the length is measured from the highest point on the shoulder closest to the neckline, and straight down to the bottom of the garment. It is NOT measured from the tip of shoulder. Similarly, the length of yoke is measured from the highest point on the shoulder and down to where yoke is split into body and sleeves.

On a jacket measures are never taken along bands, unless specifically stated. Always measure inside band stitches when measuring the length.

See DROPS lesson: How to read a schematic drawing

Diagrams are often repeated on the round or in height. 1 repeat is the diagram the way it appears in the pattern. If it says to work 5 repeats of A.1 in the round, then you work A.1 a total of 5 times after/next to each other in the round. If it says to work 2 repeats of A.1 vertically/in height you work the entire diagram once, then begin again at the start and work the entire diagram one more time.

Chain stitches are slightly narrower than other stitches and to avoid working the cast-on edge too tight, we simply chain more stitches to begin with. The stitch count will be adjusted on the following row to fit the pattern and measurement sketch.

The rib edge is more elastic and will contract slightly compared to, for example, stocking stitch. By increasing before the rib edge, you avoid a visible difference in width between the rib edge and the rest of the body.

It’s very easy to cast off too tightly, and by making yarn overs while casting off (and simultaneously casting these off) you avoid a too tight cast off edge.

See DROPS video: How to bind off with yarn overs (yo)

To achieve an even increase (or decrease) you can increase on, for example: every 3rd and 4th row alternately, like so: work 2 rows and increase on the 3rd row, work 3 rows and increase on the 4th. Repeat this until the increase is complete.

See DROPS lesson: Increase or decrease 1 st on every 3rd and 4th row alternately

Should you prefer to work in the round instead of back and forth, you may of course adjust the pattern. You’ll need to add steeks mid-front (usually 5 stitches), and follow the instructions. When you would normally turn and work from the wrong side, simply work across the steek and continue in the round. At the end you’ll cut the piece open, pick up stitches to work bands, and cover the cut edges.

See DROPS video: How to knit steeks and cut open

Should you prefer to work back and forth instead of in the round, you may of course adjust the pattern so you work the pieces separately and then assemble them at the end. Divide the stitches for the body in 2, add 1 edge stitch in each side (for sewing) and work the front and back pieces separately.

See DROPS lesson: Can I adapt a pattern for circular needles into straight needles?

Pattern repeats can vary slightly in the different sizes, in order to get the correct proportions. If you’re not working the exact same size as the garment in the photo, yours might deviate slightly. This has been carefully developed and adjusted so that the complete impression of the garment is the same in all sizes.

Make sure to follow instructions and diagrams for your size!

If you have found a pattern you like which is available in women’s size it’s not very difficult to convert it to men’s size. The biggest difference will be the length of sleeves and body. Start working on the women size that you think would fit across the chest. The additional length will be worked right before you cast off for the armhole/sleeve cap. If the pattern is worked top-down you can add the length right after the armhole or before the first decrease on sleeve.

Regarding additional yarn amount, this will depend on how much length you add, but it is better with a skein too many than too few.

All yarns will have excess fibres (from production) that might come off as lint or shedding. Brushed yarns (ie hairier yarns) have more of these loose, excess fibres, causing more shedding.

Shedding also depends on what is worn under or over the garment, and whether this pulls at the yarn fibres. It’s therefore not possible to guarantee that there will be no shedding

Below are some tips on how to get the best result when working with hairier yarns:

1. When the garment is finished (before you wash it) shake it vigorously so the looser hairs come off. NOTE: do NOT use a lint roller, brush or any method that pulls at the yarn.

2. Place the garment in a plastic bag and put it in your freezer - the temperature will cause the fibres to become less attached to each other, and excess fibres will come off easier.

3. Leave in the freezer for a few hours before taking it out and shaking it again.

4. Wash the garment according to the instructions on the yarn label.

Pilling is a natural process that happens to even the most exclusive of fibers. It's a natural sign of wear and tear that is hard to avoid, and that is most visible in high friction areas of your garment like a sweater's arms and cuffs.

You can make your garment look as new by removing the pilling, using a fabric comb or a pill/lint remover.

Still can't find the answer you need? Then scroll down and leave your question so one of our experts can try to help you. This will be done normally within 5 to 10 working days.
In the meantime, you can read the questions and answers that others have left to this pattern or join the DROPS Workshop on Facebook to get help from fellow knitters/crocheters!

You might also like...

Post a comment to pattern DROPS 199-29

We would love to hear what you have to say about this pattern!

If you want to leave a question, please make sure you select the correct category in the form below, to speed up the answering process. Required fields are marked *.

Comments / Questions (12)

country flag EK wrote:

Hej! Lige såvel som ryg- og forstykke starter med en pind (omg) ret, mener jeg også at ærmerne burde starte med en omgang ret , så opslagskanten bliver ens på både ærmer og ryg- og forstykke. Hvad mener I? Bedste hilsner, Else

10.08.2023 - 10:23

DROPS Design answered:

Hej, vi har ikke gjort det, men det må du naturligvis meget gerne gøre :)

11.08.2023 - 10:19

country flag Simply Susan wrote:

Kan jeg strikke bare med 1 tråd i denne oppskriften (199-29)

02.11.2022 - 11:47

DROPS Design answered:

Hej Simply Susan, ja det kan du men da skal du strikke med et tykkere garn som DROPS Snow eller DROPS Wish - Brug vår garnkalkulator :)

02.11.2022 - 13:47

country flag Amanda Marginson wrote:

Thank you so much for the free pattern which was chosen by my mum... easy to follow and 8 purchased my Drops Air wool which worked perfectly xx

28.07.2022 - 22:59

country flag Amanda Marginson wrote:

Hi, I'm making this for my Mum...how many balls of Drops "air" yarn are needed to make the large size and the medium size... not sure which she is, but large should cover it. Thank you

28.05.2022 - 08:57

DROPS Design answered:

Dear Amanda, for the L size you need 450 g = 9 balls of DROPS Air. For size M you need one ball less. Happy knitting!

28.05.2022 - 17:08

country flag Vacelet wrote:

Les explications ne semblent pas correspondre au modèle pour le dos et le devant. Le schéma montre un dos et un devant avec la même largeur sur toute la hauteur, je ne comprends pas pourquoi les explications indiquent des augmentations et la fin avec des aiguilles circulaires de 7

24.08.2021 - 11:16

DROPS Design answered:

Bonjour Mme Varcelet, les côtes sont tricotes sur les aiguilles no 7 (A.1). Je ne vois pas d’augmentations. Par contre on diminue les mailles apres le cotes parce que la bordure en côtes est plus élastique et contracte légèrement l'ouvrage en largeur par rapport au jersey par exemple. On diminue apres la bordure en côtes pour que la différence entre la bordure côtes et le reste de l'ouvrage soit moins visible. Bon tricot!

07.10.2021 - 09:30

country flag Brit Slotboom wrote:

Tel patroon Drops 199-29 Simply Susan Volgens de omschrijving van dit patroon wordt gebreid in tricotsteek en gerstekorrel: dat zie je ook in de boord op de foto. De omschrijving van die boordsteek in het telpatroon klopt echter niet. Het kan zo niet worden als op de foto. Wat het moet zijn is: Na de eerste toer (na opzet) geheel recht: Tweede toer: *3 av, 1r-1av-1r* herhaal Derde toer: brei tricotsteek boven 3 av en dan 3 st gerstekorrel , dus: *3r, 1 av-1r-1av* herhaal

07.05.2020 - 14:24

country flag Annalisa wrote:

Sto lavorando seguendo il modello per la taglia XXXL quindi sul davanti a 57cm ho 75 magli e devo proseguire lavorando 54 maglie a rovescio,mettere su ferma maglie 33 lavorate per lo scollo(?) ele rimanenti 21 maglie come prima. Se ne ho in tutto 75,dove sono le 33 dello scollo?

08.11.2019 - 10:59

DROPS Design answered:

Buongiorno Annalisa. Deve mettere in attesa le 33 maglie centrali del davanti. Le rimarranno 21 maglie per ognuna delle due spalle. Per evitare di tagliare il filo, lavora in questo modo: lavora 54 maglie, mette in attesa le ultime 33 maglie di queste 54 m che sono sul ferro destro (e quindi le rimangono sul ferro 21 maglie lavorate per la spalla) e poi lavora le ultime 21 maglie che sono ancora sul ferro di sinistra. Buon lavoro!

08.11.2019 - 12:16

country flag Annalisa wrote:

Sto lavorando seguendo il modello per la taglia XXXL quindi sul davanti a 57cm ho 75 magli e devo proseguire lavorando 54 maglie a rovescio,mettere su ferma maglie 33 lavorate per lo scollo(?) ele rimanenti 21 maglie come prima. Se ne ho in tutto 75,dove sono le 33 dello scollo?

08.11.2019 - 10:58

country flag Sylvia wrote:

Für mich als Anfänger war er sehr einfach zu stricken und bin sehr begeistert von dem Resultat. Ein super schicker Pulli!

18.07.2019 - 00:23

country flag Magda wrote:

Bardzo ładna bluzka. Nadaje się na wiele okazji. No i nie jest taka trudna do zrobienia.

25.05.2019 - 15:25