
Popular categories
Looking for a yarn?


|
||||||||||||||||||||||||||||||||||||||||||||||
Egyptian Feathers Jacket |
||||||||||||||||||||||||||||||||||||||||||||||
|
|
||||||||||||||||||||||||||||||||||||||||||||||
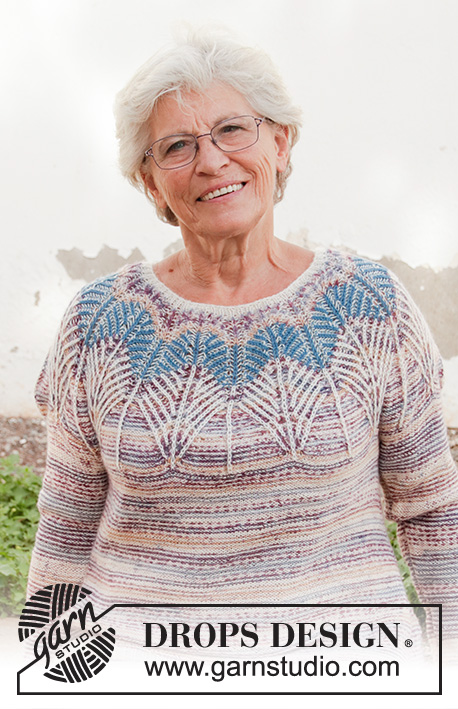
Knitted jacket with round yoke in DROPS Fabel. The piece is worked top down with 2-colored English rib and zigzag stripes. Sizes S - XXXL.
DROPS 201-29 |
||||||||||||||||||||||||||||||||||||||||||||||
|
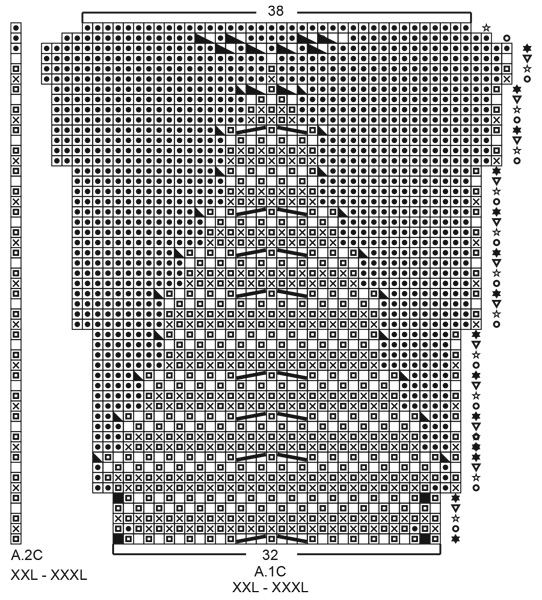
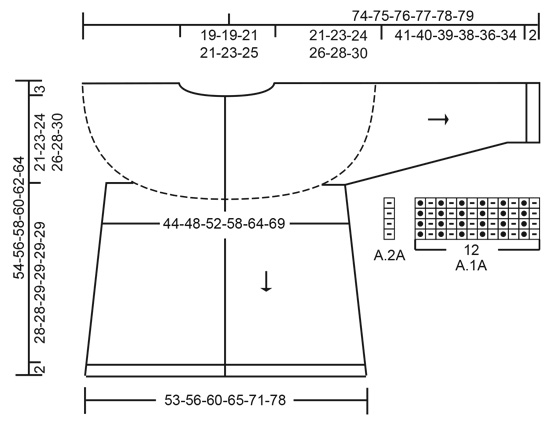
------------------------------------------------------- EXPLANATIONS FOR THE PATTERN: ------------------------------------------------------- RIDGE/GARTER STITCH (worked back and forth): Knit all rows. 1 ridge in height = Knit 2 rows. GARTER STITCH BAND (worked back and forth like this because of English rib pattern): ROW 1 (= from right side): Knit. ROW 2 (= from right side): Purl. ROW 3 (= from wrong side): Purl. ROW 4 (= from wrong side): Knit. PATTERN: See diagrams A.1 and A.2. Choose diagram for your size. First work A.1A/A.2A (= rib on neck). When A.A has been worked 1 time in height work A.1B/A.2B over A.A. When A.B has been worked 1 time in height work A.1C/A.2C over A.B. STRIPES: When working 2-colored English rib, work back and forth with circular needle as follows: Work row 1 from the right side with color-2, push all stitches back to the other end of the circular needle so the next row is also worked from the right side with color-1. Then turn the piece, work 1 row from the wrong side with color-2, push all stitches back to the other end of the circular needle so the next row is also worked from the wrong side with color-1. So you work 2 rows from the right side with different colors and 2 rows from the wrong side with different colors. Work stripes in English rib, i.e. color-1 = used for knitted stitch from right side and color-2 = used for purled stitch from right side. Adjust so that each stripe finishes after 2 rows from the wrong side. STRIPE 1: Color-1 = lavender, color-2 = off white. Work until the piece measures 5 cm = 2" at the shortest point. STRIPE 2: Color-1 = grey blue, color-2 = off white. Work until the piece measures a total of 9 cm = 3½" at the shortest point. STRIPE 3: Color-1 = off white, color-2 = lavender. Work until A.1c and A.2c have been worked 1 time in height. The last row in the diagram is worked with lavender from the right side. Then continue the stripes on yoke and body as follows (bands in garter stitch are worked as before): ROW 1: Purl with off white. ROW 2: Knit with lavender. Push all stitches to other end of circular needle so the next row is also from the wrong side. ROW 3 (= wrong side): Knit with off white. ROW 4 (= right side): Purl with lavender. Push all stitches to other end of circular needle so the next row is also from the right side. Repeat rows 1 to 4. KNITTING TIP-1: If you are in doubt about which color to use on next row, you can see the color used on the previous row by looking at the bands. KNITTING TIP-2: All stitch counts when working English rib are without yarn overs, because the yarn overs belong to the knitted stitches and are therefore counted as 1 stitch (unless otherwise stated). DECREASE TIP (for mid under sleeves): Decrease 1 stitch on each side of the marker thread as follows: Work until there are 3 stitches left before the marker thread, purl 2 together, purl 2 (marker thread sits between these 2 stitches), purl 2 stitches twisted together (2 stitches decreased). INCREASE TIP-1 (evenly spaced): To work out how to increase evenly, count the total number of stitches on the needle (e.g. 331 stitches) minus bands (e.g. 10 stitches) and divide the remaining stitches by the number of increases to be made (e.g. 4) = 80.25. In this example, increase by making 1 yarn over after approx. each 80th stitch. Do not increase on bands. On the next row (wrong side) work the yarn overs twisted to avoid holes. INCREASE TIP-2 (for sides of body): All increases are worked from the right side! Work until there are 2 stitches left before marker thread, 1 yarn over, purl 4 (marker thread sits in middle of these 4 stitches), 1 yarn over (= 2 stitches increased). On the next row (wrong side) knit the yarn overs twisted to avoid holes. Then purl the new stitches from the right side and knit from the wrong side. BUTTONHOLES: Work buttonholes on right band (when garment is worn). Work from the right side when there are 3 stitches left on row as follows: Make 1 yarn over, work 2 together and work the last stitch. On the next row (wrong side) work the yarn over normally to leave a hole. The first buttonhole is worked when the neck measures 1½-2 cm = ½"-¾". Then work the other 5-5-6-6-6-6 buttonholes with approx. 9-9-8-8-8½-9 cm = 3½"-3½"-3⅛"-3⅛"-3¼"-3½" between each one. ------------------------------------------------------- START THE PIECE HERE: ------------------------------------------------------- JACKET - SHORT OVERVIEW OF THE PIECE: Neck and yoke are worked back and forth with circular needle from mid front, top down. The yoke is worked in 2-colored English rib with zigzag, then continue with stockinette stitch with wrong side out and stripes with 1 row in each color. The yoke is divided for body and sleeves. The body is continued back and forth from mid front. The sleeves are worked in the round with short circular needle/double pointed needles, top down. NECK: Cast on 131-143-143-155-155-167 stitches (including 5 band stitches on each side towards mid front) with circular needle size 2.5 mm = US 1,5 and off-white. Work as follows from the wrong side: Knit 5 band stitches, purl until there are 5 stitches left and knit these 5 stitches. Then work pattern as follows: Work 5 band stitches in GARTER STITCH – read description above, work A.1A until there are 6 stitches left on row (= a total of 10-11-11-12-12-13 repeats of 12 stitches), A.2A (= 1 stitch) and finish with 5 band stitches in garter stitch– remember BUTTONHOLE – read description above. When A.1A and A.2A have been worked 1 time in height, work yoke as described below. YOKE: Change to circular needle size 3 mm = US 2,5 and work pattern as follows (first row from the right side with off-white): Work 5 stitches in GARTER STITCH BANDS – read description above, A.1B until there are 6 stitches left on row (= a total of 10-11-11-12-12-13 repeats of 12 stitches), A.2B (= 1 stitch) and finish with 5 stitches in garter stitch bands. Push all stitches back to the other end of the circular needle so the next row can be worked with color-1 from the right side. Read STRIPES, KNITTING TIP-1 and KNITTING TIP-2 and REMEMBER THE KNITTING GAUGE! When A.1B and A.2B have been worked 1 time in height there are 251-275-319-347-395-427 stitches on the needle. The piece measures approx. 9-9-9-9-11-11 cm = 3½"-3½"-3½"-3½"-4⅜"-4⅜" from the cast-on edge mid front. Now work A.1C over A.1B and A.2C over A.2B. When A.1C and A.2C have been worked 1 time in height there are 331-363-407-443-467-505 stitches on the needle. The piece measures approx. 17-17-19-19-21-21 cm = 6¾"-6¾"-7½"-7½"-8¼"-8¼" from the cast-on edge mid front. Continue with knit from wrong side and purl from right side, 5 stitches in garter stitch bands on each side and with stripes as before. When the piece measures 19-19-21-21-21-21 cm = 7½"-7½"-8¼"-8¼"-8¼"-8¼" from the cast-on edge increase stitches evenly spaced as follows: Increase 4-4-4-4-8-8 stitches every 2 cm = ¾" a total of 1-2-1-1-2-2 times = 335-371-411-447-483-521 stitches – read INCREASE TIP-1. When the piece measures 21-23-24-26-28-30 cm = 8¼"-9"-9½"-10¼"-11"-11¾" from the cast-on edge (measured along the band) divide the piece for body and sleeves as follows: Work 5 stitches in garter stitch bands and work the next 49-53-58-66-72-78 stitches as before (= front piece), place the next 64-74-84-88-92-98 stitches on 1 thread for sleeve, cast on 8 new stitches on the needle (= in side under sleeve), work the next 99-107-117-129-145-159 stitches as before (= back piece), place the next 64-74-84-88-92-98 stitches on 1 thread for sleeve, cast on 8 new stitches on the needle (= in side under sleeve) and work the next 49-53-58-66-72-78 stitches as before, finishing with 5 stitches in garter stitch bands. Body and sleeves are finished separately. THE PIECE IS NOW MEASURED FROM HERE! BODY: = 223-239-259-287-315-341 stitches. Insert 1 marker thread on each side of the body, in the middle of the 8 stitches cast on under each sleeve. Allow the marker threads to follow your work onwards; they are used when increasing in the sides. Continue back and forth with stripes as before with knit from the wrong side, purl from the right side and 5 stitches in garter stitch bands on each side towards mid front. When the piece measures 2 cm = ¾" from the division increase 1 stitch on each side of both marker threads – read INCREASE TIP-2 (= 4 stitches increased). Increase like this every 2½-2½-2½-3-3-2½ cm = 1"-1"-1"-1⅛"-1⅛"-1" a total of 10-10-10-9-9-11 times = 263-279-299-323-351-385 stitches. Continue working until the piece measures 28-28-29-29-29-29 cm = 11"-11"-11⅜"-11⅜"-11⅜"-11⅜" from the division (or to desired length; there is 2 cm = ¾" left to finished length). Purl 1 row from the wrong side (bands worked as before), where you increase 18-20-18-18-17-19 stitches evenly spaced (not on bands) = 281-299-317-341-368-404 stitches. Change to circular needle size 2.5 mm = US 1,5 and work rib as follows with off-white (first row from right side): 5 stitches in garter stitch *knit 1, purl 2*, work from *-* until there are 6 stitches left, knit 1 and finish with 5 band stitches in garter stitch. Work this rib for 2 cm = ¾". Loosely bind off with garter stitch over garter stitch, knit over knit and purl over purl. The jacket measures approx. 54-56-58-60-62-64 cm = 21¼"-22"-22¾"-23⅝"-24⅜"-25¼" from the shoulder down. SLEEVE: Place the 64-74-84-88-92-98 stitches from the thread on the 1 side of the piece on short circular needle/double pointed needles size 3 mm = US 2,5 and knit up 1 stitch in each of the 8 stitches cast on under the sleeve = 72-82-92-96-100-106 stitches. Insert 1 marker thread in the middle of the 8 stitches cast on under the sleeve. Allow the marker threads to follow your work onwards; they will be used when decreasing under the sleeve. Start the round by the marker thread and purl in the round with stripes with alternately 1 round off white and 1 round lavender. When the piece measures 2 cm = ¾" from the division decrease 2 stitches mid under sleeve – read DECREASE TIP. Decrease like this every 4-2½-2-1½-1½-1½ cm = 1½"-1"-¾"-½"-½"-½" a total of 9-13-17-18-19-21 times = 54-56-58-60-62-64 stitches. Continue working until the piece measures 41-40-39-38-36-34 cm = 16⅛"-15¾"-15¼"-15"-14¼"-13⅜" from the division (or to desired length; there is 2 cm = ¾" left to finished length. NOTE: Shorter measurements in larger sizes due to wider neck and longer yoke). Knit 1 round where you increase 0-1-2-0-1-2 stitches evenly spaced = 54-57-60-60-63-66 stitches. Change to double pointed needles size 2.5 mm = US 1,5 and work rib in the round with off-white (= knit 1/ purl 2) for 2 cm = ¾". Loosely bind off with knit over knit and purl over purl. The sleeve measures approx. 44-43-42-41-39-37 cm = 17¼"-17"-16½"-16⅛"-15¼"-14½" from the division. Work the other sleeve in the same way. ASSEMBLY: Sew buttons onto left band. |
||||||||||||||||||||||||||||||||||||||||||||||
Diagram explanations |
||||||||||||||||||||||||||||||||||||||||||||||
|
||||||||||||||||||||||||||||||||||||||||||||||

|
||||||||||||||||||||||||||||||||||||||||||||||

|
||||||||||||||||||||||||||||||||||||||||||||||

|
||||||||||||||||||||||||||||||||||||||||||||||

|
||||||||||||||||||||||||||||||||||||||||||||||

|
||||||||||||||||||||||||||||||||||||||||||||||
|
||||||||||||||||||||||||||||||||||||||||||||||
|
||||||||||||||||||||||||||||||||||||||||||||||
|
Have you made this or any other of our designs? Tag your pictures in social media with #dropsdesign so we can see them! Do you need help with this pattern?You'll find tutorial videos, a Comments/Questions area and more by visiting the pattern on garnstudio.com. © 1982-2024 DROPS Design A/S. We reserve all rights. This document, including all its sub-sections, has copyrights. Read more about what you can do with our patterns at the bottom of each pattern on our site. |
||||||||||||||||||||||||||||||||||||||||||||||


With over 40 years in knitting and crochet design, DROPS Design offers one of the most extensive collections of free patterns on the internet - translated to 17 languages. As of today we count 304 catalogs and 11422 patterns - 11417 of which are translated into English (US/in).
We work hard to bring you the best knitting and crochet have to offer, inspiration and advice as well as great quality yarns at incredible prices! Would you like to use our patterns for other than personal use? You can read what you are allowed to do in the Copyright text at the bottom of all our patterns. Happy crafting!
Comments / Questions (56)
Beste, Voor de hals staat dat ik A.1A en A.2A moet breien maar dit patroon staat er precies niet tussen, kan dat kloppen ? Mvg, M.-C. Snoeckx
02.10.2020 - 22:04DROPS Design answered:
Dag Marie-Christiane,
Deze staan een beetje 'verstopt' onder de tekening met de maten (onder de mouw)
05.10.2020 - 11:49Hei! Gleder meg til å starte. Men har lest gjennom hele oppskriften flere ganger og kan ikke finne diagram for A1A og A2A?
23.09.2020 - 07:53DROPS Design answered:
Hej Kristi. Du hittar de längst ner, till höger om måttskissen. Mvh DROPS Design
23.09.2020 - 11:47Jeg vil gjerne ha hjelp fra en av dere som har strikket denne jakken. Nå har jeg rekket opp 5 ganger og har egentlig gitt opp å få til jakken. Men jeg har strikket i mange år og aldri stått fast før så jeg gir meg ikke enda. Er det en av dere her inne som kan være min mentor :) ?
11.05.2020 - 16:10DROPS Design answered:
Hei Randi. Vi skal hjelpe deg så godt vi kan. Fint om du kort kan forklarer hva du har problemer med, husk å skrive hvilken størrelse det gjelder. Se gjerne igjennom spørsmål og svar under, kanskje noen har hatt samme problem og fått svar. Ta også en titt på hjelpevideoene til denne jakken, kanskje det kan hjelpe. mvh DROPS design
18.05.2020 - 10:13Hurra! Nå forstår jeg økningene. Kanskje det er lurt å gjøre oppmerksom på i strikketipsene at økningen inngår i mønsteret. Kan kanskje være flere enn meg som ikke er så rutinerte at de skjønner det?! Takk for hjelpen!
12.03.2020 - 13:33Jeg står fortsatt fast ved første økning i diagrammet A.1B. Den forklaringen jeg fikk, ser for meg ut som en del av mønsteret (med symbol svart). Ved første økning vises det to masker mer på hver side - uten at det er beskrevet hvordan dette skal gjøres.
11.02.2020 - 22:16DROPS Design answered:
Hej Aud, første øgning i diagrammet er en del af mønsteret....
12.02.2020 - 08:12Ik brei 201-29 en heb nu de boord met naturel gebreid .Wil nu verder met pas . Hoe weet ik nu wat kleur 1 en kleur 2 zijn. En moet je patroon b en c over elkaar heen breien , zo ja hoe doe je dat. Vind nl het patroon moeilijk te lezen. Terwijl ik vaak gebreid heb. Dank u voor de hulp
01.02.2020 - 12:05DROPS Design answered:
Dag Antje,
Bovenaan in het patroon bij 'STREPEN' staat wat kleur 1 en kleur 2 is. (Dit hangt dus af van welke streep je aan het breien bent.) Als je A.1b hebt gebreid, dan brei je A.1c daar achteraan. Niet over elkaar, maar boven elkaar :), dus ze sluiten in de hoogte op elkaar aan.
10.02.2020 - 23:54Een mooi patroon!\r\nIk ben van plan dit te breien voor een vriendin alleen zij heeft een erg tenger postuur dus een maat s zal ruim uitvallen voor haar. Hebben jullie enig idee hoe ik de verhoudingen van het patroon zo moet aanpassen dat het een maat kleiner uitvalt? Alvast bedankt!
08.01.2020 - 16:31Ik ben aangeland bij de eerste minderingen van A.1B, op de verkeerde kant. Ik begrijp de beschrijving niet goed, vooral het tweede deel. Welke ‘steek plus omslag’ haal je de tweede keer over? De volgende op de linkernaald? Het resultaat lijkt niet mooi op de goede kant (wel op de verkeerde!). Ik kan geen tutorial vinden voor minderen op de verkeerde kant....alleen op de goede kant.
29.12.2019 - 11:44DROPS Design answered:
Dag Marijke,
Nadat je de steek weer op de linker naald hebt gezet, haal je inderdaad de 2 steken die daarnaast op de linker naald staan over de zojuist geplaatste steek. Daarna ze je de steek weer terug op de rechter naald. Kan het zijn dat je die laatste terugplaatsing gedraaid hebt gedaan, waardoor het er niet mooi uitziet op de voorkant? Helaas is er geen video van.
04.01.2020 - 19:43Hei! Jeg har akkurat begynt på jakken, men synes det er litt vanskelig, selv om jeg har strikket ganske mye. Jeg lurer på når det står at man skal skyve alle maskene tilbake til andre enden. Må jeg da kutte tråden? Jeg tok alle maskene tilbake, men da er jo tråden på andre siden.
22.12.2019 - 09:56DROPS Design answered:
Hej Kristin, jo men du strikker med flere farver og nøster. Læs stykket med STRIPER :)
15.01.2020 - 14:10Jeg strever fortsatt. Har altså kommet til den første økningen på diagrammet, hvor det skal økes to m. på hver side av hver mønsterrapport. Jeg er ikke i stand til å finne noen beskrivelse på hvordan dette gjøres. Hverken video eller økebeskrivelse passer på det jeg skal gjøre synes jeg. Det står ett sted at alle økninger skal foretas fra retten. Men diagrammet sier at økningspinnen skal strikkes fra vrangen??? Håper på godt svar denne gangen også!! Takk!
16.12.2019 - 20:43DROPS Design answered:
Hej, Jo du øger ifølge diagrammet, symbolet er sort og således står det i symbolforklaringen: = fra vrangen: øk 2 masker med farge-2 slik: Strikk 3 masker i rettmasken og kastet slik: Strikk kastet og rettmasken rett sammen, men vent med å løfte masken av pinnen, lag 1 kast om høyre pinne og strikk masken og kastet rett sammen 1 gang til = 3 masker
15.01.2020 - 11:45